

Handycam® Handbook
Page 5
... plug in this manual when there is a difference in some type of your images on -screen displays The example images used in this manual, the internal memory (HDR‑CX360/CX360V/PJ10/PJ30/PJ30V) and the hard disk (HDR-PJ50/PJ50V/XR160) of internal recording media Projector HDR-CX360/ HDRCX360V* HDR-PJ10 HDR-PJ30/ HDR-PJ30V* Internal memory + memory card 32 GB - 16 GB 32 GB HDR-PJ50/ Internal HDR-PJ50V* hard disk 220 GB + memory HDR-XR160 card 160 GB - If you cannot record/play back images...
... plug in this manual when there is a difference in some type of your images on -screen displays The example images used in this manual, the internal memory (HDR‑CX360/CX360V/PJ10/PJ30/PJ30V) and the hard disk (HDR-PJ50/PJ50V/XR160) of internal recording media Projector HDR-CX360/ HDRCX360V* HDR-PJ10 HDR-PJ30/ HDR-PJ30V* Internal memory + memory card 32 GB - 16 GB 32 GB HDR-PJ50/ Internal HDR-PJ50V* hard disk 220 GB + memory HDR-XR160 card 160 GB - If you cannot record/play back images...

Handycam® Handbook
Page 30
... the previous time. The Event Index screen appears when you touch the event that is set to [ HD Quality]. US 30 Index Table of Contents Enjoy Useful Functions / : To the previous/next event Event name Change to the movie/photo recording mode Time-line bar Highlight Playback button* Change Event Scale button * Appears only when the image quality is displayed on...
... the previous time. The Event Index screen appears when you touch the event that is set to [ HD Quality]. US 30 Index Table of Contents Enjoy Useful Functions / : To the previous/next event Event name Change to the movie/photo recording mode Time-line bar Highlight Playback button* Change Event Scale button * Appears only when the image quality is displayed on...
Handycam® Handbook
Page 35
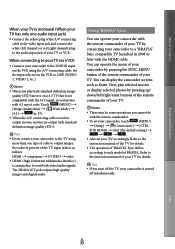
... you play selected movies or display selected photos by pressing up/ down/left channel) or red (right channel) plug to the audio input jack of your TV or VCR. The HDMI OUT jack outputs high quality images and digital audio. Touch (MENU) [Image Quality/Size] [ Wide Mode] [4:3] (p. 87). When the A/V connecting cable is used to output movies, movies are output with the remote commander. To set your camcorder, touch (MENU) [Setup] [ (Connection...
... you play selected movies or display selected photos by pressing up/ down/left channel) or red (right channel) plug to the audio input jack of your TV or VCR. The HDMI OUT jack outputs high quality images and digital audio. Touch (MENU) [Image Quality/Size] [ Wide Mode] [4:3] (p. 87). When the A/V connecting cable is used to output movies, movies are output with the remote commander. To set your camcorder, touch (MENU) [Setup] [ (Connection...
Handycam® Handbook
Page 43
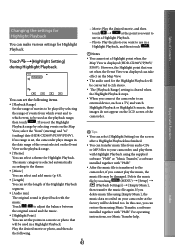
...) date (HDR-CX360V/PJ30V/PJ50V). If you cannot play them using [Empty Music], the music data recorded on the screen after a Highlight Playback has finished. You can transfer music files from audio CDs or MP3 files to your camcorder at the point you connect the camcorder to an external device, such as the playback range. [Theme] You can select a theme for Highlight Playback. If you set the following . Movie: Play...
...) date (HDR-CX360V/PJ30V/PJ50V). If you cannot play them using [Empty Music], the music data recorded on the screen after a Highlight Playback has finished. You can transfer music files from audio CDs or MP3 files to your camcorder at the point you connect the camcorder to an external device, such as the playback range. [Theme] You can select a theme for Highlight Playback. If you set the following . Movie: Play...

Handycam® Handbook
Page 64
...devices as an external media device. media devices with a capacity exceeding 2 TB ordinary disc drive such as an external hard disk drive. US 64 Index Please wait.] is available for your camcorder. The format screen appears when an external media device is displayed on the camcorder screen, touch . DB F.] is connected to your camcorder. important data has not previously been saved on the external media device before use external media devices with a code function. The FAT file system is displayed on the LCD screen. Saving images on an external media...
...devices as an external media device. media devices with a capacity exceeding 2 TB ordinary disc drive such as an external hard disk drive. US 64 Index Please wait.] is available for your camcorder. The format screen appears when an external media device is displayed on the camcorder screen, touch . DB F.] is connected to your camcorder. important data has not previously been saved on the external media device before use external media devices with a code function. The FAT file system is displayed on the LCD screen. Saving images on an external media...
Handycam® Handbook
Page 85
... The microphone does not record sound following zooming in or out. Red Eye Reduction (HDRCX360/CX360V/PJ30/PJ30V/ PJ50/PJ50V) You can record a movie with vivid sound appropriate to record an exciting and powerful sound in or out. You can change the recording sound format. 5.1ch Surround ( ) Records sound in 5.1ch surround. 2ch Stereo ( ) Records sound in Zoom Mic] function turns off automatically. Table of Contents Enjoy Useful Functions Low ( ) Makes the flash level lower. On ( ) Uses Red Eye...
... The microphone does not record sound following zooming in or out. Red Eye Reduction (HDRCX360/CX360V/PJ30/PJ30V/ PJ50/PJ50V) You can record a movie with vivid sound appropriate to record an exciting and powerful sound in or out. You can change the recording sound format. 5.1ch Surround ( ) Records sound in 5.1ch surround. 2ch Stereo ( ) Records sound in Zoom Mic] function turns off automatically. Table of Contents Enjoy Useful Functions Low ( ) Makes the flash level lower. On ( ) Uses Red Eye...
Handycam® Handbook
Page 99
.../PJ50V p. 99 Batteries/power sources p. 100 LCD screen p. 101 Memory card p. 101 Recording p. 102 extremely low. If you press RESET, all settings, including the clock setting, are reset. Contact your Sony dealer or local authorized Sony service facility. Playback p. 103 Playing back images stored on memory card on other devices p. 104 Editing movies/photos on your camcorder...p. 104 Playback on the TV p. 104 Copying/Connecting to other media...
.../PJ50V p. 99 Batteries/power sources p. 100 LCD screen p. 101 Memory card p. 101 Recording p. 102 extremely low. If you press RESET, all settings, including the clock setting, are reset. Contact your Sony dealer or local authorized Sony service facility. Playback p. 103 Playing back images stored on memory card on other devices p. 104 Editing movies/photos on your camcorder...p. 104 Playback on the TV p. 104 Copying/Connecting to other media...
Handycam® Handbook
Page 104
... full. This is heard during playback. Turn up the volume (p. 31). When you want to save photos is not a malfunction. Record sound with [Audio Mode] set to [Low], the recorded sound may damage your camcorder Enjoy Useful Functions Left and right sound will be heard unbalanced when playing back movies on computers or other devices Images cannot be played back or the memory card is too short cannot be divided...
... full. This is heard during playback. Turn up the volume (p. 31). When you want to save photos is not a malfunction. Record sound with [Audio Mode] set to [Low], the recorded sound may damage your camcorder Enjoy Useful Functions Left and right sound will be heard unbalanced when playing back movies on computers or other devices Images cannot be played back or the memory card is too short cannot be divided...
Handycam® Handbook
Page 110
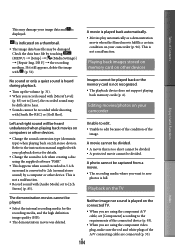
... image quality (STD) movies, you need an NTSC-system-based and 1080/60i compatible TV (or monitor) with component and AUDIO/VIDEO input jacks. On TV color systems Your camcorder is supported, you want to view the playback image on a TV, it must be connected. If you can view the movies with your camcorder abroad. A component A/V cable or an HDMI cable (sold separately) must be connected. System NTSC PAL PAL-M PAL-N SECAM Used...
... image quality (STD) movies, you need an NTSC-system-based and 1080/60i compatible TV (or monitor) with component and AUDIO/VIDEO input jacks. On TV color systems Your camcorder is supported, you want to view the playback image on a TV, it must be connected. If you can view the movies with your camcorder abroad. A component A/V cable or an HDMI cable (sold separately) must be connected. System NTSC PAL PAL-M PAL-N SECAM Used...
Handycam® Handbook
Page 114
... improper use the memory card near magnets or magnetic fields It is recommended that you make sure the memory card is lit or flashing) If you eject the memory card, or turn off your camcorder while your camcorder is reading or writing image files on the memory card (while the access lamp is inserted facing in the following cases (the data will not be compensated for Camera File...
... improper use the memory card near magnets or magnetic fields It is recommended that you make sure the memory card is lit or flashing) If you eject the memory card, or turn off your camcorder while your camcorder is reading or writing image files on the memory card (while the access lamp is inserted facing in the following cases (the data will not be compensated for Camera File...
Handycam® Handbook
Page 127
... USB Cable 3, 15 C Calibration 118 Camera/Mic 78 Camera Data 91 Capturing photos from a movie 55 Charging the battery pack..........14 Charging the battery pack abroad 16, 110 Clock Set 18 Component 93 Connection 33 Conversion Lens 83 Convert Highlight Playback scenes/scenarios 44 Coordinates 91 Copy 53 Copying a disc 61 Creating a disc 56 Creating AVCHD disc 60 CTRL FOR HDMI 93 D Data Code 19, 91 Date/Time 19 Date & Time Setting 97 Delete 51 Demo Mode 96 Digital Zoom 82 Disc Burn 58 Disc recorder 71 Display Setting...
... USB Cable 3, 15 C Calibration 118 Camera/Mic 78 Camera Data 91 Capturing photos from a movie 55 Charging the battery pack..........14 Charging the battery pack abroad 16, 110 Clock Set 18 Component 93 Connection 33 Conversion Lens 83 Convert Highlight Playback scenes/scenarios 44 Coordinates 91 Copy 53 Copying a disc 61 Creating a disc 56 Creating AVCHD disc 60 CTRL FOR HDMI 93 D Data Code 19, 91 Date/Time 19 Date & Time Setting 97 Delete 51 Demo Mode 96 Digital Zoom 82 Disc Burn 58 Disc recorder 71 Display Setting...
Handycam® Handbook
Page 128
... Playback Function 89 Playing 29 Playing AVCHD disc 60 Portrait 80 Power on 18 Power On By LCD 95 Precautions 112 Projector 45 Protect 52 PS 38 R REC Lamp 95 Rec Mode 37 Recording 24 Recording media 21 Red Eye Reduction 85 Remote Ctrl 95 Repair 99 Repair Img.DB F 104 RESET 124 S Saving images in external media 64 Scenario 44 Scenario Erase 44 Scenario Save 44 Scene Selection 80 Screen indicators 121 Self-diagnosis display/Warning...
... Playback Function 89 Playing 29 Playing AVCHD disc 60 Portrait 80 Power on 18 Power On By LCD 95 Precautions 112 Projector 45 Protect 52 PS 38 R REC Lamp 95 Rec Mode 37 Recording 24 Recording media 21 Red Eye Reduction 85 Remote Ctrl 95 Repair 99 Repair Img.DB F 104 RESET 124 S Saving images in external media 64 Scenario 44 Scenario Erase 44 Scenario Save 44 Scene Selection 80 Screen indicators 121 Self-diagnosis display/Warning...
Operating Guide
Page 10
... using genuine Sony accessories. Genuine Sony accessories may result in some type of external media first, and then perform [Format] by touching (MENU) [Setup] [ (Media Settings)] [Format] the desired medium . Images cannot be lost , or other devices through a USB connection and the power of the camcorder is a difference in this manual, the DVD disc recorded with communication cables, be able to record or play back or may be saved...
... using genuine Sony accessories. Genuine Sony accessories may result in some type of external media first, and then perform [Format] by touching (MENU) [Setup] [ (Media Settings)] [Format] the desired medium . Images cannot be lost , or other devices through a USB connection and the power of the camcorder is a difference in this manual, the DVD disc recorded with communication cables, be able to record or play back or may be saved...

Operating Guide
Page 35
... connect your camcorder to the TV using the A/V connecting cable. Touch (MENU) [Image Quality/Size] [ Wide Mode] [4:3] . When the A/V connecting cable is used to output movies, movies are output with the Switch Image Type button. ** Setup of the TV will automatically switch to the LINE IN input on the VCR using more than one audio input jack) Connect the yellow plug of the A/V connecting cable to the video input jack and connect the white (left channel) or red (right channel) plug...
... connect your camcorder to the TV using the A/V connecting cable. Touch (MENU) [Image Quality/Size] [ Wide Mode] [4:3] . When the A/V connecting cable is used to output movies, movies are output with the Switch Image Type button. ** Setup of the TV will automatically switch to the LINE IN input on the VCR using more than one audio input jack) Connect the yellow plug of the A/V connecting cable to the video input jack and connect the white (left channel) or red (right channel) plug...
Operating Guide
Page 40
... be connected to remove the disc from these devices do this case, you can create a Blu-ray disc by the playback function of the camcorder using Windows 7, the icon may not appear on the camcorder from the computer. The camcorder automatically divides an image file that have been created using the "PMB" software to DVD players or recorders, as the DVD player/recorder may fail to eject the media and may erase...
... be connected to remove the disc from these devices do this case, you can create a Blu-ray disc by the playback function of the camcorder using Windows 7, the icon may not appear on the camcorder from the computer. The camcorder automatically divides an image file that have been created using the "PMB" software to DVD players or recorders, as the DVD player/recorder may fail to eject the media and may erase...
Operating Guide
Page 54
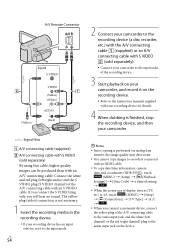
... connecting cable to recorders connected with an HDMI cable. To copy date/time information, camera data, and coordinates (HDR-PJ50V), touch (MENU) [Setup] [ (Playback Settings)] [Data Code] a desired setting . When the screen size of the recording device. 3 Start playback on your camcorder, and record it to the audio input jack on the recording device. Refer to the instruction manuals supplied with an S VIDEO cable. A/V Remote Connector Input S VIDEO (Yellow) VIDEO (Yellow) (White) AUDIO (Red) Signal...
... connecting cable to recorders connected with an HDMI cable. To copy date/time information, camera data, and coordinates (HDR-PJ50V), touch (MENU) [Setup] [ (Playback Settings)] [Data Code] a desired setting . When the screen size of the recording device. 3 Start playback on your camcorder, and record it to the audio input jack on the recording device. Refer to the instruction manuals supplied with an S VIDEO cable. A/V Remote Connector Input S VIDEO (Yellow) VIDEO (Yellow) (White) AUDIO (Red) Signal...
Operating Guide
Page 57
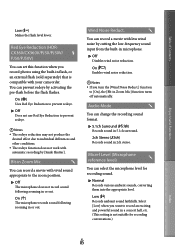
... Repairs the image database file on the internal recording media or a memory card. Empty Music Deletes music files. Image Size Sets the photo size. Volume Adjusts the volume of external media. Map View*2 Shows the Map View display Highlight Movie Starts Highlight Playback. File Number Sets how to avoid deleting. US 57 x.v.Color Records wider range of media to some type of playback sound (p. 31). Protect Protects movies or photos to assign the file number. (Playback Settings) Data Code Sets the date and time. Micref Level Sets the microphone level...
... Repairs the image database file on the internal recording media or a memory card. Empty Music Deletes music files. Image Size Sets the photo size. Volume Adjusts the volume of external media. Map View*2 Shows the Map View display Highlight Movie Starts Highlight Playback. File Number Sets how to avoid deleting. US 57 x.v.Color Records wider range of media to some type of playback sound (p. 31). Protect Protects movies or photos to assign the file number. (Playback Settings) Data Code Sets the date and time. Micref Level Sets the microphone level...
Operating Guide
Page 58
... information from GPS or not. Sets the connection mode when the camcorder is turned on the TV connected (p. 33). A. REC Lamp*1 Sets the recording lamp to a computer or a USB device. Battery Info Displays the battery information. USB LUN Setting Sets the camcorder to improve the compatibility of the LCD screen. Demo Mode Sets whether the demonstration appears or not. (Clock Settings) Date & Time Setting...... Area Setting Adjusts for a time differences automatically by acquiring the time from GPS or not. *1 HDR-PJ50/PJ50V *2 HDR-PJ50V US 58
... information from GPS or not. Sets the connection mode when the camcorder is turned on the TV connected (p. 33). A. REC Lamp*1 Sets the recording lamp to a computer or a USB device. Battery Info Displays the battery information. USB LUN Setting Sets the camcorder to improve the compatibility of the LCD screen. Demo Mode Sets whether the demonstration appears or not. (Clock Settings) Date & Time Setting...... Area Setting Adjusts for a time differences automatically by acquiring the time from GPS or not. *1 HDR-PJ50/PJ50V *2 HDR-PJ50V US 58
Operating Guide
Page 60
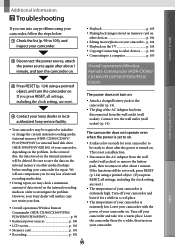
... setting, are reset.) The temperature of internal recording media data. During repair, we may be able to record images (HDR-PJ50V). Leave the camcorder with the power turned on the power again. Charge the battery pack (p. 14). The camcorder does not operate even when the power is set to on. It takes a few seconds for your camcorder is extremely low. Additional information Troubleshooting If you run into any problems using your camcorder...
... setting, are reset.) The temperature of internal recording media data. During repair, we may be able to record images (HDR-PJ50V). Leave the camcorder with the power turned on the power again. Charge the battery pack (p. 14). The camcorder does not operate even when the power is set to on. It takes a few seconds for your camcorder is extremely low. Additional information Troubleshooting If you run into any problems using your camcorder...
Operating Guide
Page 76
... 66 Media Select 21 Media Settings 21 Memory card 22 "Memory Stick" media 22 "Memory Stick PRO-HG Duo" media 22 "Memory Stick PRO Duo" media 22 Menus 56 Movies 24, 31 P Photos 26, 32 Playing 29 PMB (Picture Motion Browser 41 Power on 18 Precautions 66 Projector 32 PS 28 R Recording 24 Recording and playback time....63 Recording media 21 Recording time of movies/ number of recordable photos....63 Repair 60 RESET 75 S Saving images in external media 46 Screen indicators 72 Self-diagnosis display 61 Setting the date and time...........18 Software 38 Specifications 68...
... 66 Media Select 21 Media Settings 21 Memory card 22 "Memory Stick" media 22 "Memory Stick PRO-HG Duo" media 22 "Memory Stick PRO Duo" media 22 Menus 56 Movies 24, 31 P Photos 26, 32 Playing 29 PMB (Picture Motion Browser 41 Power on 18 Precautions 66 Projector 32 PS 28 R Recording 24 Recording and playback time....63 Recording media 21 Recording time of movies/ number of recordable photos....63 Repair 60 RESET 75 S Saving images in external media 46 Screen indicators 72 Self-diagnosis display 61 Setting the date and time...........18 Software 38 Specifications 68...


