
Handycam® Handbook
Page 2
...sheet before using extremely high-precision technology, so over 99.99% of an airplane (HDR-CX550V/XR550V). Using the camcorder Do not hold the camcorder by the jack covers. Make sure that is grayed out is set to direct sunlight for the memory card you can ...NP-FV50 (1) CD-ROM "Handycam" Application Software (1) "PMB" (software, including "PMB Help") "Handycam" Handbook (PDF) "Operating Guide" (1) See page 19 for long periods of your camcorder" (p. 114). Even if the camcorder is turned off and landing of the pixels are the...
...sheet before using extremely high-precision technology, so over 99.99% of an airplane (HDR-CX550V/XR550V). Using the camcorder Do not hold the camcorder by the jack covers. Make sure that is grayed out is set to direct sunlight for the memory card you can ...NP-FV50 (1) CD-ROM "Handycam" Application Software (1) "PMB" (software, including "PMB Help") "Handycam" Handbook (PDF) "Operating Guide" (1) See page 19 for long periods of your camcorder" (p. 114). Even if the camcorder is turned off and landing of the pixels are the...
Handycam® Handbook
Page 3
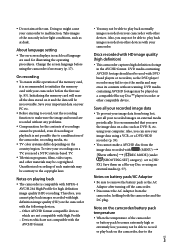
... should not be used for the contents of the memory card, it and the data will erase all your recordings on external media periodically. It is compatible with your camcorder with HD image quality (high definition) This camcorder captures high definition footage in the AVCHD format. Save them on a... depending on a disc such as the DVD player/ recorder may fail to remove the battery pack or the AC Adaptor after turning off the camcorder. Disconnect the AC Adaptor from being lost, save the image data on the country/region. Unauthorized recording of the...
... should not be used for the contents of the memory card, it and the data will erase all your recordings on external media periodically. It is compatible with your camcorder with HD image quality (high definition) This camcorder captures high definition footage in the AVCHD format. Save them on a... depending on a disc such as the DVD player/ recorder may fail to remove the battery pack or the AC Adaptor after turning off the camcorder. Disconnect the AC Adaptor from being lost, save the image data on the country/region. Unauthorized recording of the...

Handycam® Handbook
Page 5
... lamp (p. 20) are lit or flashing When using the camcorder at high altitudes (HDR-XR550/XR550V) Do not turn on the camcorder in very loud areas (HDR-XR550/XR550V). Otherwise, the recording media may be damaged, recorded images may be lost, or other malfunctions could occur. ejecting the memory card when the access lamp (p. 20...
... lamp (p. 20) are lit or flashing When using the camcorder at high altitudes (HDR-XR550/XR550V) Do not turn on the camcorder in very loud areas (HDR-XR550/XR550V). Otherwise, the recording media may be damaged, recorded images may be lost, or other malfunctions could occur. ejecting the memory card when the access lamp (p. 20...
Handycam® Handbook
Page 7
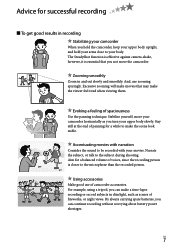
... person is essential that may make a time-lapse recording or record subjects in dim light, such as you turn your movies. Narrate the subject, or talk to make the scene look stable. Evoking a feeling of camcorder accessories. Using accessories Make good use zooming sparingly. And, use of spaciousness Use the panning technique.
... person is essential that may make a time-lapse recording or record subjects in dim light, such as you turn your movies. Narrate the subject, or talk to make the scene look stable. Evoking a feeling of camcorder accessories. Using accessories Make good use zooming sparingly. And, use of spaciousness Use the panning technique.
Handycam® Handbook
Page 9
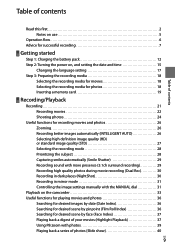
...recording 7 Getting started Step 1: Charging the battery pack 12 Step 2: Turning the power on, and setting the date and time 15 Changing the ...memory card 19 Recording/Playback Recording 21 Recording movies 22 Shooting photos 24 Useful functions for recording movies and photos 26 Zooming 26 Recording better images automatically (INTELLIGENT AUTO 26 Selecting high definition...high quality photos during movie recording (Dual Rec 30 Recording in dark places (NightShot 30 Recording in mirror mode 31 Controlling the image settings manually with the MANUAL dial 31 Playback on the camcorder...
...recording 7 Getting started Step 1: Charging the battery pack 12 Step 2: Turning the power on, and setting the date and time 15 Changing the ...memory card 19 Recording/Playback Recording 21 Recording movies 22 Shooting photos 24 Useful functions for recording movies and photos 26 Zooming 26 Recording better images automatically (INTELLIGENT AUTO 26 Selecting high definition...high quality photos during movie recording (Dual Rec 30 Recording in dark places (NightShot 30 Recording in mirror mode 31 Controlling the image settings manually with the MANUAL dial 31 Playback on the camcorder...
Handycam® Handbook
Page 13
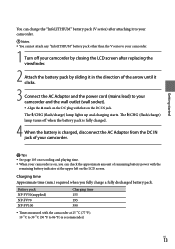
...Attach the battery pack by sliding it in the direction of the arrow until it to your camcorder. Notes You cannot attach any "InfoLITHIUM" battery pack other than the V series to your camcorder. 1 Turn off when the battery pack is fully charged. 4 When the battery is charged, disconnect the ...AC Adaptor from the DC IN jack of remaining battery power with that on the DC IN jack. The /CHG (flash/charge) lamp turns off your camcorder by closing the LCD screen after attaching it clicks. 3 Connect the AC Adaptor and the power cord (mains lead) to 86 &#...
...Attach the battery pack by sliding it in the direction of the arrow until it to your camcorder. Notes You cannot attach any "InfoLITHIUM" battery pack other than the V series to your camcorder. 1 Turn off when the battery pack is fully charged. 4 When the battery is charged, disconnect the ...AC Adaptor from the DC IN jack of remaining battery power with that on the DC IN jack. The /CHG (flash/charge) lamp turns off your camcorder by closing the LCD screen after attaching it clicks. 3 Connect the AC Adaptor and the power cord (mains lead) to 86 &#...
Handycam® Handbook
Page 14
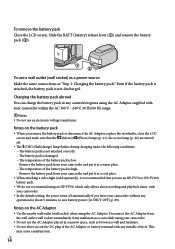
...-FV100 battery pack. We do not recommend using the AC Adaptor supplied with your camcorder. In the default setting, the power turns off . The /CHG (flash/charge) lamp flashes during charging under the following conditions: The battery pack is not attached correctly. ...NP-FV30, which only allows short recording and playback times, with your camcorder. Do not use an electronic voltage transformer. Even if the battery pack is attached, the battery pack is high. Remove the battery pack from the wall outlet (wall socket) immediately if...
...-FV100 battery pack. We do not recommend using the AC Adaptor supplied with your camcorder. In the default setting, the power turns off . The /CHG (flash/charge) lamp flashes during charging under the following conditions: The battery pack is not attached correctly. ...NP-FV30, which only allows short recording and playback times, with your camcorder. Do not use an electronic voltage transformer. Even if the battery pack is attached, the battery pack is high. Remove the battery pack from the wall outlet (wall socket) immediately if...
Handycam® Handbook
Page 15
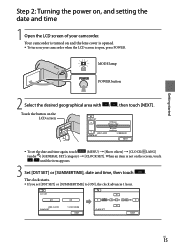
...To set [DST SET] or [SUMMERTIME] to [ON], the clock advances 1 hour. Getting started Step 2: Turning the power on, and setting the date and time 1 Open the LCD screen of your camcorder when the LCD screen is open, press POWER. The clock starts. If you set the date ... touch (MENU) [Show others] [CLOCK/ LANG] (under [GENERAL SET] category) [CLOCK SET]. US 15 Your camcorder is turned on and the lens cover is opened. To turn on the screen, touch / until the item appears. 3 Set [DST SET] or [SUMMERTIME], date and time, then touch .
...To set [DST SET] or [SUMMERTIME] to [ON], the clock advances 1 hour. Getting started Step 2: Turning the power on, and setting the date and time 1 Open the LCD screen of your camcorder when the LCD screen is open, press POWER. The clock starts. If you set the date ... touch (MENU) [Show others] [CLOCK/ LANG] (under [GENERAL SET] category) [CLOCK SET]. US 15 Your camcorder is turned on and the lens cover is opened. To turn on the screen, touch / until the item appears. 3 Set [DST SET] or [SUMMERTIME], date and time, then touch .
Handycam® Handbook
Page 16
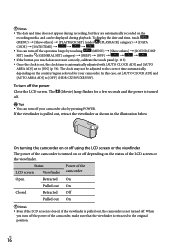
... can be adjusted to [OFF] (HDR-CX550V/XR550V). To turn off your camcorder. On turning the camcorder on or off using the LCD screen or the viewfinder The power of the camcorder, make sure that the viewfinder is turned on the country/region selected for a...PLAYBACK] category) [DATA CODE] [DATE/TIME] . You can turn off the power Close the LCD screen. The off. (Movie) lamp flashes for your camcorder also by touching (MENU) [Show others ] [PLAYBACK SET] (under [GENERAL SET] category) [...
... can be adjusted to [OFF] (HDR-CX550V/XR550V). To turn off your camcorder. On turning the camcorder on or off using the LCD screen or the viewfinder The power of the camcorder, make sure that the viewfinder is turned on the country/region selected for a...PLAYBACK] category) [DATA CODE] [DATE/TIME] . You can turn off the power Close the LCD screen. The off. (Movie) lamp flashes for your camcorder also by touching (MENU) [Show others ] [PLAYBACK SET] (under [GENERAL SET] category) [...

Handycam® Handbook
Page 21
... is opened. To turn on the following media. Press MODE to light up the desired recording mode lamp. HDR-CX550/CX550V: Internal memory HDR-XR550/XR550V: Internal hard disk Tips To change the recording media, see page 18. 1 Fasten the grip belt. 2 Open the LCD screen of your camcorder when the LCD screen...
... is opened. To turn on the following media. Press MODE to light up the desired recording mode lamp. HDR-CX550/CX550V: Internal memory HDR-XR550/XR550V: Internal hard disk Tips To change the recording media, see page 18. 1 Fasten the grip belt. 2 Open the LCD screen of your camcorder when the LCD screen...

Handycam® Handbook
Page 22
... It will be displayed for about 3 seconds, then disappear after you turn on the LCD. To display the icons and indicators again, touch anywhere on the screen except the rec & zoom buttons on the camcorder. Rec & zoom buttons on LCD about 3sec after Notes ... If you can start recording after turning on your camcorder during this time. US 22 You cannot operate your camcorder or switching the recording (movie/photo)/playback modes. START/STOP button [STBY] [REC] To stop recording, press ...
... It will be displayed for about 3 seconds, then disappear after you turn on the LCD. To display the icons and indicators again, touch anywhere on the screen except the rec & zoom buttons on the camcorder. Rec & zoom buttons on LCD about 3sec after Notes ... If you can start recording after turning on your camcorder during this time. US 22 You cannot operate your camcorder or switching the recording (movie/photo)/playback modes. START/STOP button [STBY] [REC] To stop recording, press ...

Handycam® Handbook
Page 24
...turn on the recording media. To display them as [DATA CODE] during recording. Shooting photos In the default setting, photos are recorded on the LCD screen. US 24 Data code during recording The recording date, time and condition , and coordinates (HDR-CX550V/XR550V) are recorded automatically on the (Photo) lamp. HDR-CX550/CX550V: Internal memory HDR...; [Show others] [PLAYBACK SET] (under [PLAYBACK] category) [DATA CODE] a desired setting . Flashes Lights up When disappears, the photo is recorded.
...turn on the recording media. To display them as [DATA CODE] during recording. Shooting photos In the default setting, photos are recorded on the LCD screen. US 24 Data code during recording The recording date, time and condition , and coordinates (HDR-CX550V/XR550V) are recorded automatically on the (Photo) lamp. HDR-CX550/CX550V: Internal memory HDR...; [Show others] [PLAYBACK SET] (under [PLAYBACK] category) [DATA CODE] a desired setting . Flashes Lights up When disappears, the photo is recorded.
Handycam® Handbook
Page 26
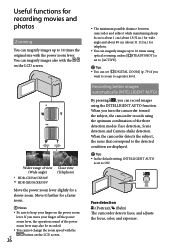
...57790; Tips You can magnify images up to 14 times the original size with the power zoom lever. When you turn the camcorder toward the subject, the camcorder records using the INTELLIGENT AUTO function. If you want to zoom to ON. Face detection (Portrait), (Baby) The... screen. * ** Wider range of view (Wide angle) * HDR-CX550/CX550V ** HDR-XR550/XR550V Close view (Telephoto) Move the power zoom lever slightly for recording movies and photos Zooming You can set to a greater level. When the camcorder detects the subject, the icons that correspond to the detected condition...
...57790; Tips You can magnify images up to 14 times the original size with the power zoom lever. When you turn the camcorder toward the subject, the camcorder records using the INTELLIGENT AUTO function. If you want to zoom to ON. Face detection (Portrait), (Baby) The... screen. * ** Wider range of view (Wide angle) * HDR-CX550/CX550V ** HDR-XR550/XR550V Close view (Telephoto) Move the power zoom lever slightly for recording movies and photos Zooming You can set to a greater level. When the camcorder detects the subject, the icons that correspond to the detected condition...

Handycam® Handbook
Page 29
...58320; If a smile is not detected, set to [HD FX], you specify the priority subject by touching the detection frame on your camcorder, 5.1ch sound is automatically converted and output in microphone. Realistic sound can be detected depending on devices that has priority for possible smile detection... shot turns orange. If the face you play back 5.1ch sound on the LCD screen, the face with more presence (5.1ch surround...
...58320; If a smile is not detected, set to [HD FX], you specify the priority subject by touching the detection frame on your camcorder, 5.1ch sound is automatically converted and output in microphone. Realistic sound can be detected depending on devices that has priority for possible smile detection... shot turns orange. If the face you play back 5.1ch sound on the LCD screen, the face with more presence (5.1ch surround...

Handycam® Handbook
Page 30
Recording high quality photos during movie recording (Dual Rec) You can record photos during movie recording by pressing PHOTO. Notes You cannot use the flash during recording standby in the same way as when the (Photo) lamp is hard to focus automatically. Do ... movies recorded with high definition image quality (HD) in 5.1ch sound, you need an AVCHD format device compatible with 5.1ch surround. When you connect your camcorder with an HDMI cable (sold separately). Adjust the focus manually ([FOCUS], p. 74) when it is turned on. Recording in...
Recording high quality photos during movie recording (Dual Rec) You can record photos during movie recording by pressing PHOTO. Notes You cannot use the flash during recording standby in the same way as when the (Photo) lamp is hard to focus automatically. Do ... movies recorded with high definition image quality (HD) in 5.1ch sound, you need an AVCHD format device compatible with 5.1ch surround. When you connect your camcorder with an HDMI cable (sold separately). Adjust the focus manually ([FOCUS], p. 74) when it is turned on. Recording in...

Handycam® Handbook
Page 33
... screen. (VIEW IMAGES) on your camcorder. Touch the (Photo) () a desired photo () to select the index type ([DATE INDEX]/[ MAP] (HDR- CX550V/XR550V)/[ FILM ROLL]/[ FACE]) (p. 36, 54, 36, 37). HDR-CX550/CX550V: Internal memory HDR-XR550/XR550V: Internal hard disk ...; Tips To change the recording media, see page 18. 1 Open the LCD screen of your camcorder when the LCD screen is opened. To turn...
... screen. (VIEW IMAGES) on your camcorder. Touch the (Photo) () a desired photo () to select the index type ([DATE INDEX]/[ MAP] (HDR- CX550V/XR550V)/[ FILM ROLL]/[ FACE]) (p. 36, 54, 36, 37). HDR-CX550/CX550V: Internal memory HDR-XR550/XR550V: Internal hard disk ...; Tips To change the recording media, see page 18. 1 Open the LCD screen of your camcorder when the LCD screen is opened. To turn...

Handycam® Handbook
Page 39
... TOOL] (under [OTHERS] category) [DOWNLOAD MUSIC]). After the music file is transferred to the center of the displayed frame. Turn on the screen is framed. Touch the screen at the factory will be deleted too. To start Music Transfer, click [Start] ...Transfer]. US 39 The point where you touched on your camcorder and computer, connect them with the power zoom lever. In this case, you can be adjusted with Highlight Playback. Using PB zoom with T (Telephoto). HDR-CX550/ CX550V HDR-XR550/ XR550V Play back the photo you ...
... TOOL] (under [OTHERS] category) [DOWNLOAD MUSIC]). After the music file is transferred to the center of the displayed frame. Turn on the screen is framed. Touch the screen at the factory will be deleted too. To start Music Transfer, click [Start] ...Transfer]. US 39 The point where you touched on your camcorder and computer, connect them with the power zoom lever. In this case, you can be adjusted with Highlight Playback. Using PB zoom with T (Telephoto). HDR-CX550/ CX550V HDR-XR550/ XR550V Play back the photo you ...
Handycam® Handbook
Page 41
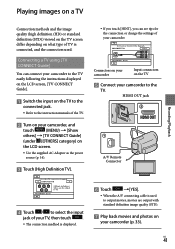
...Touch / to select the input jack of TV is used . Connectors on your camcorder Input connectors on the LCD screen. Use the supplied AC Adaptor as the power source (p. 14). Touch [High Definition TV]. If you touch [HINT], you can see tips for the... connection or change the settings of your camcorder to the instruction manuals of the TV. Turn on your camcorder, and touch (MENU) [Show others] ...
...Touch / to select the input jack of TV is used . Connectors on your camcorder Input connectors on the LCD screen. Use the supplied AC Adaptor as the power source (p. 14). Touch [High Definition TV]. If you touch [HINT], you can see tips for the... connection or change the settings of your camcorder to the instruction manuals of the TV. Turn on your camcorder, and touch (MENU) [Show others] ...
Handycam® Handbook
Page 43
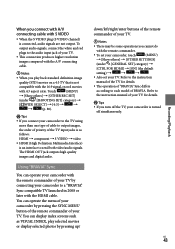
... display index screens such as follows: HDMI component S VIDEO video HDMI (High Definition Multimedia Interface) is an interface to a "BRAVIA" Sync compatible TV launched in 2008 or later with S VIDEO When the S VIDEO plug (S VIDEO channel) is turned off the TV, your camcorder to send both video/audio signals.
... display index screens such as follows: HDMI component S VIDEO video HDMI (High Definition Multimedia Interface) is an interface to a "BRAVIA" Sync compatible TV launched in 2008 or later with S VIDEO When the S VIDEO plug (S VIDEO channel) is turned off the TV, your camcorder to send both video/audio signals.

Handycam® Handbook
Page 53
... the last acquired location information is set to complete the triangulation. Make sure that is easier receive radio signals. Even if the camcorder is turned off and on. Processing time can be able to receive radio signals in places where radio signals are blocked or reflected, such as... the GPS switch is recorded. If your camcorder quits searching for a satellite signal. Unable to OFF and ON again, or turn the GPS switch to OFF during takeoff and landing of show GPS signal quantity. It may not be...
... the last acquired location information is set to complete the triangulation. Make sure that is easier receive radio signals. Even if the camcorder is turned off and on. Processing time can be able to receive radio signals in places where radio signals are blocked or reflected, such as... the GPS switch is recorded. If your camcorder quits searching for a satellite signal. Unable to OFF and ON again, or turn the GPS switch to OFF during takeoff and landing of show GPS signal quantity. It may not be...


