Handycam® Handbook
Page 4
... recording media of the camcorder using genuine Sony accessories. Genuine Sony accessories may result in the correct way. Recording Capacity USB media of internal jack recording media HDRCX550/ HDRCX550V* Internal memory + memory card 64 GB Input/ output HDRXR550/ HDRXR550V* Internal hard disk + memory card 240 GB The model with * is equipped with high definition image quality (HD...
... recording media of the camcorder using genuine Sony accessories. Genuine Sony accessories may result in the correct way. Recording Capacity USB media of internal jack recording media HDRCX550/ HDRCX550V* Internal memory + memory card 64 GB Input/ output HDRXR550/ HDRXR550V* Internal hard disk + memory card 240 GB The model with * is equipped with high definition image quality (HD...
Handycam® Handbook
Page 9
... media for photos 18 Inserting a memory card 19 Recording/Playback Recording 21 Recording movies 22 Shooting photos 24 Useful functions for recording movies and photos 26 Zooming 26 Recording better images automatically (INTELLIGENT AUTO 26 Selecting high definition image quality (HD) or standard ...(5.1ch surround recording 29 Recording high quality photos during movie recording (Dual Rec 30 Recording in dark places (NightShot 30 Recording in mirror mode 31 Controlling the image settings manually with the MANUAL dial 31 Playback on the camcorder 33 Useful functions for playing ...
... media for photos 18 Inserting a memory card 19 Recording/Playback Recording 21 Recording movies 22 Shooting photos 24 Useful functions for recording movies and photos 26 Zooming 26 Recording better images automatically (INTELLIGENT AUTO 26 Selecting high definition image quality (HD) or standard ...(5.1ch surround recording 29 Recording high quality photos during movie recording (Dual Rec 30 Recording in dark places (NightShot 30 Recording in mirror mode 31 Controlling the image settings manually with the MANUAL dial 31 Playback on the camcorder 33 Useful functions for playing ...

Handycam® Handbook
Page 11
Table of contents Menu lists 69 MANUAL SETTINGS (Items to adjust for scene condition 71 SHOOTING SET (Items for customized shooting 76 PHOTO SETTINGS (Items for recording photos 80 PLAYBACK (Items for ... battery pack 103 Expected recording time of movies 104 Expected number of recordable photos 105 Using your camcorder abroad 107 Maintenance and precautions 109 About the AVCHD format 109 About GPS (HDR-CX550V/XR550V 109 About the "Memory Stick" media 111 About the "InfoLITHIUM" battery pack 112 About x.v.Color 114 About handling of your...
Table of contents Menu lists 69 MANUAL SETTINGS (Items to adjust for scene condition 71 SHOOTING SET (Items for customized shooting 76 PHOTO SETTINGS (Items for recording photos 80 PLAYBACK (Items for ... battery pack 103 Expected recording time of movies 104 Expected number of recordable photos 105 Using your camcorder abroad 107 Maintenance and precautions 109 About the AVCHD format 109 About GPS (HDR-CX550V/XR550V 109 About the "Memory Stick" media 111 About the "InfoLITHIUM" battery pack 112 About x.v.Color 114 About handling of your...
Handycam® Handbook
Page 19
... movies and/or photos on "Memory Stick PRO Duo" media or "Memory Stick Duo" media adaptor. Inserting a memory card Notes Set the recording medium to [MEMORY CARD] to operate with your camcorder.) "Memory Stick PRO Duo" media can be used only with this manual, "Memory Stick PRO Duo" media and "Memory Stick PRO-HG Duo" media...
... movies and/or photos on "Memory Stick PRO Duo" media or "Memory Stick Duo" media adaptor. Inserting a memory card Notes Set the recording medium to [MEMORY CARD] to operate with your camcorder.) "Memory Stick PRO Duo" media can be used only with this manual, "Memory Stick PRO Duo" media and "Memory Stick PRO-HG Duo" media...

Handycam® Handbook
Page 30
...flash during recording standby in the same way as when the (Photo) lamp is turned on your fingers or other objects. Remove the conversion lens (sold separately), the sound of high definition... the movies recorded with high definition image quality (HD) in 5.1ch sound, you need an AVCHD format device compatible with 5.1ch surround. When you connect your camcorder with color images in ... 77) when you record photos with an HDMI cable (sold separately). Adjust the focus manually ([FOCUS], p. 74) when it is not enough or when you cannot use the NightShot function in...
...flash during recording standby in the same way as when the (Photo) lamp is turned on your fingers or other objects. Remove the conversion lens (sold separately), the sound of high definition... the movies recorded with high definition image quality (HD) in 5.1ch sound, you need an AVCHD format device compatible with 5.1ch surround. When you connect your camcorder with color images in ... 77) when you record photos with an HDMI cable (sold separately). Adjust the focus manually ([FOCUS], p. 74) when it is not enough or when you cannot use the NightShot function in...
Handycam® Handbook
Page 31
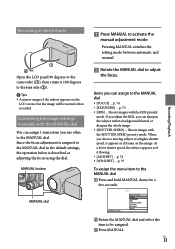
...can assign 1 menu item you can sharpen the subject with the MANUAL dial You can assign to the MANUAL dial [FOCUS] ... p. 75 To assign the menu item to the MANUAL dial in mirror mode Open the LCD panel 90 degrees to the camcorder (), then rotate it flowing. [AE SHIFT]... ... At a lower shutter speed, the subject appears as if frozen on the LCD screen, but the image will be assigned. Press MANUAL. p. 74 [EXPOSURE] ... US 31 ...
...can assign 1 menu item you can sharpen the subject with the MANUAL dial You can assign to the MANUAL dial [FOCUS] ... p. 75 To assign the menu item to the MANUAL dial in mirror mode Open the LCD panel 90 degrees to the camcorder (), then rotate it flowing. [AE SHIFT]... ... At a lower shutter speed, the subject appears as if frozen on the LCD screen, but the image will be assigned. Press MANUAL. p. 74 [EXPOSURE] ... US 31 ...

Handycam® Handbook
Page 32
...], or [SHUTTER SPEED], the settings of other 2 items are canceled. If you select [RESET] in step , all the items adjusted manually are reset to the default settings. Tips You can set the IRIS to a preferred value depending on the shooting scenes. ... (Telephoto) side. If you move the zoom lever to the power supply frequency in your region. You can also assign menu items to the MANUAL dial by touching (MENU) [Show others] [OTHER REC SET] (under a fluorescent lamp, sodium lamp, or mercury lamp, horizontal ...
...], or [SHUTTER SPEED], the settings of other 2 items are canceled. If you select [RESET] in step , all the items adjusted manually are reset to the default settings. Tips You can set the IRIS to a preferred value depending on the shooting scenes. ... (Telephoto) side. If you move the zoom lever to the power supply frequency in your region. You can also assign menu items to the MANUAL dial by touching (MENU) [Show others] [OTHER REC SET] (under a fluorescent lamp, sodium lamp, or mercury lamp, horizontal ...
Handycam® Handbook
Page 41
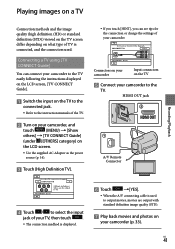
... to the instruction manuals of the TV. Turn on your camcorder, and touch (MENU) [Show others] [TV CONNECT Guide] (under [OTHERS] category) on the LCD screen. Use the supplied AC Adaptor as the power source (p. 14). Touch [High Definition TV]. ...], you can see tips for the connection or change the settings of your camcorder (p. 33). Playing images on a TV Recording/Playback Connection methods and the image quality (high definition (HD) or standard definition (STD)) viewed on the TV screen differ depending on what type of TV...
... to the instruction manuals of the TV. Turn on your camcorder, and touch (MENU) [Show others] [TV CONNECT Guide] (under [OTHERS] category) on the LCD screen. Use the supplied AC Adaptor as the power source (p. 14). Touch [High Definition TV]. ...], you can see tips for the connection or change the settings of your camcorder (p. 33). Playing images on a TV Recording/Playback Connection methods and the image quality (high definition (HD) or standard definition (STD)) viewed on the TV screen differ depending on what type of TV...
Handycam® Handbook
Page 43
... video HDMI (High Definition Multimedia Interface) is connected, audio signals are not output. Refer to the instruction manual of your TV. Notes There may be some operations you cannot do with the remote commander. To set your camcorder to a "BRAVIA" Sync compatible.... Using "BRAVIA" Sync You can operate the menu of your camcorder is not compatible with the 16:9 signal, record movies with 4:3 aspect ratio. US 43 Recording/Playback Refer to the instruction manual of your TV for details. The operation of "BRAVIA...
... video HDMI (High Definition Multimedia Interface) is connected, audio signals are not output. Refer to the instruction manual of your TV. Notes There may be some operations you cannot do with the remote commander. To set your camcorder to a "BRAVIA" Sync compatible.... Using "BRAVIA" Sync You can operate the menu of your camcorder is not compatible with the 16:9 signal, record movies with 4:3 aspect ratio. US 43 Recording/Playback Refer to the instruction manual of your TV for details. The operation of "BRAVIA...

Handycam® Handbook
Page 57
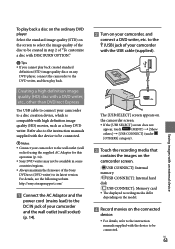
...format screen appears when the external media is connected to your camcorder. Operation is available for operating. Connect your camcorder to the wall outlet (wall socket) using the supplied AC adaptor (p. 14). Refer to the instruction manual supplied with the external media. For details on...can save movies and photos on available external media, go to the Sony support website in your country/region. 1 Connect the AC Adaptor and the power cord (mains lead) to the DC IN jack of your camcorder and the wall outlet (wall socket). 4 Connect the USB Adaptor ...
...format screen appears when the external media is connected to your camcorder. Operation is available for operating. Connect your camcorder to the wall outlet (wall socket) using the supplied AC adaptor (p. 14). Refer to the instruction manual supplied with the external media. For details on...can save movies and photos on available external media, go to the Sony support website in your country/region. 1 Connect the AC Adaptor and the power cord (mains lead) to the DC IN jack of your camcorder and the wall outlet (wall socket). 4 Connect the USB Adaptor ...

Handycam® Handbook
Page 60
...writer, DVDirect Express You can create a disc or play DVDs, etc. Refer also to the instruction manual supplied with the DVD writer. Notes Connect your camcorder to the wall outlet (wall socket) using the supplied AC Adaptor for this operation (p. 14). &#... Express (p. 60) DVD writer, other than DVDirect Express (p. 63) Disc recorder, etc. (p. 64) Disc type Standard definition image quality (STD) disc Notes Always maintain your PlayStation3 to use the latest version of the PlayStation3 system software. ...
...writer, DVDirect Express You can create a disc or play DVDs, etc. Refer also to the instruction manual supplied with the DVD writer. Notes Connect your camcorder to the wall outlet (wall socket) using the supplied AC Adaptor for this operation (p. 14). &#... Express (p. 60) DVD writer, other than DVDirect Express (p. 63) Disc recorder, etc. (p. 64) Disc type Standard definition image quality (STD) disc Notes Always maintain your PlayStation3 to use the latest version of the PlayStation3 system software. ...
Handycam® Handbook
Page 63
...high definition image quality (HD) disc with a DVD writer, etc., other than DVDirect Express Use USB cable to connect your camcorder to the wall outlet (wall socket) using the supplied AC Adaptor for this operation (p. 14). Sony DVD writer may not be connected. Refer also to the instruction manuals...OTHERS] category). Touch the recording media that contains the images on the camcorder screen. [ USB CONNECT]: Internal memory [ USB CONNECT]: Internal hard disk [ USB CONNECT]: Memory card The displayed recording media differ depending on the model. ...
...high definition image quality (HD) disc with a DVD writer, etc., other than DVDirect Express Use USB cable to connect your camcorder to the wall outlet (wall socket) using the supplied AC Adaptor for this operation (p. 14). Sony DVD writer may not be connected. Refer also to the instruction manuals...OTHERS] category). Touch the recording media that contains the images on the camcorder screen. [ USB CONNECT]: Internal memory [ USB CONNECT]: Internal hard disk [ USB CONNECT]: Memory card The displayed recording media differ depending on the model. ...
Handycam® Handbook
Page 64
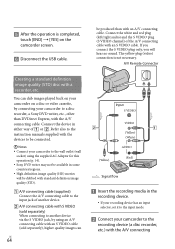
... Connect your camcorder to a disc recorder, a Sony DVD writer, etc., other than with the devices to be available in some countries/regions. High definition image quality (HD) movies...camcorder screen. Disconnect the USB cable. If you connect the S VIDEO plug only, you will be produced than DVDirect Express, with the A/V connecting A/V Remote Connector Creating a standard definition image quality (STD) disc with an S VIDEO cable. Refer also to the instruction manuals supplied with an A/V connecting cable. be dubbed with standard definition...
... Connect your camcorder to a disc recorder, a Sony DVD writer, etc., other than with the devices to be available in some countries/regions. High definition image quality (HD) movies...camcorder screen. Disconnect the USB cable. If you connect the S VIDEO plug only, you will be produced than DVDirect Express, with the A/V connecting A/V Remote Connector Creating a standard definition image quality (STD) disc with an S VIDEO cable. Refer also to the instruction manuals supplied with an A/V connecting cable. be dubbed with standard definition...
Handycam® Handbook
Page 65
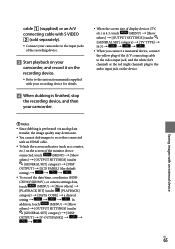
...left channel) or the red (right channel) plug to the instruction manuals supplied with an HDMI cable. To hide the screen ...sold separately). Connect your camcorder to the input jacks of the recording device. Start playback on your camcorder. When the screen ... the recording device, and then your camcorder, and record it on the recording device...] (the default setting) . To record the date/time, coordinates (HDR- US 65 In addition, touch (MENU) [Show others ] [PLAYBACK SET] (under [GENERAL...
...left channel) or the red (right channel) plug to the instruction manuals supplied with an HDMI cable. To hide the screen ...sold separately). Connect your camcorder to the input jacks of the recording device. Start playback on your camcorder. When the screen ... the recording device, and then your camcorder, and record it on the recording device...] (the default setting) . To record the date/time, coordinates (HDR- US 65 In addition, touch (MENU) [Show others ] [PLAYBACK SET] (under [GENERAL...
Handycam® Handbook
Page 66
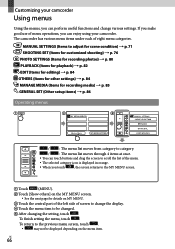
...useful functions and change the display. Touch the menu item to change various settings. Customizing your camcorder Using menus Using the menus, you can enjoy using your camcorder. If you make good use of screen to be changed. After changing the setting, touch ...58320; The selected category icon is displayed in orange. When you touch , the screen returns to scroll the list of eight menu categories. MANUAL SETTINGS (Items to adjust for scene condition) p. 71 SHOOTING SET (Items for customized shooting) p. 76 PHOTO SETTINGS (Items for ...
...useful functions and change the display. Touch the menu item to change various settings. Customizing your camcorder Using menus Using the menus, you can enjoy using your camcorder. If you make good use of screen to be changed. After changing the setting, touch ...58320; The selected category icon is displayed in orange. When you touch , the screen returns to scroll the list of eight menu categories. MANUAL SETTINGS (Items to adjust for scene condition) p. 71 SHOOTING SET (Items for customized shooting) p. 76 PHOTO SETTINGS (Items for ...
Handycam® Handbook
Page 67
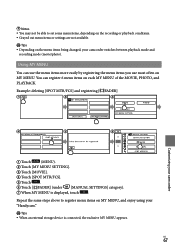
... Depending on MY MENU, and enjoy using your "Handycam." Tips When an external storage device is displayed, touch . US 67 Example: deleting [SPOT MTR/FCS] and registering [ FADER] Customizing your camcorder Touch (MENU). Touch [MY MENU SETTING...]. Touch [MOVIE]. Touch [SPOT MTR/FCS]. Touch . Touch [ FADER] (under [MANUAL SETTINGS] category). When MY MENU is connected,...
... Depending on MY MENU, and enjoy using your "Handycam." Tips When an external storage device is displayed, touch . US 67 Example: deleting [SPOT MTR/FCS] and registering [ FADER] Customizing your camcorder Touch (MENU). Touch [MY MENU SETTING...]. Touch [MOVIE]. Touch [SPOT MTR/FCS]. Touch . Touch [ FADER] (under [MANUAL SETTINGS] category). When MY MENU is connected,...
Handycam® Handbook
Page 69
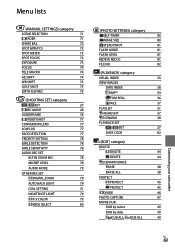
Menu lists (MANUAL SETTINGS) category SCENE SELECTION 71 FADER 71 WHITE BAL. 72 SPOT MTR/FCS 73 SPOT METER 73 SPOT FOCUS 73 EXPOSURE 73 ...79 DIAL SETTING 31 NIGHTSHOT LIGHT 79 X.V.COLOR 79 WIDE SELECT 80 (PHOTO SETTINGS) category SELF-TIMER 80 IMAGE SIZE 80 STEADYSHOT 81 FLASH MODE 81 FLASH LEVEL 81 REDEYE REDUC 81 FILE NO. 82 (PLAYBACK) category VISUAL INDEX 33 VIEW IMAGES DATE INDEX 36 MAP*1 54 FILM ROLL 36...45 DIVIDE 46 PHOTO CAPTURE 47 MOVIE DUB DUB by select 49 DUB by date 49 DUB ALL/ DUB ALL 49 Customizing your camcorder US 69
Menu lists (MANUAL SETTINGS) category SCENE SELECTION 71 FADER 71 WHITE BAL. 72 SPOT MTR/FCS 73 SPOT METER 73 SPOT FOCUS 73 EXPOSURE 73 ...79 DIAL SETTING 31 NIGHTSHOT LIGHT 79 X.V.COLOR 79 WIDE SELECT 80 (PHOTO SETTINGS) category SELF-TIMER 80 IMAGE SIZE 80 STEADYSHOT 81 FLASH MODE 81 FLASH LEVEL 81 REDEYE REDUC 81 FILE NO. 82 (PLAYBACK) category VISUAL INDEX 33 VIEW IMAGES DATE INDEX 36 MAP*1 54 FILM ROLL 36...45 DIVIDE 46 PHOTO CAPTURE 47 MOVIE DUB DUB by select 49 DUB by date 49 DUB ALL/ DUB ALL 49 Customizing your camcorder US 69

Handycam® Handbook
Page 71
...; If you set [SCENE SELECTION], [WHITE BAL.] setting is canceled. SNOW** ( ) Takes bright pictures of people and background using a flash. FADER You can record images effectively in various situations. AUTO Records images in average image quality without the [SCENE SELECTION] function. ... a transition with . LANDSCAPE*( ) Shoots distant subjects clearly. This setting also prevents your camcorder US 71 SPOTLIGHT**( ) Prevents people's faces from focusing on the operation. MANUAL SETTINGS (Items to adjust for scene condition) See "Using menus" (p. 66) on glass or...
...; If you set [SCENE SELECTION], [WHITE BAL.] setting is canceled. SNOW** ( ) Takes bright pictures of people and background using a flash. FADER You can record images effectively in various situations. AUTO Records images in average image quality without the [SCENE SELECTION] function. ... a transition with . LANDSCAPE*( ) Shoots distant subjects clearly. This setting also prevents your camcorder US 71 SPOTLIGHT**( ) Prevents people's faces from focusing on the operation. MANUAL SETTINGS (Items to adjust for scene condition) See "Using menus" (p. 66) on glass or...
Handycam® Handbook
Page 73
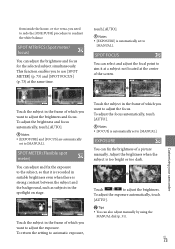
... subject is automatically set to adjust the brightness. Touch the subject in the frame of a picture manually. EXPOSURE You can also adjust manually by using the MANUAL dial (p. 31). Touch / to [MANUAL]. To return the setting to automatic exposure, Touch the subject in the frame of which you want... use [SPOT METER] (p. 73) and [SPOT FOCUS] (p. 73) at the center of which you want to adjust the exposure. Customizing your camcorder Touch the subject in the spotlight on stage. SPOT MTR/FCS (Spot meter/ focus) You can adjust and fix the exposure to the subject, ...
... subject is automatically set to adjust the brightness. Touch the subject in the frame of a picture manually. EXPOSURE You can also adjust manually by using the MANUAL dial (p. 31). Touch / to [MANUAL]. To return the setting to automatic exposure, Touch the subject in the frame of which you want... use [SPOT METER] (p. 73) and [SPOT FOCUS] (p. 73) at the center of which you want to adjust the exposure. Customizing your camcorder Touch the subject in the spotlight on stage. SPOT MTR/FCS (Spot meter/ focus) You can adjust and fix the exposure to the subject, ...
Handycam® Handbook
Page 74
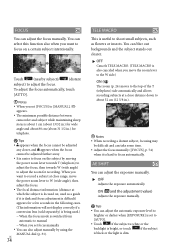
...; You can adjust the automatic exposure level to brighter or darker when [EXPOSURE] is set [FOCUS] to [MANUAL], appears. The minimum possible distance between camcorder and subject while maintaining sharp focus is about 1 cm (about 13/32 in.) for wide angle and about 80 cm (about 32 cm... canceled when you want to record a subject at which the subject is focused on; You can take some time. Adjust the focus manually ([FOCUS], p. 74) when it is dark and focus adjustment is difficult) appears for recording. You can select this function also when you move...
...; You can adjust the automatic exposure level to brighter or darker when [EXPOSURE] is set [FOCUS] to [MANUAL], appears. The minimum possible distance between camcorder and subject while maintaining sharp focus is about 1 cm (about 13/32 in.) for wide angle and about 80 cm (about 32 cm... canceled when you want to record a subject at which the subject is focused on; You can take some time. Adjust the focus manually ([FOCUS], p. 74) when it is dark and focus adjustment is difficult) appears for recording. You can select this function also when you move...


