
Handycam® Handbook
Page 4
...; the desired medium (HDR-CX150/XR150) [YES] [YES] . Confirm the model name of your camcorder. The main differences in specification between models. Carl Zeiss lens Your camcorder is a difference in specification of this manual when there is equipped with high definition image quality (HD) is lit or flashing removing the battery...
...; the desired medium (HDR-CX150/XR150) [YES] [YES] . Confirm the model name of your camcorder. The main differences in specification between models. Carl Zeiss lens Your camcorder is a difference in specification of this manual when there is equipped with high definition image quality (HD) is lit or flashing removing the battery...
Handycam® Handbook
Page 10
Making good use of your camcorder Deleting movies and photos 40 Protecting recorded movies and photos (Protect 41 Dividing a movie 42 Capturing a photo from a movie 43 Dubbing/copying movies and photos from the internal recording media to memory card (HDR-CX150/XR150 44 Dubbing movies ... high definition image quality (HD) disc with a DVD writer, etc., other than DVDirect Express 55 Creating a standard definition image quality (STD) disc with a recorder, etc 56 Customizing your camcorder Using menus 58 Operating menus 58 Using MY MENU 59 Using the OPTION MENU 60 Menu lists 61 MANUAL ...
Making good use of your camcorder Deleting movies and photos 40 Protecting recorded movies and photos (Protect 41 Dividing a movie 42 Capturing a photo from a movie 43 Dubbing/copying movies and photos from the internal recording media to memory card (HDR-CX150/XR150 44 Dubbing movies ... high definition image quality (HD) disc with a DVD writer, etc., other than DVDirect Express 55 Creating a standard definition image quality (STD) disc with a recorder, etc 56 Customizing your camcorder Using menus 58 Operating menus 58 Using MY MENU 59 Using the OPTION MENU 60 Menu lists 61 MANUAL ...

Handycam® Handbook
Page 18
...memory card you can use with your camcorder Only "Memory Stick PRO Duo" (Mark2) media, "Memory Stick PRO-HG Duo" media, SD memory cards (Class 4 or faster) and SDHC memory cards (Class 4 or faster) can be used with this manual, "Memory Stick PRO Duo" (Mark2) media and "Memory...icon The icon displayed may vary depending on a memory card (HDR-CX150/XR150). Inserting a memory card Notes Set the recording medium to [MEMORY CARD] to operate with this camcorder. In this camcorder. A MultiMediaCard cannot be used with your model. Selecting ...
...memory card you can use with your camcorder Only "Memory Stick PRO Duo" (Mark2) media, "Memory Stick PRO-HG Duo" media, SD memory cards (Class 4 or faster) and SDHC memory cards (Class 4 or faster) can be used with this manual, "Memory Stick PRO Duo" (Mark2) media and "Memory...icon The icon displayed may vary depending on a memory card (HDR-CX150/XR150). Inserting a memory card Notes Set the recording medium to [MEMORY CARD] to operate with this camcorder. In this camcorder. A MultiMediaCard cannot be used with your model. Selecting ...
Handycam® Handbook
Page 37
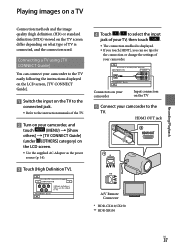
HDMI OUT jack * ** A/V Remote Connector * HDR-CX110/CX150 ** HDR-XR150 US 37 Connectors on your camcorder Input connectors on the TV Connect your camcorder to select the input jack of your TV, then touch . The connection medhod is connected, and... to the instruction manuals of the TV. Turn on your camcorder, and touch (MENU) [Show others] [TV CONNECT Guide] (under [OTHERS] category) on the LCD screen. Use the supplied AC Adaptor as the power source (p. 14). Touch [High Definition TV]. ...
HDMI OUT jack * ** A/V Remote Connector * HDR-CX110/CX150 ** HDR-XR150 US 37 Connectors on your camcorder Input connectors on the TV Connect your camcorder to select the input jack of your TV, then touch . The connection medhod is connected, and... to the instruction manuals of the TV. Turn on your camcorder, and touch (MENU) [Show others] [TV CONNECT Guide] (under [OTHERS] category) on the LCD screen. Use the supplied AC Adaptor as the power source (p. 14). Touch [High Definition TV]. ...

Handycam® Handbook
Page 39
... commander of your camcorder to a "BRAVIA" Sync compatible TV launched in 2008 or later with the HDMI cable. Using "BRAVIA" Sync You can display index screens such as follows: HDMI component S VIDEO video HDMI (High Definition Multimedia Interface) is...Tips If you turn off simultaneously. Refer to the instruction manual of the TV for details. The operation of "BRAVIA" Sync differs according to the instruction manual of your TV for connecting your camcorder. Some TVs may not function correctly (e.g., no sound ...
... commander of your camcorder to a "BRAVIA" Sync compatible TV launched in 2008 or later with the HDMI cable. Using "BRAVIA" Sync You can display index screens such as follows: HDMI component S VIDEO video HDMI (High Definition Multimedia Interface) is...Tips If you turn off simultaneously. Refer to the instruction manual of the TV for details. The operation of "BRAVIA" Sync differs according to the instruction manual of your TV for connecting your camcorder. Some TVs may not function correctly (e.g., no sound ...
Handycam® Handbook
Page 49
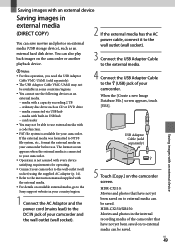
...(sold separately) 5 Touch [Copy.] on available external media, go to the Sony support website in your country/region. 1 Connect the AC Adaptor and the power cord (mains lead) to the DC IN jack of your camcorder and the wall outlet (wall socket). 4 Connect the USB Adaptor Cable to ...AC adaptor (p. 14). Refer to the instruction manual supplied with the external media. For details on the camcorder screen. US 49 USB Adaptor Cable (sold separately). The USB Adaptor Cable VMC-UAM1 may not be saved. HDR-CX110: Movies and photos that have not yet been saved ...
...(sold separately) 5 Touch [Copy.] on available external media, go to the Sony support website in your country/region. 1 Connect the AC Adaptor and the power cord (mains lead) to the DC IN jack of your camcorder and the wall outlet (wall socket). 4 Connect the USB Adaptor Cable to ...AC adaptor (p. 14). Refer to the instruction manual supplied with the external media. For details on the camcorder screen. US 49 USB Adaptor Cable (sold separately). The USB Adaptor Cable VMC-UAM1 may not be saved. HDR-CX110: Movies and photos that have not yet been saved ...
Handycam® Handbook
Page 52
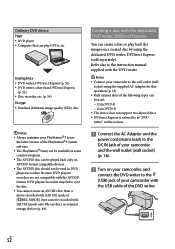
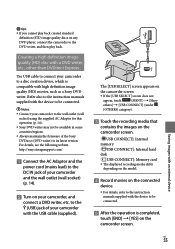
Save a movie recorded with [HD FX] mode of [ REC MODE]. Refer also to the instruction manual supplied with the DVD writer. Notes Connect your camcorder to the wall outlet (wall socket) using the dedicated DVD writer, DVDirect Express (sold separately). US 52 Creating a ... (USB) jack of your camcorder with the USB cable of the DVD writer. Creating device DVD writer, DVDirect Express (p. 52) DVD writer, other than DVDirect Express (p. 55) Disc recorder, etc. (p. 56) Disc type Standard definition image quality (STD) disc ...
Save a movie recorded with [HD FX] mode of [ REC MODE]. Refer also to the instruction manual supplied with the DVD writer. Notes Connect your camcorder to the wall outlet (wall socket) using the dedicated DVD writer, DVDirect Express (sold separately). US 52 Creating a ... (USB) jack of your camcorder with the USB cable of the DVD writer. Creating device DVD writer, DVDirect Express (p. 52) DVD writer, other than DVDirect Express (p. 55) Disc recorder, etc. (p. 56) Disc type Standard definition image quality (STD) disc ...
Handycam® Handbook
Page 55
...any DVD player, connect the camcorder to the DC IN jack of your camcorder and the wall outlet (wall socket) (p. 14). Turn on the camcorder screen. Saving images with high definition image quality (HD) movies, such as a Sony DVD writer. Creating a high definition image quality (HD) disc... Memory card The displayed recording media differ depending on the model. Record movies on the connected device. For details, refer to a disc creation device, which is completed, touch [END] [YES] on your camcorder to the instruction manuals supplied...
...any DVD player, connect the camcorder to the DC IN jack of your camcorder and the wall outlet (wall socket) (p. 14). Turn on the camcorder screen. Saving images with high definition image quality (HD) movies, such as a Sony DVD writer. Creating a high definition image quality (HD) disc... Memory card The displayed recording media differ depending on the model. Record movies on the connected device. For details, refer to a disc creation device, which is completed, touch [END] [YES] on your camcorder to the instruction manuals supplied...
Handycam® Handbook
Page 56
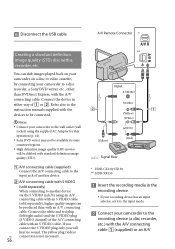
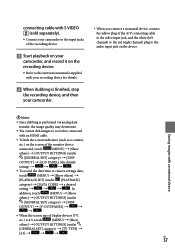
...Refer also to the instruction manuals supplied with an A/V connecting cable. A/V Remote Connector * Creating a standard definition image quality (STD) disc with an S VIDEO cable. You can be connected. Notes Connect your camcorder to a disc recorder, a Sony DVD writer, etc., other ...56 ** Input S VIDEO (Yellow) VIDEO (Yellow) (White) AUDIO (Red) Signal flow * HDR-CX110/CX150 ** HDR-XR150 Insert the recording media in some countries/regions. High definition image quality (HD) movies will hear no sound. Connect the white and red plug (left/...
...Refer also to the instruction manuals supplied with an A/V connecting cable. A/V Remote Connector * Creating a standard definition image quality (STD) disc with an S VIDEO cable. You can be connected. Notes Connect your camcorder to a disc recorder, a Sony DVD writer, etc., other ...56 ** Input S VIDEO (Yellow) VIDEO (Yellow) (White) AUDIO (Red) Signal flow * HDR-CX110/CX150 ** HDR-XR150 Insert the recording media in some countries/regions. High definition image quality (HD) movies will hear no sound. Connect the white and red plug (left/...
Handycam® Handbook
Page 57
...; . When the screen size of display devices (TV, etc.) is finished, stop the recording device, and then your camcorder, and record it on the recording device. Refer to the audio input jack on the screen of the monitor device connected, touch (MENU) &#... Start playback on your camcorder. When you connect a monaural device, connect the yellow plug of the A/V connecting cable to the video input jack, and the white (left channel) or the red (right channel) plug to the instruction manuals supplied with an HDMI cable. ...
...; . When the screen size of display devices (TV, etc.) is finished, stop the recording device, and then your camcorder, and record it on the recording device. Refer to the audio input jack on the screen of the monitor device connected, touch (MENU) &#... Start playback on your camcorder. When you connect a monaural device, connect the yellow plug of the A/V connecting cable to the video input jack, and the white (left channel) or the red (right channel) plug to the instruction manuals supplied with an HDMI cable. ...
Handycam® Handbook
Page 58
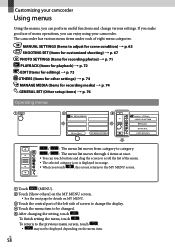
...depending on MY MENU. Touch the central part of the left side of eight menu categories. The camcorder has various menu items under each of screen to change various settings. MANUAL SETTINGS (Items to adjust for scene condition) p. 63 SHOOTING SET (Items for customized shooting) &#.../ : The menu list moves from category to category. / : The menu list moves through 4 items at once. You can enjoy using your camcorder Using menus Using the menus, you touch , the screen returns to the MY MENU screen. Touch (MENU). Touch [Show others] on ...
...depending on MY MENU. Touch the central part of the left side of eight menu categories. The camcorder has various menu items under each of screen to change various settings. MANUAL SETTINGS (Items to adjust for scene condition) p. 63 SHOOTING SET (Items for customized shooting) &#.../ : The menu list moves from category to category. / : The menu list moves through 4 items at once. You can enjoy using your camcorder Using menus Using the menus, you touch , the screen returns to the MY MENU screen. Touch (MENU). Touch [Show others] on ...
Handycam® Handbook
Page 59
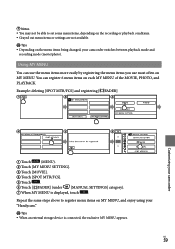
... you use most often on the menu items being changed, your camcorder Touch (MENU). Touch [MY MENU SETTING]. Touch [MOVIE]. Touch [SPOT MTR/FCS]. Touch . Touch [ FADER] (under [MANUAL SETTINGS] category). When MY MENU is connected, the exclusive... Tips Depending on MY MENU. Using MY MENU You can register 6 menu items on MY MENU, and enjoy using your "Handycam." Tips When an external storage device is displayed, touch . Notes You may not be able to register...
... you use most often on the menu items being changed, your camcorder Touch (MENU). Touch [MY MENU SETTING]. Touch [MOVIE]. Touch [SPOT MTR/FCS]. Touch . Touch [ FADER] (under [MANUAL SETTINGS] category). When MY MENU is connected, the exclusive... Tips Depending on MY MENU. Using MY MENU You can register 6 menu items on MY MENU, and enjoy using your "Handycam." Tips When an external storage device is displayed, touch . Notes You may not be able to register...

Handycam® Handbook
Page 61
Menu lists (MANUAL SETTINGS) category SCENE SELECTION 63 FADER 63 WHITE BAL. 64 SPOT MTR/FCS 65 SPOT METER 65 SPOT FOCUS 65 EXPOSURE 65 FOCUS 66 TELE ... PLAYLIST EDIT ADD/ ADD 46 ADD by date/ ADD by date 47 ERASE/ ERASE 47 ERASE ALL/ ERASE ALL 47 MOVE/ MOVE 48 Customizing your camcorder US 61
Menu lists (MANUAL SETTINGS) category SCENE SELECTION 63 FADER 63 WHITE BAL. 64 SPOT MTR/FCS 65 SPOT METER 65 SPOT FOCUS 65 EXPOSURE 65 FOCUS 66 TELE ... PLAYLIST EDIT ADD/ ADD 46 ADD by date/ ADD by date 47 ERASE/ ERASE 47 ERASE ALL/ ERASE ALL 47 MOVE/ MOVE 48 Customizing your camcorder US 61
Handycam® Handbook
Page 63
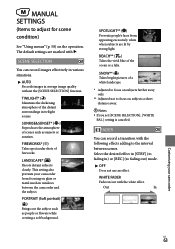
.... Select the desired effect in [STBY] (to fading in average image quality without the [SCENE SELECTION] function. Out In Customizing your camcorder from appearing excessively white when subjects are marked with the white effect. FIREWORKS* ( ) Takes spectacular shots of a white landscape. * ...Adjusted to focus on subjects farther away only. ** Adjusted not to focus on the operation. MANUAL SETTINGS (Items to adjust for scene condition) See "Using menus" (p. 58) on subjects a short distance away. Notes If you ...
.... Select the desired effect in [STBY] (to fading in average image quality without the [SCENE SELECTION] function. Out In Customizing your camcorder from appearing excessively white when subjects are marked with the white effect. FIREWORKS* ( ) Takes spectacular shots of a white landscape. * ...Adjusted to focus on subjects farther away only. ** Adjusted not to focus on the operation. MANUAL SETTINGS (Items to adjust for scene condition) See "Using menus" (p. 58) on subjects a short distance away. Notes If you ...
Handycam® Handbook
Page 65
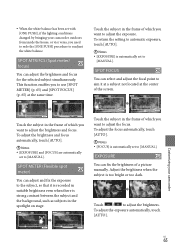
...contrast between the subject and the background, such as subjects in the spotlight on stage. Customizing your camcorder outdoors from inside the house, or vice versa, you need to redo the [ONE PUSH] procedure to [MANUAL]. To adjust the brightness and focus automatically, touch [AUTO]. Notes [EXPOSURE].../FCS (Spot meter/ focus) You can select and adjust the focal point to aim it is recorded in the frame of a picture manually. SPOT FOCUS You can adjust the brightness and focus for the selected subject simultaneously. This function enables you want to the subject, so ...
...contrast between the subject and the background, such as subjects in the spotlight on stage. Customizing your camcorder outdoors from inside the house, or vice versa, you need to redo the [ONE PUSH] procedure to [MANUAL]. To adjust the brightness and focus automatically, touch [AUTO]. Notes [EXPOSURE].../FCS (Spot meter/ focus) You can select and adjust the focal point to aim it is recorded in the frame of a picture manually. SPOT FOCUS You can adjust the brightness and focus for the selected subject simultaneously. This function enables you want to the subject, so ...
Handycam® Handbook
Page 66
...to adjust the focus. Touch (nearby subject)/ (distant subject) to focus automatically. You can take some time. Adjust the focus manually ([FOCUS], p. 66) when it is dark and focus adjustment is difficult) appears for a few seconds in the following cases. (This... under the ordinary shooting conditions, can adjust the focus manually. To adjust the focus automatically, touch [AUTO]. Notes When you set [FOCUS] to [MANUAL], appears. The minimum possible distance between camcorder and subject while maintaining sharp focus is about 1 cm...
...to adjust the focus. Touch (nearby subject)/ (distant subject) to focus automatically. You can take some time. Adjust the focus manually ([FOCUS], p. 66) when it is dark and focus adjustment is difficult) appears for a few seconds in the following cases. (This... under the ordinary shooting conditions, can adjust the focus manually. To adjust the focus automatically, touch [AUTO]. Notes When you set [FOCUS] to [MANUAL], appears. The minimum possible distance between camcorder and subject while maintaining sharp focus is about 1 cm...
Handycam® Handbook
Page 70
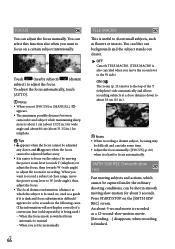
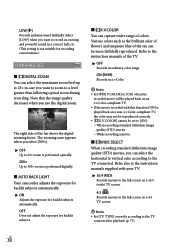
... wider range of the sea can be set to [ON]: When recording standard definition image quality (STD) movies While recording a movie WIDE SELECT When recording standard definition image quality (STD) movies, you can select the maximum zoom level up to 25×... as the brilliant color of flowers and turquoise blue of colors. Refer also to the instruction manuals supplied with this function [ON] is performed digitally. AUTO BACK LIGHT Your camcorder adjusts the exposure for backlit subjects automatically. ON Adjusts the exposure for playback (p....
... wider range of the sea can be set to [ON]: When recording standard definition image quality (STD) movies While recording a movie WIDE SELECT When recording standard definition image quality (STD) movies, you can select the maximum zoom level up to 25×... as the brilliant color of flowers and turquoise blue of colors. Refer also to the instruction manuals supplied with this function [ON] is performed digitally. AUTO BACK LIGHT Your camcorder adjusts the exposure for backlit subjects automatically. ON Adjusts the exposure for playback (p....
Handycam® Handbook
Page 77
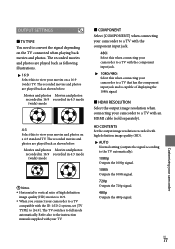
... back as shown below . Refer also to the instruction manuals supplied with your TV. COMPONENT Select [COMPONENT] when connecting your camcorder to a TV with the component input jack. 480i Select this when connecting your camcorder to a TV with the component input jack. ... mode 4:3 Select this to full mode automatically. The TV switches to view your camcorder to [16:9]. Customizing your camcorder to a TV compatible with the ID-1/ID-2 system, set [TV TYPE] to a TV with high definition image quality (HD). AUTO Normal setting (outputs the signal according to...
... back as shown below . Refer also to the instruction manuals supplied with your TV. COMPONENT Select [COMPONENT] when connecting your camcorder to a TV with the component input jack. 480i Select this when connecting your camcorder to a TV with the component input jack. ... mode 4:3 Select this to full mode automatically. The TV switches to view your camcorder to [16:9]. Customizing your camcorder to a TV compatible with the ID-1/ID-2 system, set [TV TYPE] to a TV with high definition image quality (HD). AUTO Normal setting (outputs the signal according to...

Handycam® Handbook
Page 83
...ratio of high definition image quality (HD) movies is not a malfunction. This is supplied from the AC Adaptor. Leave the camcorder there for excessive vibrations. This is not a malfunction. This is not a malfunction. Turn off your camcorder and take it for auto focus. Adjust the focus manually (p. 66... of the movie (16:9 (wide)/4:3) cannot be played back. Select the type of recording media you want to play back (p. 17). (HDR-CX150/XR150) Select the image quality of the movie you record a TV screen or computer screen. Set [ STEADYSHOT] to [ACTIVE...
...ratio of high definition image quality (HD) movies is not a malfunction. This is supplied from the AC Adaptor. Leave the camcorder there for excessive vibrations. This is not a malfunction. This is not a malfunction. Turn off your camcorder and take it for auto focus. Adjust the focus manually (p. 66... of the movie (16:9 (wide)/4:3) cannot be played back. Select the type of recording media you want to play back (p. 17). (HDR-CX150/XR150) Select the image quality of the movie you record a TV screen or computer screen. Set [ STEADYSHOT] to [ACTIVE...
Handycam® Handbook
Page 103
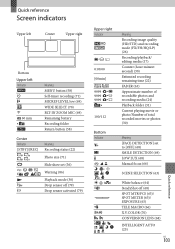
... playing movie or photo/Number of total recorded movies or photos (30) Meaning [FACE DETECTION] set to [OFF] (68) SMILE DETECTION (69) LOW LUX (68) Manual focus (66) SCENE SELECTION (63) White balance (64) SteadyShot off (68) SPOT MTR/FCS (65)/ SPOT METER (65)/ EXPOSURE (65) TELE MACRO (66) X.V.COLOR (70...
... playing movie or photo/Number of total recorded movies or photos (30) Meaning [FACE DETECTION] set to [OFF] (68) SMILE DETECTION (69) LOW LUX (68) Manual focus (66) SCENE SELECTION (63) White balance (64) SteadyShot off (68) SPOT MTR/FCS (65)/ SPOT METER (65)/ EXPOSURE (65) TELE MACRO (66) X.V.COLOR (70...


