Operating Guide (Large File - 11.29 MB)
Page 5
...fire or the like. Disconnect the AC Adaptor from earphones and headphones can help preserve our environment by Sony. • Dispose of used rechargeable batteries to the collection and recycling location nearest you. You can ...Do not crush and do not expose the battery pack to any malfunction occurs while using your camcorder. • Do not use the AC Adaptor placed in a narrow space, such as between a wall and furniture...the U.S.A. Read this first Before operating this unit, please read this manual thoroughly, and retain it while connected to the wall outlet (wall socket) via the AC Adaptor.
...fire or the like. Disconnect the AC Adaptor from earphones and headphones can help preserve our environment by Sony. • Dispose of used rechargeable batteries to the collection and recycling location nearest you. You can ...Do not crush and do not expose the battery pack to any malfunction occurs while using your camcorder. • Do not use the AC Adaptor placed in a narrow space, such as between a wall and furniture...the U.S.A. Read this first Before operating this unit, please read this manual thoroughly, and retain it while connected to the wall outlet (wall socket) via the AC Adaptor.
Operating Guide (Large File - 11.29 MB)
Page 6
...modifications not expressly approved in this manual could void your authority to operate this device must be determined by one or more of the FCC Rules. For the State of Conformity Trade Name: SONY Model No.: HDR-AX2000 Responsible Party: Sony Electronics Inc. These limits are cautioned...residential installation. This equipment generates, uses, and can be used with the equipment in the U.S.A. special handling may call: Sony Customer Information Center 1-800-222-SONY (7669). CAUTION You are designed to Part 15 of FCC Rules. Connect the equipment into an outlet on a circuit...
...modifications not expressly approved in this manual could void your authority to operate this device must be determined by one or more of the FCC Rules. For the State of Conformity Trade Name: SONY Model No.: HDR-AX2000 Responsible Party: Sony Electronics Inc. These limits are cautioned...residential installation. This equipment generates, uses, and can be used with the equipment in the U.S.A. special handling may call: Sony Customer Information Center 1-800-222-SONY (7669). CAUTION You are designed to Part 15 of FCC Rules. Connect the equipment into an outlet on a circuit...
Operating Guide (Large File - 11.29 MB)
Page 9
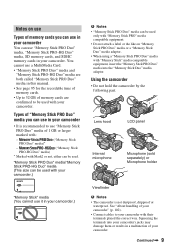
... are both called "Memory Stick PRO Duo" media in your camcorder.) Viewfinder b Notes • The camcorder is recommended to your camcorder. Types of "Memory Stick PRO Duo" media you can use in your camcorder. Using the camcorder • Do not hold the camcorder by the following part. Squeezing the terminals into...Connect cables to use "Memory Stick PRO Duo" media of memory cards you can use in your camcorder You can use "Memory Stick PRO Duo" media, "Memory Stick PRO-HG Duo" media, SD memory cards, and SDHC memory cards in this manual. • See page 95 for the recordable ...
... are both called "Memory Stick PRO Duo" media in your camcorder.) Viewfinder b Notes • The camcorder is recommended to your camcorder. Types of "Memory Stick PRO Duo" media you can use in your camcorder. Using the camcorder • Do not hold the camcorder by the following part. Squeezing the terminals into...Connect cables to use "Memory Stick PRO Duo" media of memory cards you can use in your camcorder You can use "Memory Stick PRO Duo" media, "Memory Stick PRO-HG Duo" media, SD memory cards, and SDHC memory cards in this manual. • See page 95 for the recordable ...
Operating Guide (Large File - 11.29 MB)
Page 11
...camcorder if necessary (p. 23). • Design and specifications of the memory card, it is recommended that memory card may not play back normally on a separate recordable media, such as the MENU items. About this manual • The images of the memory card. DVD media containing AVCHD... the camcorder • You can be fragmented. The phenomena can operate the camcorder using commercially available data deletion software to change without warning. Save all your camcorder with a flash. If this camcorder. Also, movies recorded on other than this manual for ...
...camcorder if necessary (p. 23). • Design and specifications of the memory card, it is recommended that memory card may not play back normally on a separate recordable media, such as the MENU items. About this manual • The images of the memory card. DVD media containing AVCHD... the camcorder • You can be fragmented. The phenomena can operate the camcorder using commercially available data deletion software to change without warning. Save all your camcorder with a flash. If this camcorder. Also, movies recorded on other than this manual for ...
Operating Guide (Large File - 11.29 MB)
Page 12
... 2: Attaching the lens hood with lens cover 16 Step 3: Charging the battery pack 17 Step 4: Turning the power on and holding your camcorder properly ..... 19 Step 5: Adjusting the LCD panel and viewfinder 20 Step 6: Setting the date and time 22 Changing the language setting 23 ... a memory card 23 Recording/Playback Recording 25 Selecting the recording format 27 Changing the settings of your camcorder recordings 29 Adjusting the zoom 29 Adjusting the focus manually 30 Adjusting the image brightness 31 Adjusting to natural color (White balance 33 Customizing the picture quality (...
... 2: Attaching the lens hood with lens cover 16 Step 3: Charging the battery pack 17 Step 4: Turning the power on and holding your camcorder properly ..... 19 Step 5: Adjusting the LCD panel and viewfinder 20 Step 6: Setting the date and time 22 Changing the language setting 23 ... a memory card 23 Recording/Playback Recording 25 Selecting the recording format 27 Changing the settings of your camcorder recordings 29 Adjusting the zoom 29 Adjusting the focus manually 30 Adjusting the image brightness 31 Adjusting to natural color (White balance 33 Customizing the picture quality (...
Operating Guide (Large File - 11.29 MB)
Page 25
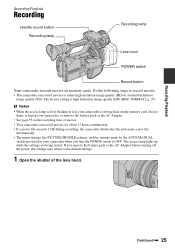
.... • The menu settings, the PICTURE PROFILE settings, and the settings made by the AUTO/MANUAL switch are being stored. The factory setting is lit or flashing in red, your camcorder when you remove the battery pack or the AC Adaptor before turning off the power, the settings ... definition image quality (SD). If you turn the POWER switch to the default settings. 1 Open the shutter of movies. • Your camcorder can record movies in your camcorder is writing data on memory cards. b Notes • When the access lamp is high definition image quality (HD) ([REC FORMAT], p....
.... • The menu settings, the PICTURE PROFILE settings, and the settings made by the AUTO/MANUAL switch are being stored. The factory setting is lit or flashing in red, your camcorder when you remove the battery pack or the AC Adaptor before turning off the power, the settings ... definition image quality (SD). If you turn the POWER switch to the default settings. 1 Open the shutter of movies. • Your camcorder can record movies in your camcorder is writing data on memory cards. b Notes • When the access lamp is high definition image quality (HD) ([REC FORMAT], p....
Operating Guide (Large File - 11.29 MB)
Page 30
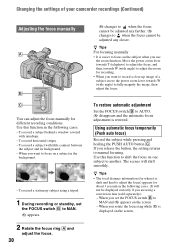
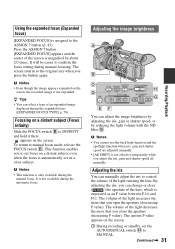
... cases. - To record horizontal stripes. - Use this function in the following cases. (It will shift smoothly. You can adjust the focus manually for when it is restored. To record a subject behind a window covered with little contrast between the subject and its background. - When you...changes to adjust the focus) appears for recording. • When you want to record a close-up image of your camcorder recordings (Continued) Adjusting the focus manually 9 changes to when the focus cannot be adjusted any closer. The scenes will not be displayed correctly if you use ...
... cases. - To record horizontal stripes. - Use this function in the following cases. (It will shift smoothly. You can adjust the focus manually for when it is restored. To record a subject behind a window covered with little contrast between the subject and its background. - When you...changes to adjust the focus) appears for recording. • When you want to record a close-up image of your camcorder recordings (Continued) Adjusting the focus manually 9 changes to when the focus cannot be adjusted any closer. The scenes will not be displayed correctly if you use ...
Operating Guide (Large File - 11.29 MB)
Page 31
...increasing F value). The volume of the light increases the more that you open the aperture (decreasing F value). It is automatically set the AUTO/MANUAL switch H to the ASSIGN 7 button (p. 43). z Tips • You can change or close subject. b Notes • You cannot use... switch B. Using the expanded focus (Expanded focus) [EXPANDED FOCUS] is not effective temporarily while you adjust the iris, gain and shutter speed all manually. Focusing on the screen. b Notes • This function is not expanded. b Notes • Even though the image appears expanded on a...
...increasing F value). The volume of the light increases the more that you open the aperture (decreasing F value). It is automatically set the AUTO/MANUAL switch H to the ASSIGN 7 button (p. 43). z Tips • You can change or close subject. b Notes • You cannot use... switch B. Using the expanded focus (Expanded focus) [EXPANDED FOCUS] is not effective temporarily while you adjust the iris, gain and shutter speed all manually. Focusing on the screen. b Notes • This function is not expanded. b Notes • Even though the image appears expanded on a...
Operating Guide (Large File - 11.29 MB)
Page 32
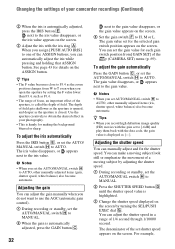
....4, such as [---]. z Tips • When you open the aperture by adjusting the shutter speed. 1 During recording or standby, set the AUTO/MANUAL switch H to MANUAL. 2 When the gain is highlighted. 3 Change the shutter speed displayed on the screen. 3 Set the gain switch F to T even when ... subject look still or emphasize the movement of 1/4 second through 1/10000 second. You can adjust the shutter speed in your camcorder recordings (Continued) 2 When the iris is closed. Adjusting the gain You can adjust the gain manually when you can manually adjust and fix the shutter speed.
....4, such as [---]. z Tips • When you open the aperture by adjusting the shutter speed. 1 During recording or standby, set the AUTO/MANUAL switch H to MANUAL. 2 When the gain is highlighted. 3 Change the shutter speed displayed on the screen. 3 Set the gain switch F to T even when ... subject look still or emphasize the movement of 1/4 second through 1/10000 second. You can adjust the shutter speed in your camcorder recordings (Continued) 2 When the iris is closed. Adjusting the gain You can adjust the gain manually when you can manually adjust and fix the shutter speed.
Operating Guide (Large File - 11.29 MB)
Page 33
... the iris automatic adjustment, set the AUTO/MANUAL switch H to AUTO. Make sure that the ND filter is too bright. Adjusting to OFF. Manual focusing with the ND filter. • If the camcorder cannot detect the ND filter position (OFF/1/2/3), flashes on the screen when you change colors,... or may be distorted. • When adjusting the iris manually, the ND filter icon does not flash even if the light...
... the iris automatic adjustment, set the AUTO/MANUAL switch H to AUTO. Make sure that the ND filter is too bright. Adjusting to OFF. Manual focusing with the ND filter. • If the camcorder cannot detect the ND filter position (OFF/1/2/3), flashes on the screen when you change colors,... or may be distorted. • When adjusting the iris manually, the ND filter icon does not flash even if the light...
Operating Guide (Large File - 11.29 MB)
Page 34
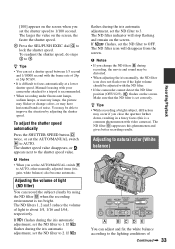
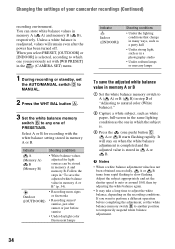
...light sources can store white balance values in A or B. Adjust the subject appropriately and set the AUTO/MANUAL switch D to MANUAL. 2 Press the WHT BAL button A. 3 Set the white balance memory switch B to any one ...respectively. b Notes • When a white balance adjustment value has not been obtained successfully, A or B turns from rapid flashing to natural color (White balance)." 2 Capture a white subject, such as white paper, full-screen in the same lighting ... the one in step 3 of your camcorder recordings (Continued) recording environment. A or B starts flashing rapidly.
...light sources can store white balance values in A or B. Adjust the subject appropriately and set the AUTO/MANUAL switch D to MANUAL. 2 Press the WHT BAL button A. 3 Set the white balance memory switch B to any one ...respectively. b Notes • When a white balance adjustment value has not been obtained successfully, A or B turns from rapid flashing to natural color (White balance)." 2 Capture a white subject, such as white paper, full-screen in the same lighting ... the one in step 3 of your camcorder recordings (Continued) recording environment. A or B starts flashing rapidly.
Operating Guide (Large File - 11.29 MB)
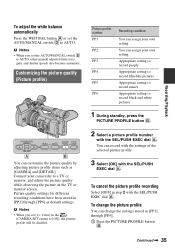
Page 35
... the settings stored in [PP1] through [PP6]. 1 Press the PICTURE PROFILE button B. To change the picture profile You can assign your camcorder to a TV or monitor, and adjust the picture quality while observing the picture on the TV or monitor screen. Picture quality settings for.../PUSH EXEC dial A. Recording/Playback To adjust the white balance automatically Press the WHT BAL button A or set the AUTO/MANUAL switch D to AUTO, other manual adjusted items (iris, gain, and shutter speed) also become automatic. Appropriate setting to record people Appropriate setting to record film...
... the settings stored in [PP1] through [PP6]. 1 Press the PICTURE PROFILE button B. To change the picture profile You can assign your camcorder to a TV or monitor, and adjust the picture quality while observing the picture on the TV or monitor screen. Picture quality settings for.../PUSH EXEC dial A. Recording/Playback To adjust the white balance automatically Press the WHT BAL button A or set the AUTO/MANUAL switch D to AUTO, other manual adjusted items (iris, gain, and shutter speed) also become automatic. Appropriate setting to record people Appropriate setting to record film...
Operating Guide (Large File - 11.29 MB)
Page 41
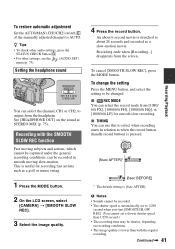
... [1080/60i LP] for recording fast actions such as a slow-motion movie. To restore automatic adjustment Set the AUTO/MAN (CH1/CH2) switch E of the manually adjusted channel to output from the headphone. Setting the headphone sound You can be shorter, depending on the sound at STEREO MIX (p. 75). x REC MODE...
... [1080/60i LP] for recording fast actions such as a slow-motion movie. To restore automatic adjustment Set the AUTO/MAN (CH1/CH2) switch E of the manually adjusted channel to output from the headphone. Setting the headphone sound You can be shorter, depending on the sound at STEREO MIX (p. 75). x REC MODE...
Operating Guide (Large File - 11.29 MB)
Page 49
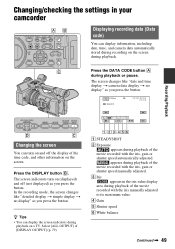
...on the screen during playback on a TV. Press the DISPLAY button B. The screen indicators turn on the screen. C Iris appears in your camcorder Displaying recording data (Data code) You can turn on (displayed) and off the display of the time code, and other information on and off... in the iris value display area during playback of the movie recorded with the iris, gain or shutter speed manually adjusted. appears during playback of the movie recorded with the iris manually adjusted to its maximum value. D Gain E Shutter speed F White balance Continued , 49 Press the DATA ...
...on the screen during playback on a TV. Press the DISPLAY button B. The screen indicators turn on the screen. C Iris appears in your camcorder Displaying recording data (Data code) You can turn on (displayed) and off the display of the time code, and other information on and off... in the iris value display area during playback of the movie recorded with the iris, gain or shutter speed manually adjusted. appears during playback of the movie recorded with the iris manually adjusted to its maximum value. D Gain E Shutter speed F White balance Continued , 49 Press the DATA ...
Operating Guide (Large File - 11.29 MB)
Page 51
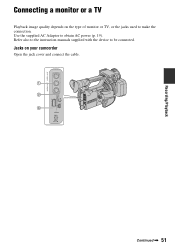
Jacks on the type of monitor or TV, or the jacks used to make the connection. Continued , 51 Refer also to the instruction manuals supplied with the device to obtain AC power (p. 19). Use the supplied AC Adaptor to be connected. Recording/Playback Connecting a monitor or a TV Playback image quality depends on your camcorder Open the jack cover and connect the cable.
Jacks on the type of monitor or TV, or the jacks used to make the connection. Continued , 51 Refer also to the instruction manuals supplied with the device to obtain AC power (p. 19). Use the supplied AC Adaptor to be connected. Recording/Playback Connecting a monitor or a TV Playback image quality depends on your camcorder Open the jack cover and connect the cable.
Operating Guide (Large File - 11.29 MB)
Page 69
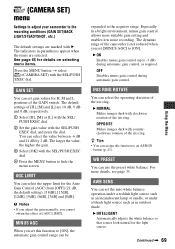
... EXEC dial. MINUS AGC When you set [MINUS AGC] to [ON]. The dynamic range of the camcorder is not reduced when you set this function to an ASSIGN button (p. 43). IRIS RING ROTATE You ... 4 Press the MENU button to hide the menu screen. b Notes • If you adjust the gain manually, you cannot obtain the effect of [AGC LIMIT]. WB PRESET You can select the value between -6 dB and... can be expanded to the negative range. (CAMERA SET) menu Settings to adjust your camcorder to the recording conditions (GAIN SET/BACK LIGHT/STEADYSHOT, etc.) The default settings are marked with counterclockwise ...
... EXEC dial. MINUS AGC When you set [MINUS AGC] to [ON]. The dynamic range of the camcorder is not reduced when you set this function to an ASSIGN button (p. 43). IRIS RING ROTATE You ... 4 Press the MENU button to hide the menu screen. b Notes • If you adjust the gain manually, you cannot obtain the effect of [AGC LIMIT]. WB PRESET You can select the value between -6 dB and... can be expanded to the negative range. (CAMERA SET) menu Settings to adjust your camcorder to the recording conditions (GAIN SET/BACK LIGHT/STEADYSHOT, etc.) The default settings are marked with counterclockwise ...
Operating Guide (Large File - 11.29 MB)
Page 70
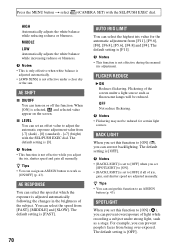
...standard) - [+7] (bright) with the SEL/PUSH EXEC dial. b Notes • This function is [OFF]. The default setting is not effective during the manual iris adjustment. z Tips • You can select the highest iris value for certain light sources. . AE SHIFT x ON/OFF You can select the speed ...in the brightness of light while recording a subject under a clear sky or the sun. Flickering of iris, gain, and shutter speed are adjusted manually. z Tips • You can correct backlighting. The default setting is [OFF]. OFF Not reduce flickering. The default setting is [F11]. ...
...standard) - [+7] (bright) with the SEL/PUSH EXEC dial. b Notes • This function is [OFF]. The default setting is not effective during the manual iris adjustment. z Tips • You can select the highest iris value for certain light sources. . AE SHIFT x ON/OFF You can select the speed ...in the brightness of light while recording a subject under a clear sky or the sun. Flickering of iris, gain, and shutter speed are adjusted manually. z Tips • You can correct backlighting. The default setting is [OFF]. OFF Not reduce flickering. The default setting is [F11]. ...
Operating Guide (Large File - 11.29 MB)
Page 71
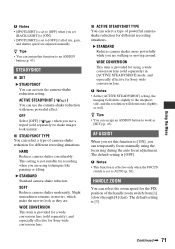
...more powerfully while you are using a wide conversion lens (sold separately) in movies, which make images look as they are adjusted manually. x STEADYSHOT TYPE You can select the zoom speed for the FIX position of camera-shake reduction for different recording situations. b ... tilting. Slight unsteadiness remains in [ACTIVE STEADYSHOT] mode, and especially effective for Sony wide conversion lens. z Tips • You can use a tripod (sold separately), and especially effective for Sony wide conversion lens. ACTIVE STEADYSHOT ( ) You can assign an ASSIGN button to...
...more powerfully while you are using a wide conversion lens (sold separately) in movies, which make images look as they are adjusted manually. x STEADYSHOT TYPE You can select the zoom speed for the FIX position of camera-shake reduction for different recording situations. b ... tilting. Slight unsteadiness remains in [ACTIVE STEADYSHOT] mode, and especially effective for Sony wide conversion lens. z Tips • You can use a tripod (sold separately), and especially effective for Sony wide conversion lens. ACTIVE STEADYSHOT ( ) You can assign an ASSIGN button to...

Operating Guide (Large File - 11.29 MB)
Page 73
... page 65 for playback. • The aspect ratio will be fixed to 16:9 and you cannot set it to 4:3 when you want to the instruction manuals that come with B. Refer also to connect. Using the Menu Continued , 73 The indicators in an aspect ratio that matches the full screen of a 16...
... page 65 for playback. • The aspect ratio will be fixed to 16:9 and you cannot set it to 4:3 when you want to the instruction manuals that come with B. Refer also to connect. Using the Menu Continued , 73 The indicators in an aspect ratio that matches the full screen of a 16...

Operating Guide (Large File - 11.29 MB)
Page 75
... CH1 and CH2 when using an external microphone (sold separately). appears on the status check screen. B SEPARATE Separately applies the AGC for CH1/CH2. x AUDIO MANUAL GAIN You can select either linked or separate audio level control of CH2. B SEPARATE Separately controls the audio levels of sound such as stereo sound...
... CH1 and CH2 when using an external microphone (sold separately). appears on the status check screen. B SEPARATE Separately applies the AGC for CH1/CH2. x AUDIO MANUAL GAIN You can select either linked or separate audio level control of CH2. B SEPARATE Separately controls the audio levels of sound such as stereo sound...


