Operating Guide (Large File - 11.29 MB)
Page 3
... all warnings. • Follow all instructions. • Do not use caution when moving the cart/apparatus combination to avoid injury from the apparatus. • Only use attachments/accessories specified by the manufacturer. • Use only with the cart, stand, tripod, bracket, or table specified by... and the point where they exit from tipover. • Unplug this apparatus near any ventilation openings. When a cart is used, use this apparatus during lightning storms or when unused for your outlet, consult an electrician for replacement of time. IMPORTANT SAFETY INSTRUCTIONS SAVE...
... all warnings. • Follow all instructions. • Do not use caution when moving the cart/apparatus combination to avoid injury from the apparatus. • Only use attachments/accessories specified by the manufacturer. • Use only with the cart, stand, tripod, bracket, or table specified by... and the point where they exit from tipover. • Unplug this apparatus near any ventilation openings. When a cart is used, use this apparatus during lightning storms or when unused for your outlet, consult an electrician for replacement of time. IMPORTANT SAFETY INSTRUCTIONS SAVE...

Operating Guide (Large File - 11.29 MB)
Page 4
IMPORTANT SAFETY INSTRUCTIONS (Continued) • Refer all servicing to rain or moisture, does not operate normally, or has been dropped. • If the shape of the plug does not fit the power outlet, use an attachment plug adaptor of the proper configuration for the power outlet. 4 Servicing is required when the apparatus has been damaged in any way, such as power-supply cord or plug is damaged, liquid has been spilled or objects have fallen into the apparatus, the apparatus has been exposed to qualified service personnel.
IMPORTANT SAFETY INSTRUCTIONS (Continued) • Refer all servicing to rain or moisture, does not operate normally, or has been dropped. • If the shape of the plug does not fit the power outlet, use an attachment plug adaptor of the proper configuration for the power outlet. 4 Servicing is required when the apparatus has been damaged in any way, such as power-supply cord or plug is damaged, liquid has been spilled or objects have fallen into the apparatus, the apparatus has been exposed to qualified service personnel.
Operating Guide (Large File - 11.29 MB)
Page 5
...customers in fire. • Do not handle damaged or leaking lithium ion batteries. • Be sure to charge the battery pack using a genuine Sony battery charger or a device that can cause hearing loss. Continued , 5 CAUTION Replace the battery with the same or equivalent type ...recommended by returning your camcorder. • Do not use the AC Adaptor placed in the instructions. Observe the following cautions. • Do not disassemble. ...
...customers in fire. • Do not handle damaged or leaking lithium ion batteries. • Be sure to charge the battery pack using a genuine Sony battery charger or a device that can cause hearing loss. Continued , 5 CAUTION Replace the battery with the same or equivalent type ...recommended by returning your camcorder. • Do not use the AC Adaptor placed in the instructions. Observe the following cautions. • Do not disassemble. ...
Operating Guide (Large File - 11.29 MB)
Page 6
...Operation is subject to radio communications. 6 However, there is no guarantee that may cause undesired operation. This equipment generates, uses, and can be used in accordance with the limits for a digital device pursuant to provide reasonable protection against harmful interference in a particular installation.... are cautioned that to Part 15 of the FCC Rules. For the State of Conformity Trade Name: SONY Model No.: HDR-AX2000 Responsible Party: Sony Electronics Inc. UL is an internationally recognized safety organization. Consult the dealer or an experienced radio/TV ...
...Operation is subject to radio communications. 6 However, there is no guarantee that may cause undesired operation. This equipment generates, uses, and can be used in accordance with the limits for a digital device pursuant to provide reasonable protection against harmful interference in a particular installation.... are cautioned that to Part 15 of the FCC Rules. For the State of Conformity Trade Name: SONY Model No.: HDR-AX2000 Responsible Party: Sony Electronics Inc. UL is an internationally recognized safety organization. Consult the dealer or an experienced radio/TV ...
Operating Guide (Large File - 11.29 MB)
Page 7
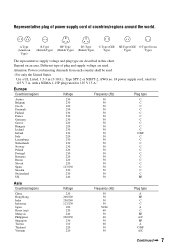
... meeting demands from each country shall be used . A Type (American Type) B Type BF Type B3 Type C Type (CEE SE Type (CEE O Type (Ocean (British Type) (British Type) (British Type) Type) Type) Type) The representative supply voltage and plug type are used . - Depend on an area, Different... type of countries/regions around the world. For only the United States Use a UL Listed, 1.5-3 m (5-10 ft.), Type SPT-2 or NISPT-2, AWG no. 18 power ...
... meeting demands from each country shall be used . A Type (American Type) B Type BF Type B3 Type C Type (CEE SE Type (CEE O Type (Ocean (British Type) (British Type) (British Type) Type) Type) Type) The representative supply voltage and plug type are used . - Depend on an area, Different... type of countries/regions around the world. For only the United States Use a UL Listed, 1.5-3 m (5-10 ft.), Type SPT-2 or NISPT-2, AWG no. 18 power ...
Operating Guide (Large File - 11.29 MB)
Page 9
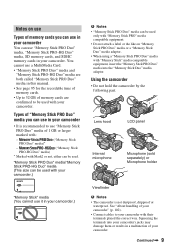
... Microphone (sold separately) or Microphone holder "Memory Stick" media (You cannot use it in your camcorder. Continued , 9 Types of "Memory Stick PRO Duo" media you can use in your camcorder You can use "Memory Stick PRO Duo" media of 1 GB or larger marked with Mark2 or not, either can be used. Squeezing the terminals into the "Memory Stick Duo...
... Microphone (sold separately) or Microphone holder "Memory Stick" media (You cannot use it in your camcorder. Continued , 9 Types of "Memory Stick PRO Duo" media you can use in your camcorder You can use "Memory Stick PRO Duo" media of 1 GB or larger marked with Mark2 or not, either can be used. Squeezing the terminals into the "Memory Stick Duo...
Operating Guide (Large File - 11.29 MB)
Page 10
... battery 10 pack is not possible due to a malfunction of the camcorder, storage media, etc., or even if images or sounds are recorded without any way. Save important data on the memory card on other media such as a computer, before formatting the memory card. • Before starting to record, ...8226; Intense light sources, especially the sun will be erased by placing it in its bag when not in use . Avoid sunlight or other strong light sources when storing your camcorder for the first time. All data recorded on the memory card will converge on the countries/regions. Horizontal lines...
... battery 10 pack is not possible due to a malfunction of the camcorder, storage media, etc., or even if images or sounds are recorded without any way. Save important data on the memory card on other media such as a computer, before formatting the memory card. • Before starting to record, ...8226; Intense light sources, especially the sun will be erased by placing it in its bag when not in use . Avoid sunlight or other strong light sources when storing your camcorder for the first time. All data recorded on the memory card will converge on the countries/regions. Horizontal lines...
Operating Guide (Large File - 11.29 MB)
Page 11
...On playing back movies • Your camcorder is compatible with high definition image quality (HD) • This camcorder captures high definition footage in the AVCHD format. Format the recording media using the supplied application software. If this ...used with the following devices; - DVD media containing AVCHD footage should not be fragmented. Note on disposal/transfer • Even if you may not play back images recorded with a flash. Other AVCHD format compatible devices which are subject to record and save all data or format the memory card on your camcorder...
...On playing back movies • Your camcorder is compatible with high definition image quality (HD) • This camcorder captures high definition footage in the AVCHD format. Format the recording media using the supplied application software. If this ...used with the following devices; - DVD media containing AVCHD footage should not be fragmented. Note on disposal/transfer • Even if you may not play back images recorded with a flash. Other AVCHD format compatible devices which are subject to record and save all data or format the memory card on your camcorder...

Operating Guide (Large File - 11.29 MB)
Page 13
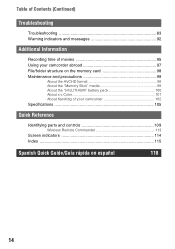
Editing Operating the MODE menu 56 Protecting recorded images (Protect 57 Using the Playlist of movies 58 Creating the Playlist 58 Playing the Playlist 58 Capturing still images from a movie 59 Dividing a movie 60 Deleting movies and ... 62 Preventing data on the memory card from being recovered 63 Repairing the image database file 64 Using the Menu Operating the menu 65 Menu items 67 (CAMERA SET) menu 69 Settings to adjust your camcorder to the recording conditions (GAIN SET/ BACK LIGHT/STEADYSHOT, etc.) (REC/OUT SET) menu 73 Recording...
Editing Operating the MODE menu 56 Protecting recorded images (Protect 57 Using the Playlist of movies 58 Creating the Playlist 58 Playing the Playlist 58 Capturing still images from a movie 59 Dividing a movie 60 Deleting movies and ... 62 Preventing data on the memory card from being recovered 63 Repairing the image database file 64 Using the Menu Operating the menu 65 Menu items 67 (CAMERA SET) menu 69 Settings to adjust your camcorder to the recording conditions (GAIN SET/ BACK LIGHT/STEADYSHOT, etc.) (REC/OUT SET) menu 73 Recording...
Operating Guide (Large File - 11.29 MB)
Page 14
... and messages 92 Additional Information Recording time of movies 95 Using your camcorder abroad 97 File/folder structure on the memory card 98 Maintenance and precautions 99 About the AVCHD format 99 About the "Memory Stick" media 99 About the "InfoLITHIUM" battery pack 100 About x.v.Color... 101 About handling of your camcorder 102 Specifications 105 Quick Reference Identifying parts and controls 109 Wireless...
... and messages 92 Additional Information Recording time of movies 95 Using your camcorder abroad 97 File/folder structure on the memory card 98 Maintenance and precautions 99 About the AVCHD format 99 About the "Memory Stick" media 99 About the "InfoLITHIUM" battery pack 100 About x.v.Color... 101 About handling of your camcorder 102 Specifications 105 Quick Reference Identifying parts and controls 109 Wireless...
Operating Guide (Large File - 11.29 MB)
Page 15
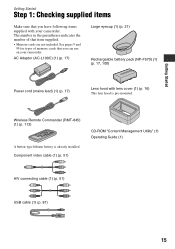
... installed. AC Adaptor (AC-L100C) (1) (p. 17) Large eyecup (1) (p. 21) Rechargeable battery pack (NP-F570) (1) (p. 17, 100) Power cord (mains lead) (1) (p. 17) Lens hood with your camcorder. Wireless Remote Commander (RMT-845) (1) (p. 113) A button-type lithium battery is pre-mounted. See pages 9 and 99 for types of that item supplied. • Memory... "Content Management Utility" (1) Operating Guide (1) A/V connecting cable (1) (p. 51) USB cable (1) (p. 81) 15 Getting Started Getting Started Step 1: Checking supplied items Make sure that you can use on your camcorder.
... installed. AC Adaptor (AC-L100C) (1) (p. 17) Large eyecup (1) (p. 21) Rechargeable battery pack (NP-F570) (1) (p. 17, 100) Power cord (mains lead) (1) (p. 17) Lens hood with your camcorder. Wireless Remote Commander (RMT-845) (1) (p. 113) A button-type lithium battery is pre-mounted. See pages 9 and 99 for types of that item supplied. • Memory... "Content Management Utility" (1) Operating Guide (1) A/V connecting cable (1) (p. 51) USB cable (1) (p. 81) 15 Getting Started Getting Started Step 1: Checking supplied items Make sure that you can use on your camcorder.
Operating Guide (Large File - 11.29 MB)
Page 17
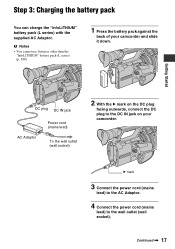
... Getting Started DC plug DC IN jack AC Adaptor Power cord (mains lead) To the wall outlet (wall socket) 2 With the B mark on your camcorder and slide it down. b Notes • You cannot use batteries other than the "InfoLITHIUM" battery pack (L series) (p. 100). 1 Press the battery pack against the back of your...
... Getting Started DC plug DC IN jack AC Adaptor Power cord (mains lead) To the wall outlet (wall socket) 2 With the B mark on your camcorder and slide it down. b Notes • You cannot use batteries other than the "InfoLITHIUM" battery pack (L series) (p. 100). 1 Press the battery pack against the back of your...
Operating Guide (Large File - 11.29 MB)
Page 18
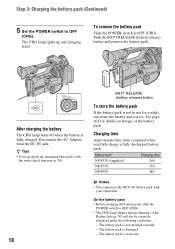
... release) button To store the battery pack If the battery pack is not in use the NP-F330 battery pack with your camcorder. To remove the battery pack Slide the POWER switch to OFF (CHG). • The CHG lamp flashes during charging, or the Battery Info (p. 50) will not be correctly displayed under...
... release) button To store the battery pack If the battery pack is not in use the NP-F330 battery pack with your camcorder. To remove the battery pack Slide the POWER switch to OFF (CHG). • The CHG lamp flashes during charging, or the Battery Info (p. 50) will not be correctly displayed under...
Operating Guide (Large File - 11.29 MB)
Page 19
... in a warm place. - On the AC Adaptor • Do not short-circuit the DC plug of your camcorder, even when the power cord (mains lead) is attached to your camcorder after you use the AC Adaptor to ON. This may cause a malfunction. POWER switch 1 Slide the POWER switch to 86 .... b Notes • The current date and time appear on your camcorder. On the charging time • Time measured with any metallic objects. Using an outside power source You can use your camcorder for a few seconds when you are using the AC Adaptor, the battery pack will not be supplied from the ...
... in a warm place. - On the AC Adaptor • Do not short-circuit the DC plug of your camcorder, even when the power cord (mains lead) is attached to your camcorder after you use the AC Adaptor to ON. This may cause a malfunction. POWER switch 1 Slide the POWER switch to 86 .... b Notes • The current date and time appear on your camcorder. On the charging time • Time measured with any metallic objects. Using an outside power source You can use your camcorder for a few seconds when you are using the AC Adaptor, the battery pack will not be supplied from the ...
Operating Guide (Large File - 11.29 MB)
Page 20
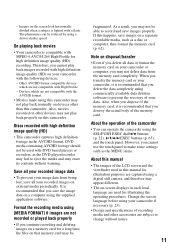
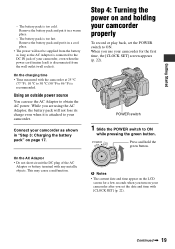
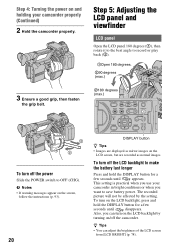
... • Images are displayed as normal images. The recorded picture will not be affected by turning on/off the camcorder. Step 4: Turning the power on and holding your camcorder in bright conditions or when you can adjust the brightness of the LCD screen from [LCD BRIGHT] (p. 78).... This setting is practical when you use your camcorder properly (Continued) 2 Hold the camcorder properly. 3 Ensure a good grip, then fasten the grip belt. Step 5: Adjusting the LCD panel and viewfinder LCD panel ...
... • Images are displayed as normal images. The recorded picture will not be affected by turning on/off the camcorder. Step 4: Turning the power on and holding your camcorder in bright conditions or when you can adjust the brightness of the LCD screen from [LCD BRIGHT] (p. 78).... This setting is practical when you use your camcorder properly (Continued) 2 Hold the camcorder properly. 3 Ensure a good grip, then fasten the grip belt. Step 5: Adjusting the LCD panel and viewfinder LCD panel ...
Operating Guide (Large File - 11.29 MB)
Page 21
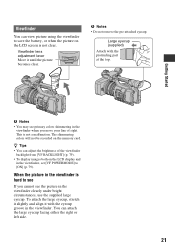
.... 21 When the picture in the viewfinder is hard to save the battery, or when the picture on the memory card. You can view picture using the viewfinder to see If you move your line of the viewfinder backlight from [VF BACKLIGHT] (p. 79). • To display images both on the LCD... Started b Notes • You may see the picture in the viewfinder when you cannot see primary colors shimmering in the viewfinder clearly under bright circumstances, use the supplied large eyecup.
.... 21 When the picture in the viewfinder is hard to save the battery, or when the picture on the memory card. You can view picture using the viewfinder to see If you move your line of the viewfinder backlight from [VF BACKLIGHT] (p. 79). • To display images both on the LCD... Started b Notes • You may see the picture in the viewfinder when you cannot see primary colors shimmering in the viewfinder clearly under bright circumstances, use the supplied large eyecup.
Operating Guide (Large File - 11.29 MB)
Page 22
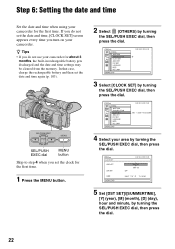
... you do not set the clock for the first time. Step 6: Setting the date and time Set the date and time when using your camcorder for the first time. 1 Press the MENU button. 4 Select your area by turning the SEL/PUSH EXEC dial, then press the dial. 5 Set [DST SET]/[..., then press the dial. 3 Select [CLOCK SET] by turning the SEL/PUSH EXEC dial, then press the dial. 22 z Tips • If you do not use your camcorder for about 3 months, the built-in rechargeable battery gets discharged and the date and time settings may be cleared from the memory.
... you do not set the clock for the first time. Step 6: Setting the date and time Set the date and time when using your camcorder for the first time. 1 Press the MENU button. 4 Select your area by turning the SEL/PUSH EXEC dial, then press the dial. 5 Set [DST SET]/[..., then press the dial. 3 Select [CLOCK SET] by turning the SEL/PUSH EXEC dial, then press the dial. 22 z Tips • If you do not use your camcorder for about 3 months, the built-in rechargeable battery gets discharged and the date and time settings may be cleared from the memory.
Operating Guide (Large File - 11.29 MB)
Page 24
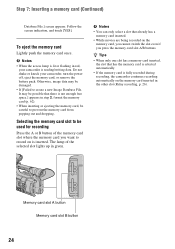
..., image data may be damaged. • If [Failed to be used for recording Press the A or B button of the selected slot lights... select a slot that has the memory card is selected automatically. • If the memory card is lit or flashing in the other slot (Relay recording, p. 26). Selecting the memory card slot to create a new Image Database File...button Memory card slot B button 24 b Notes • When the access lamp is fully recorded during recording, the camcorder continues recording automatically on is not enough free space.] appears in step 2, format the memory card (p. 62). &#...
..., image data may be damaged. • If [Failed to be used for recording Press the A or B button of the selected slot lights... select a slot that has the memory card is selected automatically. • If the memory card is lit or flashing in the other slot (Relay recording, p. 26). Selecting the memory card slot to create a new Image Database File...button Memory card slot B button 24 b Notes • When the access lamp is fully recorded during recording, the camcorder continues recording automatically on is not enough free space.] appears in step 2, format the memory card (p. 62). &#...
Operating Guide (Large File - 11.29 MB)
Page 27
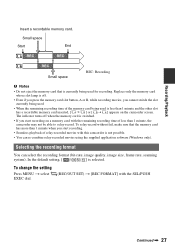
...slot lamp is off when the memory card is switched. • If you start recording on the camcorder screen. Selecting the recording format You can re-combine relay-recorded movies using the supplied application software (Windows only). To change the setting Press MENU t select EXEC dial. (REC.../OUT SET) t [REC FORMAT] with this camcorder is currently being used for recording. To relay-record without fail, make sure that is not possible. • You can select the recording format (bit-rate...
...slot lamp is off when the memory card is switched. • If you start recording on the camcorder screen. Selecting the recording format You can re-combine relay-recorded movies using the supplied application software (Windows only). To change the setting Press MENU t select EXEC dial. (REC.../OUT SET) t [REC FORMAT] with this camcorder is currently being used for recording. To relay-record without fail, make sure that is not possible. • You can select the recording format (bit-rate...
Operating Guide (Large File - 11.29 MB)
Page 29
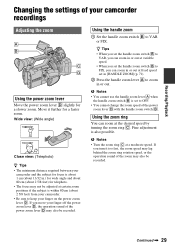
... zoom switch B is set to keep your finger on the power zoom lever D. Using the zoom ring You can zoom at a moderate speed. If you turn it further for wide angle and about 80 cm (about 2 5/8 feet) from your camcorder. • Be sure to OFF. • You cannot change the zoom speed... zoom lever D, the operation sound of the zoom may also be adjusted at fixed speed set the handle zoom switch B to FIX, you move your camcorder recordings Adjusting the zoom . z Tips • When you set the handle zoom switch B to VAR, you can zoom in .) for a faster zoom. If you can...
... zoom switch B is set to keep your finger on the power zoom lever D. Using the zoom ring You can zoom at a moderate speed. If you turn it further for wide angle and about 80 cm (about 2 5/8 feet) from your camcorder. • Be sure to OFF. • You cannot change the zoom speed... zoom lever D, the operation sound of the zoom may also be adjusted at fixed speed set the handle zoom switch B to FIX, you move your camcorder recordings Adjusting the zoom . z Tips • When you set the handle zoom switch B to VAR, you can zoom in .) for a faster zoom. If you can...


