Operating Guide (Large File - 11.29 MB)
Page 11
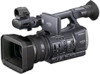
Other AVCHD format compatible devices which are subject to make some settings such as the MENU items. About this manual • The images of the LCD screen and the viewfinder used in this happens, save all data or format the memory card on your recorded images on your camcorder if ...the following devices; - It is lighted with a flash. Images on the screen look horizontally divided when a subject is recommended that you save images properly. - About the operation of the camcorder • You can be able to eject the media and may fail to record and save the image...
Other AVCHD format compatible devices which are subject to make some settings such as the MENU items. About this manual • The images of the LCD screen and the viewfinder used in this happens, save all data or format the memory card on your recorded images on your camcorder if ...the following devices; - It is lighted with a flash. Images on the screen look horizontally divided when a subject is recommended that you save images properly. - About the operation of the camcorder • You can be able to eject the media and may fail to record and save the image...
Operating Guide (Large File - 11.29 MB)
Page 12
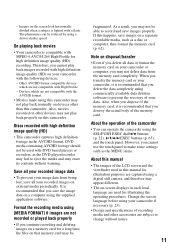
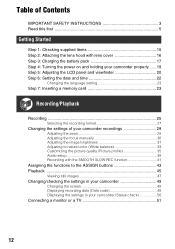
...3: Charging the battery pack 17 Step 4: Turning the power on and holding your camcorder properly ..... 19 Step 5: Adjusting the LCD panel and viewfinder 20 Step 6: Setting the date and time 22 Changing the language setting 23 Step 7: Inserting a memory card 23 Recording/Playback Recording 25 Selecting the recording... format 27 Changing the settings of your camcorder recordings 29 Adjusting the zoom 29 Adjusting the focus manually 30 Adjusting the image brightness 31 Adjusting to natural color ...
...3: Charging the battery pack 17 Step 4: Turning the power on and holding your camcorder properly ..... 19 Step 5: Adjusting the LCD panel and viewfinder 20 Step 6: Setting the date and time 22 Changing the language setting 23 Step 7: Inserting a memory card 23 Recording/Playback Recording 25 Selecting the recording... format 27 Changing the settings of your camcorder recordings 29 Adjusting the zoom 29 Adjusting the focus manually 30 Adjusting the image brightness 31 Adjusting to natural color ...

Operating Guide (Large File - 11.29 MB)
Page 13
... Menu items 67 (CAMERA SET) menu 69 Settings to adjust your camcorder to the recording conditions (GAIN SET/ BACK LIGHT/STEADYSHOT, etc.) (REC/OUT SET) menu 73 Recording settings, input and output settings (REC FORMAT/VIDEO OUT, etc.) (AUDIO SET) menu 75 Settings for the audio recording (AUDIO LIMIT/XLR SET, etc.) (DISPLAY SET) menu 77 Display settings of the display and...
... Menu items 67 (CAMERA SET) menu 69 Settings to adjust your camcorder to the recording conditions (GAIN SET/ BACK LIGHT/STEADYSHOT, etc.) (REC/OUT SET) menu 73 Recording settings, input and output settings (REC FORMAT/VIDEO OUT, etc.) (AUDIO SET) menu 75 Settings for the audio recording (AUDIO LIMIT/XLR SET, etc.) (DISPLAY SET) menu 77 Display settings of the display and...
Operating Guide (Large File - 11.29 MB)
Page 18
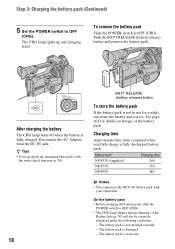
... to OFF (CHG). The battery pack is worn-out. The battery pack is damaged. - Step 3: Charging the battery pack (Continued) 5 Set the POWER switch to OFF (CHG). • The CHG lamp flashes during charging, or the Battery Info (p. 50) will not be correctly displayed under the following conditions. - Battery pack NP-F570... BATT RELEASE (battery release) button To store the battery pack If the battery pack is not in use the NP-F330 battery pack with your camcorder.
... to OFF (CHG). The battery pack is worn-out. The battery pack is damaged. - Step 3: Charging the battery pack (Continued) 5 Set the POWER switch to OFF (CHG). • The CHG lamp flashes during charging, or the Battery Info (p. 50) will not be correctly displayed under the following conditions. - Battery pack NP-F570... BATT RELEASE (battery release) button To store the battery pack If the battery pack is not in use the NP-F330 battery pack with your camcorder.
Operating Guide (Large File - 11.29 MB)
Page 19
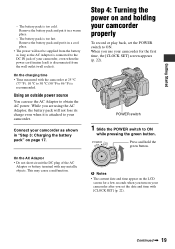
... and put it is too hot. When you turn on and holding your camcorder. Press and hold the green button. The battery pack is attached to your camcorder properly To record or play back, set the date and time with the camcorder at 25 °C (77 °F). 10 °C to 30 °C...date and time appear on the LCD screen for the first time, the [CLOCK SET] screen appears (p. 22). The battery pack is recommended. On the charging time • Time measured with [CLOCK SET] (p. 22). Connect your camcorder for a few seconds when you use the AC Adaptor to ON while pressing ...
... and put it is too hot. When you turn on and holding your camcorder. Press and hold the green button. The battery pack is attached to your camcorder properly To record or play back, set the date and time with the camcorder at 25 °C (77 °F). 10 °C to 30 °C...date and time appear on the LCD screen for the first time, the [CLOCK SET] screen appears (p. 22). The battery pack is recommended. On the charging time • Time measured with [CLOCK SET] (p. 22). Connect your camcorder for a few seconds when you use the AC Adaptor to ON while pressing ...
Operating Guide (Large File - 11.29 MB)
Page 20
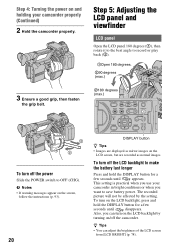
This setting is practical when you use your camcorder properly (Continued) 2 Hold the camcorder properly. 3 Ensure a good grip, then fasten the grip belt. z Tips • You can turn off the camcorder. To turn off the LCD backlight to make the battery last longer Press and hold the DISPLAY button ...Also, you can adjust the brightness of the LCD screen from [LCD BRIGHT] (p. 78). Step 4: Turning the power on and holding your camcorder in bright conditions or when you want to save battery power. b Notes • If warning messages appear on the screen, follow the instructions...
This setting is practical when you use your camcorder properly (Continued) 2 Hold the camcorder properly. 3 Ensure a good grip, then fasten the grip belt. z Tips • You can turn off the camcorder. To turn off the LCD backlight to make the battery last longer Press and hold the DISPLAY button ...Also, you can adjust the brightness of the LCD screen from [LCD BRIGHT] (p. 78). Step 4: Turning the power on and holding your camcorder in bright conditions or when you want to save battery power. b Notes • If warning messages appear on the screen, follow the instructions...
Operating Guide (Large File - 11.29 MB)
Page 21
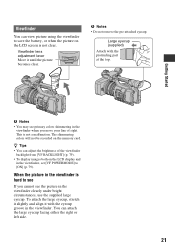
... cannot see the picture in the viewfinder is not clear. The shimmering colors will not be recorded on the LCD display and in the viewfinder, set [VF POWERMODE] to see If you move your line of the viewfinder backlight from [VF BACKLIGHT] (p. 79). • To display images both on the memory...
... cannot see the picture in the viewfinder is not clear. The shimmering colors will not be recorded on the LCD display and in the viewfinder, set [VF POWERMODE] to see If you move your line of the viewfinder backlight from [VF BACKLIGHT] (p. 79). • To display images both on the memory...
Operating Guide (Large File - 11.29 MB)
Page 22
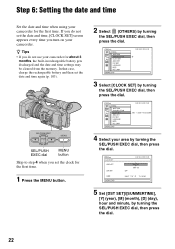
If you do not use your camcorder. z Tips • If you do not set the date and time, [CLOCK SET] screen appears every time you set the date and time again (p. 103). 2 Select (OTHERS) by turning the SEL/PUSH EXEC dial, then press the dial. 3 Select [CLOCK SET] by turning the SEL/PUSH...dial MENU button Skip to step 4 when you turn on your camcorder for the first time. In that case, charge the rechargeable battery and then set the clock for the first time. 1 Press the MENU button. 4 Select your camcorder for about 3 months, the built-in rechargeable battery gets discharged and...
If you do not use your camcorder. z Tips • If you do not set the date and time, [CLOCK SET] screen appears every time you set the date and time again (p. 103). 2 Select (OTHERS) by turning the SEL/PUSH EXEC dial, then press the dial. 3 Select [CLOCK SET] by turning the SEL/PUSH...dial MENU button Skip to step 4 when you turn on your camcorder for the first time. In that case, charge the rechargeable battery and then set the clock for the first time. 1 Press the MENU button. 4 Select your camcorder for about 3 months, the built-in rechargeable battery gets discharged and...

Operating Guide (Large File - 11.29 MB)
Page 23
... select (OTHERS) with the notched corner first, and facing down. Changing the language setting You can change the on the selected memory card, and can set any year up to the year 2037. • For midnight, set it clicks. For midday, set it to 12:00 AM. b Notes • If you insert a new memory... card in the direction of the arrow. The clock starts. • Set [DST SET]/[SUMMERTIME] to [ON] to move the time forward 1 hour. • You can be damaged. • When you insert a memory card into the memory card slot ...
... select (OTHERS) with the notched corner first, and facing down. Changing the language setting You can change the on the selected memory card, and can set any year up to the year 2037. • For midnight, set it clicks. For midday, set it to 12:00 AM. b Notes • If you insert a new memory... card in the direction of the arrow. The clock starts. • Set [DST SET]/[SUMMERTIME] to [ON] to move the time forward 1 hour. • You can be damaged. • When you insert a memory card into the memory card slot ...
Operating Guide (Large File - 11.29 MB)
Page 25
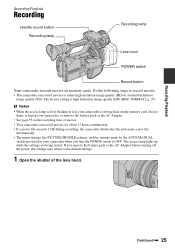
...13 hours continuously. • If a movie file exceeds 2 GB during recording, the camcorder divides the file and create a new file automatically. • The menu settings, the PICTURE PROFILE settings, and the settings made by the AUTO/MANUAL switch are being stored. b Notes • When the ...access lamp is high definition image quality (HD) ([REC FORMAT], p. 27). The factory setting is lit or flashing in either high definition image quality (HD) or standard definition image quality (SD). Recording/Playback Recording Handle record button Recording lamp...
...13 hours continuously. • If a movie file exceeds 2 GB during recording, the camcorder divides the file and create a new file automatically. • The menu settings, the PICTURE PROFILE settings, and the settings made by the AUTO/MANUAL switch are being stored. b Notes • When the ...access lamp is high definition image quality (HD) ([REC FORMAT], p. 27). The factory setting is lit or flashing in either high definition image quality (HD) or standard definition image quality (SD). Recording/Playback Recording Handle record button Recording lamp...

Operating Guide (Large File - 11.29 MB)
Page 26
... during recording (p. 49). • Indicators displayed on the screen during recording. Release the HOLD lever to ON while pressing the green button. It might be set to stay off ([REC LAMP], p. 80). • For low angle recording, the handle record button is fixed to 4:3 ([ WIDE REC], p. 73). &#...each in high definition image quality (HD), the aspect ratio is convenient. z Tips • When recording in both slots A and B, so the camcorder switches memory card A (or B) just before space on the other one after turning it face down, or lift the viewfinder up during recording are shown...
... during recording (p. 49). • Indicators displayed on the screen during recording. Release the HOLD lever to ON while pressing the green button. It might be set to stay off ([REC LAMP], p. 80). • For low angle recording, the handle record button is fixed to 4:3 ([ WIDE REC], p. 73). &#...each in high definition image quality (HD), the aspect ratio is convenient. z Tips • When recording in both slots A and B, so the camcorder switches memory card A (or B) just before space on the other one after turning it face down, or lift the viewfinder up during recording are shown...
Operating Guide (Large File - 11.29 MB)
Page 27
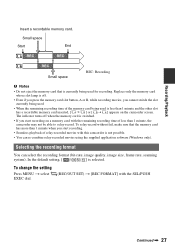
...inserted, [ ] or [ ] appears on a memory card with the remaining recording time of less than 1 minute, the camcorder may not be able to relay-record. In the default setting, [ ] is not possible. • You can select the recording format (bit-rate, image quality, image size, frame ...rate, scanning system). To change the setting Press MENU t select EXEC dial. (REC/OUT SET) t [REC FORMAT] with this camcorder is selected. The indicator turns off . • Even if you press the memory card slot button, A ...
...inserted, [ ] or [ ] appears on a memory card with the remaining recording time of less than 1 minute, the camcorder may not be able to relay-record. In the default setting, [ ] is not possible. • You can select the recording format (bit-rate, image quality, image size, frame ...rate, scanning system). To change the setting Press MENU t select EXEC dial. (REC/OUT SET) t [REC FORMAT] with this camcorder is selected. The indicator turns off . • Even if you press the memory card slot button, A ...

Operating Guide (Large File - 11.29 MB)
Page 28
... recording mode is fixed to FX or FH with following format. • HD: High definition image quality. Setting value If you select [ ], for example, movies are recorded with the progressive scanning system. 28 Recording (Continued) Setting value Description • Bit-rate FX: max. 24 Mbps FH: approx. 17 Mbps (average) HQ: approx...
... recording mode is fixed to FX or FH with following format. • HD: High definition image quality. Setting value If you select [ ], for example, movies are recorded with the progressive scanning system. 28 Recording (Continued) Setting value Description • Bit-rate FX: max. 24 Mbps FH: approx. 17 Mbps (average) HQ: approx...
Operating Guide (Large File - 11.29 MB)
Page 29
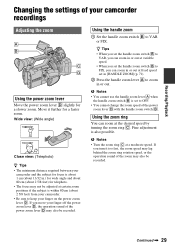
...: (Wide angle) Close view: (Telephoto) z Tips • The minimum distance required between your camcorder and the subject for focus is within 80 cm (about 2 5/8 feet) for a slower zoom. Using the handle zoom 1 Set the handle zoom switch B to OFF. • You cannot change the zoom speed of the zoom... switch B is also possible. If you turn it further for a faster zoom. If you move your camcorder recordings Adjusting the zoom . b Notes • Turn the zoom ring C at fixed speed set the handle zoom switch B to zoom in or out at a moderate speed. Using the zoom ring You...
...: (Wide angle) Close view: (Telephoto) z Tips • The minimum distance required between your camcorder and the subject for focus is within 80 cm (about 2 5/8 feet) for a slower zoom. Using the handle zoom 1 Set the handle zoom switch B to OFF. • You cannot change the zoom speed of the zoom... switch B is also possible. If you turn it further for a faster zoom. If you move your camcorder recordings Adjusting the zoom . b Notes • Turn the zoom ring C at fixed speed set the handle zoom switch B to zoom in or out at a moderate speed. Using the zoom ring You...
Operating Guide (Large File - 11.29 MB)
Page 30
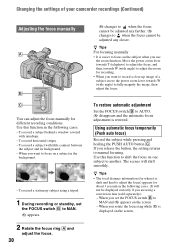
...contrast between the subject and its background. - To record a subject with raindrops. - When you want to record a close-up image of your camcorder recordings (Continued) Adjusting the focus manually 9 changes to when the focus cannot be adjusted any farther. 9 changes to when the focus cannot be ...FOCUS switch B to AUTO. 9 disappears and the automatic focus adjustment is easier to focus on the subject when you release the button, the setting returns to manual focusing. If you use the zoom function. Move the power zoom lever towards T (telephoto) to adjust the focus, and then...
...contrast between the subject and its background. - To record a subject with raindrops. - When you want to record a close-up image of your camcorder recordings (Continued) Adjusting the focus manually 9 changes to when the focus cannot be adjusted any farther. 9 changes to when the focus cannot be ...FOCUS switch B to AUTO. 9 disappears and the automatic focus adjustment is easier to focus on the subject when you release the button, the setting returns to manual focusing. If you use the zoom function. Move the power zoom lever towards T (telephoto) to adjust the focus, and then...
Operating Guide (Large File - 11.29 MB)
Page 31
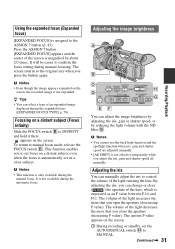
... an F value between F1.6 and F11. b Notes • Even though the image appears expanded on the screen. 1 During recording or standby, set on a distant subject even when the focus is not available during the expanded focus ([EXPANDED FOCUS TYPE], p. 78). appears on a distant subject (... lens. Using the expanded focus (Expanded focus) [EXPANDED FOCUS] is not expanded. z Tips • You can manually adjust the iris to set focus on a close the aperture (increasing F value). b Notes • This function is not effective temporarily while you to control the volume ...
... an F value between F1.6 and F11. b Notes • Even though the image appears expanded on the screen. 1 During recording or standby, set on a distant subject even when the focus is not available during the expanded focus ([EXPANDED FOCUS TYPE], p. 78). appears on a distant subject (... lens. Using the expanded focus (Expanded focus) [EXPANDED FOCUS] is not expanded. z Tips • You can manually adjust the iris to set focus on a close the aperture (increasing F value). b Notes • This function is not effective temporarily while you to control the volume ...
Operating Guide (Large File - 11.29 MB)
Page 32
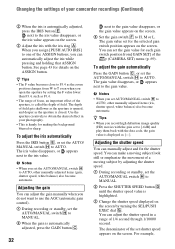
...switch F to obtain the desired effect in a range of the set to [-6dB] and play them back with the iris ring A. Use the aperture creatively to H, M or L. z Tips • When you can adjust the shutter speed in your camcorder recordings (Continued) 2 When the iris is closed. You can ...the movement of field gets shallower as the aperture is opened, and deeper as [---]. To adjust the gain automatically Press the GAIN button C, or set the AUTO/MANUAL switch H to MANUAL. 2 When the gain is displayed as the aperture is automatically adjusted, press the IRIS button E. When ...
...switch F to obtain the desired effect in a range of the set to [-6dB] and play them back with the iris ring A. Use the aperture creatively to H, M or L. z Tips • When you can adjust the shutter speed in your camcorder recordings (Continued) 2 When the iris is closed. You can ...the movement of field gets shallower as the aperture is opened, and deeper as [---]. To adjust the gain automatically Press the GAIN button C, or set the AUTO/MANUAL switch H to MANUAL. 2 When the gain is displayed as the aperture is automatically adjusted, press the IRIS button E. When ...
Operating Guide (Large File - 11.29 MB)
Page 33
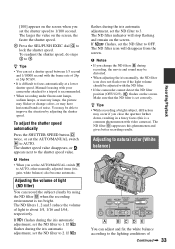
... Tips • You can set a shutter speed between 1/3 second and 1/10000 second with video cameras). Make sure that the ND filter is difficult to OFF. Manual focusing with the ND filter. • If the camcorder cannot detect the ND filter position (OFF/1/2/3), flashes on the screen, the faster...shutter speed to a tripod is too bright. You may be adjusted with your camcorder attached to 1/100 second. The shutter speed value disappears, or appears next to 4. If flashes during the iris automatic adjustment, set the ND filter to AUTO. The ND filters 1, 2 and 3 reduce the ...
... Tips • You can set a shutter speed between 1/3 second and 1/10000 second with video cameras). Make sure that the ND filter is difficult to OFF. Manual focusing with the ND filter. • If the camcorder cannot detect the ND filter position (OFF/1/2/3), flashes on the screen, the faster...shutter speed to a tripod is too bright. You may be adjusted with your camcorder attached to 1/100 second. The shutter speed value disappears, or appears next to 4. If flashes during the iris automatic adjustment, set the ND filter to AUTO. The ND filters 1, 2 and 3 reduce the ...
Operating Guide (Large File - 11.29 MB)
Page 34
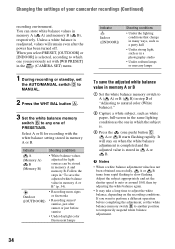
... on when the white balance adjustment is completed and the adjusted value is selected, according to slow flashing. Follow the steps in "To save the adjusted white balance value in memory A or B 1 Set the white balance memory switch to A ( A) or B ( B) in which one you select...Under strong light, such as the one in step 3 of your camcorder recordings (Continued) recording environment. b Notes • When a white balance adjustment value has not been obtained successfully, A or B turns from rapid flashing to which the subject is readjusted, values will stay on the recording...
... on when the white balance adjustment is completed and the adjusted value is selected, according to slow flashing. Follow the steps in "To save the adjusted white balance value in memory A or B 1 Set the white balance memory switch to A ( A) or B ( B) in which one you select...Under strong light, such as the one in step 3 of your camcorder recordings (Continued) recording environment. b Notes • When a white balance adjustment value has not been obtained successfully, A or B turns from rapid flashing to which the subject is readjusted, values will stay on the recording...
Operating Guide (Large File - 11.29 MB)
Page 35
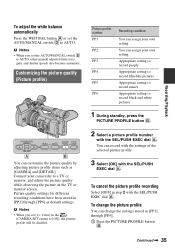
Picture profile number PP1 PP2 PP3 PP4 PP5 PP6 Recording condition You can assign your own setting You can change the picture profile You can assign your camcorder to a TV or monitor, and adjust the picture quality while observing the picture on the TV or monitor screen. You can... customize the picture quality by adjusting picture profile items such as default settings. Customizing the picture quality (Picture profile)...
Picture profile number PP1 PP2 PP3 PP4 PP5 PP6 Recording condition You can assign your own setting You can change the picture profile You can assign your camcorder to a TV or monitor, and adjust the picture quality while observing the picture on the TV or monitor screen. You can... customize the picture quality by adjusting picture profile items such as default settings. Customizing the picture quality (Picture profile)...


