Limited Warranty (U.S. Only)
Page 1
... the original Limited Warranty period or for the time periods and as fuses or batteries). This Limited Warranty covers only the hardware components packaged with new or refurbished product, product determined to you may have other than Sony or a Sony Retailer. Instructions: To obtain warranty service, you may have stored or preserved on...
... the original Limited Warranty period or for the time periods and as fuses or batteries). This Limited Warranty covers only the hardware components packaged with new or refurbished product, product determined to you may have other than Sony or a Sony Retailer. Instructions: To obtain warranty service, you may have stored or preserved on...
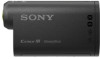
Handbook
Page 3
...the camera (page 55). • Do not shake or strike the camera. No compensation for damaged content or recording failure Sony cannot compensate for Camera File system) universal standard established by JEITA (Japan Electronics and Information Technology Industries Association). Otherwise, the ...Design and specifications are not available. Other languages are subject to change without notice. 3US Continued r Notes on the battery pack • Charge the battery pack before the power turns off automatically to protect the camera. Be careful when placing the camera near a location ...
...the camera (page 55). • Do not shake or strike the camera. No compensation for damaged content or recording failure Sony cannot compensate for Camera File system) universal standard established by JEITA (Japan Electronics and Information Technology Industries Association). Otherwise, the ...Design and specifications are not available. Other languages are subject to change without notice. 3US Continued r Notes on the battery pack • Charge the battery pack before the power turns off automatically to protect the camera. Be careful when placing the camera near a location ...
Handbook
Page 7
...using the camera 3 How to enjoy the camera 5 Operation Search 9 Settings Search 10 Identifying parts 11 Getting started Checking the bundled items 12 Inserting the battery pack 13 Inserting a memory card 16 Recording Mode 18 SteadyShot 19 Field Angle 20 Interval Photo Recording 21 Smart Remote Control... (HDR-AS15 only 22 Auto Power Off 23 Date & Time Setting 24 USB Power Supply 25 Resetting the Settings 26 Format 27 Using Accessories 28 Shooting...
...using the camera 3 How to enjoy the camera 5 Operation Search 9 Settings Search 10 Identifying parts 11 Getting started Checking the bundled items 12 Inserting the battery pack 13 Inserting a memory card 16 Recording Mode 18 SteadyShot 19 Field Angle 20 Interval Photo Recording 21 Smart Remote Control... (HDR-AS15 only 22 Auto Power Off 23 Date & Time Setting 24 USB Power Supply 25 Resetting the Settings 26 Format 27 Using Accessories 28 Shooting...
Handbook
Page 8
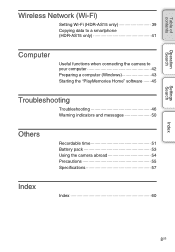
Table of contents Operation Search Settings Search Wireless Network (Wi-Fi) Setting Wi-Fi (HDR-AS15 only 39 Copying data to a smartphone (HDR-AS15 only 41 Computer Useful functions when connecting the camera to your computer 42 Preparing a computer (Windows 43 Starting the "PlayMemories Home" software 45 Troubleshooting Troubleshooting 46 Warning indicators and messages 50 Others Recordable time 51 Battery pack 53 Using the camera abroad 54 Precautions 55 Specifications 57 Index Index 60 Index 8US
Table of contents Operation Search Settings Search Wireless Network (Wi-Fi) Setting Wi-Fi (HDR-AS15 only 39 Copying data to a smartphone (HDR-AS15 only 41 Computer Useful functions when connecting the camera to your computer 42 Preparing a computer (Windows 43 Starting the "PlayMemories Home" software 45 Troubleshooting Troubleshooting 46 Warning indicators and messages 50 Others Recordable time 51 Battery pack 53 Using the camera abroad 54 Precautions 55 Specifications 57 Index Index 60 Index 8US
Handbook
Page 11
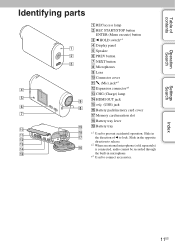
... panel E Speaker F PREV button G NEXT button H Microphones I Lens J Connector cover K m (Mic) jack*2 L Expansion connector*3 M CHG (Charge) lamp N HDMI OUT jack O (USB) jack P Battery pack/memory card cover Q Memory card insertion slot R Battery tray lever S Battery tray *1 Used to connect accessories. 11US Table of b to lock. Slide in microphone. *3 Used to prevent accidental operation.
... panel E Speaker F PREV button G NEXT button H Microphones I Lens J Connector cover K m (Mic) jack*2 L Expansion connector*3 M CHG (Charge) lamp N HDMI OUT jack O (USB) jack P Battery pack/memory card cover Q Memory card insertion slot R Battery tray lever S Battery tray *1 Used to connect accessories. 11US Table of b to lock. Slide in microphone. *3 Used to prevent accidental operation.

Handbook
Page 12
... number in parentheses indicates the quantity of that item bundled. • Camera (1) • Micro USB cable (1) • Rechargeable battery pack (NP-BX1) (1) • Battery tray, type X (only for NP-BX1) (1) Attached to the camera. • Battery tray, type G (only for NP-BG1/FG1) (1) • Waterproof Case (SPK-AS1) (1) • Adhesive Mount (VCT-AM1...
... number in parentheses indicates the quantity of that item bundled. • Camera (1) • Micro USB cable (1) • Rechargeable battery pack (NP-BX1) (1) • Battery tray, type X (only for NP-BX1) (1) Attached to the camera. • Battery tray, type G (only for NP-BG1/FG1) (1) • Waterproof Case (SPK-AS1) (1) • Adhesive Mount (VCT-AM1...
Handbook
Page 13
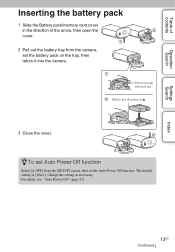
... Power Off function. The default setting is [10sec]. Match the direction of the arrow, then open the cover. 2 Pull out the battery tray from the [SETUP] screen, then set the battery pack on the tray, then return it into the camera. For detail, see "Auto Power Off" (page 23). 13US Continued r... Change the setting as necessary. Table of contents Operation Search Settings Search Index Inserting the battery pack 1 Slide the Battery pack/memory card cover in the direction of v. 3 Close the cover. Pinch the tab and pull out.
... Power Off function. The default setting is [10sec]. Match the direction of the arrow, then open the cover. 2 Pull out the battery tray from the [SETUP] screen, then set the battery pack on the tray, then return it into the camera. For detail, see "Auto Power Off" (page 23). 13US Continued r... Change the setting as necessary. Table of contents Operation Search Settings Search Index Inserting the battery pack 1 Slide the Battery pack/memory card cover in the direction of v. 3 Close the cover. Pinch the tab and pull out.
Handbook
Page 14
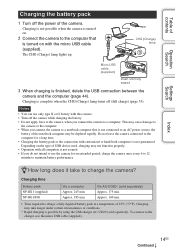
... by using the USB charger AC-UD20 (sold separately) Approx. 175 min. Approx. 140 min. • Time required to charge a fully depleted battery pack at a temperature of the notebook computer may not function properly. • Operation with this camera. • Turn off the power of the camera.... Index 14US Continued r To connect to the charger, use only type X or G battery with all computers is finished, delete the USB connection between the camera and the computer (page 44). CHG (Charge) lamp Micro USB cable (supplied) ...
... by using the USB charger AC-UD20 (sold separately) Approx. 175 min. Approx. 140 min. • Time required to charge a fully depleted battery pack at a temperature of the notebook computer may not function properly. • Operation with this camera. • Turn off the power of the camera.... Index 14US Continued r To connect to the charger, use only type X or G battery with all computers is finished, delete the USB connection between the camera and the computer (page 44). CHG (Charge) lamp Micro USB cable (supplied) ...
Handbook
Page 15
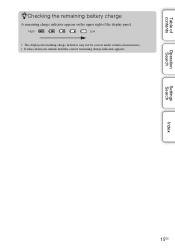
Table of contents zChecking the remaining battery charge A remaining charge indicator appears on the upper right of the display panel. Operation Search Settings Search Index 15US High Low • The displayed remaining charge indicator may not be correct under certain circumstances. • It takes about one minute until the correct remaining charge indicator appears.
Table of contents zChecking the remaining battery charge A remaining charge indicator appears on the upper right of the display panel. Operation Search Settings Search Index 15US High Low • The displayed remaining charge indicator may not be correct under certain circumstances. • It takes about one minute until the correct remaining charge indicator appears.
Handbook
Page 16
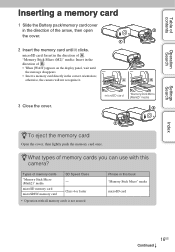
Table of contents Operation Search Settings Search Inserting a memory card 1 Slide the Battery pack/memory card cover in the direction of the arrow, then open the cover. 2 Insert the memory card until the message disappears. • Insert a memory ...
Table of contents Operation Search Settings Search Inserting a memory card 1 Slide the Battery pack/memory card cover in the direction of the arrow, then open the cover. 2 Insert the memory card until the message disappears. • Insert a memory ...
Handbook
Page 22
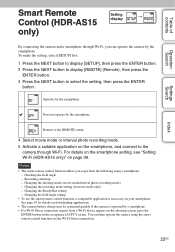
...the camera through Wi-Fi, you to select the setting, then press the ENTER button. For details on the smartphone setting, see "Setting Wi-Fi (HDR-AS15 only)" on the acceptance [ACPT?] screen. To make the setting, select [SETUP] first. 1 Press the NEXT button to display [SETUP], ...Direct connection. Does not operate by the smartphone. Changing the SteadyShot setting - See page 39 for details on downloading applications. • The camera battery charge may be consumed quickly if the camera is necessary on the smartphone, and connect to the [RMOTE] menu. 4 Select movie mode or interval...
...the camera through Wi-Fi, you to select the setting, then press the ENTER button. For details on the smartphone setting, see "Setting Wi-Fi (HDR-AS15 only)" on the acceptance [ACPT?] screen. To make the setting, select [SETUP] first. 1 Press the NEXT button to display [SETUP], ...Direct connection. Does not operate by the smartphone. Changing the SteadyShot setting - See page 39 for details on downloading applications. • The camera battery charge may be consumed quickly if the camera is necessary on the smartphone, and connect to the [RMOTE] menu. 4 Select movie mode or interval...
Handbook
Page 27
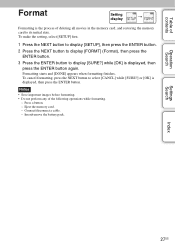
Connect/disconnect a cable. - Insert/remove the battery pack. Notes • Save important images before formatting. • Do not perform any of the following operations while formatting. - Formatting starts and [DONE] appears when ...
Connect/disconnect a cable. - Insert/remove the battery pack. Notes • Save important images before formatting. • Do not perform any of the following operations while formatting. - Formatting starts and [DONE] appears when ...
Handbook
Page 28
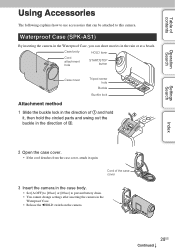
... attached to this camera. Cord of the case cover 3 Insert the camera in the case body. • Set [A.OFF] to [10sec] or [60sec] to prevent battery drain. • You cannot change settings after inserting the camera in the direction of 2. 2 Open the case cover. • If the cord detaches from the...
... attached to this camera. Cord of the case cover 3 Insert the camera in the case body. • Set [A.OFF] to [10sec] or [60sec] to prevent battery drain. • You cannot change settings after inserting the camera in the direction of 2. 2 Open the case cover. • If the cord detaches from the...

Handbook
Page 30
...; Avoid using lukewarm water. Inspect the O-ring • Carefully check that a malfunction of the Waterproof Case causes damage due to water leakage, Sony does not guarantee against damages to check for cracks, skewing, distortion, fine splitting, scratches, embedded sand, etc. Replace the O-ring if you ...sure no water leaks in water hotter than 0°C (32°F). Failure to do O-ring maintenance according to wash it (camera, battery pack, etc.) and the recorded contents, nor expenses entailed in the same way. If you find any of these situations moisture condensation or...
...; Avoid using lukewarm water. Inspect the O-ring • Carefully check that a malfunction of the Waterproof Case causes damage due to water leakage, Sony does not guarantee against damages to check for cracks, skewing, distortion, fine splitting, scratches, embedded sand, etc. Replace the O-ring if you ...sure no water leaks in water hotter than 0°C (32°F). Failure to do O-ring maintenance according to wash it (camera, battery pack, etc.) and the recorded contents, nor expenses entailed in the same way. If you find any of these situations moisture condensation or...
Handbook
Page 47
... by repeatedly charging and discharging it. • When usable battery life becomes half the usual time, even after charging the battery pack fully, the battery pack may turn off automatically to correct the indication. • Fully charge the battery pack again. Consult your nearest Sony dealer. The remaining charge indicator is inserted correctly (page 13...
... by repeatedly charging and discharging it. • When usable battery life becomes half the usual time, even after charging the battery pack fully, the battery pack may turn off automatically to correct the indication. • Fully charge the battery pack again. Consult your nearest Sony dealer. The remaining charge indicator is inserted correctly (page 13...

Handbook
Page 48
...; Turn on images. Wi-Fi It takes too much time to install "PlayMemories Home." Computers Your computer does not recognize the camera. • When the battery level is correct (page 38). Cannot play back images. • The folder/file name has been changed on your computer. • Consult the computer or...
...; Turn on images. Wi-Fi It takes too much time to install "PlayMemories Home." Computers Your computer does not recognize the camera. • When the battery level is correct (page 38). Cannot play back images. • The folder/file name has been changed on your computer. • Consult the computer or...
Handbook
Page 50
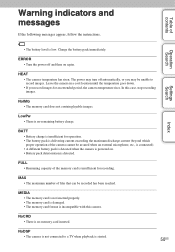
... memory card is damaged. • The memory card format is incompatible with this case, stop recording images. NoCRD • There is no remaining battery charge. Leave the camera in a cool location until the temperature goes down. • If you may be unable to a TV when playback is...the camera is powered on again. HEAT • The camera temperature has risen. The power may turn off and then on . • Battery pack deterioration is detected. ERROR • Turn the power off automatically, or you record images for recording. FULL • Remaining capacity of the...
... memory card is damaged. • The memory card format is incompatible with this case, stop recording images. NoCRD • There is no remaining battery charge. Leave the camera in a cool location until the temperature goes down. • If you may be unable to a TV when playback is...the camera is powered on again. HEAT • The camera temperature has risen. The power may turn off and then on . • Battery pack deterioration is detected. ERROR • Turn the power off automatically, or you record images for recording. FULL • Remaining capacity of the...
Handbook
Page 51
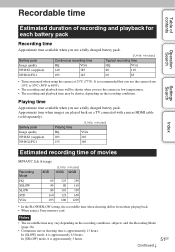
...battery pack. Approximate time when images are played back on the recording conditions. In [SLOW] mode, it is approximately 6.5 hours. Battery... pack Image quality NP-BX1 (supplied) NP-BG1/FG1 Playing time HQ 205 155 (Units: minutes) VGA 210 160 Estimated recording time of recording and playback for each battery... pack Recording time Approximate time available when you use a fully charged battery pack. In [SSLOW]... a TV connected with a micro HDMI cable (sold separately). Battery pack Image quality NP-BX1 (supplied) NP-BG1/FG1 Continuous ...
...battery pack. Approximate time when images are played back on the recording conditions. In [SLOW] mode, it is approximately 6.5 hours. Battery... pack Image quality NP-BX1 (supplied) NP-BG1/FG1 Playing time HQ 205 155 (Units: minutes) VGA 210 160 Estimated recording time of recording and playback for each battery... pack Recording time Approximate time available when you use a fully charged battery pack. In [SSLOW]... a TV connected with a micro HDMI cable (sold separately). Battery pack Image quality NP-BX1 (supplied) NP-BG1/FG1 Continuous ...
Handbook
Page 53
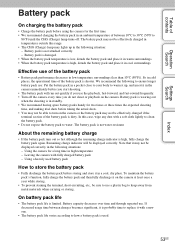
... situations: - In this range. • The CHG (Charge) lamp may not be effectively charged if the terminal section of the battery pack is high, fully charge the battery pack again. Note that it may lights up , and insert it in the camera immediately before you start shooting. • The...will run out quickly if you use a plastic bag to keep away from metal materials when carrying or storing. To maintain the battery pack's function, fully charge the battery pack and then fully discharge it in the following situation: - If decreased usage time between 10°C to 30°C (50...
... situations: - In this range. • The CHG (Charge) lamp may not be effectively charged if the terminal section of the battery pack is high, fully charge the battery pack again. Note that it may lights up , and insert it in the camera immediately before you start shooting. • The...will run out quickly if you use a plastic bag to keep away from metal materials when carrying or storing. To maintain the battery pack's function, fully charge the battery pack and then fully discharge it in the following situation: - If decreased usage time between 10°C to 30°C (50...
Handbook
Page 57
...* SteadyShot set to 60 m (197 feet) underwater* *When the camera is inserted. storage) [Power, general] Power requirements: Rechargeable battery pack 3.6 V (NP-BX1 (supplied)), Rechargeable battery pack 3.6 V (NP-BG1/ FG1) USB 5.0 V USB charging: DC 5.0 V, 500 mA/600 mA Charging time: Via a computer...shooting): Approx. 90 g (3.2 oz) (including NP-BX1 (supplied)) Approx. 92 g (3.2 oz) (including NP-BG1/FG1) Microphone: Stereo Speaker: Monaural Rechargeable battery pack: NP-BX1 (supplied) Maximum output voltage: DC 4.2 V Output voltage: DC 3.6 V Capacity: Minimum: 4.5 Wh (1,240 mAh) Type: Li-ion ...
...* SteadyShot set to 60 m (197 feet) underwater* *When the camera is inserted. storage) [Power, general] Power requirements: Rechargeable battery pack 3.6 V (NP-BX1 (supplied)), Rechargeable battery pack 3.6 V (NP-BG1/ FG1) USB 5.0 V USB charging: DC 5.0 V, 500 mA/600 mA Charging time: Via a computer...shooting): Approx. 90 g (3.2 oz) (including NP-BX1 (supplied)) Approx. 92 g (3.2 oz) (including NP-BG1/FG1) Microphone: Stereo Speaker: Monaural Rechargeable battery pack: NP-BX1 (supplied) Maximum output voltage: DC 4.2 V Output voltage: DC 3.6 V Capacity: Minimum: 4.5 Wh (1,240 mAh) Type: Li-ion ...


