
Operating Instructions
Page 2
... can radiate radio frequency energy and, if not installed and used in particular, specifies that may cause harmful interference to CATV system installer: This reminder is a U.S. This equipment generates, uses, and can be connected to the grounding system of the building, as close to the presence of important operating and maintenance (servicing) instructions in cabinet. Reorient or relocate the receiving antenna. - registered...
... can radiate radio frequency energy and, if not installed and used in particular, specifies that may cause harmful interference to CATV system installer: This reminder is a U.S. This equipment generates, uses, and can be connected to the grounding system of the building, as close to the presence of important operating and maintenance (servicing) instructions in cabinet. Reorient or relocate the receiving antenna. - registered...
Operating Instructions
Page 3
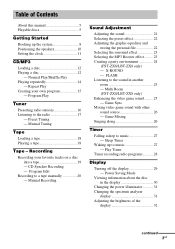
... the radio 17 - Multi Room (FST-ZX8/LBT-ZX8 only) Enhancing the video game sound ......... 25 - Power Saving Mode Viewing information about the disc in another room 25 - Repeat Play Creating your favorite tracks on a disc into a tape 19 - Preset Tuning - Game Sync Mixing video game sound with other sound source 26 - Play Timer Timer recording radio programs........... 28 Display Turning off the display 29 - Program Play Tuner Presetting radio stations 16 Listening to a tape manually 20 - Manual Recording Sound Adjustment Adjusting the sound 21 Selecting the preset...
... the radio 17 - Multi Room (FST-ZX8/LBT-ZX8 only) Enhancing the video game sound ......... 25 - Power Saving Mode Viewing information about the disc in another room 25 - Repeat Play Creating your favorite tracks on a disc into a tape 19 - Preset Tuning - Game Sync Mixing video game sound with other sound source 26 - Play Timer Timer recording radio programs........... 28 Display Turning off the display 29 - Program Play Tuner Presetting radio stations 16 Listening to a tape manually 20 - Manual Recording Sound Adjustment Adjusting the sound 21 Selecting the preset...
Operating Instructions
Page 9
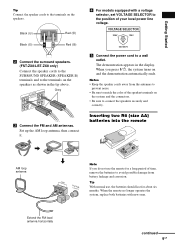
... of time, remove the batteries to connect the speakers securely and correctly. Black (#) Black (#) Red (3) Red (3) 2 Connect the surround speakers. (FST-ZX8/LBT-ZX8 only) Connect the speaker cords to the SURROUND SPEAKER (SPEAKER B) terminals and to the position of your local power line voltage. Extend the FM lead antenna horizontally continued 9GB Set up the AM loop antenna, then connect it. 4 For models equipped with new ones. When you do not use...
... of time, remove the batteries to connect the speakers securely and correctly. Black (#) Black (#) Red (3) Red (3) 2 Connect the surround speakers. (FST-ZX8/LBT-ZX8 only) Connect the speaker cords to the SURROUND SPEAKER (SPEAKER B) terminals and to the position of your local power line voltage. Extend the FM lead antenna horizontally continued 9GB Set up the AM loop antenna, then connect it. 4 For models equipped with new ones. When you do not use...

Operating Instructions
Page 14
... the tracks in the disc tray (One Touch Play). • If you press CD on the remote while the system is turned off , the system turns on a disc which can be recognize by this case, set "CD POWER ON" by CD power manage function (page 17). • If you may be recognize by pressing NX, a longer time may encounter problems such as...
... the tracks in the disc tray (One Touch Play). • If you press CD on the remote while the system is turned off , the system turns on a disc which can be recognize by this case, set "CD POWER ON" by CD power manage function (page 17). • If you may be recognize by pressing NX, a longer time may encounter problems such as...
Operating Instructions
Page 15
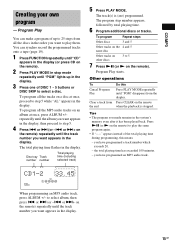
... total playing time. 6 Program additional discs or tracks. Press CLEAR on a disc at once, press ALBUM +/- The total playing time flashes in the display (or press CD on an album at once, proceed to step 5. 4 Press . Press NX (or N on the remote) repeatedly until the track number you have programmed an MP3 audio track. Disc tray Track number number Total playing time (including selected track) 5 Press PLAY MODE. Other operations To Cancel Program Play...
... total playing time. 6 Program additional discs or tracks. Press CLEAR on a disc at once, press ALBUM +/- The total playing time flashes in the display (or press CD on an album at once, proceed to step 5. 4 Press . Press NX (or N on the remote) repeatedly until the track number you have programmed an MP3 audio track. Disc tray Track number number Total playing time (including selected track) 5 Press PLAY MODE. Other operations To Cancel Program Play...

Operating Instructions
Page 17
... the display. To set the CD power manage function to preset stations, be erased. To change the AM tuning interval in the Power Saving Mode (page 29). When you want . Tips • To improve broadcast reception, adjust the supplied antennas, or connect an external antenna. • When an FM stereo program has static noise, press FM MODE repeatedly until "PRESET" lights up in the display. Use buttons on the remote) repeatedly to turn off...
... the display. To set the CD power manage function to preset stations, be erased. To change the AM tuning interval in the Power Saving Mode (page 29). When you want . Tips • To improve broadcast reception, adjust the supplied antennas, or connect an external antenna. • When an FM stereo program has static noise, press FM MODE repeatedly until "PRESET" lights up in the display. Use buttons on the remote) repeatedly to turn off...
Operating Instructions
Page 19
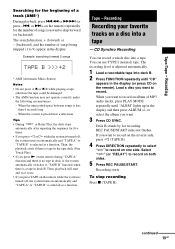
... system turns on one side. Recording Recording your favorite tracks on both sides. 5 Press REC PAUSE/START. REC PAUSE/START indicator flashes. Tape - You can record a whole disc into deck B. 2 Press FUNCTION repeatedly until "ALBM" lights up in the display. Select "j" (or "RELAY") to 9) appear in the display and then press ALBUM +/- The search direction, + (forward) or - (backward), and the number of...
... system turns on one side. Recording Recording your favorite tracks on both sides. 5 Press REC PAUSE/START. REC PAUSE/START indicator flashes. Tape - You can record a whole disc into deck B. 2 Press FUNCTION repeatedly until "ALBM" lights up in the display. Select "j" (or "RELAY") to 9) appear in the display and then press ALBUM +/- The search direction, + (forward) or - (backward), and the number of...
Operating Instructions
Page 20
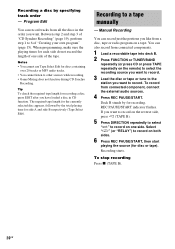
... start playing the source (for recording a disc, press EDIT after you like from connected component, connect the external audio sources. 4 Press REC PAUSE/START. REC PAUSE/START indicator flashes. If you want to record on the reverse side, press h (TAPE B). 5 Press DIRECTION repeatedly to select "g" to record on the remote) to select the recording source you want to record. 3 Load the disc or tape or tune to the station...
... start playing the source (for recording a disc, press EDIT after you like from connected component, connect the external audio sources. 4 Press REC PAUSE/START. REC PAUSE/START indicator flashes. If you want to record on the reverse side, press h (TAPE B). 5 Press DIRECTION repeatedly to select "g" to record on the remote) to select the recording source you want to record. 3 Load the disc or tape or tune to the station...
Operating Instructions
Page 21
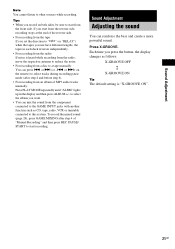
or >+ on both sides, be sure to other sources while recording. Press X-GROOVE. or > (or -. Sound Adjustment Adjusting the sound You can press . Each time you press the button, the display changes as CD, tape, radio, VCR or turntable connected to a tape manually: You can reinforce the bass and create a more powerful sound. Sound Adjustment Note You cannot listen to start recording. to select the album you want. • You can...
or >+ on both sides, be sure to other sources while recording. Press X-GROOVE. or > (or -. Sound Adjustment Adjusting the sound You can press . Each time you press the button, the display changes as CD, tape, radio, VCR or turntable connected to a tape manually: You can reinforce the bass and create a more powerful sound. Sound Adjustment Note You cannot listen to start recording. to select the album you want. • You can...
Operating Instructions
Page 25
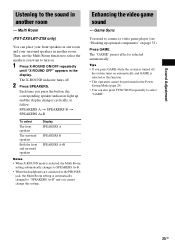
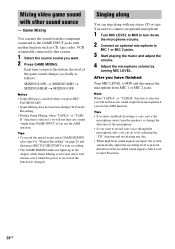
Sound Adjustment Listening to the sound in another room. Each time you cannot change this setting. Enhancing the video game sound - Game Sync You need to "SPEAKERS A+B" and you press the button, the corresponding speaker indicators light up optional components" on . 1 Press X-ROUND ON/OFF repeatedly until "X-ROUND OFF" appears in another room - The "GAME" preset effect is automatically changed to connect a video game player (see "Hooking up and the display changes cyclically...
Sound Adjustment Listening to the sound in another room. Each time you cannot change this setting. Enhancing the video game sound - Game Sync You need to "SPEAKERS A+B" and you press the button, the corresponding speaker indicators light up optional components" on . 1 Press X-ROUND ON/OFF repeatedly until "X-ROUND OFF" appears in another room - The "GAME" preset effect is automatically changed to connect a video game player (see "Hooking up and the display changes cyclically...
Operating Instructions
Page 26
... INPUT jacks with another function such as follows: MIXING LOW t MIXING MID t MIXING HIGH t MIXING OFF Notes • Game Mixing is canceled when you have finished Turn MIC LEVEL to MIN and disconnect the microphone from microphone if you use the AMS function. Note When "TAPE A" or "TAPE B" function is selected, you will not hear any sound output from the speakers or change the direction of the recorded sound signals (Auto Level Control Function). 26GB Mixing video...
... INPUT jacks with another function such as follows: MIXING LOW t MIXING MID t MIXING HIGH t MIXING OFF Notes • Game Mixing is canceled when you have finished Turn MIC LEVEL to MIN and disconnect the microphone from microphone if you use the AMS function. Note When "TAPE A" or "TAPE B" function is selected, you will not hear any sound output from the speakers or change the direction of the recorded sound signals (Auto Level Control Function). 26GB Mixing video...
Operating Instructions
Page 27
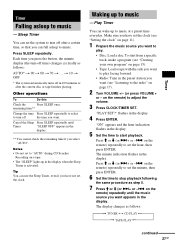
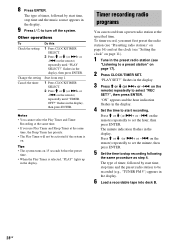
... the music source you want appears in the display. 5 Set the time to music at a preset time everyday. Make sure you have not set the clock (see "Listening to play facing forward. • Radio: Tune in the preset station you want (see "Setting the clock" on the remote) repeatedly to set the minute, then press ENTER. 6 Set the time to turn off the time you have set the clock. flashes in the display. Press...
... the music source you want appears in the display. 5 Set the time to music at a preset time everyday. Make sure you have not set the clock (see "Listening to play facing forward. • Radio: Tune in the preset station you want (see "Setting the clock" on the remote) repeatedly to set the minute, then press ENTER. 6 Set the time to turn off the time you have set the clock. flashes in the display. Press...
Operating Instructions
Page 28
... flashes in the display. 8 Press ENTER. Other operations To Check the setting Change the setting Cancel the timer Do this 1 Press CLOCK/TIMER SELECT. 2 Press M or m (or >+ or -. Start from a preset radio station at the same time, the Sleep Timer has priority. • The Play Timer will not be recorded (e.g., "TUNER FM 5") appears in the display. 9 Press ?/1 to stop time and the preset radio station to a preset station" on the remote...
... flashes in the display. 8 Press ENTER. Other operations To Check the setting Change the setting Cancel the timer Do this 1 Press CLOCK/TIMER SELECT. 2 Press M or m (or >+ or -. Start from a preset radio station at the same time, the Sleep Timer has priority. • The Play Timer will not be recorded (e.g., "TUNER FM 5") appears in the display. 9 Press ?/1 to stop time and the preset radio station to a preset station" on the remote...
Operating Instructions
Page 29
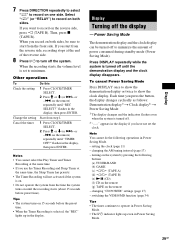
... the button, the display changes cyclically as follows: Demonstration display1) t Clock display2) t Power Saving Mode 1) The display changes and the indicators flashes even when the system is set the clock. Display Turning off until the demonstration display and the clock display disappears. Each time you have not set to minimum. switching the VIDEO/MD function (page 34) Tips • The timer continues to operate in Power Saving Mode. • The ?/1 indicator lights...
... the button, the display changes cyclically as follows: Demonstration display1) t Clock display2) t Power Saving Mode 1) The display changes and the indicators flashes even when the system is set the clock. Display Turning off until the demonstration display and the clock display disappears. Each time you have not set to minimum. switching the VIDEO/MD function (page 34) Tips • The timer continues to operate in Power Saving Mode. • The ?/1 indicator lights...
Operating Instructions
Page 34
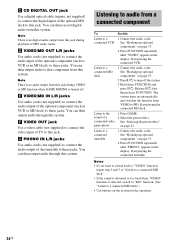
... "PHONO" appears in the display. Release ?/1 first, then release FUNCTION. Note There is turned off the system. 3 Hold down FUNCTION and press ?/1. Listen to the sound of a connected video game player 1 Press GAME. 2 Select the preset effect. Start playing the connected turntable. Listen to a connected MD deck 1 Connect the audio cords. C CD DIGITAL OUT jack Use a digital optical cable (square, not supplied) to connect the digital input of the optional MD deck to these jacks. See "Hooking up optional components" on...
... "PHONO" appears in the display. Release ?/1 first, then release FUNCTION. Note There is turned off the system. 3 Hold down FUNCTION and press ?/1. Listen to the sound of a connected video game player 1 Press GAME. 2 Select the preset effect. Start playing the connected turntable. Listen to a connected MD deck 1 Connect the audio cords. C CD DIGITAL OUT jack Use a digital optical cable (square, not supplied) to connect the digital input of the optional MD deck to these jacks. See "Hooking up optional components" on...
Operating Instructions
Page 36
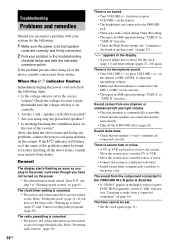
..." on page 8). Press ?/1 (see "Listening to music" (page 27) and "Timer recording radio programs" (page 28). The radio presetting is canceled. • The power cord is disconnected or a power failure occurs. on the remote) or MIC LEVEL to adjust the microphone volume. • Make sure the microphone is connected to the MIC 1 or MIC 2 jack correctly. • The tape is set to the sound in the troubleshooting checklist below and take the indicated...
..." on page 8). Press ?/1 (see "Listening to music" (page 27) and "Timer recording radio programs" (page 28). The radio presetting is canceled. • The power cord is disconnected or a power failure occurs. on the remote) or MIC LEVEL to adjust the microphone volume. • Make sure the microphone is connected to the MIC 1 or MIC 2 jack correctly. • The tape is set to the sound in the troubleshooting checklist below and take the indicated...
Operating Instructions
Page 37
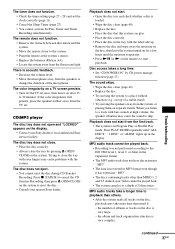
... by CD power manage function (page 17). Troubleshooting The timer does not function. • Check the timer setting (page 27 - 29) and set . CD/MP3 player The disc tray does not open and "LOCKED" appears on the system. Trying to the system. • Point the remote at high volume, the speaker vibration may take a longer time to playback than MPEG 1, 2 and 2.5 Audio Layer...
... by CD power manage function (page 17). Troubleshooting The timer does not function. • Check the timer setting (page 27 - 29) and set . CD/MP3 player The disc tray does not open and "LOCKED" appears on the system. Trying to the system. • Point the remote at high volume, the speaker vibration may take a longer time to playback than MPEG 1, 2 and 2.5 Audio Layer...
Operating Instructions
Page 38
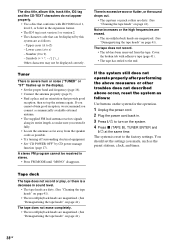
... ?/1 to the factory settings. The tape does not record. • The tab has been removed from the speaker cords as far away from the tape. Tape deck The tape does not record or play, or there is reset to turn on the system for the operation. 1 Unplug the power cord. 2 Plug the power cord back in the display). • Set the proper band and frequency (page 16). • Connect the antenna properly (page...
... ?/1 to the factory settings. The tape does not record. • The tab has been removed from the speaker cords as far away from the tape. Tape deck The tape does not record or play, or there is reset to turn on the system for the operation. 1 Unplug the power cord. 2 Plug the power cord back in the display). • Set the proper band and frequency (page 16). • Connect the antenna properly (page...
Operating Instructions
Page 42
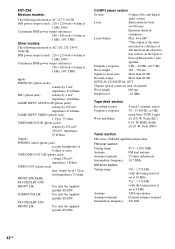
... DIGITAL OUT (Square optical connector jack, rear panel) Wave length 660 nm Output level -18 dBm Tape deck section Recording system Frequency response Wow and flutter 4-track 2-channel, stereo 50 - 13,000 Hz (±3 dB), using Sony TYPE I tapes ±0.15% W. Peak (DIN) Tuner section FM stereo, FM/AM superheterodyne tuner FM tuner section Tuning range Antenna Antenna terminals Intermediate frequency 87.5 - 108.0 MHz FM lead antenna 75 ohms unbalanced 10.7 MHz AM tuner section Tuning range Antenna Antenna terminals Intermediate frequency...
... DIGITAL OUT (Square optical connector jack, rear panel) Wave length 660 nm Output level -18 dBm Tape deck section Recording system Frequency response Wow and flutter 4-track 2-channel, stereo 50 - 13,000 Hz (±3 dB), using Sony TYPE I tapes ±0.15% W. Peak (DIN) Tuner section FM stereo, FM/AM superheterodyne tuner FM tuner section Tuning range Antenna Antenna terminals Intermediate frequency 87.5 - 108.0 MHz FM lead antenna 75 ohms unbalanced 10.7 MHz AM tuner section Tuning range Antenna Antenna terminals Intermediate frequency...
Operating Instructions
Page 44
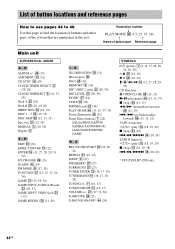
..., 29, 34) GAME INPUT AUDIO L/R jacks ws (26, 33) GAME INPUT VIDEO jack ws (33) GAME MIXING w; (21, 26) I - Z REC PAUSE/START wf (19, 20, 21) REPEAT ra (10, 14) SLEEP 4 (27) SPEAKERS* rj (25) SURROUND ej (23) TUNER ENTER qd (16, 17, 38) TUNER/BAND q; (16, 17, 20, 29) TUNING +/- D ALBUM +/- qa (16, 17) TUNING MODE qf (16, 17) VOLUME +/- Illustration number r PLAY MODE r; (13, 15...
..., 29, 34) GAME INPUT AUDIO L/R jacks ws (26, 33) GAME INPUT VIDEO jack ws (33) GAME MIXING w; (21, 26) I - Z REC PAUSE/START wf (19, 20, 21) REPEAT ra (10, 14) SLEEP 4 (27) SPEAKERS* rj (25) SURROUND ej (23) TUNER ENTER qd (16, 17, 38) TUNER/BAND q; (16, 17, 20, 29) TUNING +/- D ALBUM +/- qa (16, 17) TUNING MODE qf (16, 17) VOLUME +/- Illustration number r PLAY MODE r; (13, 15...

