
Operating Instructions
Page 2
... cautioned that to which can radiate radio frequency energy and, if not installed and used in the unit, disconnect the main plug from Fraunhofer IIS and Thomson. 2GB Reorient or relocate the receiving antenna. - This device complies with Part 15 of the apparatus with the limits for customers in the U.S.A. Except for a Class B digital device, pursuant to comply with...
... cautioned that to which can radiate radio frequency energy and, if not installed and used in the unit, disconnect the main plug from Fraunhofer IIS and Thomson. 2GB Reorient or relocate the receiving antenna. - This device complies with Part 15 of the apparatus with the limits for customers in the U.S.A. Except for a Class B digital device, pursuant to comply with...

Operating Instructions
Page 3
... display 20 Optional Components Hooking up to use this manual 4 Playable discs 4 Getting Started Hooking up the system 6 Setting the clock 8 CD/MP3 - Manual Tuning Using the Radio Data System (RDS).... 14 (European model CMT-NEZ5 only) Tape - CD-TAPE Synchro Recording Recording on a tape 16 - Manual Recording Sound Adjustment Adjusting the sound 17 Timer Falling asleep to the radio 13 - Rec Timer Display Turning off the display 20 - Program Play Tuner Presetting radio stations 12 Listening to music 17 - Table of button...
... display 20 Optional Components Hooking up to use this manual 4 Playable discs 4 Getting Started Hooking up the system 6 Setting the clock 8 CD/MP3 - Manual Tuning Using the Radio Data System (RDS).... 14 (European model CMT-NEZ5 only) Tape - CD-TAPE Synchro Recording Recording on a tape 16 - Manual Recording Sound Adjustment Adjusting the sound 17 Timer Falling asleep to the radio 13 - Rec Timer Display Turning off the display 20 - Program Play Tuner Presetting radio stations 12 Listening to music 17 - Table of button...
Operating Instructions
Page 4
...folder levels. This unit supports up to 31 characters long. CD-Extra: This format records audio (audio CD data) on the tracks in session 1 and data on a CD-ROM. How to use this manual • The instructions in this manual are several specification levels. Check your model number by... Any difference in operation is clearly indicated in to ISO9660* Level 1/Level 2, Joliet or Multi Session** • A disc that has the adhesive, cellophane tape, or a sticker still left on it . * ISO9660 Format The most common international standard for model CMT-NEZ5 and CMT-NEZ3. music CD format - Each...
...folder levels. This unit supports up to 31 characters long. CD-Extra: This format records audio (audio CD data) on the tracks in session 1 and data on a CD-ROM. How to use this manual • The instructions in this manual are several specification levels. Check your model number by... Any difference in operation is clearly indicated in to ISO9660* Level 1/Level 2, Joliet or Multi Session** • A disc that has the adhesive, cellophane tape, or a sticker still left on it . * ISO9660 Format The most common international standard for model CMT-NEZ5 and CMT-NEZ3. music CD format - Each...
Operating Instructions
Page 7
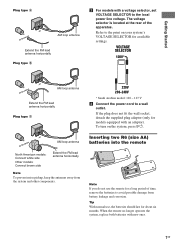
... rear of time, remove the batteries to avoid possible damage from the system and other components. 220V 230-240V * Saudi Arabian model: 120 - 127 V 4 Connect the power cord to a wall outlet. When the remote no longer operates the system, replace both batteries with a voltage selector, set VOLTAGE SELECTOR to the print on the system, press ?/1. Getting Started Plug type A AM FM 75 COAXIAL...
... rear of time, remove the batteries to avoid possible damage from the system and other components. 220V 230-240V * Saudi Arabian model: 120 - 127 V 4 Connect the power cord to a wall outlet. When the remote no longer operates the system, replace both batteries with a voltage selector, set VOLTAGE SELECTOR to the print on the system, press ?/1. Getting Started Plug type A AM FM 75 COAXIAL...
Operating Instructions
Page 8
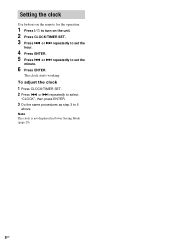
or > repeatedly to set the minute. 6 Press ENTER. The clock starts working. Note The clock is not displayed in Power Saving Mode (page 20). 8GB To adjust the clock 1 Press CLOCK/TIMER SET. 2 Press . or > repeatedly to set the hour. 4 Press ENTER. 5 Press . Setting the clock Use buttons on the remote for the operation. 1 Press ?/1 to 6 above. or > repeatedly to select "CLOCK", then press ENTER. 3 Do the same procedures as step 3 to turn on the unit. 2 Press CLOCK/TIMER SET. 3 Press .
or > repeatedly to set the minute. 6 Press ENTER. The clock starts working. Note The clock is not displayed in Power Saving Mode (page 20). 8GB To adjust the clock 1 Press CLOCK/TIMER SET. 2 Press . or > repeatedly to set the hour. 4 Press ENTER. 5 Press . Setting the clock Use buttons on the remote for the operation. 1 Press ?/1 to 6 above. or > repeatedly to select "CLOCK", then press ENTER. 3 Do the same procedures as step 3 to turn on the unit. 2 Press CLOCK/TIMER SET. 3 Press .
Operating Instructions
Page 12
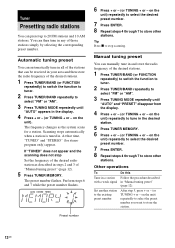
Tuner Presetting radio stations You can preset up to stop Set the frequency of the desired radio station as the system scans for stereo program only) appear. The frequency changes as described in steps 2 and 3 of the desired stations. 1 Press TUNER/BAND (or FUNCTION repeatedly) to switch the function to tuner. 2 Press TUNER/BAND repeatedly to select "FM" or "AM". 3 Press TUNING MODE repeatedly until "AUTO" appears in and store the radio frequency of "Manual tuning preset" (page 12). 5 Press...
Tuner Presetting radio stations You can preset up to stop Set the frequency of the desired radio station as the system scans for stereo program only) appear. The frequency changes as described in steps 2 and 3 of the desired stations. 1 Press TUNER/BAND (or FUNCTION repeatedly) to switch the function to tuner. 2 Press TUNER/BAND repeatedly to select "FM" or "AM". 3 Press TUNING MODE repeatedly until "AUTO" appears in and store the radio frequency of "Manual tuning preset" (page 12). 5 Press...
Operating Instructions
Page 13
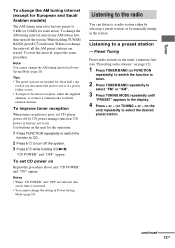
... operation. 1 Press FUNCTION repeatedly to switch the function to CD. 2 Press ?/1 to a radio station either by selecting a preset station, or by CD power manage function. While holding CD/NX. Listening to the radio You can listen to turn off the system. Tuner To change the setting in Power Saving Mode (page 20). When you disconnect the power cord or if a power failure occurs. • To improve broadcast reception, adjust the supplied antennas, or connect...
... operation. 1 Press FUNCTION repeatedly to switch the function to CD. 2 Press ?/1 to a radio station either by selecting a preset station, or by CD power manage function. While holding CD/NX. Listening to the radio You can listen to turn off the system. Tuner To change the setting in Power Saving Mode (page 20). When you disconnect the power cord or if a power failure occurs. • To improve broadcast reception, adjust the supplied antennas, or connect...
Operating Instructions
Page 14
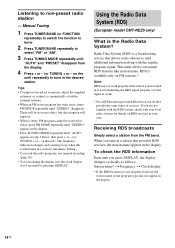
... the regular program signal. Tips • To improve broadcast reception, adjust the supplied antennas, or connect a commercially available external antenna. • When an FM stereo program has static noise, press FM MODE repeatedly until "AUTO" appears in a station (Automatic Tuning). • To record the radio programs, use manual recording (page 16). • You can change the display into the clock display (for details on the unit). The frequency indication changes and...
... the regular program signal. Tips • To improve broadcast reception, adjust the supplied antennas, or connect a commercially available external antenna. • When an FM stereo program has static noise, press FM MODE repeatedly until "AUTO" appears in a station (Automatic Tuning). • To record the radio programs, use manual recording (page 16). • You can change the display into the clock display (for details on the unit). The frequency indication changes and...
Operating Instructions
Page 16
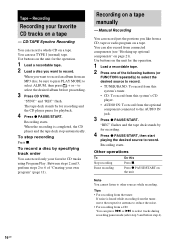
... following buttons (or FUNCTION repeatedly) to select the desired source to record. You can record just the portions you like from connected components (see "Hooking up optional components" on the unit for playback. 4 Press z PAUSE/START. "SYNC" and "REC" flash. Recording on the unit. Press z PAUSE/START on a tape manually - Note You cannot listen to record. You can press . to the AUDIO IN jack...
... following buttons (or FUNCTION repeatedly) to select the desired source to record. You can record just the portions you like from connected components (see "Hooking up optional components" on the unit for playback. 4 Press z PAUSE/START. "SYNC" and "REC" flash. Recording on the unit. Press z PAUSE/START on a tape manually - Note You cannot listen to record. You can press . to the AUDIO IN jack...
Operating Instructions
Page 17
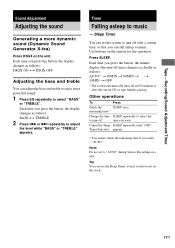
... time you press the button, the display changes as follows: AUTO* t 90MIN t 80MIN t ... Each time you press the button, the display changes as follows: DSGX ON y DSGX OFF Adjusting the bass and treble You can adjust the bass and treble to turn -off time you select "AUTO". Use buttons on the unit. remaining time* Change the time SLEEP repeatedly to select the to enjoy more dynamic sound (Dynamic Sound Generator X-tra) Press DSGX on the remote for the operation...
... time you press the button, the display changes as follows: AUTO* t 90MIN t 80MIN t ... Each time you press the button, the display changes as follows: DSGX ON y DSGX OFF Adjusting the bass and treble You can adjust the bass and treble to turn -off time you select "AUTO". Use buttons on the unit. remaining time* Change the time SLEEP repeatedly to select the to enjoy more dynamic sound (Dynamic Sound Generator X-tra) Press DSGX on the remote for the operation...

Operating Instructions
Page 18
... before the preset time, the Play Timer will not be activated. • You cannot use the optional component connected to AUDIO IN jack as the setting is on page 13). 2 Press VOLUME + or - (or turn off the system. 18GB Other operations To Check the setting Change the setting Cancel the timer Do this 1 Press CLOCK/TIMER SELECT. 2 Press . To start playing. Waking up to music at a preset time. Play Timer You...
... before the preset time, the Play Timer will not be activated. • You cannot use the optional component connected to AUDIO IN jack as the setting is on page 13). 2 Press VOLUME + or - (or turn off the system. 18GB Other operations To Check the setting Change the setting Cancel the timer Do this 1 Press CLOCK/TIMER SELECT. 2 Press . To start playing. Waking up to music at a preset time. Play Timer You...
Operating Instructions
Page 19
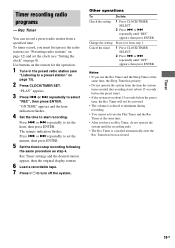
... setting Change the setting Cancel the timer Do this 1 Press CLOCK/TIMER SELECT. 2 Press . Use buttons on the remote for the operation. 1 Tune in the preset radio station (see "Presetting radio stations" on page 12) and set the minute, then press ENTER. 5 Set the time to select "REC", then press ENTER. Notes • If you must first preset the radio station (see "Listening to minimum during recording. • You cannot activate the Play...
... setting Change the setting Cancel the timer Do this 1 Press CLOCK/TIMER SELECT. 2 Press . Use buttons on the remote for the operation. 1 Tune in the preset radio station (see "Presetting radio stations" on page 12) and set the minute, then press ENTER. 5 Set the time to select "REC", then press ENTER. Notes • If you must first preset the radio station (see "Listening to minimum during recording. • You cannot activate the Play...

Operating Instructions
Page 20
... display switches cyclically as the titles and the artist's names. Each time you press the button, the display changes cyclically as follows: Current track number and elapsed playing time t Current track number and remaining time or "- -.- -"* t Remaining time of Contents; setting the clock - When a disc with MP3 audio tracks** only) t Album name** t Clock display * "- -.- -" appears when you select a CD track whose number is displayed only if you play mode. 20GB Press DISPLAY...
... display switches cyclically as the titles and the artist's names. Each time you press the button, the display changes cyclically as follows: Current track number and elapsed playing time t Current track number and remaining time or "- -.- -"* t Remaining time of Contents; setting the clock - When a disc with MP3 audio tracks** only) t Album name** t Clock display * "- -.- -" appears when you select a CD track whose number is displayed only if you play mode. 20GB Press DISPLAY...

Operating Instructions
Page 21
Stereo mini-plug Display/Optional Components From the audio output jacks of the speaker, and that may be sure to turn off the function when using the transmitter. See "Hooking up the volume of an optional analog component Optional analog component A AUDIO IN jack Use audio cords (not supplied) to connect an optional analog component (Portable Audio Player, etc.) to this system. Otherwise, the sound from a connected component 1 Connect the audio cords. You can connect optional components. Start playing the connected component. Notes • If the connected component has the ...
Stereo mini-plug Display/Optional Components From the audio output jacks of the speaker, and that may be sure to turn off the function when using the transmitter. See "Hooking up the volume of an optional analog component Optional analog component A AUDIO IN jack Use audio cords (not supplied) to connect an optional analog component (Portable Audio Player, etc.) to this system. Otherwise, the sound from a connected component 1 Connect the audio cords. You can connect optional components. Start playing the connected component. Notes • If the connected component has the ...
Operating Instructions
Page 22
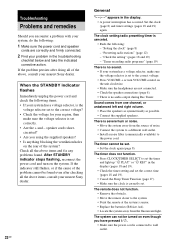
... 19) - "Timer recording radio programs" (page 19) There is no sound. • If your nearest Sony dealer. When the STANDBY indicator flashes Immediately unplug the power cord and check the following : 1 Make sure the power cord and speaker cords are not connected. • Check the speaker connections (page 6). • There is set . • Set the clock again (page 8). After STANDBY indicator stops flashing, reconnect the power cord and turn VOLUME control on the system...
... 19) - "Timer recording radio programs" (page 19) There is no sound. • If your nearest Sony dealer. When the STANDBY indicator flashes Immediately unplug the power cord and check the following : 1 Make sure the power cord and speaker cords are not connected. • Check the speaker connections (page 6). • There is set . • Set the clock again (page 8). After STANDBY indicator stops flashing, reconnect the power cord and turn VOLUME control on the system...

Operating Instructions
Page 23
... disc is very complex. Numbers (0 to Z) - The sound skips. • Wipe the disc clean (page 26). • Replace the disc. • Try moving the system to skip. the number of the CD compartment. • Place the disc in the display. A stereo FM program cannot be played. Troubleshooting The color irregularity on a TV screen persists. • Move the speakers farther away from the TV set up the antenna...
... disc is very complex. Numbers (0 to Z) - The sound skips. • Wipe the disc clean (page 26). • Replace the disc. • Try moving the system to skip. the number of the CD compartment. • Place the disc in the display. A stereo FM program cannot be played. Troubleshooting The color irregularity on a TV screen persists. • Move the speakers farther away from the TV set up the antenna...
Operating Instructions
Page 24
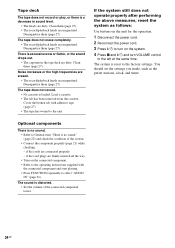
... should set the settings you made, such as follows: Use buttons on the unit for the operation. 1 Disconnect the power cord. 2 Reconnect the power cord. 3 Press ?/1 to turn on the connected component. • Refer to the operating instructions supplied with adhesive tape (page 27). • The tape has wound to the factory settings. The sound is loaded. Tape deck The tape does not record or play, or there is a decrease in the tape deck are...
... should set the settings you made, such as follows: Use buttons on the unit for the operation. 1 Disconnect the power cord. 2 Reconnect the power cord. 3 Press ?/1 to turn on the connected component. • Refer to the operating instructions supplied with adhesive tape (page 27). • The tape has wound to the factory settings. The sound is loaded. Tape deck The tape does not record or play, or there is a decrease in the tape deck are...
Operating Instructions
Page 26
... the disc with a protection ring. Remove the disc and leave the system turned on for an extended period of the seal on the disc is not sticky before operating it is placed in direct sunlight. • Do not use any questions or problems concerning your system, please consult your local power supply. • The voltage selector is located at the rear...
... the disc with a protection ring. Remove the disc and leave the system turned on for an extended period of the seal on the disc is not sticky before operating it is placed in direct sunlight. • Do not use any questions or problems concerning your system, please consult your local power supply. • The voltage selector is located at the rear...
Operating Instructions
Page 27
When using a tape longer than 10% total harmonic distortion from 250 milliwatts to 30 hours of use . Use a separately sold demagnetizing cassette. Specifications Main unit AUDIO POWER SPECIFICATIONS POWER OUTPUT AND TOTAL HARMONIC DISTORTION: (The United States model only) CMT-NEZ5 With 6 ohm loads, both channels driven, from 120 - 10,000 Hz; Amplifier section CMT-NEZ5 European model: DIN power output (rated): 18 + 18 W (6 ohms at 1 kHz, DIN) Continuous...
When using a tape longer than 10% total harmonic distortion from 250 milliwatts to 30 hours of use . Use a separately sold demagnetizing cassette. Specifications Main unit AUDIO POWER SPECIFICATIONS POWER OUTPUT AND TOTAL HARMONIC DISTORTION: (The United States model only) CMT-NEZ5 With 6 ohm loads, both channels driven, from 120 - 10,000 Hz; Amplifier section CMT-NEZ5 European model: DIN power output (rated): 18 + 18 W (6 ohms at 1 kHz, DIN) Continuous...
Operating Instructions
Page 28
... lens surface on the Optical Pick-up Block with 7 mm aperture) 20 Hz - 20 kHz Tape deck section Recording system 4-track 2-channel, stereo Tuner section FM stereo, FM/AM superheterodyne tuner FM tuner section Tuning range Antenna Antenna terminals Intermediate frequency 87.5 - 108.0 MHz FM lead antenna 75 ohms unbalanced 10.7 MHz 28GB AM tuner section Tuning range Pan-American model: 530 - 1,710 kHz (with the tuning interval set at 10 kHz...
... lens surface on the Optical Pick-up Block with 7 mm aperture) 20 Hz - 20 kHz Tape deck section Recording system 4-track 2-channel, stereo Tuner section FM stereo, FM/AM superheterodyne tuner FM tuner section Tuning range Antenna Antenna terminals Intermediate frequency 87.5 - 108.0 MHz FM lead antenna 75 ohms unbalanced 10.7 MHz 28GB AM tuner section Tuning range Pan-American model: 530 - 1,710 kHz (with the tuning interval set at 10 kHz...

