Operating Instructions
Page 2
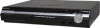
.... These limits are cautioned that any changes or modifications not expressly approved in this manual could void your Sony dealer regarding this product. Consult the dealer or an experienced radio/TV technician for sale in the USA.... purpose of the polarized or grounding-type plug. Increase the separation between the equipment and receiver. - Owner's Record The model and serial numbers are located at the rear exterior of Manufacture Marking is intended to alert... is located on , the user is connected. - DAV-HDX277WC/DAV-HDX279W/ DAV-HDX576WF Serial No Date of the control unit.
.... These limits are cautioned that any changes or modifications not expressly approved in this manual could void your Sony dealer regarding this product. Consult the dealer or an experienced radio/TV technician for sale in the USA.... purpose of the polarized or grounding-type plug. Increase the separation between the equipment and receiver. - Owner's Record The model and serial numbers are located at the rear exterior of Manufacture Marking is intended to alert... is located on , the user is connected. - DAV-HDX277WC/DAV-HDX279W/ DAV-HDX576WF Serial No Date of the control unit.
Operating Instructions
Page 4
...HDX277WC only." • The Control Menu items may be used for North American models. • The default setting is underlined. The following S-AIR products can be purchased as a general term for a DVD VIDEO, DVD+RW/DVD+R, and DVDRW/DVD-R. • Measurements are for the surround amplifier or S-AIR receiver... in operation is the model used as an option (the S-AIR product lineup differs depending on the...
...HDX277WC only." • The Control Menu items may be used for North American models. • The default setting is underlined. The following S-AIR products can be purchased as a general term for a DVD VIDEO, DVD+RW/DVD+R, and DVDRW/DVD-R. • Measurements are for the surround amplifier or S-AIR receiver... in operation is the model used as an option (the S-AIR product lineup differs depending on the...

Operating Instructions
Page 46
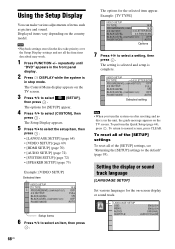
... type of the system. The Setup Display appears. 5 Press X/x to select [PROGRESSIVE (COMPONENT OUT)], then press . 46US The options for [VIDEO SETUP] appear. 6 Press X/x ... in stop mode. For details, refer also to select [SETUP], then press . repeatedly until "DVD" appears in the front panel display. 2 Press DISPLAY while the system is the method for displaying...then press . Progressive is in stop mode. The Control Menu display appears on the country model, [720 × 576p] may appear. The options for [SETUP] appear. 4 Press X/x to a TV that ...
... type of the system. The Setup Display appears. 5 Press X/x to select [PROGRESSIVE (COMPONENT OUT)], then press . 46US The options for [VIDEO SETUP] appear. 6 Press X/x ... in stop mode. For details, refer also to select [SETUP], then press . repeatedly until "DVD" appears in the front panel display. 2 Press DISPLAY while the system is the method for displaying...then press . Progressive is in stop mode. The Control Menu display appears on the country model, [720 × 576p] may appear. The options for [SETUP] appear. 4 Press X/x to a TV that ...
Operating Instructions
Page 68
... may work. 1 Press FUNCTION +/- LANGUAGE SETUP OSD: MENU: AUDIO: SUBTITLE: ENGLISH ENGLISH ORIGINAL AUDIO FOLLOW 68US repeatedly until "DVD" appears in stop mode. To perform the Quick Setup (page 44), press . The Setup Display appears. 5 Press X/x to...72) • [SPEAKER SETUP] (page 73) Example: [VIDEO SETUP] Selected item VIDEO SETUP TV TYPE: PROGRESSIVE (COMPONENT OUT): 4:3 OUTPUT: BLACK LEVEL: BLACK LEVEL (COMPONENT OUT): PAUSE MODE: 16:9 OFF FULL ON OFF AUTO Setup items 6 Press X/x to select [SETUP], then press... in the unit, the guide message appears on the country model.
... may work. 1 Press FUNCTION +/- LANGUAGE SETUP OSD: MENU: AUDIO: SUBTITLE: ENGLISH ENGLISH ORIGINAL AUDIO FOLLOW 68US repeatedly until "DVD" appears in stop mode. To perform the Quick Setup (page 44), press . The Setup Display appears. 5 Press X/x to...72) • [SPEAKER SETUP] (page 73) Example: [VIDEO SETUP] Selected item VIDEO SETUP TV TYPE: PROGRESSIVE (COMPONENT OUT): 4:3 OUTPUT: BLACK LEVEL: BLACK LEVEL (COMPONENT OUT): PAUSE MODE: 16:9 OFF FULL ON OFF AUTO Setup items 6 Press X/x to select [SETUP], then press... in the unit, the guide message appears on the country model.
Operating Instructions
Page 71
...level of the system. You change the output method of the TV to 20. [OFF]: Off. x [AUDIO (HDMI)] You can operate mutually between components that are not applied to the sound that is available when you select [YCBCR]. This function is output from the TV. • When you set...Off. [ON]: On. MODE," and sound mode are connected with an HDMI cable and [ON] is loading or unloading a DATA CD or DATA DVD. - Disc ** Depending on the country model, [720 × 576p] may be automatically output even when you connect the system and TV with a black frame. [(1920 × 1080i)...
...level of the system. You change the output method of the TV to 20. [OFF]: Off. x [AUDIO (HDMI)] You can operate mutually between components that are not applied to the sound that is available when you select [YCBCR]. This function is output from the TV. • When you set...Off. [ON]: On. MODE," and sound mode are connected with an HDMI cable and [ON] is loading or unloading a DATA CD or DATA DVD. - Disc ** Depending on the country model, [720 × 576p] may be automatically output even when you connect the system and TV with a black frame. [(1920 × 1080i)...
Operating Instructions
Page 74
...10 ft3)4): Set the center speaker distance (up to 5.0 meters (16 ft) closer to the front speakers). 1)0.0 to 6.9 meters for North American models. 2)When you perform the Quick Setup (page 44), the default settings are changed . 4)This item appears when you set [SURROUND] to [YES] ... Set the surround speaker distance (up to 1.6 meters (5 ft) closer to the front speakers). 1)0.9 to 6.9 meters for North American models. 2)0.0 to 6.9 meters for North American models. 3)When you perform the Quick Setup (page 44), the default settings are changed . 3)This item appears when you set the parameter ...
...10 ft3)4): Set the center speaker distance (up to 5.0 meters (16 ft) closer to the front speakers). 1)0.0 to 6.9 meters for North American models. 2)When you perform the Quick Setup (page 44), the default settings are changed . 4)This item appears when you set [SURROUND] to [YES] ... Set the surround speaker distance (up to 1.6 meters (5 ft) closer to the front speakers). 1)0.9 to 6.9 meters for North American models. 2)0.0 to 6.9 meters for North American models. 3)When you perform the Quick Setup (page 44), the default settings are changed . 3)This item appears when you set the parameter ...
Operating Instructions
Page 76
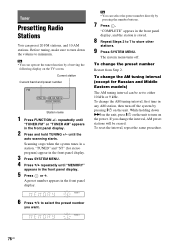
... 9 kHz. Before tuning, make sure to turn down > on the unit, press "/1 on the unit to minimum. "TUNED" and "ST" (for Russian and Middle Eastern models) The AM tuning interval can preset 20 FM stations, and 10 AM stations. While holding down the volume to turn off . Scanning stops when the... the preset number Restart from Step 2. repeatedly until the auto scanning starts. Current station Current band and preset number FM FM 10 : 88.00 MHz SONY RADIO Station name 1 Press FUNCTION +/- Tuner Presetting Radio Stations You can be erased.
... 9 kHz. Before tuning, make sure to turn down > on the unit, press "/1 on the unit to minimum. "TUNED" and "ST" (for Russian and Middle Eastern models) The AM tuning interval can preset 20 FM stations, and 10 AM stations. While holding down the volume to turn off . Scanning stops when the... the preset number Restart from Step 2. repeatedly until the auto scanning starts. Current station Current band and preset number FM FM 10 : 88.00 MHz SONY RADIO Station name 1 Press FUNCTION +/- Tuner Presetting Radio Stations You can be erased.
Operating Instructions
Page 79
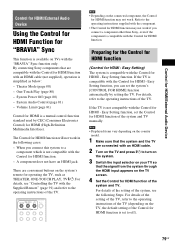
... Note • Displayed items vary depending on the country model. 1 Make sure that the system and the TV are connected with an HDMI cable. 2 Turn on the system's remote for HDMI function will not work . By connecting Sony components that the signal from the system through the HDMI input appears...; The Control for HDMI function may not work in the following Steps. Easy Setting function, you connect a component other than Sony, even if the component is compatible with the Control for "BRAVIA" Sync This function is not compatible with the "BRAVIA" Sync function only. Control ...
... Note • Displayed items vary depending on the country model. 1 Make sure that the system and the TV are connected with an HDMI cable. 2 Turn on the system's remote for HDMI function will not work . By connecting Sony components that the signal from the system through the HDMI input appears...; The Control for HDMI function may not work in the following Steps. Easy Setting function, you connect a component other than Sony, even if the component is compatible with the Control for "BRAVIA" Sync This function is not compatible with the "BRAVIA" Sync function only. Control ...
Operating Instructions
Page 85
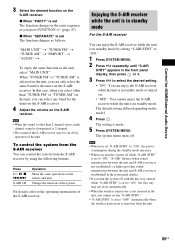
... is set The function changes as the unit, select "MAIN UNIT." For details, refer to 2 channel. • The sound of the S-AIR receiver may not close automatically. • When the wireless transceiver is in standby mode by using the following buttons. x When "SEPARATE" is in standby ...and unit. Press H, X, x, ./> S-AIR CH Operation Share the same operations on the model. 4 Press . Enjoying the S-AIR receiver while the unit is in standby mode For the S-AIR receiver You can enjoy the S-AIR receiver while the unit is not inserted in standby mode. In this case, when you select ...
... is set The function changes as the unit, select "MAIN UNIT." For details, refer to 2 channel. • The sound of the S-AIR receiver may not close automatically. • When the wireless transceiver is in standby mode by using the following buttons. x When "SEPARATE" is in standby ...and unit. Press H, X, x, ./> S-AIR CH Operation Share the same operations on the model. 4 Press . Enjoying the S-AIR receiver while the unit is in standby mode For the S-AIR receiver You can enjoy the S-AIR receiver while the unit is not inserted in standby mode. In this case, when you select ...
Operating Instructions
Page 100
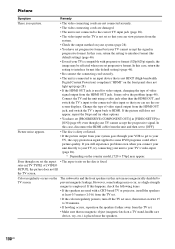
... back to the connected video input so that you connect your unit directly to your system (page 28). • You have set [PROGRESSIVE (COMPONENT OUT)] in this case, return the setting to [OFF]. Color irregularity occurs on your TV, try other than the HDMI OUT, and switch ... format but your TV cannot accept the progressive signal. ratio in progressive format. However, some DVD programs could affect picture quality. Picture Symptom Remedy There is no magnetic object (magnetic latch on the country model, [720 × 576p] may appear. It may solve the problem (page 46). If...
... back to the connected video input so that you connect your unit directly to your system (page 28). • You have set [PROGRESSIVE (COMPONENT OUT)] in this case, return the setting to [OFF]. Color irregularity occurs on your TV, try other than the HDMI OUT, and switch ... format but your TV cannot accept the progressive signal. ratio in progressive format. However, some DVD programs could affect picture quality. Picture Symptom Remedy There is no magnetic object (magnetic latch on the country model, [720 × 576p] may appear. It may solve the problem (page 46). If...
Operating Instructions
Page 108
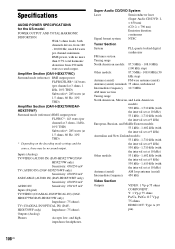
... 530 kHz - 1,610 kHz (with no sound output. HDX277WC/DAV-HDX279W only) Impedance: 75 ohms/- Super Audio CD/DVD System Laser Semiconductor laser (Super Audio CD/DVD: λ = 650 nm) (CD: λ =... Hz; TV (COAXIAL IN/OPTICAL IN) (DAV- Specifications AUDIO POWER SPECIFICATIONS for the US model POWER OUTPUT AND TOTAL HARMONIC DISTORTION: With 3 ohms loads, both channels driven, from 250 milli...1 Vp-p 75 ohms COMPONENT: Y: 1 Vp-p 75 ohms PB/CB, PR/CR: 0.7 Vp-p 75 ohms HDMI OUT: Type A (19 pin) 108US Inputs (Analog) TV/VIDEO (AUDIO IN) (DAV-HDX277WC/DAV- Outputs (Analog) ...
... 530 kHz - 1,610 kHz (with no sound output. HDX277WC/DAV-HDX279W only) Impedance: 75 ohms/- Super Audio CD/DVD System Laser Semiconductor laser (Super Audio CD/DVD: λ = 650 nm) (CD: λ =... Hz; TV (COAXIAL IN/OPTICAL IN) (DAV- Specifications AUDIO POWER SPECIFICATIONS for the US model POWER OUTPUT AND TOTAL HARMONIC DISTORTION: With 3 ohms loads, both channels driven, from 250 milli...1 Vp-p 75 ohms COMPONENT: Y: 1 Vp-p 75 ohms PB/CB, PR/CR: 0.7 Vp-p 75 ohms HDMI OUT: Type A (19 pin) 108US Inputs (Analog) TV/VIDEO (AUDIO IN) (DAV-HDX277WC/DAV- Outputs (Analog) ...
Operating Instructions
Page 109
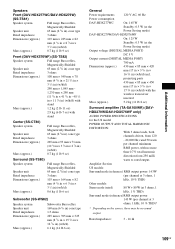
...in) (w/h/d) with the wireless transceiver inserted Mass (approx.) 5.2 kg (11 lb 8 oz) Surround amplifier (TA-SA100WR) (DAV- Additional Information Speakers Front (DAV-HDX277WC/DAV-HDX279W) (SS-TS81) Speaker system Full range Bass reflex, Magnetically Shielded Speaker unit 65 mm (2 5/8 in) cone type Rated impedance 3 ohms Dimensions (... distortion from 120 - 20,000 Hz; HDX279W/DAV-HDX576WF only) AUDIO POWER SPECIFICATIONS for the US model POWER OUTPUT AND TOTAL HARMONIC DISTORTION: With 3 ohms loads, both channels driven, from 250 milli watts to rated output.
...in) (w/h/d) with the wireless transceiver inserted Mass (approx.) 5.2 kg (11 lb 8 oz) Surround amplifier (TA-SA100WR) (DAV- Additional Information Speakers Front (DAV-HDX277WC/DAV-HDX279W) (SS-TS81) Speaker system Full range Bass reflex, Magnetically Shielded Speaker unit 65 mm (2 5/8 in) cone type Rated impedance 3 ohms Dimensions (... distortion from 120 - 20,000 Hz; HDX279W/DAV-HDX576WF only) AUDIO POWER SPECIFICATIONS for the US model POWER OUTPUT AND TOTAL HARMONIC DISTORTION: With 3 ohms loads, both channels driven, from 250 milli watts to rated output.

