
Operating Instructions
Page 3
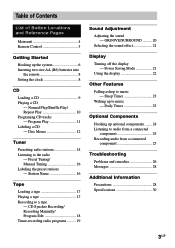
... 22 Other Features Falling asleep to the radio - Preset Tuning/ Manual Tuning 16 Labeling the preset stations - Daily Timer 23 Optional Components Hooking up to a tape - CD Synchro Recording/ Recording Manually/ Program Edit 18 Timer-recording radio programs ......... 19 Sound Adjustment Adjusting... a tape 17 Recording to music - Table of Contents List of Button Locations and Reference Pages Main unit 4 Remote Control 5 Getting Started Hooking up the system 6 Inserting two size AA (R6) batteries into the remote 8 Setting the clock 8 CD Loading a CD 9 Playing a CD -
... 22 Other Features Falling asleep to the radio - Preset Tuning/ Manual Tuning 16 Labeling the preset stations - Daily Timer 23 Optional Components Hooking up to a tape - CD Synchro Recording/ Recording Manually/ Program Edit 18 Timer-recording radio programs ......... 19 Sound Adjustment Adjusting... a tape 17 Recording to music - Table of Contents List of Button Locations and Reference Pages Main unit 4 Remote Control 5 Getting Started Hooking up the system 6 Inserting two size AA (R6) batteries into the remote 8 Setting the clock 8 CD Loading a CD 9 Playing a CD -
Operating Instructions
Page 5
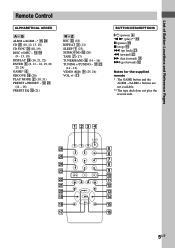
...@/1 (power) 4 n N (play)** 0 X (pause) 0 x (stop) 0 . (go back) wa m (rewind) ws M (fast forward) qa > (go forward) qs Notes for the supplied remote * The GAME button and the ALBM -/ALBM + buttons are not available. ** The tape deck does not play the reverse side. 1 23 4 wh 5 6 wg 7 wf 8 wd 9 0 ...) TUNING +/TUNING - qd ql qf qk qg qj qh 5US qs wa (14 - 16) PRESET EQ qg (21) R - List of Button Locations and Reference Pages Remote Control ALPHABETICAL ORDER A - Q ALBM +/ALBM -* qd w; qf ql (9 - 13, 18) DISPLAY wh (16, 21, 22) ENTER 5 (8, 11 - 16, 19, 20, 23, 24) GAME*...
...@/1 (power) 4 n N (play)** 0 X (pause) 0 x (stop) 0 . (go back) wa m (rewind) ws M (fast forward) qa > (go forward) qs Notes for the supplied remote * The GAME button and the ALBM -/ALBM + buttons are not available. ** The tape deck does not play the reverse side. 1 23 4 wh 5 6 wg 7 wf 8 wd 9 0 ...) TUNING +/TUNING - qd ql qf qk qg qj qh 5US qs wa (14 - 16) PRESET EQ qg (21) R - List of Button Locations and Reference Pages Remote Control ALPHABETICAL ORDER A - Q ALBM +/ALBM -* qd w; qf ql (9 - 13, 18) DISPLAY wh (16, 21, 22) ENTER 5 (8, 11 - 16, 19, 20, 23, 24) GAME*...
Operating Instructions
Page 8
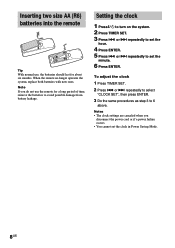
.... Inserting two size AA (R6) batteries into the remote e E E e Tip With normal use the remote for about six months. To adjust the clock 1 Press TIMER SET. 2 Press . or > repeatedly to 6 above. When the remote no longer operates the system, replace both batteries with new ones. or > repeatedly... to turn on the system. 2 Press TIMER SET. 3 Press . Note If you disconnect the power cord or if a power failure...
.... Inserting two size AA (R6) batteries into the remote e E E e Tip With normal use the remote for about six months. To adjust the clock 1 Press TIMER SET. 2 Press . or > repeatedly to 6 above. When the remote no longer operates the system, replace both batteries with new ones. or > repeatedly... to turn on the system. 2 Press TIMER SET. 3 Press . Note If you disconnect the power cord or if a power failure...
Operating Instructions
Page 9
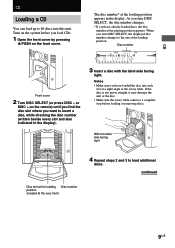
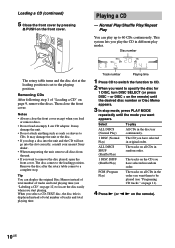
... checking the disc number (written beside every slot and also indicated in the display). 3 Insert a disc with the label side facing right. Turn on the remote) until you find the disc slot where you want to load additional discs. CD CD Loading a CD You can load up to 60 discs into... each slot at a right angle to the rotary table. The disc number* at the very front) 9US or DISC + on the system before loading or removing discs.
... checking the disc number (written beside every slot and also indicated in the display). 3 Insert a disc with the label side facing right. Turn on the remote) until you find the disc slot where you want to load additional discs. CD CD Loading a CD You can load up to 60 discs into... each slot at a right angle to the rotary table. The disc number* at the very front) 9US or DISC + on the system before loading or removing discs.
Operating Instructions
Page 10
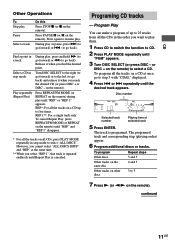
... PLAY MODE repeatedly until the desired disc number or Disc Memo appears. 3 In stop . This system lets you have selected in the disc tray continuously. Disc number The rotary table turns and the ...the discs. Loading a CD (continued) 5 Close the front cover by pressing Z PUSH on the remote). 10US Normal Play/Shuffle Play/Repeat Play You can display the original Disc Memos instead of total number of "... a disc into the unit and the CD will not go into the slot correctly, consult your nearest Sony dealer. • When transporting the unit, remove all discs from the unit. • If you...
... PLAY MODE repeatedly until the desired disc number or Disc Memo appears. 3 In stop . This system lets you have selected in the disc tray continuously. Disc number The rotary table turns and the ...the discs. Loading a CD (continued) 5 Close the front cover by pressing Z PUSH on the remote). 10US Normal Play/Shuffle Play/Repeat Play You can display the original Disc Memos instead of total number of "... a disc into the unit and the CD will not go into the slot correctly, consult your nearest Sony dealer. • When transporting the unit, remove all discs from the unit. • If you...
Operating Instructions
Page 11
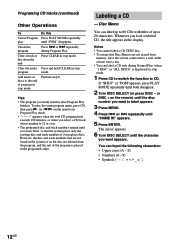
...the CDs in stop mode to select "ALL DISCS". Press PAUSE X (or X on the remote). During play , press and hold M (to go forward) or m (to go to step 5 with "CDAL" displayed. 4... Press . on the remote). or > repeatedly until the desired track appears. The programed track and corresponding step (playing order) appear. 6 ...the tracks on a CD up to 25 tracks from all the tracks on the remote). To cancel Repeat Play, press REPEAT/FM MODE (or REPEAT on the remote) until "REP" and "REP 1" disappear. * For all CDs, press PLAY...
...the CDs in stop mode to select "ALL DISCS". Press PAUSE X (or X on the remote). During play , press and hold M (to go forward) or m (to go to step 5 with "CDAL" displayed. 4... Press . on the remote). or > repeatedly until the desired track appears. The programed track and corresponding step (playing order) appear. 6 ...the tracks on a CD up to 25 tracks from all the tracks on the remote). To cancel Repeat Play, press REPEAT/FM MODE (or REPEAT on the remote) until "REP" and "REP 1" disappear. * For all CDs, press PLAY...
Operating Instructions
Page 12
... or Press CLEAR in the programed order. Tips • The program you made remains after Program Play finishes. Labeling a CD - or DISC + on the remote) in Program Play mode. The cursor appears. 6 Turn DISC SELECT until both disappear. 2 Turn DISC SELECT (or press DISC - If "SHUF" or "... To Do this Cancel Program Press PLAY MODE repeatedly play the same program again, press CD, then press N (or n N on the remote) until "PGM" disappears. Check the program Press . disc from memory, have the system connected to CD. You can label a CD only during Program Play.
... or Press CLEAR in the programed order. Tips • The program you made remains after Program Play finishes. Labeling a CD - or DISC + on the remote) in Program Play mode. The cursor appears. 6 Turn DISC SELECT until both disappear. 2 Turn DISC SELECT (or press DISC - If "SHUF" or "... To Do this Cancel Program Press PLAY MODE repeatedly play the same program again, press CD, then press N (or n N on the remote) until "PGM" disappears. Check the program Press . disc from memory, have the system connected to CD. You can label a CD only during Program Play.
Operating Instructions
Page 17
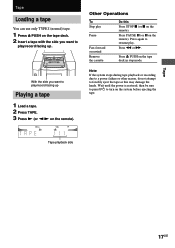
... m or M. Tape playback side 17US Wait until the power is restored, then be sure to press ?/1 to resume play. Press again to turn on the system before ejecting the tape. Tape Tape Loading a tape You can use only TYPE I (normal) tape. 1 Press Z PUSH on the tape deck. 2 Insert a tape with ... Z PUSH on the remote). Other Operations To Stop play Pause Fast-forward or rewind Remove the cassette Do this may damage the heads. Note If the system stops during tape playback or recording due to a power failure or other reason, do not attempt to forcibly eject the tape as this Press ...
... m or M. Tape playback side 17US Wait until the power is restored, then be sure to press ?/1 to resume play. Press again to turn on the system before ejecting the tape. Tape Tape Loading a tape You can use only TYPE I (normal) tape. 1 Press Z PUSH on the tape deck. 2 Insert a tape with ... Z PUSH on the remote). Other Operations To Stop play Pause Fast-forward or rewind Remove the cassette Do this may damage the heads. Note If the system stops during tape playback or recording due to a power failure or other reason, do not attempt to forcibly eject the tape as this Press ...
Operating Instructions
Page 18
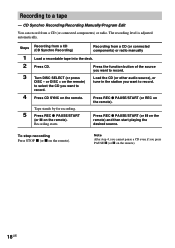
...playing the desired source. Recording starts. Press REC z PAUSE/START (or X on the remote). Recording to record. CD Synchro Recording/Recording Manually/Program Edit You can record from a CD (or connected components) or radio manually Load a recordable tape into the deck. Press CD. Press REC ... in the station you want to select the CD you press PAUSE X (or X on the remote). Steps 1 2 3 4 5 Recording from a CD (CD Synchro Recording) Recording from a CD (or connected components) or radio. Press the function button of the source you want to a tape - Press CD...
...playing the desired source. Recording starts. Press REC z PAUSE/START (or X on the remote). Recording to record. CD Synchro Recording/Recording Manually/Program Edit You can record from a CD (or connected components) or radio manually Load a recordable tape into the deck. Press CD. Press REC ... in the station you want to select the CD you press PAUSE X (or X on the remote). Steps 1 2 3 4 5 Recording from a CD (CD Synchro Recording) Recording from a CD (or connected components) or radio. Press the function button of the source you want to a tape - Press CD...
Operating Instructions
Page 19
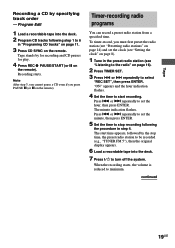
... by the stop recording following step 1 to 6 in "Programing CD tracks" on page 11. 3 Press CD SYNC on the remote). Press . or > repeatedly to turn off the system. Program Edit 1 Load a recordable tape into the deck. 7 Press ?/1 to set the hour, then press ENTER. Recording starts.... To timer-record, you press PAUSE X (or X on the remote. Press . Timer-recording radio programs You can record a preset radio ...
... by the stop recording following step 1 to 6 in "Programing CD tracks" on page 11. 3 Press CD SYNC on the remote). Press . or > repeatedly to turn off the system. Program Edit 1 Load a recordable tape into the deck. 7 Press ?/1 to set the hour, then press ENTER. Recording starts.... To timer-record, you press PAUSE X (or X on the remote. Press . Timer-recording radio programs You can record a preset radio ...
Operating Instructions
Page 20
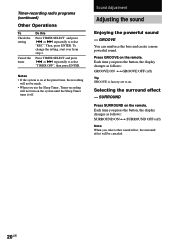
... TIMER SELECT and press . or > repeatedly to select "REC". To change the setting, start over from step 1. SURROUND Press SURROUND on the system until the Sleep Timer turns it off. GROOVE You can reinforce the bass and create a more powerful sound. Selecting the surround effect - or >... repeatedly to select "TIMER OFF", then press ENTER. Notes • If the system is factory-set to on the remote. Each time you press the button, the display changes as follows: GROOVE ON y GROOVE OFF (off ) Note When you use ...
... TIMER SELECT and press . or > repeatedly to select "REC". To change the setting, start over from step 1. SURROUND Press SURROUND on the system until the Sleep Timer turns it off. GROOVE You can reinforce the bass and create a more powerful sound. Selecting the surround effect - or >... repeatedly to select "TIMER OFF", then press ENTER. Notes • If the system is factory-set to on the remote. Each time you press the button, the display changes as follows: GROOVE ON y GROOVE OFF (off ) Note When you use ...
Operating Instructions
Page 21
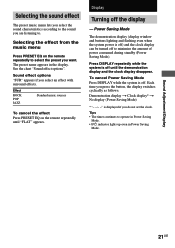
...if you are listening to. Power Saving Mode The demonstration display (display window and buttons lighting and flashing even when the system power is off to minimize the amount of power consumed during standby (Power Saving Mode). Sound Adjustment/Display 21US Press DISPLAY repeatedly ...t No display (Power Saving Mode) * "- -:- -" is off the display - Selecting the effect from the music menu Press PRESET EQ on the remote repeatedly until the demonstration display and the clock display disappear. The preset name appears in Power Saving Mode. See the chart "Sound effect options". Effect...
...if you are listening to. Power Saving Mode The demonstration display (display window and buttons lighting and flashing even when the system power is off to minimize the amount of power consumed during standby (Power Saving Mode). Sound Adjustment/Display 21US Press DISPLAY repeatedly ...t No display (Power Saving Mode) * "- -:- -" is off the display - Selecting the effect from the music menu Press PRESET EQ on the remote repeatedly until the demonstration display and the clock display disappear. The preset name appears in Power Saving Mode. See the chart "Sound effect options". Effect...
Operating Instructions
Page 23
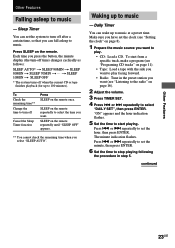
...the remote. or > repeatedly to stop playing following the procedure in the preset station you want . or > repeatedly to set the minute, then press ENTER. 6 Set the time to set the clock (see "Listening to play facing forward. • Radio: Tune in step 5. t SLEEP 10MIN t SLEEP OFF * The system ... to music - The minute indication flashes. Other Features Falling asleep to select "DAILY SET", then press ENTER. Sleep Timer You can set the system to turn off Cancel the Sleep Timer function Press SLEEP on page 8). 1 Prepare the music source you want to music. Each time you press...
...the remote. or > repeatedly to stop playing following the procedure in the preset station you want . or > repeatedly to set the minute, then press ENTER. 6 Set the time to set the clock (see "Listening to play facing forward. • Radio: Tune in step 5. t SLEEP 10MIN t SLEEP OFF * The system ... to music - The minute indication flashes. Other Features Falling asleep to select "DAILY SET", then press ENTER. Sleep Timer You can set the system to turn off Cancel the Sleep Timer function Press SLEEP on page 8). 1 Prepare the music source you want to music. Each time you press...
Operating Instructions
Page 26
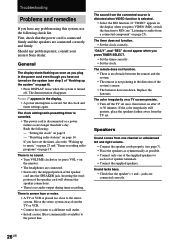
...• There is an obstacle between the remote and the system. • The remote is connected firmly and the speakers are connected correctly. 26US Redo the following check list. "Presetting radio stations" on page 14 If you have any problem persist, consult your nearest Sony dealer. First, check that the speaker's ...; Place the speakers as symmetrically as you plug in the display when you have not turned on the system (see "Listening to audio from a connected component" on page 25). Troubleshooting Problems and remedies If you have set the timer, also redo "Waking up the...
...• There is an obstacle between the remote and the system. • The remote is connected firmly and the speakers are connected correctly. 26US Redo the following check list. "Presetting radio stations" on page 14 If you have any problem persist, consult your nearest Sony dealer. First, check that the speaker's ...; Place the speakers as symmetrically as you plug in the display when you have not turned on the system (see "Listening to audio from a connected component" on page 25). Troubleshooting Problems and remedies If you have set the timer, also redo "Waking up the...
Operating Instructions
Page 27
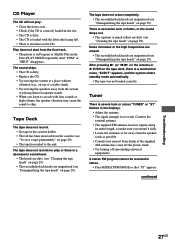
... extend it fully. • Locate the antennas as possible. • Consult your nearest Sony dealer if the supplied AM antenna has come off the plastic stand. • Try turning... save a tape permanently" on the tape deck, there is a mechanical noise, "EJECT" appears, and the system enters standby mode automatically. • The tape was not loaded correctly. Tuner There is severe hum or noise ... • The signal strength is in Program or Shuffle Play mode. After pressing N (or n N on the remote) or Z PUSH on page 29). • The tape has reeled to a track with the label side facing ...
... extend it fully. • Locate the antennas as possible. • Consult your nearest Sony dealer if the supplied AM antenna has come off the plastic stand. • Try turning... save a tape permanently" on the tape deck, there is a mechanical noise, "EJECT" appears, and the system enters standby mode automatically. • The tape was not loaded correctly. Tuner There is severe hum or noise ... • The signal strength is in Program or Shuffle Play mode. After pressing N (or n N on the remote) or Z PUSH on page 29). • The tape has reeled to a track with the label side facing ...
Operating Instructions
Page 30
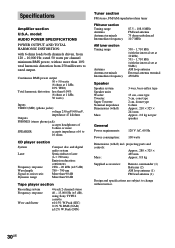
... 325 × 465 mm Mass : Approx. 8.8 kg Supplied accessories: Remote commander (1) Batteries (2) AM loop antenna (1) FM lead antenna (1) Design and specifications are subject to -noise ratio Dynamic range Compact disc and digital audio system Semiconductor laser (λ = 780 nm) Emission duration: continuous 2 Hz... phone jack): accepts headphones of 8 ohms or more than 90 dB Tape player section Recording system Frequency response Wow and flutter 4-track 2-channel stereo 40 - 13,000 Hz (±3 dB), using Sony TYPE I cassette ±0.15% W.Peak (IEC) 0.1% W.RMS (NAB) ±0.2% W....
... 325 × 465 mm Mass : Approx. 8.8 kg Supplied accessories: Remote commander (1) Batteries (2) AM loop antenna (1) FM lead antenna (1) Design and specifications are subject to -noise ratio Dynamic range Compact disc and digital audio system Semiconductor laser (λ = 780 nm) Emission duration: continuous 2 Hz... phone jack): accepts headphones of 8 ohms or more than 90 dB Tape player section Recording system Frequency response Wow and flutter 4-track 2-channel stereo 40 - 13,000 Hz (±3 dB), using Sony TYPE I cassette ±0.15% W.Peak (IEC) 0.1% W.RMS (NAB) ±0.2% W....


