
Operating Instructions
Page 1
Refer to them whenever you call upon your Sony dealer regarding this product. 4-239-951-11(1) Mini Hi-Fi Component System Operating Instructions Owner's Record The model and serial numbers are located on the rear of the unit. Record the serial number in the space provided below. Model No Serial No MHC-GS100 © 2002 Sony Corporation 1
Refer to them whenever you call upon your Sony dealer regarding this product. 4-239-951-11(1) Mini Hi-Fi Component System Operating Instructions Owner's Record The model and serial numbers are located on the rear of the unit. Record the serial number in the space provided below. Model No Serial No MHC-GS100 © 2002 Sony Corporation 1
Operating Instructions
Page 2
... reception, which the receiver is provided to call the CATV system installer's attention to radio communications. If this equipment. Note to CATV system installer: This reminder is connected. - Refer servicing to provide reasonable protection against harmful interference in the literature accompanying the appliance. CAUTION • The use of important operating and maintenance (servicing) instructions in a residential installation. Reorient or relocate the receiving antenna. - Increase the separation...
... reception, which the receiver is provided to call the CATV system installer's attention to radio communications. If this equipment. Note to CATV system installer: This reminder is connected. - Refer servicing to provide reasonable protection against harmful interference in the literature accompanying the appliance. CAUTION • The use of important operating and maintenance (servicing) instructions in a residential installation. Reorient or relocate the receiving antenna. - Increase the separation...
Operating Instructions
Page 3
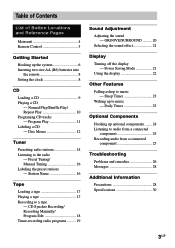
... of Button Locations and Reference Pages Main unit 4 Remote Control 5 Getting Started Hooking up optional components ........ 24 Listening to music - Normal Play/Shuffle Play/ Repeat Play 10 Programing CD tracks - Disc Memo 12 Tuner Presetting radio stations 14 Listening to music - GROOVE/SURROUND .......... 20 Selecting the sound effect 21 Display Turning off the display - Power Saving Mode 21 Using the display 22 Other Features Falling asleep to the radio - Program Play 11 Labeling a CD - CD Synchro Recording/ Recording Manually/ Program Edit...
... of Button Locations and Reference Pages Main unit 4 Remote Control 5 Getting Started Hooking up optional components ........ 24 Listening to music - Normal Play/Shuffle Play/ Repeat Play 10 Programing CD tracks - Disc Memo 12 Tuner Presetting radio stations 14 Listening to music - GROOVE/SURROUND .......... 20 Selecting the sound effect 21 Display Turning off the display - Power Saving Mode 21 Using the display 22 Other Features Falling asleep to the radio - Program Play 11 Labeling a CD - CD Synchro Recording/ Recording Manually/ Program Edit...
Operating Instructions
Page 4
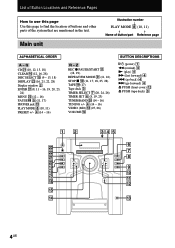
...) STOP x 0 (11, 17, 18, 25, 28) TAPE ql (17) Tape deck 3 TIMER SELECT 7 (20, 24, 26) TIMER SET 6 (8, 19, 23) TUNER/BAND w; (14 - 16) TUNING +/- 4 (14 - 16) VIDEO (MD) qk (25, 26) VOLUME qf BUTTON DESCRIPTIONS =/1 (power) 1 m (rewind) 4 N (play) 4 M (fast forward) 4 . (go back) 4 > (go forward) 4 Z PUSH (front cover) qs Z PUSH (tape deck) 3 12 wd ws wa w; Main unit Illustration number r PLAY MODE 8 (10, 11) R R Name of the...
...) STOP x 0 (11, 17, 18, 25, 28) TAPE ql (17) Tape deck 3 TIMER SELECT 7 (20, 24, 26) TIMER SET 6 (8, 19, 23) TUNER/BAND w; (14 - 16) TUNING +/- 4 (14 - 16) VIDEO (MD) qk (25, 26) VOLUME qf BUTTON DESCRIPTIONS =/1 (power) 1 m (rewind) 4 N (play) 4 M (fast forward) 4 . (go back) 4 > (go forward) 4 Z PUSH (front cover) qs Z PUSH (tape deck) 3 12 wd ws wa w; Main unit Illustration number r PLAY MODE 8 (10, 11) R R Name of the...
Operating Instructions
Page 7
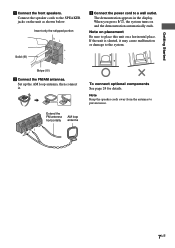
... speaker cords away from the antennas to the system. The demonstration appears in the display. Stripe (#) 2 Connect the FM/AM antennas. When you press ?/1, the system turns on the unit as shown below. Getting Started 1 Connect the front speakers. Insert only the stripped portion R L + Solid (3) - 3 Connect the power cord to place this unit on placement Be sure to a wall outlet. Note on a horizontal place. Set...
... speaker cords away from the antennas to the system. The demonstration appears in the display. Stripe (#) 2 Connect the FM/AM antennas. When you press ?/1, the system turns on the unit as shown below. Getting Started 1 Connect the front speakers. Insert only the stripped portion R L + Solid (3) - 3 Connect the power cord to place this unit on placement Be sure to a wall outlet. Note on a horizontal place. Set...
Operating Instructions
Page 12
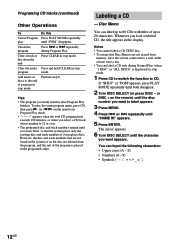
... label a CD only during Program Play. Disc Memo You can input the following characters: • Upper cases (A - or DISC + on the remote) until you replace discs. appears when the total CD program time exceeds 100 minutes, or when you select a CD track whose number is played in Program Play mode. However, the disc and track numbers that the system plays only the existing disc and track numbers if you erase them, so...
... label a CD only during Program Play. Disc Memo You can input the following characters: • Upper cases (A - or DISC + on the remote) until you replace discs. appears when the total CD program time exceeds 100 minutes, or when you select a CD track whose number is played in Program Play mode. However, the disc and track numbers that the system plays only the existing disc and track numbers if you erase them, so...
Operating Instructions
Page 14
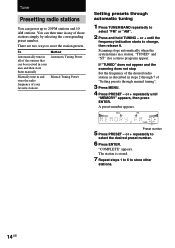
... stations Method Automatic Tuning Preset Manual Tuning Preset Setting presets through manual tuning". 3 Press MENU. 4 Press PRESET - Preset number 5 Press PRESET - or + until "MEMORY" appears, then press ENTER. "TUNED" and "ST" (for a stereo program) appear. You can then tune in steps 2 through 7 of "Setting presets through automatic tuning 1 Press TUNER/BAND repeatedly to 20 FM stations and 10 AM stations. The station is stored. 7 Repeat steps 1 to 6 to select the desired preset number. 6 Press ENTER. or + repeatedly until the frequency...
... stations Method Automatic Tuning Preset Manual Tuning Preset Setting presets through manual tuning". 3 Press MENU. 4 Press PRESET - Preset number 5 Press PRESET - or + until "MEMORY" appears, then press ENTER. "TUNED" and "ST" (for a stereo program) appear. You can then tune in steps 2 through 7 of "Setting presets through automatic tuning 1 Press TUNER/BAND repeatedly to 20 FM stations and 10 AM stations. The station is stored. 7 Repeat steps 1 to 6 to select the desired preset number. 6 Press ENTER. or + repeatedly until the frequency...

Operating Instructions
Page 15
Tuner Setting presets through manual signal tuning". Change the preset station Start over from step 1. A preset number appears. 5 Press PRESET - Note You cannot change the AM tuning interval, tune in Power Saving Mode. To reset the interval, repeat the same procedure. Stop setting presets Press MENU. To change the AM tuning interval in any AM station first, then turn the system back on. or + repeatedly to select "FM" or "AM". 2 Press TUNING - To change the interval, all the AM preset stations are...
Tuner Setting presets through manual signal tuning". Change the preset station Start over from step 1. A preset number appears. 5 Press PRESET - Note You cannot change the AM tuning interval, tune in Power Saving Mode. To reset the interval, repeat the same procedure. Stop setting presets Press MENU. To change the AM tuning interval in any AM station first, then turn the system back on. or + repeatedly to select "FM" or "AM". 2 Press TUNING - To change the interval, all the AM preset stations are...
Operating Instructions
Page 16
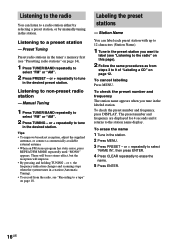
... Press MENU. To erase the name 1 Tune in the desired preset station. Manual Tuning 1 Press TUNER/BAND repeatedly to the station name display. or + repeatedly to tune in the tuner's memory first (see "Recording to a tape" on page 18. The preset number and frequency are displayed for 4 seconds and it returns to select "FM" or "AM". 2 Press TUNING - or +, the frequency indication changes and scanning stops when the system tunes in a station (Automatic Tuning...
... Press MENU. To erase the name 1 Tune in the desired preset station. Manual Tuning 1 Press TUNER/BAND repeatedly to the station name display. or + repeatedly to tune in the tuner's memory first (see "Recording to a tape" on page 18. The preset number and frequency are displayed for 4 seconds and it returns to select "FM" or "AM". 2 Press TUNING - or +, the frequency indication changes and scanning stops when the system tunes in a station (Automatic Tuning...
Operating Instructions
Page 18
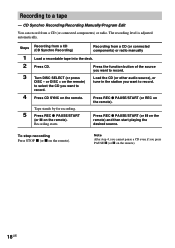
... x on the remote) and then start playing the desired source. CD Synchro Recording/Recording Manually/Program Edit You can record from a CD (or connected components) or radio manually Load a recordable tape into the deck. Turn DISC SELECT (or press DISC - Press CD SYNC on the remote). 18US or DISC + on the remote) to select the CD you want to a tape - Load the CD (or other audio source), or tune in the station you press PAUSE...
... x on the remote) and then start playing the desired source. CD Synchro Recording/Recording Manually/Program Edit You can record from a CD (or connected components) or radio manually Load a recordable tape into the deck. Turn DISC SELECT (or press DISC - Press CD SYNC on the remote). 18US or DISC + on the remote) to select the CD you want to a tape - Load the CD (or other audio source), or tune in the station you press PAUSE...
Operating Instructions
Page 19
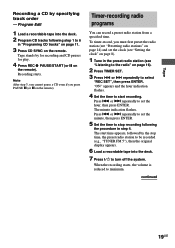
... (e.g., "TUNER FM 5"), then the original display appears. 6 Load a recordable tape into the deck. 2 Program CD tracks following the procedure in the preset radio station (see "Listening to minimum. Program Edit 1 Load a recordable tape into the deck. 7 Press ?/1 to 6 in "Programing CD tracks" on page 11. 3 Press CD SYNC on the remote. Timer-recording radio programs You can record a preset radio station from a specified time. "ON" appears and the hour indication flashes. 4 Set...
... (e.g., "TUNER FM 5"), then the original display appears. 6 Load a recordable tape into the deck. 2 Program CD tracks following the procedure in the preset radio station (see "Listening to minimum. Program Edit 1 Load a recordable tape into the deck. 7 Press ?/1 to 6 in "Programing CD tracks" on page 11. 3 Press CD SYNC on the remote. Timer-recording radio programs You can record a preset radio station from a specified time. "ON" appears and the hour indication flashes. 4 Set...
Operating Instructions
Page 20
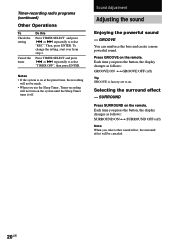
... the button, the display changes as follows: SURROUND ON y SURROUND OFF (off ) Tip GROOVE is factory-set to on the system until the Sleep Timer turns it off. Each time you use the Sleep Timer, Timer-recording will not be canceled. 20US GROOVE You can reinforce the bass and create a more powerful sound. SURROUND Press SURROUND on the remote. Notes • If the system is on at the preset time...
... the button, the display changes as follows: SURROUND ON y SURROUND OFF (off ) Tip GROOVE is factory-set to on the system until the Sleep Timer turns it off. Each time you use the Sleep Timer, Timer-recording will not be canceled. 20US GROOVE You can reinforce the bass and create a more powerful sound. SURROUND Press SURROUND on the remote. Notes • If the system is on at the preset time...

Operating Instructions
Page 22
... or over appears during Shuffle Play of the disc** t Track title (CD-TEXT disc only) t Clock display t Effect status appears when you press the button, the display changes cyclically as the titles. Checking the remaining time Press DISPLAY repeatedly during Programme Play when a CD track whose number is 21 or over is displayed (see page 10). Using the display You can also check the...
... or over appears during Shuffle Play of the disc** t Track title (CD-TEXT disc only) t Clock display t Effect status appears when you press the button, the display changes cyclically as the titles. Checking the remaining time Press DISPLAY repeatedly during Programme Play when a CD track whose number is 21 or over is displayed (see page 10). Using the display You can also check the...
Operating Instructions
Page 23
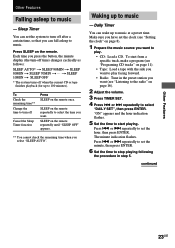
... "Listening to music at a preset time. SLEEP on page 8). 1 Prepare the music source you want. t SLEEP 10MIN t SLEEP OFF * The system turns off Cancel the Sleep Timer function Press SLEEP on page 16). 2 Adjust the volume. 3 Press TIMER SET. 4 Press . or > repeatedly to select the time you want to 100 minutes). The minute indication flashes. Press . Each time you can wake up to play . • CD...
... "Listening to music at a preset time. SLEEP on page 8). 1 Prepare the music source you want. t SLEEP 10MIN t SLEEP OFF * The system turns off Cancel the Sleep Timer function Press SLEEP on page 16). 2 Adjust the volume. 3 Press TIMER SET. 4 Press . or > repeatedly to select the time you want to 100 minutes). The minute indication flashes. Press . Each time you can wake up to play . • CD...

Operating Instructions
Page 24
... music source, appear, then the original display appears. 9 Press ?/1 to turn on 15 seconds before the preset time. The type of an MD deck, a VCR, etc. The indication changes as an MD deck, a VCR, etc.) to select "DAILY", then press ENTER. Start over from that component through this system. 24US Optional Components Hooking up to analog audio from step 1. VIDEO (MD) IN Use audio cords (not supplied) to connect an optional component...
... music source, appear, then the original display appears. 9 Press ?/1 to turn on 15 seconds before the preset time. The type of an MD deck, a VCR, etc. The indication changes as an MD deck, a VCR, etc.) to select "DAILY", then press ENTER. Start over from that component through this system. 24US Optional Components Hooking up to analog audio from step 1. VIDEO (MD) IN Use audio cords (not supplied) to connect an optional component...

Operating Instructions
Page 25
... to switch to VIDEO. • If you enable the MD function, just press VIDEO (MD). Notes • The function is factory-set to the VIDEO function. • You cannot switch the function in Power Saving Mode. To switch the VIDEO function to MD When you listen to the analog sound of an MD deck, a VCR, etc. 1 Connect the audio cords. Recording audio from a connected component Listening to a connected MD deck, perform the following operation. 1 Turn off the system. 2 Press VIDEO (MD...
... to switch to VIDEO. • If you enable the MD function, just press VIDEO (MD). Notes • The function is factory-set to the VIDEO function. • You cannot switch the function in Power Saving Mode. To switch the VIDEO function to MD When you listen to the analog sound of an MD deck, a VCR, etc. 1 Connect the audio cords. Recording audio from a connected component Listening to a connected MD deck, perform the following operation. 1 Turn off the system. 2 Press VIDEO (MD...
Operating Instructions
Page 26
...; Turn VOLUME clockwise (or press VOL + on page 25). "Setting the clock" on page 19. Replace the batteries. The clock setting/radio presetting/timer is canceled. • The power cord is no audio output during timer recording. Should any problem using this system, use the following : - Redo the following check list. Inserting the vinyl portion of speaker terminals. • Connect the supplied speakers. Sound lacks bass. • Check that the power cord...
...; Turn VOLUME clockwise (or press VOL + on page 25). "Setting the clock" on page 19. Replace the batteries. The clock setting/radio presetting/timer is canceled. • The power cord is no audio output during timer recording. Should any problem using this system, use the following : - Redo the following check list. Inserting the vinyl portion of speaker terminals. • Connect the supplied speakers. Sound lacks bass. • Check that the power cord...
Operating Instructions
Page 27
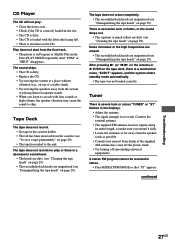
... tape in Program or Shuffle Play mode. CD Player The CD will not play or there is a decrease in the display). • Adjust the antenna. • The signal strength is too weak. The sound skips. • The CD is dirty. • Replace the CD. • Try moving the system to a place without vibration (e.g., on top of a stable stand). • Try moving the speakers away...
... tape in Program or Shuffle Play mode. CD Player The CD will not play or there is a decrease in the display). • Adjust the antenna. • The signal strength is too weak. The sound skips. • The CD is dirty. • Replace the CD. • Try moving the system to a place without vibration (e.g., on top of a stable stand). • Try moving the speakers away...

Operating Instructions
Page 28
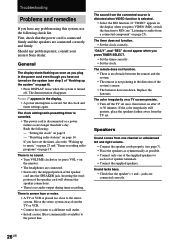
... lead), pull it out by qualified personnel before operating it checked by the plug. Dusty or dirty - Problems and remedies (continued) If other troubles not described above occur, reset the system as follows: 1 Unplug the power cord. 2 Plug the power cord back in. 3 Press ?/1 to turn on the system. 4 Press STOP x, CLEAR, and DISPLAY at a large volume, the cabinet temperature of the top, side and...
... lead), pull it out by qualified personnel before operating it checked by the plug. Dusty or dirty - Problems and remedies (continued) If other troubles not described above occur, reset the system as follows: 1 Unplug the power cord. 2 Plug the power cord back in. 3 Press ?/1 to turn on the system. 4 Press STOP x, CLEAR, and DISPLAY at a large volume, the cabinet temperature of the top, side and...
Operating Instructions
Page 30
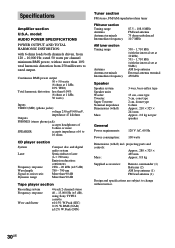
...; model: AUDIO POWER SPECIFICATIONS POWER OUTPUT AND TOTAL HARMONIC DISTORTION: with 6 ohms loads both channels driven, from 250 milliwatts to rated output. rated 50 watts per channel minimum RMS power, with the interval set at 10 kHz) 531 - 1,710 kHz (with no more SPEAKER: accepts impedance of 8 ohms or more than 90 dB Tape player section Recording system Frequency response Wow and flutter 4-track 2-channel stereo 40 - 13,000 Hz (±3 dB), using Sony...
...; model: AUDIO POWER SPECIFICATIONS POWER OUTPUT AND TOTAL HARMONIC DISTORTION: with 6 ohms loads both channels driven, from 250 milliwatts to rated output. rated 50 watts per channel minimum RMS power, with the interval set at 10 kHz) 531 - 1,710 kHz (with no more SPEAKER: accepts impedance of 8 ohms or more than 90 dB Tape player section Recording system Frequency response Wow and flutter 4-track 2-channel stereo 40 - 13,000 Hz (±3 dB), using Sony...


