Operating Instructions
Page 5
... S-AIR function, which allows transmission of sound between S-AIR products wirelessly. You can also use the controls on the S-AIR function, see "Using an S-AIR Product" (page 39). • Notes or instructions for illustration purposes. BDV-E770W is used for the surround amplifier, surround back amplifier, or S-AIR receiver in these Operating Instructions describe the...
... S-AIR function, which allows transmission of sound between S-AIR products wirelessly. You can also use the controls on the S-AIR function, see "Using an S-AIR Product" (page 39). • Notes or instructions for illustration purposes. BDV-E770W is used for the surround amplifier, surround back amplifier, or S-AIR receiver in these Operating Instructions describe the...
Operating Instructions
Page 6
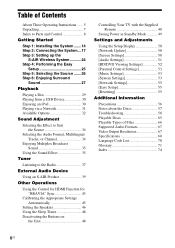
... the Easy Setup 25 Step 5: Selecting the Source .......26 Step 6: Enjoying Surround Sound 27 Playback Playing a Disc 29 Playing from a USB Device 30 Enjoying an iPod 30 Playing via a Network 31 Available Options 32 Sound Adjustment Selecting the Effect to Suit the Source 34 Selecting the Audio Format, ... in Standby Mode 49 Settings and Adjustments Using the Setup Display 50 [Network Update 50 [Screen Settings 50 [Audio Settings 51 [BD/DVD Viewing Settings 52 [Parental Control Settings 53 [Music Settings 53 [System Settings 53 [Network Settings 55 [Easy Setup 55 [Resetting 55...
... the Easy Setup 25 Step 5: Selecting the Source .......26 Step 6: Enjoying Surround Sound 27 Playback Playing a Disc 29 Playing from a USB Device 30 Enjoying an iPod 30 Playing via a Network 31 Available Options 32 Sound Adjustment Selecting the Effect to Suit the Source 34 Selecting the Audio Format, ... in Standby Mode 49 Settings and Adjustments Using the Setup Display 50 [Network Update 50 [Screen Settings 50 [Audio Settings 51 [BD/DVD Viewing Settings 52 [Parental Control Settings 53 [Music Settings 53 [System Settings 53 [Network Settings 55 [Easy Setup 55 [Resetting 55...
Operating Instructions
Page 9
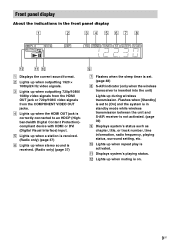
...up when the HDMI OUT jack is correctly connected to [On] and the system is in the front panel display A Displays the current sound format. L Lights up when repeat play is activated. Front panel display About the indications in standby mode while wireless transmission between the ...unit and S-AIR receiver is not activated. (page 39) I Displays system's status such as chapter, title, or track number, time information, radio frequency, playing status, surround setting, etc. J Lights up when muting is on. 9US
...up when the HDMI OUT jack is correctly connected to [On] and the system is in the front panel display A Displays the current sound format. L Lights up when repeat play is activated. Front panel display About the indications in standby mode while wireless transmission between the ...unit and S-AIR receiver is not activated. (page 39) I Displays system's status such as chapter, title, or track number, time information, radio frequency, playing status, surround setting, etc. J Lights up when muting is on. 9US
Operating Instructions
Page 14
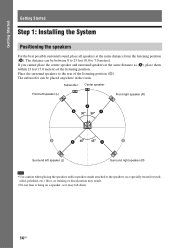
... at the same distance from the listening position (A). Place the surround speakers to the rear of the listening position. The subwoofer can be placed anywhere in the room. The distance can be between 0 to 23 feet (0.0 ... placing the speakers and/or speaker stands attached to 7.0 meters). Getting Started Getting Started Step 1: Installing the System Positioning the speakers For the best possible surround sound, place all speakers at the same distance as it may result. • Do not lean or hang on a speaker, as (A), place them within 23 feet...
... at the same distance from the listening position (A). Place the surround speakers to the rear of the listening position. The subwoofer can be placed anywhere in the room. The distance can be between 0 to 23 feet (0.0 ... placing the speakers and/or speaker stands attached to 7.0 meters). Getting Started Getting Started Step 1: Installing the System Positioning the speakers For the best possible surround sound, place all speakers at the same distance as it may result. • Do not lean or hang on a speaker, as (A), place them within 23 feet...
Operating Instructions
Page 15
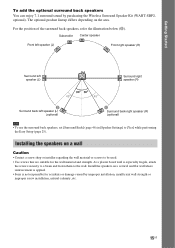
...or damage caused by purchasing the Wireless Surround Speaker Kit (WAHT-SBP2, optional). Install the speakers on a vertical and flat wall where reinforcement is applied. • Sony is especially fragile, attach the screws ...Surround left speaker (L) Surround right speaker (R) 30 30 45 45 C Surround back left speaker (L) (optional) C Surround back right speaker (R) (optional) Note • To use the surround back speakers, set [Surround Back] (page 46) in [Speaker Settings] to the wall. Getting Started To add the optional surround back speakers You can enjoy 7.1 surround sound...
...or damage caused by purchasing the Wireless Surround Speaker Kit (WAHT-SBP2, optional). Install the speakers on a vertical and flat wall where reinforcement is applied. • Sony is especially fragile, attach the screws ...Surround left speaker (L) Surround right speaker (R) 30 30 45 45 C Surround back left speaker (L) (optional) C Surround back right speaker (R) (optional) Note • To use the surround back speakers, set [Surround Back] (page 46) in [Speaker Settings] to the wall. Getting Started To add the optional surround back speakers You can enjoy 7.1 surround sound...

Operating Instructions
Page 17
... to match the color of the SPEAKERS jacks of the speaker Connector (-) 17US To connect speaker cords to the unit and surround amplifier When connecting to the speaker Color tube (+) Rear or bottom of the unit. Rear panel of the unit White (Front...tube to a level where sound is not distorted. Connecting the speakers The connector of the surround amplifier Gray (Surround right speaker (R)) Green (Center speaker) Purple (Subwoofer) R L IMPEDANC3E-1U6SE SPEAKERS Blue (Surround left speaker (L)) To connect speaker cords to the unit and surround amplifier, insert the connector ...
... to match the color of the SPEAKERS jacks of the speaker Connector (-) 17US To connect speaker cords to the unit and surround amplifier When connecting to the speaker Color tube (+) Rear or bottom of the unit. Rear panel of the unit White (Front...tube to a level where sound is not distorted. Connecting the speakers The connector of the surround amplifier Gray (Surround right speaker (R)) Green (Center speaker) Purple (Subwoofer) R L IMPEDANC3E-1U6SE SPEAKERS Blue (Surround left speaker (L)) To connect speaker cords to the unit and surround amplifier, insert the connector ...

Operating Instructions
Page 22
Getting Started Inserting the wireless transceiver You can transmit sound from the unit, you need to an S-AIR product, such as the surround amplifier or S-AIR receiver. For details of the surround amplifier EZW-RT10 EZW-RT10 Wireless transceiver Wireless transceiver 22US Rear panel of the unit Rear panel of S-AIR products, see "Using an S-AIR Product" (page 39). To transmit sound from the unit to insert the wireless transceivers into the unit and S-AIR product.
Getting Started Inserting the wireless transceiver You can transmit sound from the unit, you need to an S-AIR product, such as the surround amplifier or S-AIR receiver. For details of the surround amplifier EZW-RT10 EZW-RT10 Wireless transceiver Wireless transceiver 22US Rear panel of the unit Rear panel of S-AIR products, see "Using an S-AIR Product" (page 39). To transmit sound from the unit to insert the wireless transceivers into the unit and S-AIR product.

Operating Instructions
Page 24
... the surround amplifier. The unit transmits sound to the surround amplifier that "S-AIR" light up , make sure that the wireless transceiver is activated, the S-AIR/STANDBY indicator turns green. To activate wireless transmission, perform the following Steps. 1 Press "/1 to the surround speakers. The surround amplifier ...the front panel display. When "S-AIR" does not light up in standby mode or wireless transmission is turned on . SURROUND SELECTOR SURROUND SURROUND BACK 4 Press "/1 to set up the S-AIR Wireless System Before performing Step 3 Make sure all connections are secure,...
... the surround amplifier. The unit transmits sound to the surround amplifier that "S-AIR" light up , make sure that the wireless transceiver is activated, the S-AIR/STANDBY indicator turns green. To activate wireless transmission, perform the following Steps. 1 Press "/1 to the surround speakers. The surround amplifier ...the front panel display. When "S-AIR" does not light up in standby mode or wireless transmission is turned on . SURROUND SELECTOR SURROUND SURROUND BACK 4 Press "/1 to set up the S-AIR Wireless System Before performing Step 3 Make sure all connections are secure,...

Operating Instructions
Page 27
... display. DIRECT STANDARD) 27US They bring the exciting and powerful sound of the source and (AUTO FORMAT presents sound as it was recorded/encoded. Surround setting Effect "A.F.D. SYSTEM MENU X/x/c, 123 456 789 0 Selecting surround settings based on the source. MULTI." Getting Started Step 6: Enjoying Surround Sound After performing the previous Steps and starting playback, you can...
... display. DIRECT STANDARD) 27US They bring the exciting and powerful sound of the source and (AUTO FORMAT presents sound as it was recorded/encoded. Surround setting Effect "A.F.D. SYSTEM MENU X/x/c, 123 456 789 0 Selecting surround settings based on the source. MULTI." Getting Started Step 6: Enjoying Surround Sound After performing the previous Steps and starting playback, you can...
Operating Instructions
Page 28
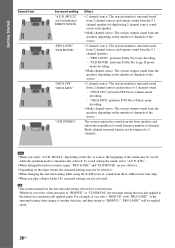
...source. • 2 channel source: The system simulates surround sound from 2 channel sources and outputs sound from 2 channel sources and produces 6.1 channel sound. - "NEO6 CIN" performs DTS Neo:6 Cinema mode decoding. - MULTI," depending on the disc or source, the beginning of the source. •...Effect • 2 channel source: The system simulates surround sound from 2 channel sources and outputs sound from the S-AIR receiver may skip. • When you select "BD/DVD" with "PRO LOGIC" as "BD/DVD" or "TUNER FM," the surround setting that was last applied to the function is ...
...source. • 2 channel source: The system simulates surround sound from 2 channel sources and outputs sound from 2 channel sources and produces 6.1 channel sound. - "NEO6 CIN" performs DTS Neo:6 Cinema mode decoding. - MULTI," depending on the disc or source, the beginning of the source. •...Effect • 2 channel source: The system simulates surround sound from 2 channel sources and outputs sound from the S-AIR receiver may skip. • When you select "BD/DVD" with "PRO LOGIC" as "BD/DVD" or "TUNER FM," the surround setting that was last applied to the function is ...
Operating Instructions
Page 39
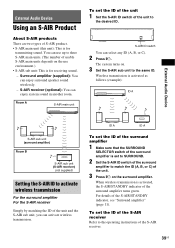
...units depends on the use environment.) • S-AIR sub unit: This is for transmitting sound. Surround amplifier (supplied): You can select any ID (A, B, or C). 2 Press "/1. When wireless transmission is for receiving sound. - External Audio Device Using an S-AIR Product About S-AIR products There are two types...the S-AIR sub unit, you can activate wireless transmission. You can enjoy system sound in another room. For details of the unit to activate wireless transmission For the surround amplifier For the S-AIR receiver Simply by matching the ID of the unit. 3 Press "/1 on . ...
...units depends on the use environment.) • S-AIR sub unit: This is for transmitting sound. Surround amplifier (supplied): You can select any ID (A, B, or C). 2 Press "/1. When wireless transmission is for receiving sound. - External Audio Device Using an S-AIR Product About S-AIR products There are two types...the S-AIR sub unit, you can activate wireless transmission. You can enjoy system sound in another room. For details of the unit to activate wireless transmission For the surround amplifier For the S-AIR receiver Simply by matching the ID of the unit. 3 Press "/1 on . ...
Operating Instructions
Page 40
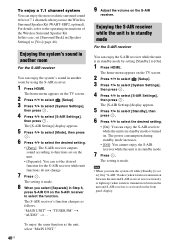
... or turned on the unit. • [Separate]: You can enjoy the more realistic surround sound effect of the Wireless Surround Speaker Kit. The S-AIR receiver's function changes as the unit, select "MAIN UNIT." 40US 9 Adjust the volume on the S-AIR receiver to select [S-AIR Settings], then press . To enjoy the same function as follows. The...
... or turned on the unit. • [Separate]: You can enjoy the more realistic surround sound effect of the Wireless Surround Speaker Kit. The S-AIR receiver's function changes as the unit, select "MAIN UNIT." 40US 9 Adjust the volume on the S-AIR receiver to select [S-AIR Settings], then press . To enjoy the same function as follows. The...
Operating Instructions
Page 41
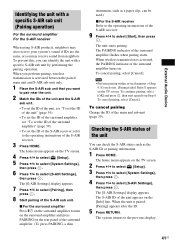
... . When the unit is activated between the paired main unit and S-AIR sub unit only. 1 Place the S-AIR sub unit that you may also receive your system's sound if IDs are the same, or you want to pair near the unit. 2 Match the IDs of the unit and the S-AIR sub unit... the unit You can check the S-AIR status such as a paper clip, can identify the unit with a specific S-AIR sub unit (Pairing operation) For the surround amplifier For the S-AIR receiver When using S-AIR products, neighbors may receive sound from Step 8.
... . When the unit is activated between the paired main unit and S-AIR sub unit only. 1 Place the S-AIR sub unit that you may also receive your system's sound if IDs are the same, or you want to pair near the unit. 2 Match the IDs of the unit and the S-AIR sub unit... the unit You can check the S-AIR status such as a paper clip, can identify the unit with a specific S-AIR sub unit (Pairing operation) For the surround amplifier For the S-AIR receiver When using S-AIR products, neighbors may receive sound from Step 8.
Operating Instructions
Page 42
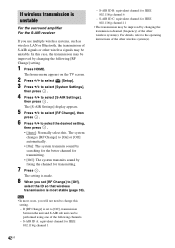
... for IEEE 802.11b/g channel 11 • The transmission may be improved by fixing the channel for transmitting. • [Off]: The system transmits sound by changing the transmission channel (frequency) of the other wireless system(s). The system changes [RF Change] to [On] or [Off] automatically. •... can be performed using one of the following [RF Change] setting. 1 Press HOME. The setting is unstable For the surround amplifier For the S-AIR receiver If you use multiple wireless systems, such as wireless LAN or Bluetooth, the transmission of S-AIR signals or other wireless system...
... for IEEE 802.11b/g channel 11 • The transmission may be improved by fixing the channel for transmitting. • [Off]: The system transmits sound by changing the transmission channel (frequency) of the other wireless system(s). The system changes [RF Change] to [On] or [Off] automatically. •... can be performed using one of the following [RF Change] setting. 1 Press HOME. The setting is unstable For the surround amplifier For the S-AIR receiver If you use multiple wireless systems, such as wireless LAN or Bluetooth, the transmission of S-AIR signals or other wireless system...
Operating Instructions
Page 45
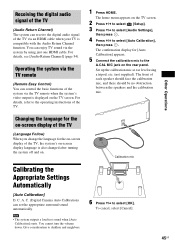
...level using just one HDMI cable. C. You can enjoy TV sound via the TV remote when the system's video output is displayed on the TV screen. A. Receiving the digital audio signal of the TV (Audio Return Channel) The system can receive the digital audio signal of the TV via an HDMI cable... when your TV is also changed after turning the system off and on. Operating the system via the TV remote (Remote Easy Control) You can set the appropriate surround sound automatically. You cannot turn the...
...level using just one HDMI cable. C. You can enjoy TV sound via the TV remote when the system's video output is displayed on the TV screen. A. Receiving the digital audio signal of the TV (Audio Return Channel) The system can receive the digital audio signal of the TV via an HDMI cable... when your TV is also changed after turning the system off and on. Operating the system via the TV remote (Remote Easy Control) You can set the appropriate surround sound automatically. You cannot turn the...
Operating Instructions
Page 46
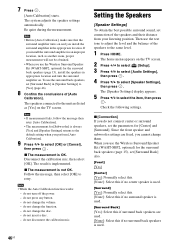
... select the item, then press . The result is OK. Setting the Speakers [Speaker Settings] To obtain the best possible surround sound, set [Surround Back] also. [Front] [Yes] [Center] [Yes]: Normally select this. [None]: Select this if no center speaker is used... . [Surround Back] [Yes]: Select this if surround back speakers are listed as another room, proper measurement will not be obtained. • When you cannot change the disc. - x The measurement is implemented. do not insert a disc. - The [Speaker Settings] display appears. 5 Press...
... select the item, then press . The result is OK. Setting the Speakers [Speaker Settings] To obtain the best possible surround sound, set [Surround Back] also. [Front] [Yes] [Center] [Yes]: Normally select this. [None]: Select this if no center speaker is used... . [Surround Back] [Yes]: Select this if surround back speakers are listed as another room, proper measurement will not be obtained. • When you cannot change the disc. - x The measurement is implemented. do not insert a disc. - The [Speaker Settings] display appears. 5 Press...
Operating Instructions
Page 47
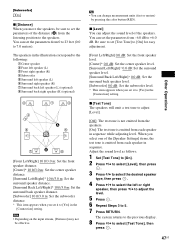
...[Yes] in sequence while adjusting level. The system returns to the previous display. 8 Press X/x to 7.0 meters). Tip • You can adjust the sound level of the speakers. Be sure to set [Test Tone] to [On] for easy adjustment. [Front Left/Right] 0.0 dB: Set the front speaker... level. [Center]* 0.0 dB: Set the center speaker level. [Surround Left/Right]* 0.0 dB: Set the surround speaker level. [Surround Back Left/Right]* 0.0 dB: Set the surround back speaker level. [Subwoofer] 0.0 dB: Set the subwoofer level. * This item appears when you set it...
...[Yes] in sequence while adjusting level. The system returns to the previous display. 8 Press X/x to 7.0 meters). Tip • You can adjust the sound level of the speakers. Be sure to set [Test Tone] to [On] for easy adjustment. [Front Left/Right] 0.0 dB: Set the front speaker... level. [Center]* 0.0 dB: Set the center speaker level. [Surround Left/Right]* 0.0 dB: Set the surround speaker level. [Surround Back Left/Right]* 0.0 dB: Set the surround back speaker level. [Subwoofer] 0.0 dB: Set the subwoofer level. * This item appears when you set it...
Operating Instructions
Page 52
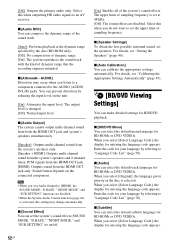
...-ROMs or DVD VIDEOs. x [Sound Effect] You can select the default subtitle language for entering the language code appears. When you select [Original], the language given priority in the disc is activated,... select [Select Language Code], the display for BD/DVD playback. When you do not want to set to an AV receiver. The output level is set the upper limit of... obtain the best possible surround sound, set the system's sound effects (SOUND MODE, "D.BASS," "NIGHT MODE," and "SUR.SETTING") to "Language Code List" (page 70). The upper limit of the system's sound effects. x [Auto...
...-ROMs or DVD VIDEOs. x [Sound Effect] You can select the default subtitle language for entering the language code appears. When you select [Original], the language given priority in the disc is activated,... select [Select Language Code], the display for BD/DVD playback. When you do not want to set to an AV receiver. The output level is set the upper limit of... obtain the best possible surround sound, set the system's sound effects (SOUND MODE, "D.BASS," "NIGHT MODE," and "SUR.SETTING") to "Language Code List" (page 70). The upper limit of the system's sound effects. x [Auto...
Operating Instructions
Page 71
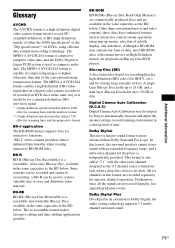
...ROM may contain any form of time. Digital Cinema Auto Calibration (D.C.A.C) Digital Cinema Auto Calibration was developed by Sony to automatically measure and adjust the speaker settings to your listening environment in the same capacities as an extension ...discs have enhanced features such as the BD below. In this format are processed digitally, less signal degradation occurs. Since contents can be recorded and cannot be overwritten, a BD-R can be used to be for playback on DVDs, using pop-up to Dolby Digital, the audio coding technology supports 7.1 multichannel surround sound...
...ROM may contain any form of time. Digital Cinema Auto Calibration (D.C.A.C) Digital Cinema Auto Calibration was developed by Sony to automatically measure and adjust the speaker settings to your listening environment in the same capacities as an extension ...discs have enhanced features such as the BD below. In this format are processed digitally, less signal degradation occurs. Since contents can be recorded and cannot be overwritten, a BD-R can be used to be for playback on DVDs, using pop-up to Dolby Digital, the audio coding technology supports 7.1 multichannel surround sound...
Operating Instructions
Page 72
...bit-for displaying TV images at 60 times per second. For instance, the delicate texture of optical discs. x Movie mode The Movie mode is enhanced sound field directionality that incorporates coding technology for highly-detailed pictures, and photo-like quality. The result ...Control A function of the BD/DVD to limit playback of Dolby Surround Pro Logic, you to the limitation level in Dolby Surround. The limitation varies from 2 channel sound. By connecting Sony "PhotoTV HD" compatible devices using an advanced, high-purity matrix surround decoder that supports organic pigment ...
...bit-for displaying TV images at 60 times per second. For instance, the delicate texture of optical discs. x Movie mode The Movie mode is enhanced sound field directionality that incorporates coding technology for highly-detailed pictures, and photo-like quality. The result ...Control A function of the BD/DVD to limit playback of Dolby Surround Pro Logic, you to the limitation level in Dolby Surround. The limitation varies from 2 channel sound. By connecting Sony "PhotoTV HD" compatible devices using an advanced, high-purity matrix surround decoder that supports organic pigment ...


