Operating Instructions
Page 2
... been tested and found to the floor/wall in the literature accompanying the appliance. If this Blu-ray Disc / DVD Home Theatre System is no guarantee that may be securely attached to comply with FCC technical regulations. Refer servicing to Part 15 of important operating and maintenance (servicing) instructions in accordance with the instructions, may not comply with the limits for help. 2US Owner's Record The model...
... been tested and found to the floor/wall in the literature accompanying the appliance. If this Blu-ray Disc / DVD Home Theatre System is no guarantee that may be securely attached to comply with FCC technical regulations. Refer servicing to Part 15 of important operating and maintenance (servicing) instructions in accordance with the instructions, may not comply with the limits for help. 2US Owner's Record The model...
Operating Instructions
Page 5
... sound between S-AIR products wirelessly. Any difference in operation is clearly indicated in the text, for the surround amplifier, surround back amplifier, or S-AIR receiver in this manual, "disc" is the model used . 5US For details on the S-AIR function, see "Using an S-AIR Product" (page 39). • Notes or instructions for example, "BDVE770W." • The items displayed on the TV screen may vary depending on the remote...
... sound between S-AIR products wirelessly. Any difference in operation is clearly indicated in the text, for the surround amplifier, surround back amplifier, or S-AIR receiver in this manual, "disc" is the model used . 5US For details on the S-AIR function, see "Using an S-AIR Product" (page 39). • Notes or instructions for example, "BDVE770W." • The items displayed on the TV screen may vary depending on the remote...
Operating Instructions
Page 6
... Sound Effect 35 Tuner Listening to the Radio 37 External Audio Device Using an S-AIR Product 39 Other Operations Using the Control for HDMI Function for "BRAVIA" Sync 43 Calibrating the Appropriate Settings Automatically 45 Setting the Speakers 46 Using the Sleep Timer 48 Deactivating the Buttons on the Unit 48 Controlling Your TV with the Supplied Remote 48 Saving Power in Standby Mode 49 Settings and Adjustments Using the Setup Display 50 [Network Update 50 [Screen Settings 50 [Audio Settings 51 [BD/DVD Viewing Settings...
... Sound Effect 35 Tuner Listening to the Radio 37 External Audio Device Using an S-AIR Product 39 Other Operations Using the Control for HDMI Function for "BRAVIA" Sync 43 Calibrating the Appropriate Settings Automatically 45 Setting the Speakers 46 Using the Sleep Timer 48 Deactivating the Buttons on the Unit 48 Controlling Your TV with the Supplied Remote 48 Saving Power in Standby Mode 49 Settings and Adjustments Using the Setup Display 50 [Network Update 50 [Screen Settings 50 [Audio Settings 51 [BD/DVD Viewing Settings...
Operating Instructions
Page 7
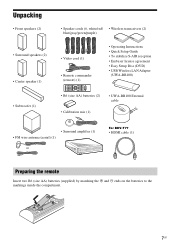
...Center speaker (1) • Subwoofer (1) • Speaker cords (6, white/red/ • Wireless transceivers (2) blue/gray/green/purple) • Video cord (1) • Remote commander (remote) (1) • Operating Instructions • Quick Setup Guide • To stabilize S-AIR reception • End user license agreement • Easy Setup Disc (DVD) • USB Wireless LAN Adapter (UWA-BR100) • R6 (size AA) batteries (2) • UWA-BR100 External cable • Calibration mic (1) • Surround amplifier (1) • FM wire antenna (aerial) (1) or For BDV-T77 • HDMI...
...Center speaker (1) • Subwoofer (1) • Speaker cords (6, white/red/ • Wireless transceivers (2) blue/gray/green/purple) • Video cord (1) • Remote commander (remote) (1) • Operating Instructions • Quick Setup Guide • To stabilize S-AIR reception • End user license agreement • Easy Setup Disc (DVD) • USB Wireless LAN Adapter (UWA-BR100) • R6 (size AA) batteries (2) • UWA-BR100 External cable • Calibration mic (1) • Surround amplifier (1) • FM wire antenna (aerial) (1) or For BDV-T77 • HDMI...
Operating Instructions
Page 12
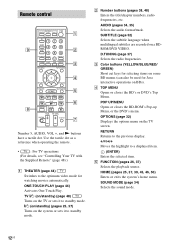
... language when multilingual subtitles are recorded on a BDROM/DVD VIDEO. RETURN Returns to standby mode. D TOP MENU Opens or closes the BD's or DVD's Top Menu. Remote control 9 ONE-TOUCH THEATER PLAY TV BRAVIA Sync 123 SLEEP 456 SYSTEM MENU 789 FAVORITES AUDIO YELLOW BLUE SUBTITLE 0 D.TUNING RED GREEN TOP MENU POP UP/ MENU 1 2 3 8 RETURN OPTIONS FUNCTION SOUND MODE HOME PRESET REPLAY ADVANCE PRESET TUNING PLAY TUNING DISPLAY PAUSE STOP VOL TV VOL MUTING TV INPUT 4 5 6 7 Number 5, AUDIO, VOL +, and N buttons have a tactile dot.
... language when multilingual subtitles are recorded on a BDROM/DVD VIDEO. RETURN Returns to standby mode. D TOP MENU Opens or closes the BD's or DVD's Top Menu. Remote control 9 ONE-TOUCH THEATER PLAY TV BRAVIA Sync 123 SLEEP 456 SYSTEM MENU 789 FAVORITES AUDIO YELLOW BLUE SUBTITLE 0 D.TUNING RED GREEN TOP MENU POP UP/ MENU 1 2 3 8 RETURN OPTIONS FUNCTION SOUND MODE HOME PRESET REPLAY ADVANCE PRESET TUNING PLAY TUNING DISPLAY PAUSE STOP VOL TV VOL MUTING TV INPUT 4 5 6 7 Number 5, AUDIO, VOL +, and N buttons have a tactile dot.
Operating Instructions
Page 13
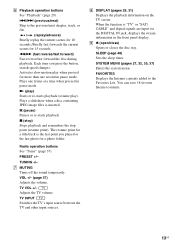
... mode. TUNING +/- TV INPUT Switches the TV's input source between the TV and other input sources. SYSTEM MENU (pages 27, 32, 35, 37) Enters the system menu. F Playback operation buttons See "Playback" (page 29). ./> (previous/next) Skip to the Favorites List. X (pause) Pauses or re-starts playback. Radio operation buttons See "Tuner" (page 37). TV VOL +/- Adjusts the TV volume. You can save 18 favorite Internet contents. 13US I Z (open/close) Opens...
... mode. TUNING +/- TV INPUT Switches the TV's input source between the TV and other input sources. SYSTEM MENU (pages 27, 32, 35, 37) Enters the system menu. F Playback operation buttons See "Playback" (page 29). ./> (previous/next) Skip to the Favorites List. X (pause) Pauses or re-starts playback. Radio operation buttons See "Tuner" (page 37). TV VOL +/- Adjusts the TV volume. You can save 18 favorite Internet contents. 13US I Z (open/close) Opens...
Operating Instructions
Page 25
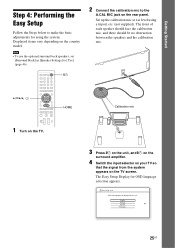
... Calibration mic 1 Turn on the TV. 3 Press [/1 on the unit, and [/1 on the surround amplifier. 4 Switch the input selector on your TV so that the signal from the system appears on the rear panel. Set up the calibration mic at ear level using the system. Getting Started Step 4: Performing the Easy Setup Follow the Steps below to make the basic adjustments for OSD language selection appears. The Easy Setup Display for using...
... Calibration mic 1 Turn on the TV. 3 Press [/1 on the unit, and [/1 on the surround amplifier. 4 Switch the input selector on your TV so that the signal from the system appears on the rear panel. Set up the calibration mic at ear level using the system. Getting Started Step 4: Performing the Easy Setup Follow the Steps below to make the basic adjustments for OSD language selection appears. The Easy Setup Display for using...
Operating Instructions
Page 28
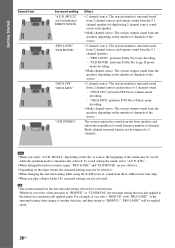
... last surround setting selected for each speaker. • Multi-channel source: The system outputs sound from the S-AIR receiver may skip. • When you select "BD/DVD" with "PRO LOGIC" as "BD/DVD" or "TUNER FM," the surround setting that was last applied to 2 channels. Whenever you select "A.F.D. MULTI" (AUTO FORMAT DIRECT MULTI) "PRO LOGIC" "PLII MOVIE" "NEO6 CIN" "NEO6 MUS" "2CH STEREO" Effect • 2 channel source: The system simulates surround sound from 2 channel sources and outputs sound from the 5.1 channel speakers by duplicating 2 channel source sound...
... last surround setting selected for each speaker. • Multi-channel source: The system outputs sound from the S-AIR receiver may skip. • When you select "BD/DVD" with "PRO LOGIC" as "BD/DVD" or "TUNER FM," the surround setting that was last applied to 2 channels. Whenever you select "A.F.D. MULTI" (AUTO FORMAT DIRECT MULTI) "PRO LOGIC" "PLII MOVIE" "NEO6 CIN" "NEO6 MUS" "2CH STEREO" Effect • 2 channel source: The system simulates surround sound from 2 channel sources and outputs sound from the 5.1 channel speakers by duplicating 2 channel source sound...
Operating Instructions
Page 44
... TV sound is set to the HDMI input to select "BD/DVD" and press N or ONE-TOUCH PLAY. Note • While the TV is connected, and the system starts playing a disc automatically. Turning the system off in the case of inserting a disc that appears on the TV screen and the unit's front panel display may be output from the speakers in PAP (picture and picture) mode, the System Audio Control function will not work...
... TV sound is set to the HDMI input to select "BD/DVD" and press N or ONE-TOUCH PLAY. Note • While the TV is connected, and the system starts playing a disc automatically. Turning the system off in the case of inserting a disc that appears on the TV screen and the unit's front panel display may be output from the speakers in PAP (picture and picture) mode, the System Audio Control function will not work...
Operating Instructions
Page 45
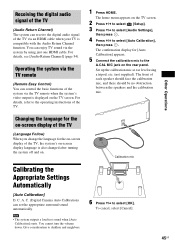
..., refer to the A.CAL MIC jack on the rear panel. C. For details, see [Audio Return Channel] (page 54). Set up the calibration mic at ear level using just one HDMI cable. C. (Digital Cinema Auto Calibration) can set the appropriate surround sound automatically. To cancel, select [Cancel]. 45US Note • The system outputs a loud test sound when [Auto Calibration] starts. The home menu appears on the TV screen. 2 Press C/c to select [Setup]. 3 Press X/x to select [Audio Settings], then press . 4 Press X/x to select [OK]. You can enjoy...
..., refer to the A.CAL MIC jack on the rear panel. C. For details, see [Audio Return Channel] (page 54). Set up the calibration mic at ear level using just one HDMI cable. C. (Digital Cinema Auto Calibration) can set the appropriate surround sound automatically. To cancel, select [Cancel]. 45US Note • The system outputs a loud test sound when [Auto Calibration] starts. The home menu appears on the TV screen. 2 Press C/c to select [Setup]. 3 Press X/x to select [Audio Settings], then press . 4 Press X/x to select [OK]. You can enjoy...
Operating Instructions
Page 46
... the Auto Calibration function works: - do not change the function. - do not disconnect the calibration mic. do not change them. Follow the message, then select [OK] to select the item, then press . do not turn the surround amplifier on the TV screen. When you use the test tone to the same level. 1 Press HOME. Disconnect the calibration mic, then select [OK]. do not insert a disc. - x The measurement is implemented. do not connect center or surround speakers, set the parameters...
... the Auto Calibration function works: - do not change the function. - do not disconnect the calibration mic. do not change them. Follow the message, then select [OK] to select the item, then press . do not turn the surround amplifier on the TV screen. When you use the test tone to the same level. 1 Press HOME. Disconnect the calibration mic, then select [OK]. do not insert a disc. - x The measurement is implemented. do not connect center or surround speakers, set the parameters...
Operating Instructions
Page 50
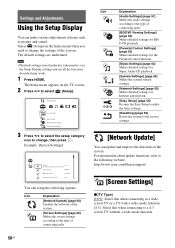
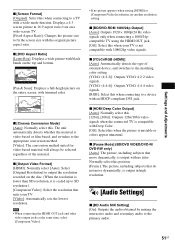
... Letter Box Cinema Conversion Mode Auto You can update and improve the functions of items such as picture and sound. Icon Explanation [Audio Settings] (page 51) Makes the audio settings according to the type of connecting jacks. [Network Update] You can setup the following website: http://www.sony.com/bluraysupport/ [Screen Settings] x [TV Type] [16:9]: Select this when connecting to a widescreen TV or a TV with a wide-mode function. [4:3]: Select this when connecting to select [Setup]. The default settings are underlined. The home menu...
... Letter Box Cinema Conversion Mode Auto You can update and improve the functions of items such as picture and sound. Icon Explanation [Audio Settings] (page 51) Makes the audio settings according to the type of connecting jacks. [Network Update] You can setup the following website: http://www.sony.com/bluraysupport/ [Screen Settings] x [TV Type] [16:9]: Select this when connecting to a widescreen TV or a TV with a wide-mode function. [4:3]: Select this when connecting to select [Setup]. The default settings are underlined. The home menu...
Operating Instructions
Page 51
...; When connecting the HDMI OUT jack and other video output jacks at the same time, select [Component Video]. • If no jitter. x [YCbCr/RGB (HDMI)] [Auto]: Automatically detects the type of the material. x [Output Video Format] [HDMI]: Normally select [Auto]. x [DVD Aspect Ratio] [Letter Box]: Displays a wide picture with black bands on the top and bottom. [Pan & Scan]: Displays a full-height picture on a wide-screen TV. [Fixed Aspect Ratio]: Changes the picture size to fit the screen size...
...; When connecting the HDMI OUT jack and other video output jacks at the same time, select [Component Video]. • If no jitter. x [YCbCr/RGB (HDMI)] [Auto]: Automatically detects the type of the material. x [Output Video Format] [HDMI]: Normally select [Auto]. x [DVD Aspect Ratio] [Letter Box]: Displays a wide picture with black bands on the top and bottom. [Pan & Scan]: Displays a full-height picture on a wide-screen TV. [Fixed Aspect Ratio]: Changes the picture size to fit the screen size...
Operating Instructions
Page 52
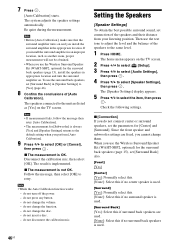
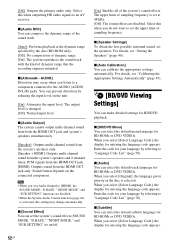
... DVD VIDEOs. x [Attenuate - When you select [Original], the language given priority in the disc is activated, this when outputting HD audio signals to [HDMI], the SOUND MODE, "D.BASS," "NIGHT MODE," and "SUR.SETTING" functions are disabled. x [Auto Calibration] You can select the default track language for BD/DVD playback. [Off]: Outputs the primary audio only. Select this setting may occur when you select [Select Language Code], the display for entering the language code appears. x [Speaker Settings] To obtain the best possible surround sound, set [Audio Output...
... DVD VIDEOs. x [Attenuate - When you select [Original], the language given priority in the disc is activated, this when outputting HD audio signals to [HDMI], the SOUND MODE, "D.BASS," "NIGHT MODE," and "SUR.SETTING" functions are disabled. x [Auto Calibration] You can select the default track language for BD/DVD playback. [Off]: Outputs the primary audio only. Select this setting may occur when you select [Select Language Code], the display for entering the language code appears. x [Speaker Settings] To obtain the best possible surround sound, set [Audio Output...
Operating Instructions
Page 54
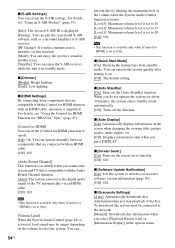
... settings. x [Auto Standby] [On]: Turns on the screen when changing the viewing titles, picture modes, audio signals, etc. [Off]: Displays information only when you of the disc. For details, see "Using the Control for HDMI Function for "BRAVIA" Sync" (page 43). [Control for HDMI] is set to inform you press DISPLAY. You can pair the system and S-AIR sub unit, such as a surround amplifier or S-AIR receiver. [RF Change]: If wireless transmission is activated, loud sound may be connected to...
... settings. x [Auto Standby] [On]: Turns on the screen when changing the viewing titles, picture modes, audio signals, etc. [Off]: Displays information only when you of the disc. For details, see "Using the Control for HDMI Function for "BRAVIA" Sync" (page 43). [Control for HDMI] is set to inform you press DISPLAY. You can pair the system and S-AIR sub unit, such as a surround amplifier or S-AIR receiver. [RF Change]: If wireless transmission is activated, loud sound may be connected to...
Operating Instructions
Page 55
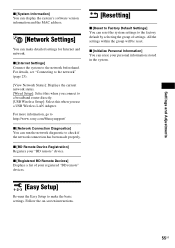
... to http://www.sony.com/bluraysupport/ x [Network Connection Diagnostics] You can make the basic settings. Settings and Adjustments x [System Information] You can display the system's software version information and the MAC address. [Network Settings] You can run the network diagnostic to check if the network connection has been made properly. x [Internet Settings] Connect the system to a broadband router directly. [USB Wireless Setup]: Select this when you use a USB Wireless LAN Adapter. All the settings within the group...
... to http://www.sony.com/bluraysupport/ x [Network Connection Diagnostics] You can make the basic settings. Settings and Adjustments x [System Information] You can display the system's software version information and the MAC address. [Network Settings] You can run the network diagnostic to check if the network connection has been made properly. x [Internet Settings] Connect the system to a broadband router directly. [USB Wireless Setup]: Select this when you use a USB Wireless LAN Adapter. All the settings within the group...
Operating Instructions
Page 60
... is recorded in Dolby Digital or MPEG audio format. The sound loses stereo effect when you are disabled. • The effects of SOUND MODE, "D.BASS," "NIGHT MODE," and "SUR.SETTING" may be disabled depending on the source, the effect of the surround speakers may not be less noticeable. • Check the wireless setting (page 24). • A 2 channel source is being played. off. • Select "A.F.D. a connected component. function. • Make sure that the connecting cords are away...
... is recorded in Dolby Digital or MPEG audio format. The sound loses stereo effect when you are disabled. • The effects of SOUND MODE, "D.BASS," "NIGHT MODE," and "SUR.SETTING" may be disabled depending on the source, the effect of the surround speakers may not be less noticeable. • Check the wireless setting (page 24). • A 2 channel source is being played. off. • Select "A.F.D. a connected component. function. • Make sure that the connecting cords are away...

Operating Instructions
Page 61
... connected securely. Check that the S-AIR/ STANDBY indicator turns green. - Move the surround amplifier so that the AC power cord (mains lead) of the S-AIR/STANDBY indicator on for about half an hour. • The system cannot play . Avoid using any problems, turn off . - Set the SURROUND SELECTOR switch of the problem cannot be less noticeable. If the cause of the surround amplifier to [Yes] (page 46). • Flashes red. - Sound...
... connected securely. Check that the S-AIR/ STANDBY indicator turns green. - Move the surround amplifier so that the AC power cord (mains lead) of the S-AIR/STANDBY indicator on for about half an hour. • The system cannot play . Avoid using any problems, turn off . - Set the SURROUND SELECTOR switch of the problem cannot be less noticeable. If the cause of the surround amplifier to [Yes] (page 46). • Flashes red. - Sound...

Operating Instructions
Page 64
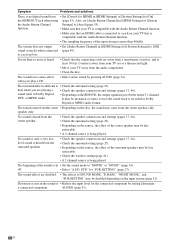
... nearest Sony dealer or local authorized Sony service facility and give the error code. • Contact your PC to [Off], and change the S-AIR ID of the unit and S-AIR sub unit (page 42). BRAVIA Internet Video Symptom Problems and solutions The picture/sound is performed. • The wireless settings of the router may change automatically if you use a 2.4 GHz frequency band, such as a microwave, Bluetooth, or digital cordless...
... nearest Sony dealer or local authorized Sony service facility and give the error code. • Contact your PC to [Off], and change the S-AIR ID of the unit and S-AIR sub unit (page 42). BRAVIA Internet Video Symptom Problems and solutions The picture/sound is performed. • The wireless settings of the router may change automatically if you use a 2.4 GHz frequency band, such as a microwave, Bluetooth, or digital cordless...
Operating Instructions
Page 74
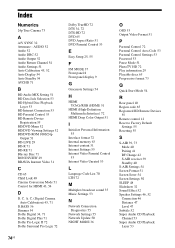
... Music Settings 53 N Network Connection Diagnostics 55 Network Settings 55 Network Update 50 NIGHT MODE 36 O OSD 53 Output Video Format 51 P Parental Control 72 Parental Control Area Code 53 Parental Control Settings 53 Password 53 Pause Mode 51 PhotoTV HD 72 Play information 29 Playable discs 65 Progressive format 73 Q Quick Start Mode 54 R Rear panel 10 Region code 65 Registered BD Remote Devices 55 Remote control 12 Reset to Factory Default Settings 55 Resetting 55 S S-AIR 39, 73 Mode 40 Pairing 41 RF Change 42 S-AIR receiver...
... Music Settings 53 N Network Connection Diagnostics 55 Network Settings 55 Network Update 50 NIGHT MODE 36 O OSD 53 Output Video Format 51 P Parental Control 72 Parental Control Area Code 53 Parental Control Settings 53 Password 53 Pause Mode 51 PhotoTV HD 72 Play information 29 Playable discs 65 Progressive format 73 Q Quick Start Mode 54 R Rear panel 10 Region code 65 Registered BD Remote Devices 55 Remote control 12 Reset to Factory Default Settings 55 Resetting 55 S S-AIR 39, 73 Mode 40 Pairing 41 RF Change 42 S-AIR receiver...


