

Operating Instructions
Page 2
...third grounding prong. To reduce the risk of fire, do not expose this appliance to qualified service personnel. Should you call upon your Sony dealer regarding this apparatus near any heat sources such as a bookcase or built-in the USA Owner's Record The model and serial ... manufacturer's instructions. 8) Do not install near water. 6) Clean only with battery-installed to an easily accessible AC outlet. Notice for example, lighted candles). Install in any ventilation openings. Do not expose the appliance to rain or moisture, does not operate normally, or has been dropped. ...
...third grounding prong. To reduce the risk of fire, do not expose this appliance to qualified service personnel. Should you call upon your Sony dealer regarding this apparatus near any heat sources such as a bookcase or built-in the USA Owner's Record The model and serial ... manufacturer's instructions. 8) Do not install near water. 6) Clean only with battery-installed to an easily accessible AC outlet. Notice for example, lighted candles). Install in any ventilation openings. Do not expose the appliance to rain or moisture, does not operate normally, or has been dropped. ...

Operating Instructions
Page 7
Other Operations Using the Party Chain function 22 Listening to music wirelessly with two systems (Speaker add function 25 Enjoying music with the Speaker Lights turned on......... 27 Using an optional equipment 27 Setting the automatic standby function 27 Additional Information Information about compatible devices 28 Troubleshooting 28 Precautions 31 Specifications 33 License and Trademark Notice 35 7GB
Other Operations Using the Party Chain function 22 Listening to music wirelessly with two systems (Speaker add function 25 Enjoying music with the Speaker Lights turned on......... 27 Using an optional equipment 27 Setting the automatic standby function 27 Additional Information Information about compatible devices 28 Troubleshooting 28 Precautions 31 Specifications 33 License and Trademark Notice 35 7GB

Operating Instructions
Page 8
Guide to parts and controls Unit Top Speaker Lights* (page 27) Rear * Do not look directly at the light-emitting parts when the Speaker Lights are turned on. 8GB
Guide to parts and controls Unit Top Speaker Lights* (page 27) Rear * Do not look directly at the light-emitting parts when the Speaker Lights are turned on. 8GB

Operating Instructions
Page 9
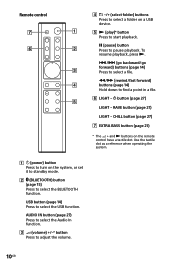
... when operating the system. 9GB (power) button Press to turn on or off the system. (power) indicator --Lights up in green while the system is turned on. --Lights up in amber while the system is turned off, and when the BLUETOOTH standby mode is turned on the unit has...
... when operating the system. 9GB (power) button Press to turn on or off the system. (power) indicator --Lights up in green while the system is turned on. --Lights up in amber while the system is turned off, and when the BLUETOOTH standby mode is turned on the unit has...
Operating Instructions
Page 10
...to turn on the system, or set it to standby mode. (BLUETOOTH) button (page 15) Press to find a point in a file. LIGHT - To resume playback, press . / (go backward/go forward) buttons (page 14) Press to select a file. / (rewind/fast ...a USB device. (play)* button Press to start playback. (pause) button Press to select the USB function. button (page 27) LIGHT - AUDIO IN button (page 27) Press to select the Audio In function. (volume) +/-* button Press to adjust the volume. 10GB RAVE ...
...to turn on the system, or set it to standby mode. (BLUETOOTH) button (page 15) Press to find a point in a file. LIGHT - To resume playback, press . / (go backward/go forward) buttons (page 14) Press to select a file. / (rewind/fast ...a USB device. (play)* button Press to start playback. (pause) button Press to select the USB function. button (page 27) LIGHT - AUDIO IN button (page 27) Press to select the Audio In function. (volume) +/-* button Press to adjust the volume. 10GB RAVE ...
Operating Instructions
Page 11
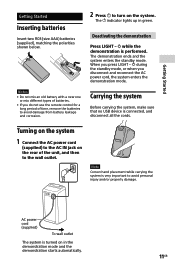
The indicator lights up in the demonstration mode and the demonstration starts automatically. 11GB Getting Started Getting Started Inserting batteries Insert two R03 (size AAA) batteries (supplied), matching ... power cord (supplied) to the wall outlet. The demonstration ends and the system enters the standby mode. Deactivating the demonstration Press LIGHT - during the standby mode, or when you press LIGHT - Notes ••Do not mix an old battery with a new one or mix different types of batteries. ••If...
The indicator lights up in the demonstration mode and the demonstration starts automatically. 11GB Getting Started Getting Started Inserting batteries Insert two R03 (size AAA) batteries (supplied), matching ... power cord (supplied) to the wall outlet. The demonstration ends and the system enters the standby mode. Deactivating the demonstration Press LIGHT - during the standby mode, or when you press LIGHT - Notes ••Do not mix an old battery with a new one or mix different types of batteries. ••If...
Operating Instructions
Page 14
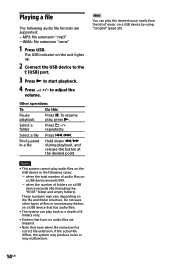
... when file name has the correct file extension, if the actual file differs, the system may produce noise or may vary depending on the unit lights up. 2 Connect the USB device to the (USB) port. 3 Press to start playback. 4 Press +/-
... when file name has the correct file extension, if the actual file differs, the system may produce noise or may vary depending on the unit lights up. 2 Connect the USB device to the (USB) port. 3 Press to start playback. 4 Press +/-
Operating Instructions
Page 15
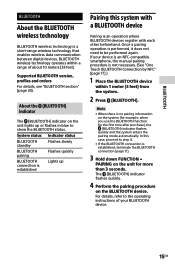
... BLUETOOTH connection is established, terminate the BLUETOOTH connection (page 17). 3 Hold down FUNCTION PAIRING on the unit lights up Pairing this case, proceed to step 4. ••If the BLUETOOTH connection is established Lights up or flashes in blue to show the BLUETOOTH status. BLUETOOTH BLUETOOTH About the BLUETOOTH wireless technology BLUETOOTH...
... BLUETOOTH connection is established, terminate the BLUETOOTH connection (page 17). 3 Hold down FUNCTION PAIRING on the unit lights up Pairing this case, proceed to step 4. ••If the BLUETOOTH connection is established Lights up or flashes in blue to show the BLUETOOTH status. BLUETOOTH BLUETOOTH About the BLUETOOTH wireless technology BLUETOOTH...

Operating Instructions
Page 16
... devices. The (BLUETOOTH) indicator on the system using AVRCP. See "Resetting the system" (page 31). If the volume level is established, the (BLUETOOTH) indicator lights up to the system, the currently connected BLUETOOTH device will be connected automatically. Listening to pair with the BLUETOOTH device. Perform the BLUETOOTH connection from...is completed. Check the following before playing music: --The BLUETOOTH function of the BLUETOOTH device first. To cancel the pairing operation Press (BLUETOOTH) . 5 Select "GTK-XB7" on the BLUETOOTH device.
... devices. The (BLUETOOTH) indicator on the system using AVRCP. See "Resetting the system" (page 31). If the volume level is established, the (BLUETOOTH) indicator lights up to the system, the currently connected BLUETOOTH device will be connected automatically. Listening to pair with the BLUETOOTH device. Perform the BLUETOOTH connection from...is completed. Check the following before playing music: --The BLUETOOTH function of the BLUETOOTH device first. To cancel the pairing operation Press (BLUETOOTH) . 5 Select "GTK-XB7" on the BLUETOOTH device.
Operating Instructions
Page 21
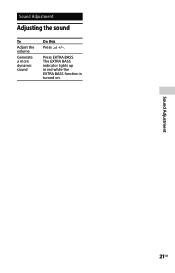
Sound Adjustment Adjusting the sound To Adjust the volume Generate a more dynamic sound Do this Press +/-. Sound Adjustment 21GB The EXTRA BASS indicator lights up in red while the EXTRA BASS function is turned on. Press EXTRA BASS.
Sound Adjustment Adjusting the sound To Adjust the volume Generate a more dynamic sound Do this Press +/-. Sound Adjustment 21GB The EXTRA BASS indicator lights up in red while the EXTRA BASS function is turned on. Press EXTRA BASS.

Operating Instructions
Page 24
... 22), do not select the Audio In function. Notes ••Depending on the total unit of "Enjoying the Party Chain." The PARTY CHAIN indicator lights up. Enjoying the Party Chain 1 Plug in the AC power cord and turn on all the systems in the chain has been activated. ••...
... 22), do not select the Audio In function. Notes ••Depending on the total unit of "Enjoying the Party Chain." The PARTY CHAIN indicator lights up. Enjoying the Party Chain 1 Plug in the AC power cord and turn on all the systems in the chain has been activated. ••...

Operating Instructions
Page 25
...Then the L/R indicators on both systems change their status from flashing to music wirelessly with two systems (Speaker add function) To use this function, two GTK-XB7 systems are described as "system " (or master system) and "system ." 4 Press (BLUETOOTH) on system . 5 Hold down SPEAKER... very quickly, the L/R indicators on system may light up directly without flashing. 25GB You can enjoy music in which the two systems play the same sound) and stereo mode (stereo sound). By connecting two GTK-XB7 systems via BLUETOOTH, you can also select an audio output...
...Then the L/R indicators on both systems change their status from flashing to music wirelessly with two systems (Speaker add function) To use this function, two GTK-XB7 systems are described as "system " (or master system) and "system ." 4 Press (BLUETOOTH) on system . 5 Hold down SPEAKER... very quickly, the L/R indicators on system may light up directly without flashing. 25GB You can enjoy music in which the two systems play the same sound) and stereo mode (stereo sound). By connecting two GTK-XB7 systems via BLUETOOTH, you can also select an audio output...
Operating Instructions
Page 27
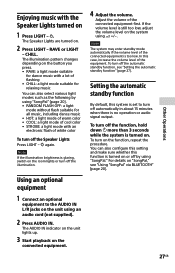
... To turn off by using "SongPal." To turn off the illumination. 4 Adjust the volume. RAVE or LIGHT - The AUDIO IN indicator on the unit lights up. 3 Start playback on . 2 Press LIGHT - CHILL. Setting the automatic standby function By default, this system is too low. You can also select... connected equipment is set to the AUDIO IN L/R jacks on "SongPal," see "Setting the automatic standby function" (page 27). The Speaker Lights are turned on the connected equipment. 27GB Note If the illumination brightness is still too low, adjust the volume level on or off the...
... To turn off by using "SongPal." To turn off the illumination. 4 Adjust the volume. RAVE or LIGHT - The AUDIO IN indicator on the unit lights up. 3 Start playback on . 2 Press LIGHT - CHILL. Setting the automatic standby function By default, this system is too low. You can also select... connected equipment is set to the AUDIO IN L/R jacks on "SongPal," see "Setting the automatic standby function" (page 27). The Speaker Lights are turned on the connected equipment. 27GB Note If the illumination brightness is still too low, adjust the volume level on or off the...
Operating Instructions
Page 29
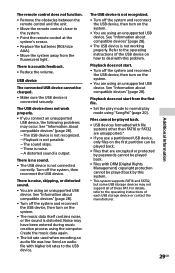
...;• You are unsupported.* •• If you connect an unsupported USB device, the following problems may occur. Playback does not start from the fluorescent light. See "Information about compatible devices" (page 28). --The USB device is not recognized. --Playback is not possible. --The sound skips. --There is noise. --A distorted sound...
...;• You are unsupported.* •• If you connect an unsupported USB device, the following problems may occur. Playback does not start from the fluorescent light. See "Information about compatible devices" (page 28). --The USB device is not recognized. --Playback is not possible. --The sound skips. --There is noise. --A distorted sound...
Operating Instructions
Page 31
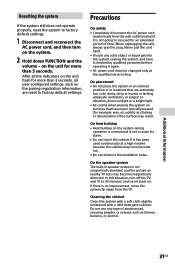
... as the pairing registration information, are extremely hot, cold, dusty, dirty, or humid or lacking adequate ventilation, or subject to vibration, direct sunlight or a bright light. ••Be careful when placing the system on the system during operation is normal and is no improvement, move the system far away from...
... as the pairing registration information, are extremely hot, cold, dusty, dirty, or humid or lacking adequate ventilation, or subject to vibration, direct sunlight or a bright light. ••Be careful when placing the system on the system during operation is normal and is no improvement, move the system far away from...


