User Manual
Page 4
... the inset picture (For PinP only 33 (GB) Setting up the Multi Display 34 (GB) Adjusting the Sound Quality 35 (GB) Adjusting the Treble, Bass, and Balance, etc. ....... 35 (GB) Restoring the Adjust Sound Menu Items to Their Original Settings 35 (GB) Selecting the On-screen Language 36 (GB) Adjusting Color Matrix...
... the inset picture (For PinP only 33 (GB) Setting up the Multi Display 34 (GB) Adjusting the Sound Quality 35 (GB) Adjusting the Treble, Bass, and Balance, etc. ....... 35 (GB) Restoring the Adjust Sound Menu Items to Their Original Settings 35 (GB) Selecting the On-screen Language 36 (GB) Adjusting Color Matrix...
User Manual
Page 5
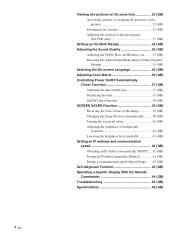
... illustrated on the unit for a long period of time, part of that may damage the finish of the Remote Commander, noisy picture, noisy sound, may emanate from the unit. They may block the ventilation holes. • Do not install the unit in which to direct sunlight, excessive... dust, mechanical vibration or shock. • When you install the unit on this plasma display panel is made, when this unit, contact your authorized Sony dealers. 5 (GB) They make an ideal container in a location near materials (curtains, draperies) that image may become less conspicuous, but once burn...
... illustrated on the unit for a long period of time, part of that may damage the finish of the Remote Commander, noisy picture, noisy sound, may emanate from the unit. They may block the ventilation holes. • Do not install the unit in which to direct sunlight, excessive... dust, mechanical vibration or shock. • When you install the unit on this plasma display panel is made, when this unit, contact your authorized Sony dealers. 5 (GB) They make an ideal container in a location near materials (curtains, draperies) that image may become less conspicuous, but once burn...
User Manual
Page 11
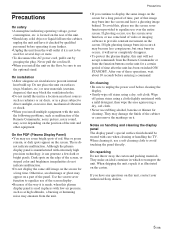
... the documentation of the respective adaptor. Connects to the INPUT2 connectors. qd ql MONITOR RM-980 1 POWER ON switch Press to mute the sound. Press again to restore sound. 4 DISPLAY button Press to display information about the input signal type and picture mode on the display. 2 STANDBY button Press to change the...
... the documentation of the respective adaptor. Connects to the INPUT2 connectors. qd ql MONITOR RM-980 1 POWER ON switch Press to mute the sound. Press again to restore sound. 4 DISPLAY button Press to display information about the input signal type and picture mode on the display. 2 STANDBY button Press to change the...
User Manual
Page 16
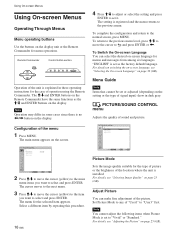
Note Operation may differ in some cases since there is explained in these operating instructions for menu operations. The M/m and ENTER buttons on the Remote Commander have the same functions as the M/m and ENTER buttons on the display unit or the Remote Commander for the case of the unit is no Remote Commander MENU Control button section ENTER Operation of operation using the Remote Commander. Using On-screen Menus Using On-screen Menus Operating Through Menus Menu operating buttons Use the buttons on the display.
Note Operation may differ in some cases since there is explained in these operating instructions for menu operations. The M/m and ENTER buttons on the Remote Commander have the same functions as the M/m and ENTER buttons on the display unit or the Remote Commander for the case of the unit is no Remote Commander MENU Control button section ENTER Operation of operation using the Remote Commander. Using On-screen Menus Using On-screen Menus Operating Through Menus Menu operating buttons Use the buttons on the display.

User Manual
Page 17
... for overscan image display, and set to "DTV", this option specifies whether to a wide screen image with overscan or underscan. Adjust Sound You can show two pictures from among ordinary television broadcasts, or wide screen images, all having different proportions for horizontal and vertical display,...images. Note You cannot adjust the following items when Picture Mode is used for underscan image display. You can make fine adjustment of the sound. For details, see "Setting Auto Wide" on page 29 (GB). 17 (GB) SCREEN CONTROL Multi Display Setup Wide Setup Aspect: Adjust...
... for overscan image display, and set to "DTV", this option specifies whether to a wide screen image with overscan or underscan. Adjust Sound You can show two pictures from among ordinary television broadcasts, or wide screen images, all having different proportions for horizontal and vertical display,...images. Note You cannot adjust the following items when Picture Mode is used for underscan image display. You can make fine adjustment of the sound. For details, see "Setting Auto Wide" on page 29 (GB). 17 (GB) SCREEN CONTROL Multi Display Setup Wide Setup Aspect: Adjust...
User Manual
Page 18
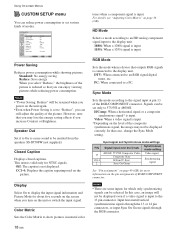
.../PR 1080i DTV H/Comp Selectable Set ENTER Exit MENU Power Saving Reduces power consumption while showing pictures. Speaker Out Set it to On to cause sound to show pictures in natural color tones when a component signal is valid only for more information on page 49 (GB) for NTSC signals. Color Matrix...
.../PR 1080i DTV H/Comp Selectable Set ENTER Exit MENU Power Saving Reduces power consumption while showing pictures. Speaker Out Set it to On to cause sound to show pictures in natural color tones when a component signal is valid only for more information on page 49 (GB) for NTSC signals. Color Matrix...
User Manual
Page 25
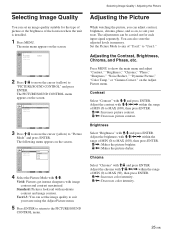
...the Picture While watching the picture, you can set the image quality to suit your taste. Press MENU to "User3." PICTURE/SOUND CONTROL Picture Mode: Adjust Picture Adjust Sound Vivid Standard User1 User2 User3 Select Set ENTER Exit MENU 4 Select the Picture Mode with M/m/ or "Gamma Correct." Adjust the ...contrast, brightness, chroma, phase, and so on, to suit your taste using the Adjust Picture menu. 5 Press ENTER to return to the PICTURE/SOUND CONTROL menu. User1-3: You can be carried out for the type of picture or the brightness of "User1" to show the main menu and ...
...the Picture While watching the picture, you can set the image quality to suit your taste. Press MENU to "User3." PICTURE/SOUND CONTROL Picture Mode: Adjust Picture Adjust Sound Vivid Standard User1 User2 User3 Select Set ENTER Exit MENU 4 Select the Picture Mode with M/m/ or "Gamma Correct." Adjust the ...contrast, brightness, chroma, phase, and so on, to suit your taste using the Adjust Picture menu. 5 Press ENTER to return to the PICTURE/SOUND CONTROL menu. User1-3: You can be carried out for the type of picture or the brightness of "User1" to show the main menu and ...
User Manual
Page 26
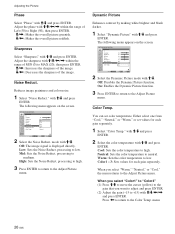
Adjusting the Picture Phase Select "Phase" with M/m/ Adjust the phase with M/m and press ENTER.
Adjusting the Picture Phase Select "Phase" with M/m/ Adjust the phase with M/m and press ENTER.
User Manual
Page 27
... Balances the light and dark portions of Color Temp. The following menu appears on the screen. to "OK" and press ENTER. PICTURE/SOUND CONTROL Adjust Picture Gamma Correct.: Reset Mid Cancel OK Select Set ENTER Exit MENU 2 Press M/m to move the cursor (yellow) to ... to move the cursor (yellow) to medium. Note The values set for Color1 - 3 of pictures automatically. 1 Select "Gamma Correct." PICTURE/SOUND CONTROL Adjust Picture Gamma Correct.: High Reset Mid Low Select Set ENTER Exit MENU 2 Select the Gamma Correct. The following menu appears on the ...
... Balances the light and dark portions of Color Temp. The following menu appears on the screen. to "OK" and press ENTER. PICTURE/SOUND CONTROL Adjust Picture Gamma Correct.: Reset Mid Cancel OK Select Set ENTER Exit MENU 2 Press M/m to move the cursor (yellow) to ... to move the cursor (yellow) to medium. Note The values set for Color1 - 3 of pictures automatically. 1 Select "Gamma Correct." PICTURE/SOUND CONTROL Adjust Picture Gamma Correct.: High Reset Mid Low Select Set ENTER Exit MENU 2 Select the Gamma Correct. The following menu appears on the ...

User Manual
Page 28
... Auto Wide The Auto Wide function faithfully reproduces images based on the screen. You can enlarge pictures to suite your taste. PICTURE/SOUND CONTROL Picture Mode: Adjust Picture Adjust Sound Standard Select Set ENTER Exit MENU 2 Press M/m to move the cursor (yellow) to "Wide Setup" and press ENTER. SCREEN CONTROL Wide Setup...
... Auto Wide The Auto Wide function faithfully reproduces images based on the screen. You can enlarge pictures to suite your taste. PICTURE/SOUND CONTROL Picture Mode: Adjust Picture Adjust Sound Standard Select Set ENTER Exit MENU 2 Press M/m to move the cursor (yellow) to "Wide Setup" and press ENTER. SCREEN CONTROL Wide Setup...
User Manual
Page 32
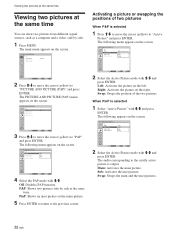
... main and the inset pictures. 32 (GB) Select Set ENTER Exit MENU 2 Select the Active Picture mode with M/m and press ENTER. PICTURE/SOUND CONTROL Picture Mode: Adjust Picture Adjust Sound Standard Activating a picture or swapping the positions of the two pictures. Viewing two pictures at the same time Viewing two pictures at...
... main and the inset pictures. 32 (GB) Select Set ENTER Exit MENU 2 Select the Active Picture mode with M/m and press ENTER. PICTURE/SOUND CONTROL Picture Mode: Adjust Picture Adjust Sound Standard Activating a picture or swapping the positions of the two pictures. Viewing two pictures at the same time Viewing two pictures at...
User Manual
Page 34
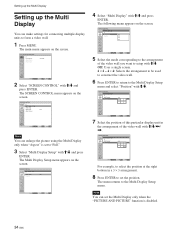
... video wall you want to the Multi Display Setup menu and select "Position" with M/m. The following menu appears on the screen. PICTURE/SOUND CONTROL Picture Mode: Adjust Picture Adjust Sound Standard Select Set ENTER Exit MENU 2 Select "SCREEN CONTROL" with M/m/ SCREEN CONTROL Multi Display Setup Multi Display: Off Position Select Set ENTER...
... video wall you want to the Multi Display Setup menu and select "Position" with M/m. The following menu appears on the screen. PICTURE/SOUND CONTROL Picture Mode: Adjust Picture Adjust Sound Standard Select Set ENTER Exit MENU 2 Select "SCREEN CONTROL" with M/m/ SCREEN CONTROL Multi Display Setup Multi Display: Off Position Select Set ENTER...
User Manual
Page 35
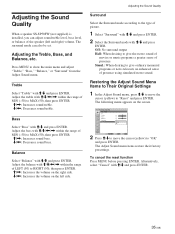
Adjusting the Treble, Bass, and Balance, etc. Treble Select "Treble" with M/m/ The surround mode can adjust sound treble level, bass level, or balance of the speaker (left and right) volume. Press MENU to show the main menu and adjust "Treble," "Bass," "Balance," or "Surround" from the Adjust Sound menu. Adjusting the Sound Quality When a speaker SS-SP50FW (not supplied) is installed, you can also be set. Adjust the treble with M/m and press ENTER.
Adjusting the Treble, Bass, and Balance, etc. Treble Select "Treble" with M/m/ The surround mode can adjust sound treble level, bass level, or balance of the speaker (left and right) volume. Press MENU to show the main menu and adjust "Treble," "Bass," "Balance," or "Surround" from the Adjust Sound menu. Adjusting the Sound Quality When a speaker SS-SP50FW (not supplied) is installed, you can also be set. Adjust the treble with M/m and press ENTER.
User Manual
Page 36
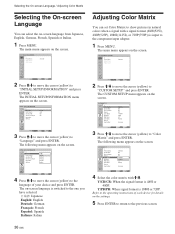
... Picture Mode: Adjust Picture Adjust Sound Standard Select Set ENTER Exit MENU 2 Press M/m to move the cursor (yellow) to "INITIAL SETUP/INFORMATION" and press ENTER. The CUSTOM SETUP menu appears on ... the screen. The INITIAL SETUP/INFORMATION menu appears on -screen language from Japanese, English, German, French, Spanish or Italian. 1 Press MENU. PICTURE/SOUND CONTROL Picture Mode: Adjust Picture Adjust Sound Standard Adjusting Color Matrix You can select the on the screen. INITIAL SETUP/INFORMATION Language: Color System: Auto Shut Off: Auto Screen...
... Picture Mode: Adjust Picture Adjust Sound Standard Select Set ENTER Exit MENU 2 Press M/m to move the cursor (yellow) to "INITIAL SETUP/INFORMATION" and press ENTER. The CUSTOM SETUP menu appears on ... the screen. The INITIAL SETUP/INFORMATION menu appears on -screen language from Japanese, English, German, French, Spanish or Italian. 1 Press MENU. PICTURE/SOUND CONTROL Picture Mode: Adjust Picture Adjust Sound Standard Adjusting Color Matrix You can select the on the screen. INITIAL SETUP/INFORMATION Language: Color System: Auto Shut Off: Auto Screen...

User Manual
Page 39
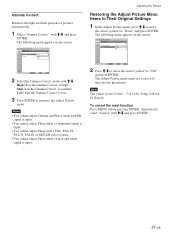
... ENTER, the following menu appears. The display image will return to "Pic. This cycle is to "Start Time" and press ENTER. PICTURE/SOUND CONTROL Picture Mode: Adjust Picture Adjust Sound Standard SCREEN SAVER Function 3 Press M/m to move the cursor (yellow) to the original display image at the Start Time and will be...
... ENTER, the following menu appears. The display image will return to "Pic. This cycle is to "Start Time" and press ENTER. PICTURE/SOUND CONTROL Picture Mode: Adjust Picture Adjust Sound Standard SCREEN SAVER Function 3 Press M/m to move the cursor (yellow) to the original display image at the Start Time and will be...
User Manual
Page 42
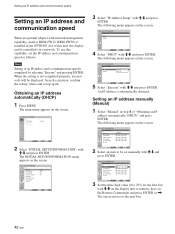
... setting is not completed properly, an error code will be controlled via a network. Obtaining an IP address automatically (DHCP) 1 Press MENU. PICTURE/SOUND CONTROL Picture Mode: Adjust Picture Adjust Sound Standard Select Set ENTER Exit MENU 2 Select "INITIAL SETUP/INFORMATION" with M/m and press ENTER. INITIAL SETUP/INFORMATION Language: Color System: Auto Shut...
... setting is not completed properly, an error code will be controlled via a network. Obtaining an IP address automatically (DHCP) 1 Press MENU. PICTURE/SOUND CONTROL Picture Mode: Adjust Picture Adjust Sound Standard Select Set ENTER Exit MENU 2 Select "INITIAL SETUP/INFORMATION" with M/m and press ENTER. INITIAL SETUP/INFORMATION Language: Color System: Auto Shut...
User Manual
Page 44
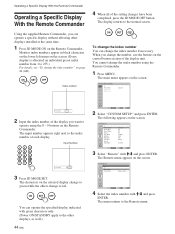
... button section of the setting changes have been completed, press the ID MODE OFF button. The following appears on the screen. PICTURE/SOUND CONTROL Picture Mode: Adjust Picture Adjust Sound Standard Index Number 117 . . . 2 Input the index number of the display you change the number, use the buttons on page 44 (GB...
... button section of the setting changes have been completed, press the ID MODE OFF button. The following appears on the screen. PICTURE/SOUND CONTROL Picture Mode: Adjust Picture Adjust Sound Standard Index Number 117 . . . 2 Input the index number of the display you change the number, use the buttons on page 44 (GB...


