Brochure
Page 2
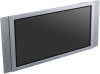
...;2005 Sony Electronics Inc. Operating System Compatibility: N/A Picture Modes: Custom (3), Vivid, Standard Color Temperature: Cool, Neutral, Warm Weight: 94lbs. 6oz. FWD-50PX2 Plasma Display specifications Screen Size: 50.0" Audio Power Output: 14W Total (7Wx2 Digital AMP) Cable Management System: Yes On Screen Controls: Yes Wall/Arm Mount: Yes (capable) Multiple Language Display: English, French, Spanish, Italian, German, Japanese, Dutch, Swedish, Russian, Chinese Picture and Picture: Yes Picture-in most areas. Limited Warranty: 2 years parts, 2 years labor, 1 year panel...
...;2005 Sony Electronics Inc. Operating System Compatibility: N/A Picture Modes: Custom (3), Vivid, Standard Color Temperature: Cool, Neutral, Warm Weight: 94lbs. 6oz. FWD-50PX2 Plasma Display specifications Screen Size: 50.0" Audio Power Output: 14W Total (7Wx2 Digital AMP) Cable Management System: Yes On Screen Controls: Yes Wall/Arm Mount: Yes (capable) Multiple Language Display: English, French, Spanish, Italian, German, Japanese, Dutch, Swedish, Russian, Chinese Picture and Picture: Yes Picture-in most areas. Limited Warranty: 2 years parts, 2 years labor, 1 year panel...
User Manual
Page 2
... the instructions, may fall. Voor de klanten in Canada This class B digital apparatus complies with Part 15 of the FCC Rules. Refer to qualified personnel only. To reduce the risk of fire or electric shock, do so, the speakers may come out of Conformity Trade Name: SONY Model: FWD-50PX2/50PX2A Responsible Party: Sony Electronics Inc. For customers in this manual...
... the instructions, may fall. Voor de klanten in Canada This class B digital apparatus complies with Part 15 of the FCC Rules. Refer to qualified personnel only. To reduce the risk of fire or electric shock, do so, the speakers may come out of Conformity Trade Name: SONY Model: FWD-50PX2/50PX2A Responsible Party: Sony Electronics Inc. For customers in this manual...
User Manual
Page 3
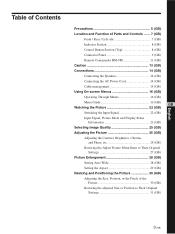
... Section 8 (GB) Control Button Section (Top 8 (GB) Connector Panel 9 (GB) Remote Commander RM-980 11 (GB) Caution 13 (GB) Connections 14 (GB) Connecting the Speakers 14 (GB) Connecting the AC Power Cord 14 (GB) Cable management 15 (GB) Using On-screen Menus 16 (GB) Operating Through Menus 16 (GB) Menu Guide 16 (GB) GB Watching the Picture 22 (GB) Switching the Input Signal 22 (GB) Input Signal, Picture Mode and Display Status Information 23...
... Section 8 (GB) Control Button Section (Top 8 (GB) Connector Panel 9 (GB) Remote Commander RM-980 11 (GB) Caution 13 (GB) Connections 14 (GB) Connecting the Speakers 14 (GB) Connecting the AC Power Cord 14 (GB) Cable management 15 (GB) Using On-screen Menus 16 (GB) Operating Through Menus 16 (GB) Menu Guide 16 (GB) GB Watching the Picture 22 (GB) Switching the Input Signal 22 (GB) Input Signal, Picture Mode and Display Status Information 23...
User Manual
Page 5
..., power consumption, etc. Precautions • If you install the unit on this plasma display panel is manufactured with the unit, the following problems, such as malfunction of the Remote Commander, noisy picture, noisy sound, may become less conspicuous, but once burn-in places with low air pressure, such as illustrated on the rear of time after the unit has been switched ON/ STANDBY. Use the screen saver...
..., power consumption, etc. Precautions • If you install the unit on this plasma display panel is manufactured with the unit, the following problems, such as malfunction of the Remote Commander, noisy picture, noisy sound, may become less conspicuous, but once burn-in places with low air pressure, such as illustrated on the rear of time after the unit has been switched ON/ STANDBY. Use the screen saver...
User Manual
Page 9
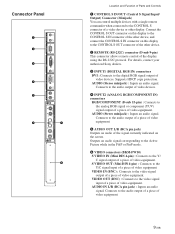
... screen. Supports HDCP copy protection. Connector Panel Location and Function of Parts and Controls 1 CONTROL S IN/OUT (Control S Signal Input/ Output) Connector (Minijack) You can control multiple devices with a single remote commander when connected to the CONTROL S OUT connector of the other device. 2 REMOTE (RS-232C) connector (D-sub 9-pin) This connector allows remote control of the display using the RS-232C protocol. VIDEO IN (BNC) : Connects to the audio output of a piece of video equipment. Connects...
... screen. Supports HDCP copy protection. Connector Panel Location and Function of Parts and Controls 1 CONTROL S IN/OUT (Control S Signal Input/ Output) Connector (Minijack) You can control multiple devices with a single remote commander when connected to the CONTROL S OUT connector of the other device. 2 REMOTE (RS-232C) connector (D-sub 9-pin) This connector allows remote control of the display using the RS-232C protocol. VIDEO IN (BNC) : Connects to the audio output of a piece of video equipment. Connects...
User Manual
Page 11
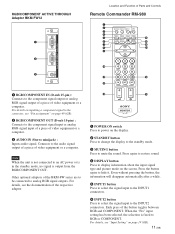
.... qd ql MONITOR RM-980 1 POWER ON switch Press to power on the screen. Note When the unit is not connected to an AC power or is in the standby mode, no signal is fixed to RGB or COMPONENT. Press again to restore sound. 4 DISPLAY button Press to display information about the input signal type and picture mode on the display. 2 STANDBY button Press to change the display to the standby mode. 3 MUTING button Press to mute...
.... qd ql MONITOR RM-980 1 POWER ON switch Press to power on the screen. Note When the unit is not connected to an AC power or is in the standby mode, no signal is fixed to RGB or COMPONENT. Press again to restore sound. 4 DISPLAY button Press to display information about the input signal type and picture mode on the display. 2 STANDBY button Press to change the display to the standby mode. 3 MUTING button Press to mute...
User Manual
Page 12
Location and Function of Parts and Controls 7 PICTURE button Selects Picture mode. Each press toggles between Vivid, Standard, and User 1 to 3. 8 ASPECT button Press to change the aspect ratio. 9 M/m/
Location and Function of Parts and Controls 7 PICTURE button Selects Picture mode. Each press toggles between Vivid, Standard, and User 1 to 3. 8 ASPECT button Press to change the aspect ratio. 9 M/m/
User Manual
Page 14
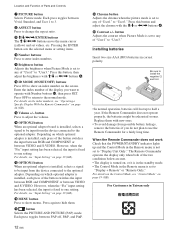
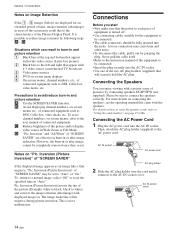
... wide video source (Letter box picture) 2 Black bars to the left and right that the power to each piece of equipment is turned off. • Use connecting cables suitable for an extended period of time, image retention (afterimage) in "Auto." Connecting the AC Power Cord 1 Plug the AC power cord into the AC IN socket. • Use one of the equipment to be set to the user manual of connected equipment such as DSS, Cable box, video...
... wide video source (Letter box picture) 2 Black bars to the left and right that the power to each piece of equipment is turned off. • Use connecting cables suitable for an extended period of time, image retention (afterimage) in "Auto." Connecting the AC Power Cord 1 Plug the AC power cord into the AC IN socket. • Use one of the equipment to be set to the user manual of connected equipment such as DSS, Cable box, video...

User Manual
Page 17
SCREEN CONTROL Multi Display Setup Wide Setup Aspect: Adjust Screen Over Scan: Wide Zoom On Select Set ENTER Exit MENU Multi Display Setup You can make fine adjustment of the sound. Using On-screen Menus Adjust Screen This menu is a function which chooses from different signal sources, such as a computer and a video, side by side. PICTURE AND PICTURE(PAP) PAP: Off Active Picture Picture Size Picture Position Select Set ENTER Exit MENU For details, see "Viewing two pictures at the same time" on page...
SCREEN CONTROL Multi Display Setup Wide Setup Aspect: Adjust Screen Over Scan: Wide Zoom On Select Set ENTER Exit MENU Multi Display Setup You can make fine adjustment of the sound. Using On-screen Menus Adjust Screen This menu is a function which chooses from different signal sources, such as a computer and a video, side by side. PICTURE AND PICTURE(PAP) PAP: Off Active Picture Picture Size Picture Position Select Set ENTER Exit MENU For details, see "Viewing two pictures at the same time" on page...
User Manual
Page 18
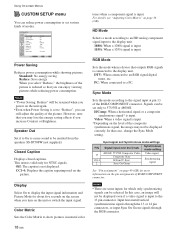
... power consumption. CUSTOM SETUP Power Saving: Speaker Out: Closed Caption: Display: Color Matrix: HD Mode: RGB Mode: Sync Mode: Remote Input Setting Select Standard Off Off Off Y/PB/PR 1080i DTV H/Comp Selectable Set ENTER Exit MENU Power Saving Reduces power consumption while showing pictures. This item is valid only for more information on the level of the picture is reduced so that outputs RGB signals is not displayed. Using On-screen Menus CUSTOM SETUP menu You can reduce power consumption or set...
... power consumption. CUSTOM SETUP Power Saving: Speaker Out: Closed Caption: Display: Color Matrix: HD Mode: RGB Mode: Sync Mode: Remote Input Setting Select Standard Off Off Off Y/PB/PR 1080i DTV H/Comp Selectable Set ENTER Exit MENU Power Saving Reduces power consumption while showing pictures. This item is valid only for more information on the level of the picture is reduced so that outputs RGB signals is not displayed. Using On-screen Menus CUSTOM SETUP menu You can reduce power consumption or set...
User Manual
Page 19
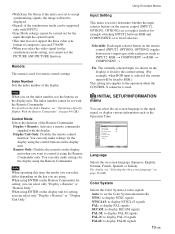
... display using . Selectable: Each input selector button on the display unit when you can be carried out for the input through the option boards. • This unit does not support the three value sync format of the display. For details, see "Operating a Specific Display With the Remote Commander" on the display unit for remote control settings. INITIAL SETUP/INFORMATION Language: Color System: Auto Shut Off: Auto Screen Adjust: Information IP Address Setup Speed Setup All Reset English Auto...
... display using . Selectable: Each input selector button on the display unit when you can be carried out for the input through the option boards. • This unit does not support the three value sync format of the display. For details, see "Operating a Specific Display With the Remote Commander" on the display unit for remote control settings. INITIAL SETUP/INFORMATION Language: Color System: Auto Shut Off: Auto Screen Adjust: Information IP Address Setup Speed Setup All Reset English Auto...
User Manual
Page 20
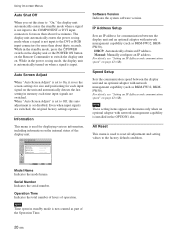
... the model name. While in the power saving mode, the display unit is automatically turned on . Even when input signals are switched. DHCP: Automatically obtain an IP address. Serial Number Indicates the serial number. When "Auto Screen Adjust" is set to Off, this item to "On," the display unit automatically enters the standby mode when a signal is not input to the COMPONENT or DVI input connectors for more than about five minutes. Speed Setup Sets...
... the model name. While in the power saving mode, the display unit is automatically turned on . Even when input signals are switched. DHCP: Automatically obtain an IP address. Serial Number Indicates the serial number. When "Auto Screen Adjust" is set to Off, this item to "On," the display unit automatically enters the standby mode when a signal is not input to the COMPONENT or DVI input connectors for more than about five minutes. Speed Setup Sets...
User Manual
Page 22
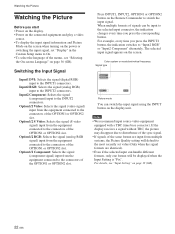
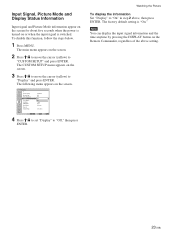
.../2 S Video: Selects the signal (S video signal) input from the equipment connected to switch the input signal. When multiple formats of signals can switch the input signal using the INPUT button on the display unit. For example, every time you press the INPUT2 button, the indication switches to the selected input connector, the indication changes every time you start • Power on the display. • Power on the connected equipment and play a video source. • To display the input signal information and Picture Mode on the screen when turning...
.../2 S Video: Selects the signal (S video signal) input from the equipment connected to switch the input signal. When multiple formats of signals can switch the input signal using the INPUT button on the display unit. For example, every time you press the INPUT2 button, the indication switches to the selected input connector, the indication changes every time you start • Power on the display. • Power on the connected equipment and play a video source. • To display the input signal information and Picture Mode on the screen when turning...
User Manual
Page 23
The CUSTOM SETUP menu appears on the screen. Note You can display the input signal information and the time anytime by pressing the DISPLAY button on the Remote Commander, regardless of the above , then press ENTER. The following menu appears on the screen. 3 Press M/m to move the cursor (yellow) to "Off," then press ENTER. The factory default setting is switched. CUSTOM SETUP Power Saving: Speaker Out: Closed Caption: Display: Color Matrix: HD Mode: RGB Mode: Sync Mode: Remote Input Setting: Standard...
The CUSTOM SETUP menu appears on the screen. Note You can display the input signal information and the time anytime by pressing the DISPLAY button on the Remote Commander, regardless of the above , then press ENTER. The following menu appears on the screen. 3 Press M/m to move the cursor (yellow) to "Off," then press ENTER. The factory default setting is switched. CUSTOM SETUP Power Saving: Speaker Out: Closed Caption: Display: Color Matrix: HD Mode: RGB Mode: Sync Mode: Remote Input Setting: Standard...

User Manual
Page 28
.... Images are enlarged to full screen size without being enlarged. Zoom Hey! Identification Control Signal This is displayed on the screen. Picture Enlargement Picture Enlargement You can also enlarge picture with a 4:3 aspect ratio to 16:9. How ya doing ? PICTURE/SOUND CONTROL Picture Mode: Adjust Picture Adjust Sound Standard Select Set ENTER Exit MENU 2 Press M/m to move the cursor (yellow) to full screen size aligned with aspect ratio information (ID-1 format). • Television broadcasts containing a signal for...
.... Images are enlarged to full screen size without being enlarged. Zoom Hey! Identification Control Signal This is displayed on the screen. Picture Enlargement Picture Enlargement You can also enlarge picture with a 4:3 aspect ratio to 16:9. How ya doing ? PICTURE/SOUND CONTROL Picture Mode: Adjust Picture Adjust Sound Standard Select Set ENTER Exit MENU 2 Press M/m to move the cursor (yellow) to full screen size aligned with aspect ratio information (ID-1 format). • Television broadcasts containing a signal for...

User Manual
Page 29
... 16:9. 9 Press ENTER. Normal: Displays the picture without changing the top and bottom. SCREEN CONTROL Wide Setup Auto Wide: 4:3 Mode: Ofnf OWnide Zoom Select Set ENTER Exit MENU 5 Select the Auto Wide setting with a 4:3 aspect ratio are reproduced as defined under the copyright laws. 29 (GB) On: The image is . The following menu appears on the screen. SCREEN CONTROL Multi Display Setup Wide Setup Aspect: Adjust Screen Wide Zoom Zoom Subtitle Full...
... 16:9. 9 Press ENTER. Normal: Displays the picture without changing the top and bottom. SCREEN CONTROL Wide Setup Auto Wide: 4:3 Mode: Ofnf OWnide Zoom Select Set ENTER Exit MENU 5 Select the Auto Wide setting with a 4:3 aspect ratio are reproduced as defined under the copyright laws. 29 (GB) On: The image is . The following menu appears on the screen. SCREEN CONTROL Multi Display Setup Wide Setup Aspect: Adjust Screen Wide Zoom Zoom Subtitle Full...
User Manual
Page 36
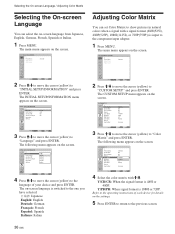
... screen. PICTURE/SOUND CONTROL Picture Mode: Adjust Picture Adjust Sound Standard Adjusting Color Matrix You can select the on the screen. The CUSTOM SETUP menu appears on the screen. CUSTOM SETUP Power Saving: Speaker Out: Closed Caption: Display: Color Matrix: HD Mode: RGB Mode: Sync Mode: Remote Input Setting: Standard Off Off Off Y/PB/PR 1080i DTV H/Comp Selectable Select Set ENTER Exit MENU 3 Press M/m to move the cursor (yellow) to "Language" and press ENTER. Y/PB/PR: When signal format is input to the component input adapter...
... screen. PICTURE/SOUND CONTROL Picture Mode: Adjust Picture Adjust Sound Standard Adjusting Color Matrix You can select the on the screen. The CUSTOM SETUP menu appears on the screen. CUSTOM SETUP Power Saving: Speaker Out: Closed Caption: Display: Color Matrix: HD Mode: RGB Mode: Sync Mode: Remote Input Setting: Standard Off Off Off Y/PB/PR 1080i DTV H/Comp Selectable Select Set ENTER Exit MENU 3 Press M/m to move the cursor (yellow) to "Language" and press ENTER. Y/PB/PR: When signal format is input to the component input adapter...
User Manual
Page 42
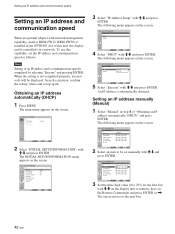
.... PICTURE/SOUND CONTROL Picture Mode: Adjust Picture Adjust Sound Standard Select Set ENTER Exit MENU 2 Select "INITIAL SETUP/INFORMATION" with M/m and press ENTER. The following menu appears on the Remote Commander and press ENTER or ,. An IP address is not completed properly, an error code will be displayed. The cursor moves to 255) for the first box with M/m and press ENTER. Note Setting of this capability, set up again. Setting an...
.... PICTURE/SOUND CONTROL Picture Mode: Adjust Picture Adjust Sound Standard Select Set ENTER Exit MENU 2 Select "INITIAL SETUP/INFORMATION" with M/m and press ENTER. The following menu appears on the Remote Commander and press ENTER or ,. An IP address is not completed properly, an error code will be displayed. The cursor moves to 255) for the first box with M/m and press ENTER. Note Setting of this capability, set up again. Setting an...
User Manual
Page 44
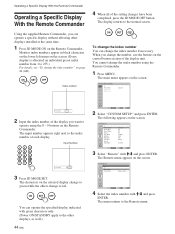
... Remote menu. PICTURE/SOUND CONTROL Picture Mode: Adjust Picture Adjust Sound Standard Index Number 117 . . . 2 Input the index number of the setting changes have been completed, press the ID MODE OFF button. CUSTOM SETUP Power Saving: Speaker Out: Closed Caption: Display: Color Matrix: HD Mode: RGB Mode: Sync Mode: Remote Input Setting: Standard Off Off Off Y/PB/PR 1080i DTV H/Comp Selectable Select Set ENTER Exit MENU 3 Select "Remote" with M/m and press ENTER. ON SET OFF You can operate the specified display indicated with green characters only. (Power ON/STANDBY...
... Remote menu. PICTURE/SOUND CONTROL Picture Mode: Adjust Picture Adjust Sound Standard Index Number 117 . . . 2 Input the index number of the setting changes have been completed, press the ID MODE OFF button. CUSTOM SETUP Power Saving: Speaker Out: Closed Caption: Display: Color Matrix: HD Mode: RGB Mode: Sync Mode: Remote Input Setting: Standard Off Off Off Y/PB/PR 1080i DTV H/Comp Selectable Select Set ENTER Exit MENU 3 Select "Remote" with M/m and press ENTER. ON SET OFF You can operate the specified display indicated with green characters only. (Power ON/STANDBY...
User Manual
Page 45
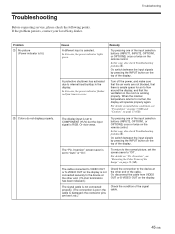
... the normal picture, set to "Off". The cable connected to VIDEO OUT or S-VIDEO OUT on the display is not connected securely to COMPONENT (YUV) but the input signal is poor; Cause A different input is working properly. In this case, also check Troubleshooting problem 9. Remedy Try pressing one of the input selection buttons (INPUT2, OPTION1, or OPTION2) once or twice on the remote control. For details on installation conditions...
... the normal picture, set to "Off". The cable connected to VIDEO OUT or S-VIDEO OUT on the display is not connected securely to COMPONENT (YUV) but the input signal is poor; Cause A different input is working properly. In this case, also check Troubleshooting problem 9. Remedy Try pressing one of the input selection buttons (INPUT2, OPTION1, or OPTION2) once or twice on the remote control. For details on installation conditions...


