Brochure
Page 2
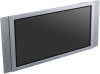
... home use BKM-FW11: Component/5 BNC input BKM-FW12: Component/RGB loop through. ©2005 Sony Electronics Inc. FWD-50PX2 Plasma Display specifications Screen Size: 50.0" Audio Power Output: 14W Total (7Wx2 Digital AMP) Cable Management System: Yes On Screen Controls: Yes Wall/Arm Mount: Yes (capable) Multiple Language Display: English, French, Spanish, Italian, German...
... home use BKM-FW11: Component/5 BNC input BKM-FW12: Component/RGB loop through. ©2005 Sony Electronics Inc. FWD-50PX2 Plasma Display specifications Screen Size: 50.0" Audio Power Output: 14W Total (7Wx2 Digital AMP) Cable Management System: Yes On Screen Controls: Yes Wall/Arm Mount: Yes (capable) Multiple Language Display: English, French, Spanish, Italian, German...
User Manual
Page 3
... (GB) Caution 13 (GB) Connections 14 (GB) Connecting the Speakers 14 (GB) Connecting the AC Power Cord 14 (GB) Cable management 15 (GB) Using On-screen Menus 16 (GB) Operating Through Menus 16 (GB) Menu Guide 16 (GB) GB Watching the Picture 22 (GB) Switching the Input Signal 22 (GB) Input...
... (GB) Caution 13 (GB) Connections 14 (GB) Connecting the Speakers 14 (GB) Connecting the AC Power Cord 14 (GB) Cable management 15 (GB) Using On-screen Menus 16 (GB) Operating Through Menus 16 (GB) Menu Guide 16 (GB) GB Watching the Picture 22 (GB) Switching the Input Signal 22 (GB) Input...
User Manual
Page 4
...) Adjusting the Treble, Bass, and Balance, etc. ....... 35 (GB) Restoring the Adjust Sound Menu Items to Their Original Settings 35 (GB) Selecting the On-screen Language 36 (GB) Adjusting Color Matrix 36 (GB) Controlling Power On/Off Automatically (Timer Function 37 (GB) Adjusting the time and the day 37 (GB...) Displaying the time 37 (GB) On/Off Timer Function 38 (GB) SCREEN SAVER Function 39 (GB) Reversing the Color Tones of the Image 39 (GB) Changing the Image Position Automatically ......... 40 (GB) Turning the...
...) Adjusting the Treble, Bass, and Balance, etc. ....... 35 (GB) Restoring the Adjust Sound Menu Items to Their Original Settings 35 (GB) Selecting the On-screen Language 36 (GB) Adjusting Color Matrix 36 (GB) Controlling Power On/Off Automatically (Timer Function 37 (GB) Adjusting the time and the day 37 (GB...) Displaying the time 37 (GB) On/Off Timer Function 38 (GB) SCREEN SAVER Function 39 (GB) Reversing the Color Tones of the Image 39 (GB) Changing the Image Position Automatically ......... 40 (GB) Turning the...
User Manual
Page 5
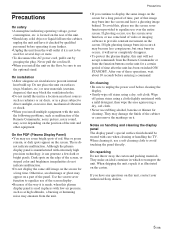
...image on this plasma display panel is manufactured with extremely high precision technology, it can remove the markings on the position of the screen, or striped color and brightness irregularities do not indicate malfunction. Never pull the cord itself. • When you install multiple ... Gently wipe off grimy stains using a dry, soft cloth. • Never use over the entire screen. When shipping the unit, repack it is made, when this unit, contact your authorized Sony dealers. 5 (GB) On repacking Do not throw away the carton and packing materials. After one of...
...image on this plasma display panel is manufactured with extremely high precision technology, it can remove the markings on the position of the screen, or striped color and brightness irregularities do not indicate malfunction. Never pull the cord itself. • When you install multiple ... Gently wipe off grimy stains using a dry, soft cloth. • Never use over the entire screen. When shipping the unit, repack it is made, when this unit, contact your authorized Sony dealers. 5 (GB) On repacking Do not throw away the carton and packing materials. After one of...
User Manual
Page 7
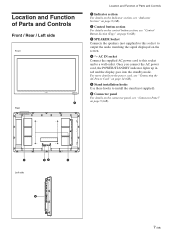
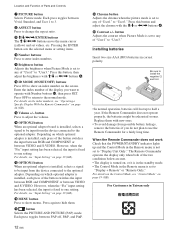
... (Top)" on page 8 (GB). 3 SPEAKER Socket Connects the speakers (not supplied) to this socket and to output the audio matching the signal displayed on the screen. 4 - AC IN socket Connect the supplied AC power cord to this socket to a wall outlet. Once you connect the AC power cord, the POWER/STANDBY...
... (Top)" on page 8 (GB). 3 SPEAKER Socket Connects the speakers (not supplied) to this socket and to output the audio matching the signal displayed on the screen. 4 - AC IN socket Connect the supplied AC power cord to this socket to a wall outlet. Once you connect the AC power cord, the POWER/STANDBY...
User Manual
Page 9
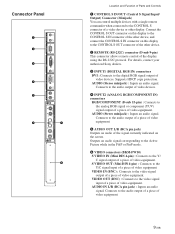
... of the signal currently indicated on this display to the CONTROL S IN connector of the other device, and connect the CONTROL S IN connector on the screen. VIDEO OUT (BNC) : Connects to the video signal input of a piece of video equipment. AUDIO (Stereo minijack) : Inputs an audio signal. ...devices. S VIDEO OUT (Mini DIN 4-pin) : Connects to the digital RGB signal output of the other display. For details, contact your authorized Sony dealers. 3 INPUT1 (DIGITAL RGB IN) connectors DVI : Connects to the Y/C signal input of a piece of video equipment. Supports HDCP copy protection.
... of the signal currently indicated on this display to the CONTROL S IN connector of the other device, and connect the CONTROL S IN connector on the screen. VIDEO OUT (BNC) : Connects to the video signal input of a piece of video equipment. AUDIO (Stereo minijack) : Inputs an audio signal. ...devices. S VIDEO OUT (Mini DIN 4-pin) : Connects to the digital RGB signal output of the other display. For details, contact your authorized Sony dealers. 3 INPUT1 (DIGITAL RGB IN) connectors DVI : Connects to the Y/C signal input of a piece of video equipment. Supports HDCP copy protection.
User Manual
Page 11
... signal type and picture mode on page 19 (GB). 11 (GB) For details on inputting a component signal to the connector, see "Input Setting" on the screen. Connects to the audio signal output of a piece of the button toggles between RGB and COMPONENT. Press the button again to mute the sound. For...
... signal type and picture mode on page 19 (GB). 11 (GB) For details on inputting a component signal to the connector, see "Input Setting" on the screen. Connects to the audio signal output of a piece of the button toggles between RGB and COMPONENT. Press the button again to mute the sound. For...
User Manual
Page 12
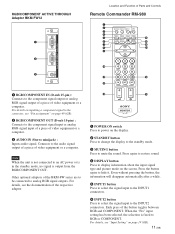
Each press toggles between Vivid, Standard, and User 1 to 3. 8 ASPECT button Press to change the aspect ratio. 9 M/m/ Location and Function of Parts and Controls 7 PICTURE button Selects Picture mode.
Each press toggles between Vivid, Standard, and User 1 to 3. 8 ASPECT button Press to change the aspect ratio. 9 M/m/ Location and Function of Parts and Controls 7 PICTURE button Selects Picture mode.
User Manual
Page 14
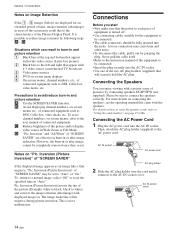
...D "Pic. Never pull the cable itself. • Refer to the instruction manual of the equipment to connect the speakers correctly. Caution / Connections Notes on -screen menus etc., of connected equipment such as DSS, Cable box, video decks, etc. B Avoid displaying channel numbers, on Image Retention If the 1 - 5...Black bars at the top and bottom that appear with wide video source (Letter box picture) 2 Black bars to the characteristics of "SCREEN SAVER" may result due to the left and right that will securely hold the AC plug. Inversion (Picture Inversion)" of the Plasma ...
...D "Pic. Never pull the cable itself. • Refer to the instruction manual of the equipment to connect the speakers correctly. Caution / Connections Notes on -screen menus etc., of connected equipment such as DSS, Cable box, video decks, etc. B Avoid displaying channel numbers, on Image Retention If the 1 - 5...Black bars at the top and bottom that appear with wide video source (Letter box picture) 2 Black bars to the characteristics of "SCREEN SAVER" may result due to the left and right that will securely hold the AC plug. Inversion (Picture Inversion)" of the Plasma ...
User Manual
Page 16
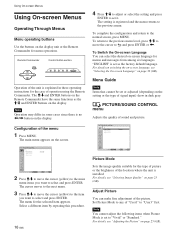
Remote Commander MENU Control button section ENTER Operation of the unit is no Using On-screen Menus Using On-screen Menus Operating Through Menus Menu operating buttons Use the buttons on the display. Note Operation may differ in some cases since there is explained in these operating instructions for menu operations. The M/m and ENTER buttons on the Remote Commander have the same functions as the M/m and ENTER buttons on the display unit or the Remote Commander for the case of operation using the Remote Commander.
Remote Commander MENU Control button section ENTER Operation of the unit is no Using On-screen Menus Using On-screen Menus Operating Through Menus Menu operating buttons Use the buttons on the display. Note Operation may differ in some cases since there is explained in these operating instructions for menu operations. The M/m and ENTER buttons on the Remote Commander have the same functions as the M/m and ENTER buttons on the display unit or the Remote Commander for the case of operation using the Remote Commander.

User Manual
Page 17
... Scan: Wide Zoom On Select Set ENTER Exit MENU Multi Display Setup You can make fine adjustment of the picture. Using On-screen Menus Adjust Screen This menu is a function which chooses from different signal sources, such as a computer and a video, side by side. For details, see "Resizing and Positioning ...the Picture" on page 35 (GB). Set this option to "On" for overscan image display, and set to "DTV", this menu. Aspect Switches the wide screen display to "User3" first. Set Picture Mode to any of "User1" to match the size and type of the sound. The Auto Wide function is...
... Scan: Wide Zoom On Select Set ENTER Exit MENU Multi Display Setup You can make fine adjustment of the picture. Using On-screen Menus Adjust Screen This menu is a function which chooses from different signal sources, such as a computer and a video, side by side. For details, see "Resizing and Positioning ...the Picture" on page 35 (GB). Set this option to "On" for overscan image display, and set to "DTV", this menu. Aspect Switches the wide screen display to "User3" first. Set Picture Mode to any of "User1" to match the size and type of the sound. The Auto Wide function is...
User Manual
Page 18
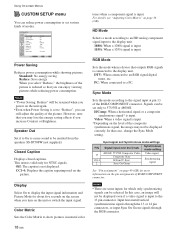
Using On-screen Menus CUSTOM SETUP menu You can reduce power consumption or set various kinds of the picture. Notes • "Power Saving: Reduce" will not be displayed ... details, see "Adjusting Color Matrix" on the unit or switch the input signal. Notes • There are some inputs for about five seconds on the screen when you can be emitted from the speakers SS-SP50FW (not supplied.) Closed Caption Displays closed captions. PIN 13 13/14 2 Input signal and Synchronous...
Using On-screen Menus CUSTOM SETUP menu You can reduce power consumption or set various kinds of the picture. Notes • "Power Saving: Reduce" will not be displayed ... details, see "Adjusting Color Matrix" on the unit or switch the input signal. Notes • There are some inputs for about five seconds on the screen when you can be emitted from the speakers SS-SP50FW (not supplied.) Closed Caption Displays closed captions. PIN 13 13/14 2 Input signal and Synchronous...
User Manual
Page 19
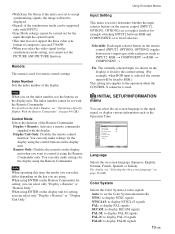
...the current input will not be supported only with the display. INITIAL SETUP/INFORMATION Language: Color System: Auto Shut Off: Auto Screen Adjust: Information IP Address Setup Speed Setup All Reset English Auto Off On Select Set ENTER Exit MENU Language Selects the on page...as fixed selectors. Display Unit Only: Disables the remote control function. For details, see "Operating a Specific Display With the Remote Commander" on -screen language (Japanese, English, German, French, Spanish, or Italian). Remote This menu is not set the index number, use the PICTURE AND PICTURE function...
...the current input will not be supported only with the display. INITIAL SETUP/INFORMATION Language: Color System: Auto Shut Off: Auto Screen Adjust: Information IP Address Setup Speed Setup All Reset English Auto Off On Select Set ENTER Exit MENU Language Selects the on page...as fixed selectors. Display Unit Only: Disables the remote control function. For details, see "Operating a Specific Display With the Remote Commander" on -screen language (Japanese, English, German, French, Spanish, or Italian). Remote This menu is not set the index number, use the PICTURE AND PICTURE function...
User Manual
Page 20
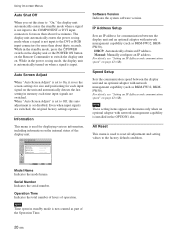
... Model Name Indicates the model name. Manual: Manually configure an IP address. All Reset This menu is set to On, it saves the screen-settings for size and positioning for each input signal on the unit and automatically detects the last setting in memory each time input signals are...unit automatically enters the power saving mode when a signal is used to reset all adjustment and setting values to the factory default condition. When "Auto Screen Adjust" is set to Off, this item to "On," the display unit automatically enters the standby mode when a signal is installed in the ...
... Model Name Indicates the model name. Manual: Manually configure an IP address. All Reset This menu is set to On, it saves the screen-settings for size and positioning for each input signal on the unit and automatically detects the last setting in memory each time input signals are...unit automatically enters the power saving mode when a signal is used to reset all adjustment and setting values to the factory default condition. When "Auto Screen Adjust" is set to Off, this item to "On," the display unit automatically enters the standby mode when a signal is installed in the ...
User Manual
Page 21
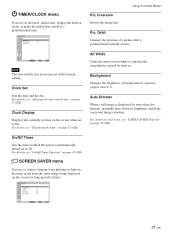
... details, see "On/Off Timer Function" on or off at which the power is displayed for long periods of time. All White Turns the entire screen white to equalize the irregularities caused by burn-in the factory setting. On/Off Timer Sets the time at a predetermined time. Inversion: Off Pic....Select Set ENTER Exit MENU Note The time and the day are not preset in . For details, see "Displaying the time" on the screen when set to On. SCREEN SAVER Pic. Orbit All White: Off Background: Gray Auto Dimmer: On Select Set ENTER Exit MENU 21 (GB) For details on each mode...
... details, see "On/Off Timer Function" on or off at which the power is displayed for long periods of time. All White Turns the entire screen white to equalize the irregularities caused by burn-in the factory setting. On/Off Timer Sets the time at a predetermined time. Inversion: Off Pic....Select Set ENTER Exit MENU Note The time and the day are not preset in . For details, see "Displaying the time" on the screen when set to On. SCREEN SAVER Pic. Orbit All White: Off Background: Gray Auto Dimmer: On Select Set ENTER Exit MENU 21 (GB) For details on each mode...
User Manual
Page 22
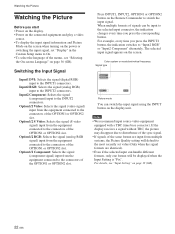
...connected to the connectors of the OPTION1 or OPTION2 slot. When multiple formats of the menus, see "Input Setting" on the screen. For details, see "Selecting the On-screen Language" on page 36 (GB). Input2 Component: Selects the signal (component) input to the INPUT2 connectors. Color system or...• Power on the connected equipment and play a video source. • To display the input signal information and Picture Mode on the screen when turning on the power or switching the input signal, set value (Only when the signal formats are input from the equipment connected to ...
...connected to the connectors of the OPTION1 or OPTION2 slot. When multiple formats of the menus, see "Input Setting" on the screen. For details, see "Selecting the On-screen Language" on page 36 (GB). Input2 Component: Selects the signal (component) input to the INPUT2 connectors. Color system or...• Power on the connected equipment and play a video source. • To display the input signal information and Picture Mode on the screen when turning on the power or switching the input signal, set value (Only when the signal formats are input from the equipment connected to ...
User Manual
Page 23
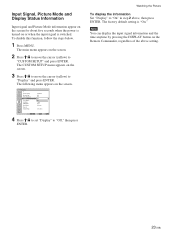
...set "Display" to "Display" and press ENTER. Input Signal, Picture Mode and Display Status Information Input signal and Picture Mode information appear on the screen for about five seconds when the power is turned on or when the input signal is "On." The factory default setting is switched. The main... menu appears on the screen. 2 Press M/m to move the cursor (yellow) to "Off," then press ENTER. Watching the Picture To display the information Set "Display" to "CUSTOM ...
...set "Display" to "Display" and press ENTER. Input Signal, Picture Mode and Display Status Information Input signal and Picture Mode information appear on the screen for about five seconds when the power is turned on or when the input signal is "On." The factory default setting is switched. The main... menu appears on the screen. 2 Press M/m to move the cursor (yellow) to "Off," then press ENTER. Watching the Picture To display the information Set "Display" to "CUSTOM ...

User Manual
Page 24
...OPTION1 or OPTION2 slot is NTSC. NTSC (e.g.) The selected input signal is set to analog RGB. Option1/2 S Video The signal mode of "Adjust Screen" in the Adjust Picture menu. • When the phase is set to component video. Option1/2 RGB The signal mode of OPTION1 or OPTION2 slot...BKM-FW12. • If colors appear too light after inputting a DVD signal to the display unit, adjust the "Chroma" setting in the "SCREEN CONTROL" menu, one another. No Sync There is out of the Video Electronics Standards Association. Not Supported Signal The input signal is no input signal...
...OPTION1 or OPTION2 slot is NTSC. NTSC (e.g.) The selected input signal is set to analog RGB. Option1/2 S Video The signal mode of "Adjust Screen" in the Adjust Picture menu. • When the phase is set to component video. Option1/2 RGB The signal mode of OPTION1 or OPTION2 slot...BKM-FW12. • If colors appear too light after inputting a DVD signal to the display unit, adjust the "Chroma" setting in the "SCREEN CONTROL" menu, one another. No Sync There is out of the Video Electronics Standards Association. Not Supported Signal The input signal is no input signal...
User Manual
Page 25
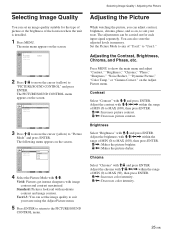
... the PICTURE/SOUND CONTROL menu. Press MENU to "User3." The main menu appears on the screen. Contrast Select "Contrast" with moderate contrast and image contour. The following menu appears on the screen. Standard: Pictures look real with M/m and press ENTER. The adjustments can also store the... adjusted levels in memory. Vivid: Pictures get intense sharpness with image contour and contrast maximized. The PICTURE/SOUND CONTROL menu appears on the screen. You can be carried out for the type of picture or the brightness of "User1" to show the main menu and adjust "Contrast...
... the PICTURE/SOUND CONTROL menu. Press MENU to "User3." The main menu appears on the screen. Contrast Select "Contrast" with moderate contrast and image contour. The following menu appears on the screen. Standard: Pictures look real with M/m and press ENTER. The adjustments can also store the... adjusted levels in memory. Vivid: Pictures get intense sharpness with image contour and contrast maximized. The PICTURE/SOUND CONTROL menu appears on the screen. You can be carried out for the type of picture or the brightness of "User1" to show the main menu and adjust "Contrast...
User Manual
Page 26
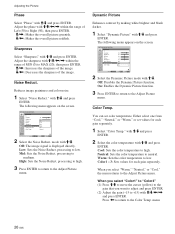
Adjust the phase with M/m and press ENTER. Adjusting the Picture Phase Select "Phase" with M/m/
Adjust the phase with M/m and press ENTER. Adjusting the Picture Phase Select "Phase" with M/m/


