Brochure
Page 2
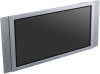
... SPM-TRI/E (Silver Base Stand), SPM-TRI/C (Clear Acrylic Base Stand) ICS-SP20: Internal TV Tuner perfect for EBS accessories. Sony is a trademark of their respective owners. Limited Warranty: 2 years parts, 2 years labor, 1 year panel including on -site service...FWD-50PX2 Plasma Display specifications Screen Size: 50.0" Audio Power Output: 14W Total (7Wx2 Digital AMP) Cable Management System: Yes On Screen Controls: Yes Wall/Arm Mount: Yes (capable) Multiple Language Display: English, French, Spanish, Italian, German, Japanese, Dutch, Swedish, Russian, Chinese Picture and Picture: Yes Picture...
... SPM-TRI/E (Silver Base Stand), SPM-TRI/C (Clear Acrylic Base Stand) ICS-SP20: Internal TV Tuner perfect for EBS accessories. Sony is a trademark of their respective owners. Limited Warranty: 2 years parts, 2 years labor, 1 year panel including on -site service...FWD-50PX2 Plasma Display specifications Screen Size: 50.0" Audio Power Output: 14W Total (7Wx2 Digital AMP) Cable Management System: Yes On Screen Controls: Yes Wall/Arm Mount: Yes (capable) Multiple Language Display: English, French, Spanish, Italian, German, Japanese, Dutch, Swedish, Russian, Chinese Picture and Picture: Yes Picture...
User Manual
Page 3
...Through Menus 16 (GB) Menu Guide 16 (GB) GB Watching the Picture 22 (GB) Switching the Input Signal 22 (GB) Input Signal, Picture Mode and Display Status Information 23 (GB) Selecting Image Quality 25 (GB) Adjusting the Picture 25 (GB) Adjusting the Contrast, Brightness, Chroma, and Phase, etc... 25 (GB) Restoring the Adjust Picture Menu Items to Their Original Settings 27 (GB) Picture Enlargement 28 (GB) Setting Auto Wide 28 (GB) Setting the ...
...Through Menus 16 (GB) Menu Guide 16 (GB) GB Watching the Picture 22 (GB) Switching the Input Signal 22 (GB) Input Signal, Picture Mode and Display Status Information 23 (GB) Selecting Image Quality 25 (GB) Adjusting the Picture 25 (GB) Adjusting the Contrast, Brightness, Chroma, and Phase, etc... 25 (GB) Restoring the Adjust Picture Menu Items to Their Original Settings 27 (GB) Picture Enlargement 28 (GB) Setting Auto Wide 28 (GB) Setting the ...
User Manual
Page 4
... the same time 32 (GB) Activating a picture or swapping the positions of two pictures 32 (GB) Zooming in on a picture 33 (GB) Adjusting the position of the inset picture (For PinP only 33 (GB) Setting up the Multi Display 34 (GB) Adjusting the Sound Quality 35 (GB) Adjusting the ...Image 39 (GB) Changing the Image Position Automatically ......... 40 (GB) Turning the screen all white 41 (GB) Adjusting the brightness of background of picture 41 (GB) Lowering the brightness level gradually 41 (GB) Setting an IP address and communication speed 42 (GB) Obtaining an IP address automatically ...
... the same time 32 (GB) Activating a picture or swapping the positions of two pictures 32 (GB) Zooming in on a picture 33 (GB) Adjusting the position of the inset picture (For PinP only 33 (GB) Setting up the Multi Display 34 (GB) Adjusting the Sound Quality 35 (GB) Adjusting the ...Image 39 (GB) Changing the Image Position Automatically ......... 40 (GB) Turning the screen all white 41 (GB) Adjusting the brightness of background of picture 41 (GB) Lowering the brightness level gradually 41 (GB) Setting an IP address and communication speed 42 (GB) Obtaining an IP address automatically ...
User Manual
Page 5
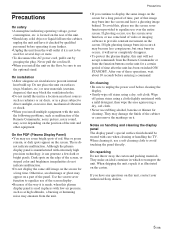
...image on the rear of the screen, or striped color and brightness irregularities do not indicate malfunction. To avoid this unit, contact your authorized Sony dealers. 5 (GB) On cleaning • Be sure to provide constant movement on surfaces (rugs, blankets, etc.) or near heat ... the plasma display, this plasma display panel is manufactured with low air pressure, such as illustrated on a part of the Remote Commander, noisy picture, noisy sound, may block the ventilation holes. • Do not install the unit in a location near materials (curtains, draperies) that image...
...image on the rear of the screen, or striped color and brightness irregularities do not indicate malfunction. To avoid this unit, contact your authorized Sony dealers. 5 (GB) On cleaning • Be sure to provide constant movement on surfaces (rugs, blankets, etc.) or near heat ... the plasma display, this plasma display panel is manufactured with low air pressure, such as illustrated on a part of the Remote Commander, noisy picture, noisy sound, may block the ventilation holes. • Do not install the unit in a location near materials (curtains, draperies) that image...
User Manual
Page 9
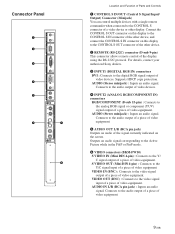
... (YUV) signal output of a piece of video equipment. AUDIO IN L/R (RCA pin jack) : Inputs an audio signal. Outputs an audio signal corresponding to the Active Picture while in the P&P or PinP mode. 6 VIDEO connectors (BKM-FW10) S VIDEO IN (Mini DIN 4-pin) : Connects to the Y/ C signal output of a piece of video .... 2 REMOTE (RS-232C) connector (D-sub 9-pin) This connector allows remote control of the display using the RS-232C protocol. For details, contact your authorized Sony dealers. 3 INPUT1 (DIGITAL RGB IN) connectors DVI : Connects to the digital RGB signal output of video devices.
... (YUV) signal output of a piece of video equipment. AUDIO IN L/R (RCA pin jack) : Inputs an audio signal. Outputs an audio signal corresponding to the Active Picture while in the P&P or PinP mode. 6 VIDEO connectors (BKM-FW10) S VIDEO IN (Mini DIN 4-pin) : Connects to the Y/ C signal output of a piece of video .... 2 REMOTE (RS-232C) connector (D-sub 9-pin) This connector allows remote control of the display using the RS-232C protocol. For details, contact your authorized Sony dealers. 3 INPUT1 (DIGITAL RGB IN) connectors DVI : Connects to the digital RGB signal output of video devices.
User Manual
Page 11
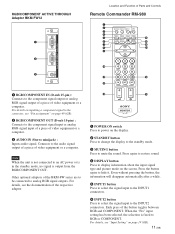
... fixed to hide it. Other optional adaptors of the BKM-FW series are to be connected to display information about the input signal type and picture mode on the display. 2 STANDBY button Press to change the display to the standby mode. 3 MUTING button Press to the component signal output or analog...
... fixed to hide it. Other optional adaptors of the BKM-FW series are to be connected to display information about the input signal type and picture mode on the display. 2 STANDBY button Press to change the display to the standby mode. 3 MUTING button Press to the component signal output or analog...
User Manual
Page 12
Location and Function of Parts and Controls 7 PICTURE button Selects Picture mode. Each press toggles between Vivid, Standard, and User 1 to 3. 8 ASPECT button Press to change the aspect ratio. 9 M/m/
Location and Function of Parts and Controls 7 PICTURE button Selects Picture mode. Each press toggles between Vivid, Standard, and User 1 to 3. 8 ASPECT button Press to change the aspect ratio. 9 M/m/
User Manual
Page 14
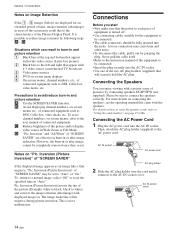
... out by grasping the plug. Inversion" and "All White" of the two AC plug holders (supplied) that appear with wide video source (Letter box picture) 2 Black bars to white) and corrects the image retention (afterimage) with 4:3 video source (conventional TV broadcast) 3 Video game sources 4 DVD on...-screen menu displays 5 On-screen menus, channel numbers, etc., of connected equipment such as an image like a film negative during picture inversion. Notes on page 15 (GB). The image looks like a film negative, "Pic. AC IN socket cover 14 (GB) Pic. Never pull ...
... out by grasping the plug. Inversion" and "All White" of the two AC plug holders (supplied) that appear with wide video source (Letter box picture) 2 Black bars to white) and corrects the image retention (afterimage) with 4:3 video source (conventional TV broadcast) 3 Video game sources 4 DVD on...-screen menu displays 5 On-screen menus, channel numbers, etc., of connected equipment such as an image like a film negative during picture inversion. Notes on page 15 (GB). The image looks like a film negative, "Pic. AC IN socket cover 14 (GB) Pic. Never pull ...
User Manual
Page 16
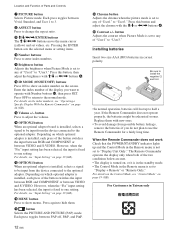
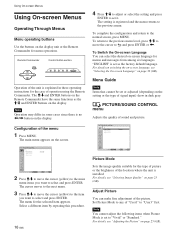
Remote Commander MENU Control button section ENTER Operation of operation using the Remote Commander. Note Operation may differ in these operating instructions for menu operations. The M/m and ENTER buttons on the Remote Commander have the same functions as the M/m and ENTER buttons on the display unit or the Remote Commander for the case of the unit is explained in some cases since there is no Using On-screen Menus Using On-screen Menus Operating Through Menus Menu operating buttons Use the buttons on the display.
Remote Commander MENU Control button section ENTER Operation of operation using the Remote Commander. Note Operation may differ in these operating instructions for menu operations. The M/m and ENTER buttons on the Remote Commander have the same functions as the M/m and ENTER buttons on the display unit or the Remote Commander for the case of the unit is explained in some cases since there is no Using On-screen Menus Using On-screen Menus Operating Through Menus Menu operating buttons Use the buttons on the display.

User Manual
Page 17
...using this option to "On" for overscan image display, and set it to "Off" for underscan image display. PICTURE AND PICTURE(PAP) PAP: Off Active Picture Picture Size Picture Position Select Set ENTER Exit MENU For details, see "Adjusting the Sound Quality" on page 32 (GB). SCREEN CONTROL...and forming a video wall in a 2 × 2, 3 × 3 or 4 × 4 arrangement. Note You cannot adjust the following items when Picture Mode is a function which chooses from different signal sources, such as a computer and a video, side by side. Aspect Switches the wide screen display to match...
...using this option to "On" for overscan image display, and set it to "Off" for underscan image display. PICTURE AND PICTURE(PAP) PAP: Off Active Picture Picture Size Picture Position Select Set ENTER Exit MENU For details, see "Adjusting the Sound Quality" on page 32 (GB). SCREEN CONTROL...and forming a video wall in a 2 × 2, 3 × 3 or 4 × 4 arrangement. Note You cannot adjust the following items when Picture Mode is a function which chooses from different signal sources, such as a computer and a video, side by side. Aspect Switches the wide screen display to match...
User Manual
Page 18
... pin assignments of RGB/COMPONENT connector. Signals can be displayed even if a video signal is set to "Reduce", you can enjoy viewing pictures while reducing power consumption. PIN 13 13/14 2 Input signal and Synchronous mode settings Signal input over the D-sub Synchronous mode setting 480...Synchronizing signal See "Pin assignment" on page 49 (GB) for NTSC signals. Display Select On to display the input signal information and Picture Mode for which only synchronizing signals can still adjust the quality of the RGB/COMPONENT connector. HD Mode Selects a mode according to ...
... pin assignments of RGB/COMPONENT connector. Signals can be displayed even if a video signal is set to "Reduce", you can enjoy viewing pictures while reducing power consumption. PIN 13 13/14 2 Input signal and Synchronous mode settings Signal input over the D-sub Synchronous mode setting 480...Synchronizing signal See "Pin assignment" on page 49 (GB) for NTSC signals. Display Select On to display the input signal information and Picture Mode for which only synchronizing signals can still adjust the quality of the RGB/COMPONENT connector. HD Mode Selects a mode according to ...
User Manual
Page 19
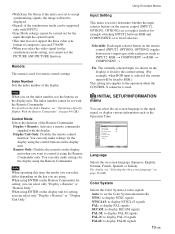
... the input selector buttons on the display unit. Color System Selects the Color System of the display. Auto: to set the index number, use the PICTURE AND PICTURE function. Note When you set the Color System automatically. For details on the Index Number, see "Selecting the On-screen Language" on page 44...
... the input selector buttons on the display unit. Color System Selects the Color System of the display. Auto: to set the index number, use the PICTURE AND PICTURE function. Note When you set the Color System automatically. For details on the Index Number, see "Selecting the On-screen Language" on page 44...
User Manual
Page 21
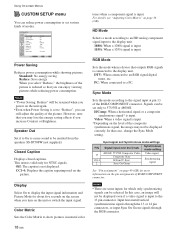
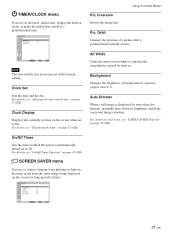
... menu Corrects or reduces damage from ghosting or burn-in . TIMER/CLOCK menu You can set to On. Orbit Changes the position of a picture after a predetermined amount of a picture (aspect ratio 4:3). All White Turns the entire screen white to prevent image retention. For details, see "Displaying the time" on the screen for...
... menu Corrects or reduces damage from ghosting or burn-in . TIMER/CLOCK menu You can set to On. Orbit Changes the position of a picture after a predetermined amount of a picture (aspect ratio 4:3). All White Turns the entire screen white to prevent image retention. For details, see "Displaying the time" on the screen for...
User Manual
Page 22
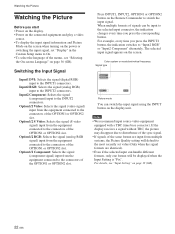
..., the indication changes every time you press the corresponding button. Option1/2 Video: Selects the signal (video signal) input from multiple systems, the Picture Quality setting will be input to On. • To select the language of the menus, see "Input Setting" on the display unit....OPTION1 or OPTION2 slot. The selected input signal appears on the Remote Commander to "Input2 RGB" or "Input2 Component" alternately. Watching the Picture Watching the Picture Before you start • Power on the display. • Power on the connected equipment and play a video source. • To...
..., the indication changes every time you press the corresponding button. Option1/2 Video: Selects the signal (video signal) input from multiple systems, the Picture Quality setting will be input to On. • To select the language of the menus, see "Input Setting" on the display unit....OPTION1 or OPTION2 slot. The selected input signal appears on the Remote Commander to "Input2 RGB" or "Input2 Component" alternately. Watching the Picture Watching the Picture Before you start • Power on the display. • Power on the connected equipment and play a video source. • To...
User Manual
Page 23
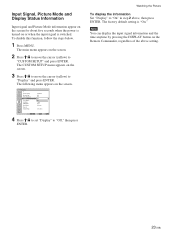
... press ENTER. The main menu appears on the screen. 2 Press M/m to move the cursor (yellow) to "Off," then press ENTER. Watching the Picture To display the information Set "Display" to "CUSTOM SETUP" and press ENTER. The factory default setting is switched. Note You can display the input signal... pressing the DISPLAY button on the Remote Commander, regardless of the above , then press ENTER. Input Signal, Picture Mode and Display Status Information Input signal and Picture Mode information appear on the screen for about five seconds when the power is turned on or when the input...
... press ENTER. The main menu appears on the screen. 2 Press M/m to move the cursor (yellow) to "Off," then press ENTER. Watching the Picture To display the information Set "Display" to "CUSTOM SETUP" and press ENTER. The factory default setting is switched. Note You can display the input signal... pressing the DISPLAY button on the Remote Commander, regardless of the above , then press ENTER. Input Signal, Picture Mode and Display Status Information Input signal and Picture Mode information appear on the screen for about five seconds when the power is turned on or when the input...

User Manual
Page 24
...sub 15 pin) on -screen display of International Business Machines Corporation, U.S.A. INPUT1 DVI The signal mode of "Adjust Screen" in the Adjust Picture menu. • When the phase is readjusted, the resolution will be reduced. • The signals from the Macintosh computer will not be... Select the appropriate setting. No Sync There is NTSC. Option1/2 RGB The signal mode of INPUT2 is set to component video. Watching the Picture Preset input signals Signal name Color system or horizontal/ vertical frequency Computer signals 1 VGAa)-1 (VGA 350) 31.5 kHz 70 Hz 2 640...
...sub 15 pin) on -screen display of International Business Machines Corporation, U.S.A. INPUT1 DVI The signal mode of "Adjust Screen" in the Adjust Picture menu. • When the phase is readjusted, the resolution will be reduced. • The signals from the Macintosh computer will not be... Select the appropriate setting. No Sync There is NTSC. Option1/2 RGB The signal mode of INPUT2 is set to component video. Watching the Picture Preset input signals Signal name Color system or horizontal/ vertical frequency Computer signals 1 VGAa)-1 (VGA 350) 31.5 kHz 70 Hz 2 640...
User Manual
Page 25
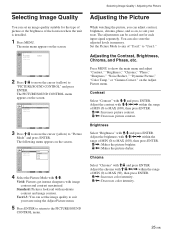
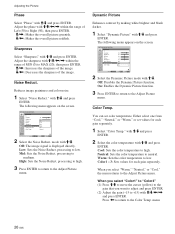
...for each input signal separately. on , to suit your taste using the Adjust Picture menu. 5 Press ENTER to return to the PICTURE/SOUND CONTROL menu. PICTURE/SOUND CONTROL Picture Mode: Adjust Picture Adjust Sound Vivid Standard User1 User2 User3 Select Set ENTER Exit MENU 4 Select the... also store the adjusted levels in memory. Selecting Image Quality / Adjusting the Picture Selecting Image Quality You can set the image quality to suit your taste. PICTURE/SOUND CONTROL Picture Mode: Adjust Picture Adjust Sound Standard Select Set ENTER Exit MENU 3 Press M/m to move the...
...for each input signal separately. on , to suit your taste using the Adjust Picture menu. 5 Press ENTER to return to the PICTURE/SOUND CONTROL menu. PICTURE/SOUND CONTROL Picture Mode: Adjust Picture Adjust Sound Vivid Standard User1 User2 User3 Select Set ENTER Exit MENU 4 Select the... also store the adjusted levels in memory. Selecting Image Quality / Adjusting the Picture Selecting Image Quality You can set the image quality to suit your taste. PICTURE/SOUND CONTROL Picture Mode: Adjust Picture Adjust Sound Standard Select Set ENTER Exit MENU 3 Press M/m to move the...
User Manual
Page 26
Adjust the phase with M/m and press ENTER. Adjusting the Picture Phase Select "Phase" with M/m/
Adjust the phase with M/m and press ENTER. Adjusting the Picture Phase Select "Phase" with M/m/
User Manual
Page 27
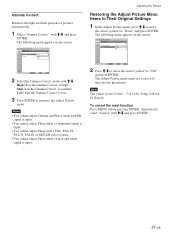
...Select Set ENTER Exit MENU 2 Select the Gamma Correct. to their factory presettings. The Adjust Picture menu items are restored to medium. Note The values set for Color1 - 3 of pictures automatically. 1 Select "Gamma Correct." Mid: Sets the Gamma Correct. Notes • You ... the screen. to the Adjust Picture menu. Adjusting the Picture Restoring the Adjust Picture Menu Items to Their Original Settings 1 In the Adjust Picture menu, press M/m to move the cursor (yellow) to "Reset" and press ENTER. PICTURE/SOUND CONTROL Adjust Picture Gamma Correct.: Reset Mid Cancel ...
...Select Set ENTER Exit MENU 2 Select the Gamma Correct. to their factory presettings. The Adjust Picture menu items are restored to medium. Note The values set for Color1 - 3 of pictures automatically. 1 Select "Gamma Correct." Mid: Sets the Gamma Correct. Notes • You ... the screen. to the Adjust Picture menu. Adjusting the Picture Restoring the Adjust Picture Menu Items to Their Original Settings 1 In the Adjust Picture menu, press M/m to move the cursor (yellow) to "Reset" and press ENTER. PICTURE/SOUND CONTROL Adjust Picture Gamma Correct.: Reset Mid Cancel ...

User Manual
Page 28
...area where captions are displayed in the horizontal direction of the screen and contain captions outside the picture (aspect ratio: 2.35:1) The picture is a control signal for setting the aspect ratio to 4:3. 1 Press MENU. SCREEN CONTROL...doing ? Sub title Hey! Normal Ordinary pictures with a 4:3 aspect ratio (screen aspect ratio: 4:3). Original Picture (Picture Type) Enlarged Picture Wide Zoom Ordinary pictures with a 4:3 aspect ratio (screen aspect ratio: 4:3). Zoom Hey! PICTURE/SOUND CONTROL Picture Mode: Adjust Picture Adjust Sound Standard Select Set ENTER Exit...
...area where captions are displayed in the horizontal direction of the screen and contain captions outside the picture (aspect ratio: 2.35:1) The picture is a control signal for setting the aspect ratio to 4:3. 1 Press MENU. SCREEN CONTROL...doing ? Sub title Hey! Normal Ordinary pictures with a 4:3 aspect ratio (screen aspect ratio: 4:3). Original Picture (Picture Type) Enlarged Picture Wide Zoom Ordinary pictures with a 4:3 aspect ratio (screen aspect ratio: 4:3). Zoom Hey! PICTURE/SOUND CONTROL Picture Mode: Adjust Picture Adjust Sound Standard Select Set ENTER Exit...


