Operating Instructions
Page 3
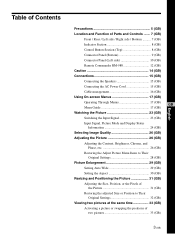
... Rear / Left side / Right side / Bottom .......... 7 (GB) Indicator Section 8 (GB) Control Button Section (Top 8 (GB) Connector Panel (Bottom 9 (GB) Connector Panel (Left side 10 (GB) Remote Commander RM-980 12 (GB) Caution 14 (GB) Connections 15 (GB) Connecting the Speakers 15 (GB) ...Connecting the AC Power Cord 15 (GB) Cable management 16 (GB) Using On-screen Menus 17 (GB) Operating Through Menus 17 (GB) GB Menu Guide 17 (GB) Watching the Picture...
... Rear / Left side / Right side / Bottom .......... 7 (GB) Indicator Section 8 (GB) Control Button Section (Top 8 (GB) Connector Panel (Bottom 9 (GB) Connector Panel (Left side 10 (GB) Remote Commander RM-980 12 (GB) Caution 14 (GB) Connections 15 (GB) Connecting the Speakers 15 (GB) ...Connecting the AC Power Cord 15 (GB) Cable management 16 (GB) Using On-screen Menus 17 (GB) Operating Through Menus 17 (GB) GB Menu Guide 17 (GB) Watching the Picture...
Operating Instructions
Page 4
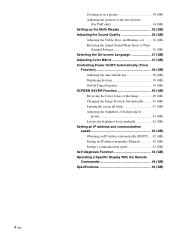
... (GB) Adjusting the position of the inset picture (For PinP only 34 (GB) Setting up the Multi Display 35 (GB) Adjusting the Sound Quality 36 (GB) Adjusting the Treble, Bass, and Balance, etc. ....... ... screen all white 41 (GB) Adjusting the brightness of background of picture 41 (GB) Lowers the brightness level gradually 42 (GB) Setting an IP address and communication speed 42 (GB) Obtaining an IP address automatically (DHCP) .... 42 (GB) Setting an IP address manually (Manual 42 (GB) Setting a communication speed 43 (GB) Self-diagnosis Function 43...
... (GB) Adjusting the position of the inset picture (For PinP only 34 (GB) Setting up the Multi Display 35 (GB) Adjusting the Sound Quality 36 (GB) Adjusting the Treble, Bass, and Balance, etc. ....... ... screen all white 41 (GB) Adjusting the brightness of background of picture 41 (GB) Lowers the brightness level gradually 42 (GB) Setting an IP address and communication speed 42 (GB) Obtaining an IP address automatically (DHCP) .... 42 (GB) Setting an IP address manually (Manual 42 (GB) Setting a communication speed 43 (GB) Self-diagnosis Function 43...
Operating Instructions
Page 5
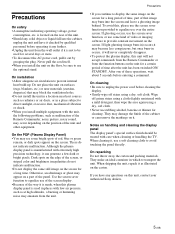
... or shock. • When you install multiple equipment with the unit, the following problems, such as malfunction of the Remote Commander, noisy picture, noisy sound, may appear on it checked by grasping the plug. After one of time after the unit has been switched ON/ STANDBY...• Gently wipe off grimy stains using a cloth slightly moistened with low air pressure, such as illustrated on this plasma display panel is made, when this unit, contact your authorized Sony dealers. 5 (GB) On cleaning • Be sure to equalize use rubbing alcohol, benzine or thinner for several ...
... or shock. • When you install multiple equipment with the unit, the following problems, such as malfunction of the Remote Commander, noisy picture, noisy sound, may appear on it checked by grasping the plug. After one of time after the unit has been switched ON/ STANDBY...• Gently wipe off grimy stains using a cloth slightly moistened with low air pressure, such as illustrated on this plasma display panel is made, when this unit, contact your authorized Sony dealers. 5 (GB) On cleaning • Be sure to equalize use rubbing alcohol, benzine or thinner for several ...
Operating Instructions
Page 9
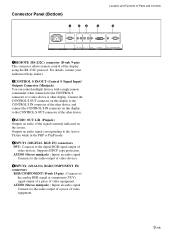
... video equipment. 9 (GB) Outputs an audio signal corresponding to the Active Picture while in the P&P or PinP mode. 4INPUT1 (DIGITAL RGB IN) connectors... a video device or other device. 3AUDIO OUT L/R (Pinjack) Outputs an audio of the other display. Connector Panel (Bottom) 1 23 4 Location and Function of Parts and Controls 5 AC IN REMOTE IN OUT R L ...connector (D-sub 9-pin) This connector allows remote control of video equipment. For details, contact your authorized Sony dealers. 2CONTROL S IN/OUT (Control S Signal Input/ Output) Connector (Minijack) You can control multiple...
... video equipment. 9 (GB) Outputs an audio signal corresponding to the Active Picture while in the P&P or PinP mode. 4INPUT1 (DIGITAL RGB IN) connectors... a video device or other device. 3AUDIO OUT L/R (Pinjack) Outputs an audio of the other display. Connector Panel (Bottom) 1 23 4 Location and Function of Parts and Controls 5 AC IN REMOTE IN OUT R L ...connector (D-sub 9-pin) This connector allows remote control of video equipment. For details, contact your authorized Sony dealers. 2CONTROL S IN/OUT (Control S Signal Input/ Output) Connector (Minijack) You can control multiple...
Operating Instructions
Page 12
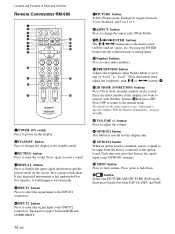
Press again to restore sound. 4DISPLAY button Press to display the input signal information and the picture mode on the display. 2STANDBY button Press to change the aspect ratio (Wide Mode). 9M/m/ If this displayed information is left undisturbed for five minutes, ... SET qd ql MONITOR RM-980 1POWER ON switch Press to power on the screen. Each press toggles between RGB and COMPONENT. 7PICTURE button Selects Picture mode. Press again to the INPUT2 connectors.
Press again to restore sound. 4DISPLAY button Press to display the input signal information and the picture mode on the display. 2STANDBY button Press to change the aspect ratio (Wide Mode). 9M/m/ If this displayed information is left undisturbed for five minutes, ... SET qd ql MONITOR RM-980 1POWER ON switch Press to power on the screen. Each press toggles between RGB and COMPONENT. 7PICTURE button Selects Picture mode. Press again to the INPUT2 connectors.
Operating Instructions
Page 13
qk CHROMA button Adjusts the chroma when the picture mode is set to any of "User1" to "User3." Press this button and adjust the chroma with the M/m or
qk CHROMA button Adjusts the chroma when the picture mode is set to any of "User1" to "User3." Press this button and adjust the chroma with the M/m or
Operating Instructions
Page 15
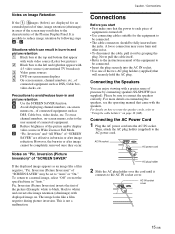
...screen menu displays 5 On-screen menus, channel numbers, etc., of connected equipment. However, the burn-in or after image reduction. Inversion (Picture Inversion) inverts the tint of equipment is turned off. • Use connecting cables suitable for an extended period of time, image retention (...of "SCREEN SAVER" may cause hum and other noise. • To disconnect the cable, pull it connects to the characteristics of the Plasma Display Panel. Inversion" and "All White" of "SCREEN SAVER" are displayed for the equipment to white) and corrects the image retention (afterimage) with...
...screen menu displays 5 On-screen menus, channel numbers, etc., of connected equipment. However, the burn-in or after image reduction. Inversion (Picture Inversion) inverts the tint of equipment is turned off. • Use connecting cables suitable for an extended period of time, image retention (...of "SCREEN SAVER" may cause hum and other noise. • To disconnect the cable, pull it connects to the characteristics of the Plasma Display Panel. Inversion" and "All White" of "SCREEN SAVER" are displayed for the equipment to white) and corrects the image retention (afterimage) with...
Operating Instructions
Page 17
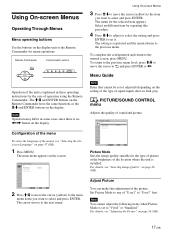
The M/m and ENTER buttons on the Remote Commander have the same functions as the M/m and ENTER buttons on the display unit or the Remote Commander for the case of the unit is no Note Operation may differ in some cases since there is explained in these operating instructions for menu operations. Remote Commander MENU Control button section ENTER Operation of operation using the Remote Commander. Using On-screen Menus Operating Through Menus Menu operating buttons Use the buttons on the display.
The M/m and ENTER buttons on the Remote Commander have the same functions as the M/m and ENTER buttons on the display unit or the Remote Commander for the case of the unit is no Note Operation may differ in some cases since there is explained in these operating instructions for menu operations. Remote Commander MENU Control button section ENTER Operation of operation using the Remote Commander. Using On-screen Menus Operating Through Menus Menu operating buttons Use the buttons on the display.
Operating Instructions
Page 18
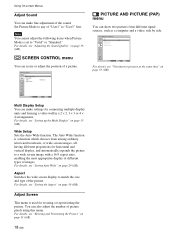
...to a wide screen image with a 16:9 aspect ratio, enabling the most appropriate display of different types of the sound. PICTURE AND PICTURE(PAP) PAP: Off Active Picture Picture Size Picture Position Select Set ENTER Exit MENU For details, see "Setting up the Multi Display" on page 33 (GB). Select ...Set ENTER Exit MENU Multi Display Setup You can make fine adjustment of images. For details, see "Viewing two pictures at the same time" on page 35 (GB). Adjust Screen This menu is a function which chooses from different signal sources, such as ...
...to a wide screen image with a 16:9 aspect ratio, enabling the most appropriate display of different types of the sound. PICTURE AND PICTURE(PAP) PAP: Off Active Picture Picture Size Picture Position Select Set ENTER Exit MENU For details, see "Setting up the Multi Display" on page 33 (GB). Select ...Set ENTER Exit MENU Multi Display Setup You can make fine adjustment of images. For details, see "Viewing two pictures at the same time" on page 35 (GB). Adjust Screen This menu is a function which chooses from different signal sources, such as ...
Operating Instructions
Page 19
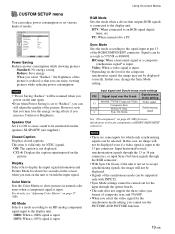
... • This unit does not support the three value sync format of composite sync and 576/60P. • When you cannot use the PICTURE AND PICTURE function. 19 (GB) Notes • "Power Saving: Reduce" will not be selected. This item is valid only for the synchronous mode setting... signal or a composite synchronous signal* is input Video: When a video signal is input *Depending on the screen when you can enjoy viewing pictures while reducing power consumption. However, note that you increase Contrast or Brightness. Speaker Out Set it to ON to cause sound to be displayed correctly...
... • This unit does not support the three value sync format of composite sync and 576/60P. • When you cannot use the PICTURE AND PICTURE function. 19 (GB) Notes • "Power Saving: Reduce" will not be selected. This item is valid only for the synchronous mode setting... signal or a composite synchronous signal* is input Video: When a video signal is input *Depending on the screen when you can enjoy viewing pictures while reducing power consumption. However, note that you increase Contrast or Brightness. Speaker Out Set it to ON to cause sound to be displayed correctly...

Operating Instructions
Page 22
...: On Select Set ENTER Exit MENU Pic. All White Turns the entire screen white to prevent image retention. Orbit Changes the position of a picture after a predetermined amount of a picture (aspect ratio 4:3). Using On-screen Menus SCREEN SAVER menu Corrects or reduces damage from the same image being displayed on page 40 (GB...
...: On Select Set ENTER Exit MENU Pic. All White Turns the entire screen white to prevent image retention. Orbit Changes the position of a picture after a predetermined amount of a picture (aspect ratio 4:3). Using On-screen Menus SCREEN SAVER menu Corrects or reduces damage from the same image being displayed on page 40 (GB...
Operating Instructions
Page 23
...connectors of the menus, see "Selecting the On-screen Language" on the display unit. If the display receives a signal without TBC, the picture may disappear due to the connectors of the option 1 slot. Input2 Component: Selects the signal (component) input to switch the input signal.... • To select the language of the option 1 slot. Option1 Component: Selects the signal (component signal) input from multiple systems, the Picture Quality setting will default to the most recently set "Display" in the Custom Setup menu to "Input2 RGB" or "Input2 Component" alternately. For...
...connectors of the menus, see "Selecting the On-screen Language" on the display unit. If the display receives a signal without TBC, the picture may disappear due to the connectors of the option 1 slot. Input2 Component: Selects the signal (component) input to switch the input signal.... • To select the language of the option 1 slot. Option1 Component: Selects the signal (component signal) input from multiple systems, the Picture Quality setting will default to the most recently set "Display" in the Custom Setup menu to "Input2 RGB" or "Input2 Component" alternately. For...
Operating Instructions
Page 24
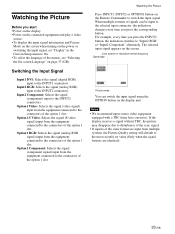
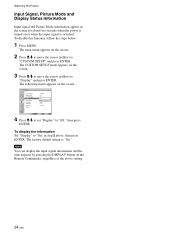
... pressing the DISPLAY button on the screen. 2 Press M/m to move the cursor (yellow) to "Display" and press ENTER. Watching the Picture Input Signal, Picture Mode and Display Status Information Input signal and Picture Mode information appear on the screen for about five seconds when the power is turned on the screen. 3 Press M/m to...
... pressing the DISPLAY button on the screen. 2 Press M/m to move the cursor (yellow) to "Display" and press ENTER. Watching the Picture Input Signal, Picture Mode and Display Status Information Input signal and Picture Mode information appear on the screen for about five seconds when the power is turned on the screen. 3 Press M/m to...

Operating Instructions
Page 25
... or the BKM-FW12. • If colors appear too light after inputting a DVD signal to the display unit, adjust the "Chroma" setting in the Adjust Picture menu. • When the phase is out of the capture range. The selected input signal is computer RGB. The signal mode of Option 1 slot is.../50i 1080/50I 12 576/50p 576/50P 13 480/60p 480/60P 14 1080/60i 1080/60I 15 720/60p 720/60P Watching the Picture a) VGA is a registered trademark of the Video Electronics Standards Association.
... or the BKM-FW12. • If colors appear too light after inputting a DVD signal to the display unit, adjust the "Chroma" setting in the Adjust Picture menu. • When the phase is out of the capture range. The selected input signal is computer RGB. The signal mode of Option 1 slot is.../50i 1080/50I 12 576/50p 576/50P 13 480/60p 480/60P 14 1080/60i 1080/60I 15 720/60p 720/60P Watching the Picture a) VGA is a registered trademark of the Video Electronics Standards Association.
Operating Instructions
Page 26
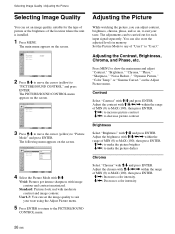
... Set ENTER Exit MENU 2 Press M/m to move the cursor (yellow) to suit your taste using the Adjust Picture menu. 5 Press ENTER to return to "PICTURE/SOUND CONTROL" and press ENTER. User1-3: You can set an image quality suitable for each input signal separately. ...Contrast Select "Contrast" with image contour and contrast maximized. PICTURE/SOUND CONTROL Picture Mode: Adjust Picture Adjust Sound Vivid Standard User1 User2 User3 Select Set ENTER Exit MENU 4 Select the Picture Mode with M/m/ Press MENU to any of the location where the unit is...
... Set ENTER Exit MENU 2 Press M/m to move the cursor (yellow) to suit your taste using the Adjust Picture menu. 5 Press ENTER to return to "PICTURE/SOUND CONTROL" and press ENTER. User1-3: You can set an image quality suitable for each input signal separately. ...Contrast Select "Contrast" with image contour and contrast maximized. PICTURE/SOUND CONTROL Picture Mode: Adjust Picture Adjust Sound Vivid Standard User1 User2 User3 Select Set ENTER Exit MENU 4 Select the Picture Mode with M/m/ Press MENU to any of the location where the unit is...
Operating Instructions
Page 27
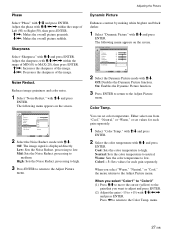
Adjust the phase with M/m and press ENTER. Phase Select "Phase" with M/m/
Adjust the phase with M/m and press ENTER. Phase Select "Phase" with M/m/

Operating Instructions
Page 28
..." and press ENTER. High: Sets the Gamma Correct. To cancel the reset function Press MENU before pressing ENTER. Adjusting the Picture Gamma Correct. PICTURE/SOUND CONTROL Adjust Picture Gamma Correct.: Reset Mid Cancel OK Select Set ENTER Exit MENU 2 Press M/m to move the cursor (yellow) to "OK..." and press ENTER. Note The values set for Color1 - 3 of pictures automatically. 1 Select "Gamma Correct." mode with a PAL, PAL-M, PAL-N, PAL60, or SECAM color system. • You cannot adjust Phase when a...
..." and press ENTER. High: Sets the Gamma Correct. To cancel the reset function Press MENU before pressing ENTER. Adjusting the Picture Gamma Correct. PICTURE/SOUND CONTROL Adjust Picture Gamma Correct.: Reset Mid Cancel OK Select Set ENTER Exit MENU 2 Press M/m to move the cursor (yellow) to "OK..." and press ENTER. Note The values set for Color1 - 3 of pictures automatically. 1 Select "Gamma Correct." mode with a PAL, PAL-M, PAL-N, PAL60, or SECAM color system. • You cannot adjust Phase when a...
Operating Instructions
Page 29
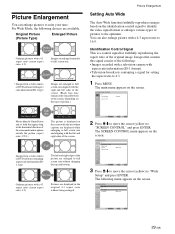
...being enlarged. Full Images from a video camera or DVD software with aspect ratio information (ID-1 type) Images are available. PICTURE/SOUND CONTROL Picture Mode: Adjust Picture Adjust Sound Standard Select Set ENTER Exit MENU 2 Press M/m to move the cursor (yellow) to "SCREEN CONTROL" and ...? • Images from a video camera or DVD software containing aspect ratio information (ID1 type) The left and right edges of the picture are displayed while enlarging to full screen size aligned with a 4:3 aspect ratio to 4:3. 1 Press MENU. Images that appear long in the...
...being enlarged. Full Images from a video camera or DVD software with aspect ratio information (ID-1 type) Images are available. PICTURE/SOUND CONTROL Picture Mode: Adjust Picture Adjust Sound Standard Select Set ENTER Exit MENU 2 Press M/m to move the cursor (yellow) to "SCREEN CONTROL" and ...? • Images from a video camera or DVD software containing aspect ratio information (ID1 type) The left and right edges of the picture are displayed while enlarging to full screen size aligned with a 4:3 aspect ratio to 4:3. 1 Press MENU. Images that appear long in the...
Operating Instructions
Page 30
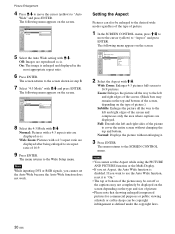
... Aspect, the Auto Wide function is . The following menu appears on the screen. Notes • You cannot set the Aspect while using the PICTURE AND PICTURE function or the Multi Display. • If you want to use the Auto Wide function, reset it . 3 Press ENTER. The following menu... also be copyright infringement as defined under the copyright laws. 30 (GB) Off: Images are displayed as -is disabled. Wide Zoom: Enlarges 4:3 pictures full-screen to the Wide Setup menu. The screen returns to the screen shown in the most appropriate aspect ratio. 6 Press ENTER. Setting the...
... Aspect, the Auto Wide function is . The following menu appears on the screen. Notes • You cannot set the Aspect while using the PICTURE AND PICTURE function or the Multi Display. • If you want to use the Auto Wide function, reset it . 3 Press ENTER. The following menu... also be copyright infringement as defined under the copyright laws. 30 (GB) Off: Images are displayed as -is disabled. Wide Zoom: Enlarges 4:3 pictures full-screen to the Wide Setup menu. The screen returns to the screen shown in the most appropriate aspect ratio. 6 Press ENTER. Setting the...
Operating Instructions
Page 31
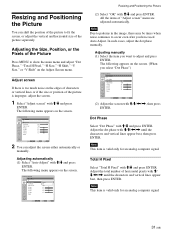
...," "H Size," "H Shift," "V Size," or "V Shift" on the edges of characters or vertical lines or if the size or position of the picture is too much noise on the Adjust Screen menu. Adjust screen If there is improper, adjust the screen. 1 Select "Adjust screen" with M/m/ The following...H Size: H Shift: V Size: V Shift: Reset 28 1344 30 30 30 30 Select Set ENTER Exit MENU 2 You can shift the position of the picture to adjust and press ENTER. Adjusting automatically (1) Select "Auto Adjust" with M/m and press ENTER. SCREEN CONTROL Adjust Screen Auto Adjust Dot Phase: Total H Pixel...
...," "H Size," "H Shift," "V Size," or "V Shift" on the edges of characters or vertical lines or if the size or position of the picture is too much noise on the Adjust Screen menu. Adjust screen If there is improper, adjust the screen. 1 Select "Adjust screen" with M/m/ The following...H Size: H Shift: V Size: V Shift: Reset 28 1344 30 30 30 30 Select Set ENTER Exit MENU 2 You can shift the position of the picture to adjust and press ENTER. Adjusting automatically (1) Select "Auto Adjust" with M/m and press ENTER. SCREEN CONTROL Adjust Screen Auto Adjust Dot Phase: Total H Pixel...


