
Operating Instructions (Flat Panel Display)
Page 2
... do not open the cabinet. CAUTION RISK OF EXPLOSION IF BATTERY IS REPLACED BY AN INCORRECT TYPE. Refer to provide reasonable protection against harmful interference in accordance with the limits for help. This equipment generates, uses, and can cause injury. WARNING Owner's Record The model and serial numbers are designed to these numbers whenever you call ; Refer servicing to radio...
... do not open the cabinet. CAUTION RISK OF EXPLOSION IF BATTERY IS REPLACED BY AN INCORRECT TYPE. Refer to provide reasonable protection against harmful interference in accordance with the limits for help. This equipment generates, uses, and can cause injury. WARNING Owner's Record The model and serial numbers are designed to these numbers whenever you call ; Refer servicing to radio...
Operating Instructions (Flat Panel Display)
Page 3
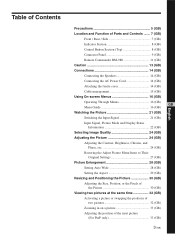
...) Connections 14 (GB) Connecting the Speakers 14 (GB) Connecting the AC Power Cord 14 (GB) Attaching the ferrite cores 14 (GB) Cable management 15 (GB) Using On-screen Menus 16 (GB) Operating Through Menus 16 (GB) GB Menu Guide 16 (GB) Watching the Picture 21 (GB) Switching the Input Signal 21 (GB) Input Signal, Picture Mode and Display Status Information 22 (GB) Selecting Image Quality 24 (GB) Adjusting the Picture 24 (GB) Adjusting the Contrast, Brightness...
...) Connections 14 (GB) Connecting the Speakers 14 (GB) Connecting the AC Power Cord 14 (GB) Attaching the ferrite cores 14 (GB) Cable management 15 (GB) Using On-screen Menus 16 (GB) Operating Through Menus 16 (GB) GB Menu Guide 16 (GB) Watching the Picture 21 (GB) Switching the Input Signal 21 (GB) Input Signal, Picture Mode and Display Status Information 22 (GB) Selecting Image Quality 24 (GB) Adjusting the Picture 24 (GB) Adjusting the Contrast, Brightness...
Operating Instructions (Flat Panel Display)
Page 5
...8226; When you display a still image for cleaning. Although the LCD panel is not to transport the unit. Avoid touching the LCD screen. If you have it checked by qualified personnel before cleaning the display. • The LCD panel surface has been ...position of the Remote Commander, noisy picture, noisy sound, may remove the coating or spoil the unit. When shipping the unit, repack it can remove the markings on it out by a window. • Do not push, scratch or put a heavy weight on the carton. When cleaning it, use a soft cleaning cloth to unplug the power cord...
...8226; When you display a still image for cleaning. Although the LCD panel is not to transport the unit. Avoid touching the LCD screen. If you have it checked by qualified personnel before cleaning the display. • The LCD panel surface has been ...position of the Remote Commander, noisy picture, noisy sound, may remove the coating or spoil the unit. When shipping the unit, repack it can remove the markings on it out by a window. • Do not push, scratch or put a heavy weight on the carton. When cleaning it, use a soft cleaning cloth to unplug the power cord...
Operating Instructions (Flat Panel Display)
Page 8
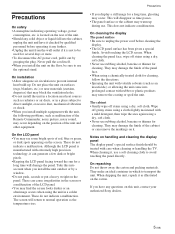
... is switched, the indicator blinks green. Press again to hide them. 3 4 m/M (cursor/volume) button Press to move the cursor (yellow), set a value, or control speaker volume. 5 ENTER button Press to set your choice. 6 1POWER switch Press to power on page 39 (GB). 1 INPUT button Press to select a signal to the standby mode. Lights up in the standby mode. Lights up in red in orange when the display enters the power saving mode while a signal is powered on...
... is switched, the indicator blinks green. Press again to hide them. 3 4 m/M (cursor/volume) button Press to move the cursor (yellow), set a value, or control speaker volume. 5 ENTER button Press to set your choice. 6 1POWER switch Press to power on page 39 (GB). 1 INPUT button Press to select a signal to the standby mode. Lights up in the standby mode. Lights up in red in orange when the display enters the power saving mode while a signal is powered on...
Operating Instructions (Flat Panel Display)
Page 11
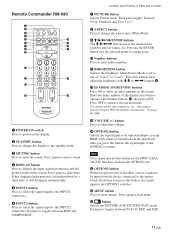
... change the aspect ratio (Wide Mode). 9 M/m/ Press again to restore sound. 4 DISPLAY button Press to the INPUT2 connectors. Press again to mute the sound. Remote Commander RM-980 1 2 MUTING DISPLAY STBY ON 3 4 5 qf 6 qg 7 qh 8 qj 9 ENTER 123 0 456 789 qa 0 qk qs ON SET qd ql MONITOR RM-980 1 POWER ON switch Press to power on the screen. Each press toggles between Vivid, Standard, and User...
... change the aspect ratio (Wide Mode). 9 M/m/ Press again to restore sound. 4 DISPLAY button Press to the INPUT2 connectors. Press again to mute the sound. Remote Commander RM-980 1 2 MUTING DISPLAY STBY ON 3 4 5 qf 6 qg 7 qh 8 qj 9 ENTER 123 0 456 789 qa 0 qk qs ON SET qd ql MONITOR RM-980 1 POWER ON switch Press to power on the screen. Each press toggles between Vivid, Standard, and User...

Operating Instructions (Flat Panel Display)
Page 12
Location and Function of Parts and Controls qk CHROMA button Adjusts the chroma when the picture mode is set to any of "User1" to "User3." Press this button and adjust the chroma with the M/m or
Location and Function of Parts and Controls qk CHROMA button Adjusts the chroma when the picture mode is set to any of "User1" to "User3." Press this button and adjust the chroma with the M/m or

Operating Instructions (Flat Panel Display)
Page 14
... of the cable as shown in compliance with the EMC limits unless you connect a cable to the AC power cord. AC plug holder 2 Slide the AC plug holder over the cord until it connects to the AC IN socket cover. AC IN socket AC power cord To remove the AC power cord After squeezing the AC plug holder and freeing it out by connecting speakers SS-SP42FW/32FW (not supplied).
... of the cable as shown in compliance with the EMC limits unless you connect a cable to the AC power cord. AC plug holder 2 Slide the AC plug holder over the cord until it connects to the AC IN socket cover. AC IN socket AC power cord To remove the AC power cord After squeezing the AC plug holder and freeing it out by connecting speakers SS-SP42FW/32FW (not supplied).
Operating Instructions (Flat Panel Display)
Page 15
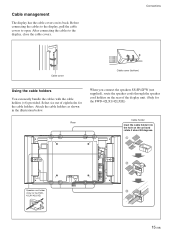
... FWD-42LX1/42LX1E) Cable holder Inset the cable holder into the hole on the unit and rotate it about 90 degrees. 1 2 Speaker cord holder 3 (Only for the cable holders. Before connecting the cables to the display, pull the cable covers to the display, close the cable covers. Connections Cable cover Cable cover (bottom) Using the cable holders You can neatly bundle the cables with the cable holders (×6) provided. After connecting the cables to open. Attach the cable...
... FWD-42LX1/42LX1E) Cable holder Inset the cable holder into the hole on the unit and rotate it about 90 degrees. 1 2 Speaker cord holder 3 (Only for the cable holders. Before connecting the cables to the display, pull the cable covers to the display, close the cable covers. Connections Cable cover Cable cover (bottom) Using the cable holders You can neatly bundle the cables with the cable holders (×6) provided. After connecting the cables to open. Attach the cable...

Operating Instructions (Flat Panel Display)
Page 16
Note Operation may differ in some cases since there is explained in these operating instructions for menu operations. Remote Commander MENU Control button section ENTER Operation of operation using the Remote Commander. The M/m and ENTER buttons on the Remote Commander have the same functions as the M/m and ENTER buttons on the display unit or the Remote Commander for the case of the unit is no Using On-screen Menus Using On-screen Menus Operating Through Menus Menu operating buttons Use the buttons on the display.
Note Operation may differ in some cases since there is explained in these operating instructions for menu operations. Remote Commander MENU Control button section ENTER Operation of operation using the Remote Commander. The M/m and ENTER buttons on the Remote Commander have the same functions as the M/m and ENTER buttons on the display unit or the Remote Commander for the case of the unit is no Using On-screen Menus Using On-screen Menus Operating Through Menus Menu operating buttons Use the buttons on the display.

Operating Instructions (Flat Panel Display)
Page 17
... Using On-screen Menus PICTURE AND PICTURE (PAP) menu You can make settings for connecting multiple display units and forming a video wall in a 2 × 2, 3 × 3 or 4 × 4 arrangement. PICTURE AND PICTURE(PAP) PAP: Off Active Picture Picture Size Picture Position Select Set ENTER Exit MENU For details, see "Adjusting the Sound Quality" on page 32 (GB). Adjust Sound You can show two pictures from among ordinary television broadcasts, or wide screen images, all having different proportions for horizontal and vertical display...
... Using On-screen Menus PICTURE AND PICTURE (PAP) menu You can make settings for connecting multiple display units and forming a video wall in a 2 × 2, 3 × 3 or 4 × 4 arrangement. PICTURE AND PICTURE(PAP) PAP: Off Active Picture Picture Size Picture Position Select Set ENTER Exit MENU For details, see "Adjusting the Sound Quality" on page 32 (GB). Adjust Sound You can show two pictures from among ordinary television broadcasts, or wide screen images, all having different proportions for horizontal and vertical display...
Operating Instructions (Flat Panel Display)
Page 18
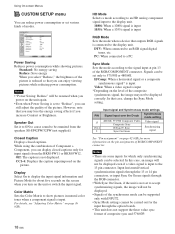
... input signal. Using On-screen Menus CUSTOM SETUP menu You can be selected. Input horizontal/vertical synchronization signals through the 13 or 14 pin connectors, or input Sync On Green signals through the option boards. • This unit does not support the three value sync format of the synchronous mode can be displayed correctly. Notes • "Power Saving: Reduce" will be resumed when you turn on page 42 (GB) for the input through the RGB connector...
... input signal. Using On-screen Menus CUSTOM SETUP menu You can be selected. Input horizontal/vertical synchronization signals through the 13 or 14 pin connectors, or input Sync On Green signals through the option boards. • This unit does not support the three value sync format of the synchronous mode can be displayed correctly. Notes • "Power Saving: Reduce" will be resumed when you turn on page 42 (GB) for the input through the RGB connector...
Operating Instructions (Flat Panel Display)
Page 19
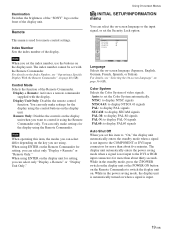
... SETUP/INFORMATION Language: Color System: Auto Shut Off: Security Lock: Information English Auto Off Off Select Set ENTER Exit MENU Language Selects the on page 36 (GB). Auto: to the COMPONENT or DVI input connectors for the display using ENTER on the Remote Commander for remote control settings. While in the power saving mode, the display unit is automatically turned on when a signal is not input to set with the display. Index Number Sets the index number of the Remote Commander. When using the control buttons...
... SETUP/INFORMATION Language: Color System: Auto Shut Off: Security Lock: Information English Auto Off Off Select Set ENTER Exit MENU Language Selects the on page 36 (GB). Auto: to the COMPONENT or DVI input connectors for the display using ENTER on the Remote Commander for remote control settings. While in the power saving mode, the display unit is automatically turned on when a signal is not input to set with the display. Index Number Sets the index number of the Remote Commander. When using the control buttons...
Operating Instructions (Flat Panel Display)
Page 21
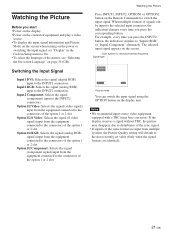
... Picture Quality setting will default to the most recently set "Display" in the Custom Setup menu to the connectors of the menus, see "Selecting the On-screen Language" on page 36 (GB). The selected input signal appears on the screen. Switching the Input Signal Input1 DVI: Selects the signal (digital RGB) input to the INPUT2 connectors. Notes • We recommend input source video equipment equipped with a TBC (time base corrector). Option1/2 S Video: Selects the signal (S video signal) input from the equipment connected...
... Picture Quality setting will default to the most recently set "Display" in the Custom Setup menu to the connectors of the menus, see "Selecting the On-screen Language" on page 36 (GB). The selected input signal appears on the screen. Switching the Input Signal Input1 DVI: Selects the signal (digital RGB) input to the INPUT2 connectors. Notes • We recommend input source video equipment equipped with a TBC (time base corrector). Option1/2 S Video: Selects the signal (S video signal) input from the equipment connected...

Operating Instructions (Flat Panel Display)
Page 22
CUSTOM SETUP Power Saving: Speaker Out: Closed Caption: Display: Color Matrix: HD Mode: RGB Mode: Sync Mode: Illumination: Remote Standard Off Off Off YO/nPB/PR 1080i DTV H/Comp High Select Set ENTER Exit MENU 2 Press M/m to set "Display" to "On" in step 2 above setting. 22 (GB) Watching the Picture Input Signal, Picture Mode and Display Status Information Input signal and Picture Mode information appear on the screen for about five seconds when the power is turned on the screen. To display the...
CUSTOM SETUP Power Saving: Speaker Out: Closed Caption: Display: Color Matrix: HD Mode: RGB Mode: Sync Mode: Illumination: Remote Standard Off Off Off YO/nPB/PR 1080i DTV H/Comp High Select Set ENTER Exit MENU 2 Press M/m to set "Display" to "On" in step 2 above setting. 22 (GB) Watching the Picture Input Signal, Picture Mode and Display Status Information Input signal and Picture Mode information appear on the screen for about five seconds when the power is turned on the screen. To display the...

Operating Instructions (Flat Panel Display)
Page 23
c) Mac (Macintosh) is a registered trademark of the capture range. Actual on the INPUT2 connector or the BKM-FW12. • If colors appear too light after inputting a DVD signal to the display unit, adjust the "Chroma" setting in the Adjust Picture menu. • When the phase is readjusted, the resolution will be reduced. The selected input signal is no input signal. The input signal is out of Apple Computer, Inc. The signal mode of...
c) Mac (Macintosh) is a registered trademark of the capture range. Actual on the INPUT2 connector or the BKM-FW12. • If colors appear too light after inputting a DVD signal to the display unit, adjust the "Chroma" setting in the Adjust Picture menu. • When the phase is readjusted, the resolution will be reduced. The selected input signal is no input signal. The input signal is out of Apple Computer, Inc. The signal mode of...

Operating Instructions (Flat Panel Display)
Page 34
... the picture using the Multi Display only when "Aspect" is set to"Full." 3 Select "Multi Display Setup" with M/m and press ENTER. The Multi Display Setup menu appears on the screen. SCREEN CONTROL Multi Display Setup Wide Setup Wide Mode: Full Adjust Screen Select Set ENTER Exit MENU Note You can make settings for connecting multiple display units to setup with M/m/ The SCREEN CONTROL menu appears on the screen. The following menu appears on the screen. SCREEN CONTROL Multi Display Setup Multi Display: 3x3 Position Select Set ENTER Exit MENU 7 Select...
... the picture using the Multi Display only when "Aspect" is set to"Full." 3 Select "Multi Display Setup" with M/m and press ENTER. The Multi Display Setup menu appears on the screen. SCREEN CONTROL Multi Display Setup Wide Setup Wide Mode: Full Adjust Screen Select Set ENTER Exit MENU Note You can make settings for connecting multiple display units to setup with M/m/ The SCREEN CONTROL menu appears on the screen. The following menu appears on the screen. SCREEN CONTROL Multi Display Setup Multi Display: 3x3 Position Select Set ENTER Exit MENU 7 Select...

Operating Instructions (Flat Panel Display)
Page 36
.... CUSTOM SETUP Power Saving: Speaker Out: Closed Caption: Display: Color Matrix: HD Mode: RGB Mode: Sync Mode: Illumination: Remote Standard Off Off Off Y/PCB/PCR 1Y0/P8B0i/PR DTV H/Comp High Select Set ENTER Exit MENU 4 Select the color matrix with a signal format (480I(525I), 480P(525P), 1080I(1125I), or 720P(750P)) is input to the component input adapter. 1 Press MENU. PICTURE/SOUND CONTROL Picture Mode: Adjust Picture Adjust Sound Standard Adjusting Color Matrix You can select the on -screen language is switched to...
.... CUSTOM SETUP Power Saving: Speaker Out: Closed Caption: Display: Color Matrix: HD Mode: RGB Mode: Sync Mode: Illumination: Remote Standard Off Off Off Y/PCB/PCR 1Y0/P8B0i/PR DTV H/Comp High Select Set ENTER Exit MENU 4 Select the color matrix with a signal format (480I(525I), 480P(525P), 1080I(1125I), or 720P(750P)) is input to the component input adapter. 1 Press MENU. PICTURE/SOUND CONTROL Picture Mode: Adjust Picture Adjust Sound Standard Adjusting Color Matrix You can select the on -screen language is switched to...
Operating Instructions (Flat Panel Display)
Page 37
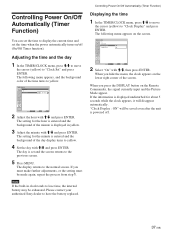
... your authorized Sony dealer to the normal screen. When you hide the menu, the clock appears on the Remote Commander, the signal currently input and the Picture Mode appear. The day is powered off (On/Off Timer function). TIMER/CLOCK Clock Set Clock Set: 00 : 00 Mon Select Set ENTER Exit MENU 2 Adjust the hour with M/m, then press ENTER. If you press the DISPLAY button on...
... your authorized Sony dealer to the normal screen. When you hide the menu, the clock appears on the Remote Commander, the signal currently input and the Picture Mode appear. The day is powered off (On/Off Timer function). TIMER/CLOCK Clock Set Clock Set: 00 : 00 Mon Select Set ENTER Exit MENU 2 Adjust the hour with M/m, then press ENTER. If you press the DISPLAY button on...

Operating Instructions (Flat Panel Display)
Page 40
... you change the number, use the buttons on the Remote Commander. PICTURE/SOUND CONTROL Picture Mode: Adjust Picture Adjust Sound Standard Index Number 117 . . . 2 Input the index number of the display you want to operate using the Remote Commander. 1 Press MENU. The input number appears right next to the normal screen. The characters on the screen. ON SET OFF You can operate the specified display indicated with M/m and press ENTER. CUSTOM SETUP Power Saving: Speaker Out: Closed Caption: Display: Color Matrix: HD Mode: RGB Mode: Sync Mode: Illumination: Remote...
... you change the number, use the buttons on the Remote Commander. PICTURE/SOUND CONTROL Picture Mode: Adjust Picture Adjust Sound Standard Index Number 117 . . . 2 Input the index number of the display you want to operate using the Remote Commander. 1 Press MENU. The input number appears right next to the normal screen. The characters on the screen. ON SET OFF You can operate the specified display indicated with M/m and press ENTER. CUSTOM SETUP Power Saving: Speaker Out: Closed Caption: Display: Color Matrix: HD Mode: RGB Mode: Sync Mode: Illumination: Remote...

Operating Instructions (Flat Panel Display)
Page 41
... MHz Panel system a-Si TFT Active Matrix LCD Panel Display resolution 1366 dots (horizontal) × 768 lines (vertical) FWD-42LX1/42LX1E: Pixel pitch 0.681 (horizontal) × 0.681 (vertical) mm (1⁄32 × 1⁄32 inches) Picture size 930 (horizontal) × 523 (vertical) mm (36 5⁄8 × 20 5⁄8 inches) Panel size 42-inch (diagonal 1068 mm) FWD-32LX1/32LX1E: Pixel pitch 0.510 (horizontal) × 0.510 (vertical) mm (1⁄32 × 1⁄32 inches) Picture size 698 (horizontal) × 392 (vertical) mm...
... MHz Panel system a-Si TFT Active Matrix LCD Panel Display resolution 1366 dots (horizontal) × 768 lines (vertical) FWD-42LX1/42LX1E: Pixel pitch 0.681 (horizontal) × 0.681 (vertical) mm (1⁄32 × 1⁄32 inches) Picture size 930 (horizontal) × 523 (vertical) mm (36 5⁄8 × 20 5⁄8 inches) Panel size 42-inch (diagonal 1068 mm) FWD-32LX1/32LX1E: Pixel pitch 0.510 (horizontal) × 0.510 (vertical) mm (1⁄32 × 1⁄32 inches) Picture size 698 (horizontal) × 392 (vertical) mm...


