
Operating Instructions
Page 43
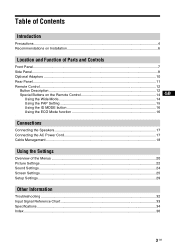
Table of Contents Introduction Precautions ...4 Recommendations on Installation 6 Location and Function of Parts and Controls Front Panel...7 Side Panel...8 Optional Adaptors ...10 Rear Panel ...11 Remote Control ...12 Button Description...12 Special Buttons on the Remote Control 14 GB Using the Wide Mode...14 Using the PAP Setting 15 Using the ID MODE button 16 Using the ECO Mode...
Table of Contents Introduction Precautions ...4 Recommendations on Installation 6 Location and Function of Parts and Controls Front Panel...7 Side Panel...8 Optional Adaptors ...10 Rear Panel ...11 Remote Control ...12 Button Description...12 Special Buttons on the Remote Control 14 GB Using the Wide Mode...14 Using the PAP Setting 15 Using the ID MODE button 16 Using the ECO Mode...
Operating Instructions
Page 44
...Sony dealers. 4 GB Avoid touching the LCD screen. When cleaning the panel face, wipe off stains using a dry, soft cloth. • Never use a soft cleaning cloth to direct sunlight, excessive dust, mechanical vibration or shock. • When you install the unit outdoor or by qualified personnel before cleaning the display. • The LCD panel... of the remote control, noisy picture, noisy sound, may warm up . Never pull the cord itself. • When you display the same still image for cleaning. Although the LCD panel is not to use the optional display stand. Wipe...
...Sony dealers. 4 GB Avoid touching the LCD screen. When cleaning the panel face, wipe off stains using a dry, soft cloth. • Never use a soft cleaning cloth to direct sunlight, excessive dust, mechanical vibration or shock. • When you install the unit outdoor or by qualified personnel before cleaning the display. • The LCD panel... of the remote control, noisy picture, noisy sound, may warm up . Never pull the cord itself. • When you display the same still image for cleaning. Although the LCD panel is not to use the optional display stand. Wipe...
Operating Instructions
Page 47
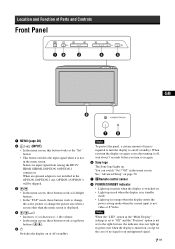
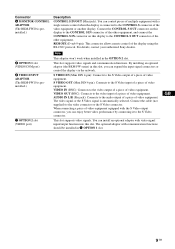
...turned on, except for the case of Parts and Controls Front Panel GB 1 MENU (page 20) 2 / (INPUT) • In the menu screen, this button works as up/down buttons ( / ). 51 Switches the display on or off (standby). When you turn the display on again, soon after turning it off, wait ... signal when it on again. 6 Sony logo The Sony logo lights up. Selects an input signal from among the HD15/ HDMI 1/HDMI 2/OPTION 1/OPTION 2 connectors. See "Advanced Setup" on page 30. 7 Remote control sensor 8 POWER/STANDBY indicator • Lights up in green when the display is switched on. • Lights ...
...turned on, except for the case of Parts and Controls Front Panel GB 1 MENU (page 20) 2 / (INPUT) • In the menu screen, this button works as up/down buttons ( / ). 51 Switches the display on or off (standby). When you turn the display on again, soon after turning it off, wait ... signal when it on again. 6 Sony logo The Sony logo lights up. Selects an input signal from among the HD15/ HDMI 1/HDMI 2/OPTION 1/OPTION 2 connectors. See "Advanced Setup" on page 30. 7 Remote control sensor 8 POWER/STANDBY indicator • Lights up in green when the display is switched on. • Lights ...
Operating Instructions
Page 48
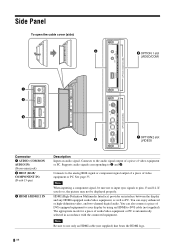
... piece of audio/video equipment or PC is automatically selected in accordance with the connected equipment. Note When inputting a component signal, be displayed properly. Note Be sure to pins 13 and 14. See page 35. The appropriate mode for a piece of video equipment or PC.... between the display and any HDMI-equipped audio/video equipment, as well as PC. Supports audio signals corresponding to -DVI cable (not supplied). Side Panel To open the cable cover (side) 4 IN 5 OPTION 1 slot (VIDEO/COM) OPTION 1(VIDEO/COM) MONITOR CONTROL ADAPTOR CONTROL S OUT REMOTE RGB/COMPONENT IN...
... piece of audio/video equipment or PC is automatically selected in accordance with the connected equipment. Note When inputting a component signal, be displayed properly. Note Be sure to pins 13 and 14. See page 35. The appropriate mode for a piece of video equipment or PC.... between the display and any HDMI-equipped audio/video equipment, as well as PC. Supports audio signals corresponding to -DVI cable (not supplied). Side Panel To open the cable cover (side) 4 IN 5 OPTION 1 slot (VIDEO/COM) OPTION 1(VIDEO/COM) MONITOR CONTROL ADAPTOR CONTROL S OUT REMOTE RGB/COMPONENT IN...
Operating Instructions
Page 49
... video equipment equipped with the S Video output connector, you can control pieces of the other equipment. The optional adaptor with a single remote control when the display is connected to the video output of a piece of video equipment. For details, contact your authorized Sony dealers. 5 OPTION 1 slot (VIDEO/COM port) 6 VIDEO ...Connects to the video connector or the S Video connector. Connect the cable (not supplied) to the video input of a piece of the display using the RS-232C protocol. GB 9 GB REMOTE (D-sub 9-pin): This connector allows remote control of video equipment.
... video equipment equipped with the S Video output connector, you can control pieces of the other equipment. The optional adaptor with a single remote control when the display is connected to the video output of a piece of video equipment. For details, contact your authorized Sony dealers. 5 OPTION 1 slot (VIDEO/COM port) 6 VIDEO ...Connects to the video connector or the S Video connector. Connect the cable (not supplied) to the video input of a piece of the display using the RS-232C protocol. GB 9 GB REMOTE (D-sub 9-pin): This connector allows remote control of video equipment.
Operating Instructions
Page 52
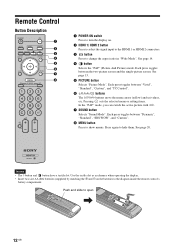
Remote Control Button Description STANDBY ON HD15 HDMI1 OPTION1 OPTION2 DISPLAY HDMI2 PICTURE ECO SOUND ON ID MODE OFF SET 1 POWER ON switch Press to turn the display on the batteries to hide them. See page 15. 5 PICTURE button Selects "Picture Mode". Push and slide to ...toggles between "Dynamic", "Standard", "SRS WOW", and "Custom". 8 MENU button Press to show menus. Press again to the diagram inside the remote control's battery compartment. See page 14. 4 button Selects the "PAP" (Picture And Picture) mode. Each press toggles between the two-picture screen and...
Remote Control Button Description STANDBY ON HD15 HDMI1 OPTION1 OPTION2 DISPLAY HDMI2 PICTURE ECO SOUND ON ID MODE OFF SET 1 POWER ON switch Press to turn the display on the batteries to hide them. See page 15. 5 PICTURE button Selects "Picture Mode". Push and slide to ...toggles between "Dynamic", "Standard", "SRS WOW", and "Custom". 8 MENU button Press to show menus. Press again to the diagram inside the remote control's battery compartment. See page 14. 4 button Selects the "PAP" (Picture And Picture) mode. Each press toggles between the two-picture screen and...
Operating Instructions
Page 54
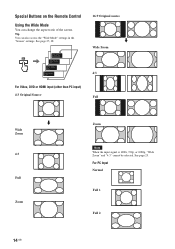
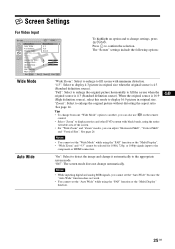
Tip You can change the aspect ratio of the screen. See page 25. See page 25, 28. Wide Mode: Wide Zoom Wide Mode: 4:3 Wide Mode: Full Wide Mode: Zoom For Video, DVD or HDMI input (other than PC input) 4:3 Original Source 16:9 Original source m Wide Zoom 4:3 Full m Wide Zoom 4:3 Full Zoom Zoom Note When the input signal is 1080i, 720p, or 1080p, "Wide Zoom" and "4:3" cannot be selected. For PC Input Normal Full 1 Full 2 14 GB Special Buttons on the Remote Control Using the Wide Mode You can also access the "Wide Mode" settings in the "Screen" settings.
Tip You can change the aspect ratio of the screen. See page 25. See page 25, 28. Wide Mode: Wide Zoom Wide Mode: 4:3 Wide Mode: Full Wide Mode: Zoom For Video, DVD or HDMI input (other than PC input) 4:3 Original Source 16:9 Original source m Wide Zoom 4:3 Full m Wide Zoom 4:3 Full Zoom Zoom Note When the input signal is 1080i, 720p, or 1080p, "Wide Zoom" and "4:3" cannot be selected. For PC Input Normal Full 1 Full 2 14 GB Special Buttons on the Remote Control Using the Wide Mode You can also access the "Wide Mode" settings in the "Screen" settings.
Operating Instructions
Page 56
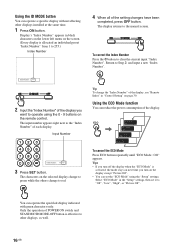
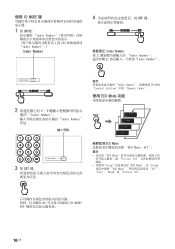
...while the others change the "Index Number" of the display, see "Remote Index" in "Control Setting" on the screen. (Every display is effective to red. Using the ID MODE button You can operate a specific display without affecting other displays, as well. 16 GB Return to clear the current... Index Number : 117 117 3 Press SET button. Only the operation of each display. Display's "Index Number" appears in the "Setup" settings, then set the "ECO Mode" using the 0 - 9 buttons on the remote control. The display returns to "Off", "Low", "High", or "Picture Off". Using the ECO...
...while the others change the "Index Number" of the display, see "Remote Index" in "Control Setting" on the screen. (Every display is effective to red. Using the ID MODE button You can operate a specific display without affecting other displays, as well. 16 GB Return to clear the current... Index Number : 117 117 3 Press SET button. Only the operation of each display. Display's "Index Number" appears in the "Setup" settings, then set the "ECO Mode" using the 0 - 9 buttons on the remote control. The display returns to "Off", "Low", "High", or "Picture Off". Using the ECO...
Operating Instructions
Page 62
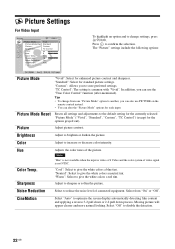
...and adjustments to another, you can alter the "Picture Mode" options for the options grayed out). "Warm": Select to optimize the screen display automatically detecting film content and applying a reverse 3-2 pull down or 2-2 pull down process. CineMotion Select "Auto" to give the white...sharpness. Sharpness Adjusts the color tones of connected equipment. "Custom": Allows you can use PICTURE on the remote control instead. • You can also use the "True Color Control" function (after-mentioned). Hue Color Temp. Press to store preferred settings. "Cool": Select to give ...
...and adjustments to another, you can alter the "Picture Mode" options for the options grayed out). "Warm": Select to optimize the screen display automatically detecting film content and applying a reverse 3-2 pull down or 2-2 pull down process. CineMotion Select "Auto" to give the white...sharpness. Sharpness Adjusts the color tones of connected equipment. "Custom": Allows you can use PICTURE on the remote control instead. • You can also use the "True Color Control" function (after-mentioned). Hue Color Temp. Press to store preferred settings. "Cool": Select to give ...
Operating Instructions
Page 64
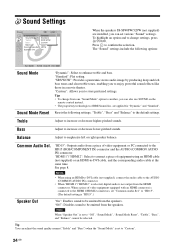
...Note When "Speaker Out" is "HD15".) Speaker Out "On": Enables sound to "HD15". (The default setting is set "Common Audio Sel." "Standard": Flat setting. to be emitted from the HDMI connectors. Notes • When using an HDMI cable (not supplied) or an HDMI-to emphasize left or right...sound quality menus ("Treble" and "Bass") when the "Sound Mode" is not output from the speakers. Tip You can also use SOUND on the remote control instead. • The proprietary technologies of equipment using an HDMI-to-DVI cable (not supplied), connect the audio cable to "Off", "Sound Mode",...
...Note When "Speaker Out" is "HD15".) Speaker Out "On": Enables sound to "HD15". (The default setting is set "Common Audio Sel." "Standard": Flat setting. to be emitted from the HDMI connectors. Notes • When using an HDMI cable (not supplied) or an HDMI-to emphasize left or right...sound quality menus ("Treble" and "Bass") when the "Sound Mode" is not output from the speakers. Tip You can also use SOUND on the remote control instead. • The proprietary technologies of equipment using an HDMI-to-DVI cable (not supplied), connect the audio cable to "Off", "Sound Mode",...
Operating Instructions
Page 65
... because the "Auto Wide" function does not work. • You cannot set the "Wide Mode" while using the "PAP" function or the "Multi Display". • "Wide Zoom" and "4:3" cannot be selected for 1080i, 720p, or 1080p signals input to the component or HDMI connectors. Press to enlarge ...Size : Reset PAP Setting Multi Display Sel: Set: HDMI 1 Wide ZZoooomm 4O:n3 FWuildl e Zoom ZNooormal 0 0 0 Back: Exit: MENU To highlight an option and to change from one "Wide Mode" option to another, you can also use on the remote control. • Select "Zoom" to display movies and other DVD content ...
... because the "Auto Wide" function does not work. • You cannot set the "Wide Mode" while using the "PAP" function or the "Multi Display". • "Wide Zoom" and "4:3" cannot be selected for 1080i, 720p, or 1080p signals input to the component or HDMI connectors. Press to enlarge ...Size : Reset PAP Setting Multi Display Sel: Set: HDMI 1 Wide ZZoooomm 4O:n3 FWuildl e Zoom ZNooormal 0 0 0 Back: Exit: MENU To highlight an option and to change from one "Wide Mode" option to another, you can also use on the remote control. • Select "Zoom" to display movies and other DVD content ...
Operating Instructions
Page 69
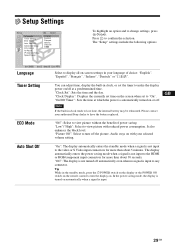
... Note If the built-in the standby mode, press the 1 POWER switch on the display or the POWER ON switch on the remote control to turn off . Please contact your authorized Sony dealer to "On". Auto Shut Off "On": The display automatically enters the standby mode when a signal is automatically turned on -screen settings in...
... Note If the built-in the standby mode, press the 1 POWER switch on the display or the POWER ON switch on the remote control to turn off . Please contact your authorized Sony dealer to "On". Auto Shut Off "On": The display automatically enters the standby mode when a signal is automatically turned on -screen settings in...
Operating Instructions
Page 70
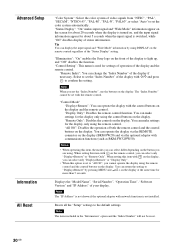
... network functions is switched, while "Off" disables display of both the remote control and the control buttons on the display. "Illumination": "On" enables the Sony logo on the display (BKM-FW20) and via the REMOTE connector on the front of the "Status Display" setting. "All Off": Disables the operation of status information. "Control Setting": This menu is set the "Index...
... network functions is switched, while "Off" disables display of both the remote control and the control buttons on the display. "Illumination": "On" enables the Sony logo on the display (BKM-FW20) and via the REMOTE connector on the front of the "Status Display" setting. "All Off": Disables the operation of status information. "Control Setting": This menu is set the "Index...
Operating Instructions
Page 71
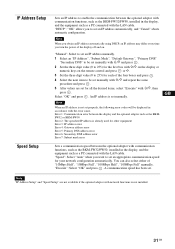
Select "OK" and press . An IP address is not installed. 31 GB You can also select either of the display off and on the remote control and press or g. 3 Set the three digit value (0 to 255) for each of the four boxes and press . 4 Select the next item to be ..." and press . "Manual": Select to set an IP address manually. 1 Select an "IP Address", "Subnet Mask", "Default Gateway", "Primary DNS" "Secondary DNS" to be displayed in accordance with the error cause. A communication speed has been set properly, the following error codes will be set an appropriate communication speed for other...
Select "OK" and press . An IP address is not installed. 31 GB You can also select either of the display off and on the remote control and press or g. 3 Set the three digit value (0 to 255) for each of the four boxes and press . 4 Select the next item to be ..." and press . "Manual": Select to set an IP address manually. 1 Select an "IP Address", "Subnet Mask", "Default Gateway", "Primary DNS" "Secondary DNS" to be displayed in accordance with the error cause. A communication speed has been set properly, the following error codes will be set an appropriate communication speed for other...
Operating Instructions
Page 72
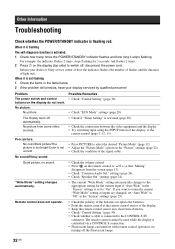
...). • Check the polarity of the batteries or replace the batteries. • Point the remote control at the remote control sensor of the display. • Keep the remote control sensor area clear from obstacles. • Check "Control Setting" (page 30). • Check whether a cable is activated (page 29). •..., have your dealer or Sony service center of how the indicator flashes (the number of flashes and the duration of the signal cable. No picture from the screen (page 13). • Check "Common Audio Sel." Possible Remedies • Check "Control Setting" (page 30). ...
...). • Check the polarity of the batteries or replace the batteries. • Point the remote control at the remote control sensor of the display. • Keep the remote control sensor area clear from obstacles. • Check "Control Setting" (page 30). • Check whether a cable is activated (page 29). •..., have your dealer or Sony service center of how the indicator flashes (the number of flashes and the duration of the signal cable. No picture from the screen (page 13). • Check "Common Audio Sel." Possible Remedies • Check "Control Setting" (page 30). ...
Operating Instructions
Page 74
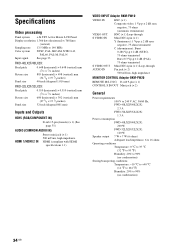
... Matrix LCD Panel Display resolution 1,366 dots (horizontal) × 768 lines (vertical) Sampling rate 13.5 MHz to 90% (no condensation) Storing/transporting conditions Temperature: -10 °C to +40 °C (14 °F to 104 °F) Humidity: 20% to 140 MHz Color system NTSC, PAL, SECAM, NTSC4.43, PAL60, PAL-M, PAL-N Input signal See page 33. FWD-40LX2F...
... Matrix LCD Panel Display resolution 1,366 dots (horizontal) × 768 lines (vertical) Sampling rate 13.5 MHz to 90% (no condensation) Storing/transporting conditions Temperature: -10 °C to +40 °C (14 °F to 104 °F) Humidity: 20% to 140 MHz Color system NTSC, PAL, SECAM, NTSC4.43, PAL60, PAL-M, PAL-N Input signal See page 33. FWD-40LX2F...
Operating Instructions
Page 75
.... 16.0 kg (35 lb 5 oz) FWD-32LX2X: Approx. 17.0 kg (37 lb 8 oz) Supplied accessories AC power cord (1) AC plug holder (2) Cable holder 40" type (4), 32" type (6) Component video signal cable (HD15 - RCA × 3) (1) BNC-RCA adaptor (1) Remote Control RM-FW001 (1) Size AA (R6) batteries (2) Operating instructions (1) Optional accessories Display stand SU-42FW/32FW Speakers...
.... 16.0 kg (35 lb 5 oz) FWD-32LX2X: Approx. 17.0 kg (37 lb 8 oz) Supplied accessories AC power cord (1) AC plug holder (2) Cable holder 40" type (4), 32" type (6) Component video signal cable (HD15 - RCA × 3) (1) BNC-RCA adaptor (1) Remote Control RM-FW001 (1) Size AA (R6) batteries (2) Operating instructions (1) Optional accessories Display stand SU-42FW/32FW Speakers...
Operating Instructions
Page 76
...POWER ON switch 12 POWER switch 7 POWER/STANDBY indicator 7 R REMOTE connector 9 Remote control sensor 7 RReemseot t2e1I,nd2e6x, 30 28 S SSSSScoehVrtnauerIyeppDnlnSoEeSgeOsetosttiItn27Ning0,/gs,O3s220U212T1,,...c2o29n5nector 9 SSOouUnNd DMobduetto2n0,1224 SSSoopuueannkddeSMr eOottudinteg2Rs0e,2se02t,42204, 24 SSPpeEeAdKSEetRupso2c1k,et3111 SRS WOW 24 SSttaannddairndst2al2l,ati2o3n, hooks 24 11 STANDBY button 13 Status Display 30 Swap 26 T TC Control...
...POWER ON switch 12 POWER switch 7 POWER/STANDBY indicator 7 R REMOTE connector 9 Remote control sensor 7 RReemseot t2e1I,nd2e6x, 30 28 S SSSSScoehVrtnauerIyeppDnlnSoEeSgeOsetosttiItn27Ning0,/gs,O3s220U212T1,,...c2o29n5nector 9 SSOouUnNd DMobduetto2n0,1224 SSSoopuueannkddeSMr eOottudinteg2Rs0e,2se02t,42204, 24 SSPpeEeAdKSEetRupso2c1k,et3111 SRS WOW 24 SSttaannddairndst2al2l,ati2o3n, hooks 24 11 STANDBY button 13 Status Display 30 Swap 26 T TC Control...
Operating Instructions
Page 229
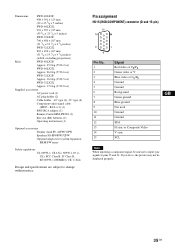
...;VIDEO/COM 端口) 6 VIDEO INPUT ADAPTOR BKM-FW10 7 OPTION 2 插槽 (VIDEO 端口) 说明 CONTROL S IN/OUT CONTROL S CONTROL S OUT CONTROL S IN CONTROL S IN CONTROL S OUT REMOTE (D-sub 9 RS-232C Sony 注 OPTION 2 BKM-FM S VIDEO IN (微型 DIN 4 S Video (S S VIDEO OUT (微型 DIN 4 S Video (...
...;VIDEO/COM 端口) 6 VIDEO INPUT ADAPTOR BKM-FW10 7 OPTION 2 插槽 (VIDEO 端口) 说明 CONTROL S IN/OUT CONTROL S CONTROL S OUT CONTROL S IN CONTROL S IN CONTROL S OUT REMOTE (D-sub 9 RS-232C Sony 注 OPTION 2 BKM-FM S VIDEO IN (微型 DIN 4 S Video (S S VIDEO OUT (微型 DIN 4 S Video (...
Operating Instructions
Page 236
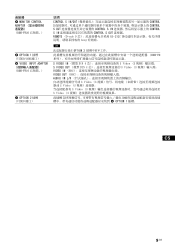
... Number Index Number" 旁边。 输入号码 Index Number : 117 117 3 按 SET 键。 Index Number 29 页的 "Control Setting"中的 "Remote Index"。 使用 ECO Mode 功能 ECO ECO Mode: Off ECO Mode: Low ECO Mode: High ECO Mode: Picture Off ECO Mode...
... Number Index Number" 旁边。 输入号码 Index Number : 117 117 3 按 SET 键。 Index Number 29 页的 "Control Setting"中的 "Remote Index"。 使用 ECO Mode 功能 ECO ECO Mode: Off ECO Mode: Low ECO Mode: High ECO Mode: Picture Off ECO Mode...


