
Operating Instructions
Page 42
... residential installation. Sony Customer Information Services Center 1-800-222-7669 or http://www.sony.com/ Declaration of Conformity Trade Name: SONY Model: FWD-40LX2F/FWD- 40LX2X/FWD-32LX2F/ FWD-32LX2X Responsible Party: Sony Electronics Inc. ...risk of fire or electric shock, do not expose this product, you carry the display unit, hold the unit itself, not the speakers. CAUTION RISK OF EXPLOSION IF ...in Canada This class B digital apparatus complies with Part 15 of the FCC Rules. Operation is encouraged to try to Part 15 of the FCC Rules. You are cautioned ...
... residential installation. Sony Customer Information Services Center 1-800-222-7669 or http://www.sony.com/ Declaration of Conformity Trade Name: SONY Model: FWD-40LX2F/FWD- 40LX2X/FWD-32LX2F/ FWD-32LX2X Responsible Party: Sony Electronics Inc. ...risk of fire or electric shock, do not expose this product, you carry the display unit, hold the unit itself, not the speakers. CAUTION RISK OF EXPLOSION IF ...in Canada This class B digital apparatus complies with Part 15 of the FCC Rules. Operation is encouraged to try to Part 15 of the FCC Rules. You are cautioned ...
Operating Instructions
Page 43
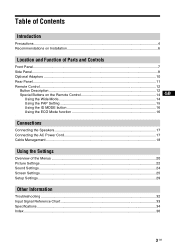
Table of Contents Introduction Precautions ...4 Recommendations on Installation 6 Location and Function of Parts and Controls Front Panel...7 Side Panel...8 Optional Adaptors ...10 Rear Panel ...11 Remote Control ...12 Button Description...12 Special Buttons on the Remote Control 14 GB Using the Wide Mode...14 Using the PAP Setting 15 ...
Table of Contents Introduction Precautions ...4 Recommendations on Installation 6 Location and Function of Parts and Controls Front Panel...7 Side Panel...8 Optional Adaptors ...10 Rear Panel ...11 Remote Control ...12 Button Description...12 Special Buttons on the Remote Control 14 GB Using the Wide Mode...14 Using the PAP Setting 15 ...
Operating Instructions
Page 47
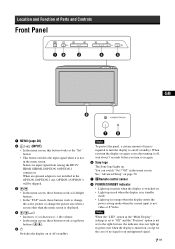
... size when a screen other than the menu screen is required to turn the display to the right-bottom, the indicator does not light up in green even when the display is turned on again. 6 Sony logo The Sony logo lights up in the menu screen. Selects an input signal from among the...it off (standby). You can switch "On"/"Off" in standby mode. • Lights up /down buttons ( / ). 51 Switches the display on or off (standby). Location and Function of Parts and Controls Front Panel GB 1 MENU (page 20) 2 / (INPUT) • In the menu screen, this button works as up in orange when the...
... size when a screen other than the menu screen is required to turn the display to the right-bottom, the indicator does not light up in green even when the display is turned on again. 6 Sony logo The Sony logo lights up in the menu screen. Selects an input signal from among the...it off (standby). You can switch "On"/"Off" in standby mode. • Lights up /down buttons ( / ). 51 Switches the display on or off (standby). Location and Function of Parts and Controls Front Panel GB 1 MENU (page 20) 2 / (INPUT) • In the menu screen, this button works as up in orange when the...

Operating Instructions
Page 51
... see the operating manual that came with a greater sense of presence. Please be sure to install the display stand SU-42FW/32FW (not supplied). 11 GB Rear Panel GB R L SPEAKER Parts 1 AC IN socket 2 SPEAKER socket 3 Stand installation hooks Description Connect the supplied AC power cord to... this socket, you connect the AC power cord, the POWER/STANDBY indicator lights up in red and the display goes into the standby...
... see the operating manual that came with a greater sense of presence. Please be sure to install the display stand SU-42FW/32FW (not supplied). 11 GB Rear Panel GB R L SPEAKER Parts 1 AC IN socket 2 SPEAKER socket 3 Stand installation hooks Description Connect the supplied AC power cord to... this socket, you connect the AC power cord, the POWER/STANDBY indicator lights up in red and the display goes into the standby...
Operating Instructions
Page 59
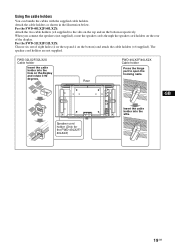
...cable holders. The speaker cord holders are not supplied. Rear FWD-40LX2F/40LX2X Cable holder Press the hinge part to the slits on the top and on the display and rotate it 90 degrees. GB Speaker cord holder (Only for the FWD-40LX2F/ 40LX2X) Insert the cable holder into the hole on the... bottom respectively. For the FWD-40LX2F/40LX2X: Attach the two cable holders (×4...
...cable holders. The speaker cord holders are not supplied. Rear FWD-40LX2F/40LX2X Cable holder Press the hinge part to the slits on the top and on the display and rotate it 90 degrees. GB Speaker cord holder (Only for the FWD-40LX2F/ 40LX2X) Insert the cable holder into the hole on the... bottom respectively. For the FWD-40LX2F/40LX2X: Attach the two cable holders (×4...
Operating Instructions
Page 63
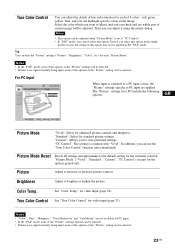
...", "Sharpness", "Noise Reduction" and "CineMotion" are applied. picture screen, the setting of this option in the image. Select the color which part of current image will be selected. 23 GB "TC Control": The setting is set to the default setting for the currently selected "Picture Mode"... Reset Picture : Brightness : Color : Hue : Color Temp. : Sharpness : Noise Reduction : CineMotion : True Color Control : HD15 RGB Vivid 50 40 Neutral When input is switched to a PC input source, the "Picture" settings specific to PC input are not available for PC input. • In...
...", "Sharpness", "Noise Reduction" and "CineMotion" are applied. picture screen, the setting of this option in the image. Select the color which part of current image will be selected. 23 GB "TC Control": The setting is set to the default setting for the currently selected "Picture Mode"... Reset Picture : Brightness : Color : Hue : Color Temp. : Sharpness : Noise Reduction : CineMotion : True Color Control : HD15 RGB Vivid 50 40 Neutral When input is switched to a PC input source, the "Picture" settings specific to PC input are not available for PC input. • In...
Operating Instructions
Page 67
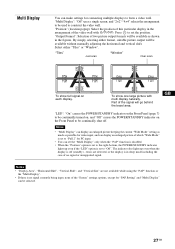
... or "Window". To show full signal on the Front Panel to be available as possible for video input, and can display an enlarged picture of which "Wide Mode" is in the figures. Notes • "Multi Display" can set the "Multi Display" only when the "PAP" function is disabled. •..., suitable picture output will go behind the bezel area. Part of the "Screen" settings options, except for "PAP Setting" and "Multi Display" can make settings for connecting multiple displays to "Full 2" for PC input. • You can display an enlarged picture keeping the current "Wide Mode" setting as...
... or "Window". To show full signal on the Front Panel to be available as possible for video input, and can display an enlarged picture of which "Wide Mode" is in the figures. Notes • "Multi Display" can set the "Multi Display" only when the "PAP" function is disabled. •..., suitable picture output will go behind the bezel area. Part of the "Screen" settings options, except for "PAP Setting" and "Multi Display" can make settings for connecting multiple displays to "Full 2" for PC input. • You can display an enlarged picture keeping the current "Wide Mode" setting as...


