Operating Instructions
Page 4
...36 (GB) Adjusting Color Matrix 36 (GB) Controlling Power On/Off Automatically (Timer Function 37 (GB) Adjusting the time and the day 37 (GB) Displaying the time 37 (GB) On/Off Timer Function 37 (GB) Setting the Security Lock 38 (GB) To activate the Security Lock 38 (GB) Security ...(GB) Setting an IP address and communication speed 39 (GB) Obtaining an IP address automatically (DHCP) .... 39 (GB) Setting an IP address manually (Manual 40 (GB) Setting a communication speed 41 (GB) Self-diagnosis Function 41 (GB) Operating a Specific Display With the Remote Commander 42 (GB...
...36 (GB) Adjusting Color Matrix 36 (GB) Controlling Power On/Off Automatically (Timer Function 37 (GB) Adjusting the time and the day 37 (GB) Displaying the time 37 (GB) On/Off Timer Function 37 (GB) Setting the Security Lock 38 (GB) To activate the Security Lock 38 (GB) Security ...(GB) Setting an IP address and communication speed 39 (GB) Obtaining an IP address automatically (DHCP) .... 39 (GB) Setting an IP address manually (Manual 40 (GB) Setting a communication speed 41 (GB) Self-diagnosis Function 41 (GB) Operating a Specific Display With the Remote Commander 42 (GB...
Operating Instructions
Page 11
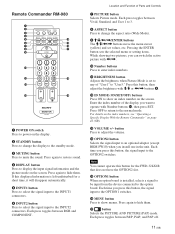
...Function of Parts and Controls 7 PICTURE button Selects Picture mode. Press again to the INPUT2 connectors. Press again to restore sound. 4 DISPLAY button Press to change the display to the standby mode. 3 MUTING button Press to mute the sound. Each press toggles between RGB and COMPONENT. Remote Commander RM-980... 1 2 MUTING DISPLAY STBY ON 3 4 5 qf 6 qg 7 qh 8 qj 9 ENTER 123 0 456 789 qa 0 qk qs ON SET qd ql MONITOR RM-980 1 ...
...Function of Parts and Controls 7 PICTURE button Selects Picture mode. Press again to the INPUT2 connectors. Press again to restore sound. 4 DISPLAY button Press to change the display to the standby mode. 3 MUTING button Press to mute the sound. Each press toggles between RGB and COMPONENT. Remote Commander RM-980... 1 2 MUTING DISPLAY STBY ON 3 4 5 qf 6 qg 7 qh 8 qj 9 ENTER 123 0 456 789 qa 0 qk qs ON SET qd ql MONITOR RM-980 1 ...
Operating Instructions
Page 19
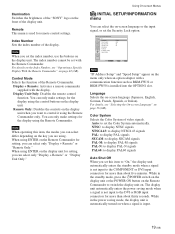
... settings. For details, see "Operating a Specific Display With the Remote Commander" on . Remote This menu is not input to switch the display unit on page 42 (GB). When using ENTER on the display unit for the display using the control buttons on when a signal... connectors for setting, you want to set with the display. The index number cannot be set the Color System automatically. Display + Remote: Activates a remote commander supplied with the Remote Commander. Illumination Switches the brightness of the "SONY" logo on -screen language (Japanese, English, German...
... settings. For details, see "Operating a Specific Display With the Remote Commander" on . Remote This menu is not input to switch the display unit on page 42 (GB). When using ENTER on the display unit for the display using the control buttons on when a signal... connectors for setting, you want to set with the display. The index number cannot be set the Color System automatically. Display + Remote: Activates a remote commander supplied with the Remote Commander. Illumination Switches the brightness of the "SONY" logo on -screen language (Japanese, English, German...

Operating Instructions
Page 38
...keep this function. Notes • The time is entered and you can set a specific time for power-on the screen. Use : MENU ENTER Cancel : Other key A dialog box prompting you to enter a password when the display unit is prompted to enter a new password appears on , and a picture will not... Exit MENU 3 To set the On Time, change to continue using the current password.) Enter the password in mind when you intend to with qualified Sony personnel. Controlling Power On/Off Automatically (Timer Function) / Setting the Security Lock 2 Select either "Every day"or "Day of Week" is set...
...keep this function. Notes • The time is entered and you can set a specific time for power-on the screen. Use : MENU ENTER Cancel : Other key A dialog box prompting you to enter a password when the display unit is prompted to enter a new password appears on , and a picture will not... Exit MENU 3 To set the On Time, change to continue using the current password.) Enter the password in mind when you intend to with qualified Sony personnel. Controlling Power On/Off Automatically (Timer Function) / Setting the Security Lock 2 Select either "Every day"or "Day of Week" is set...
Operating Instructions
Page 42
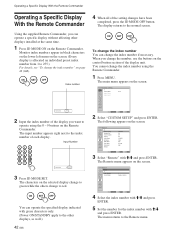
...index number with M/m and press ENTER. 5 Set the number for the index number with M/m and press ENTER. Operating a Specific Display With the Remote Commander Operating a Specific Display With the Remote Commander Using the supplied Remote Commander, you want to operate using the Remote Commander. 1 Press MENU. The... Press ID MODE ON on page 42 (GB). The menu returns to the normal screen. ON SET OFF You can operate a specific display without affecting other displays, as well.) 42 (GB) Select Set ENTER Exit MENU 2 Select "CUSTOM SETUP" and press ENTER. When you change the ...
...index number with M/m and press ENTER. 5 Set the number for the index number with M/m and press ENTER. Operating a Specific Display With the Remote Commander Operating a Specific Display With the Remote Commander Using the supplied Remote Commander, you want to operate using the Remote Commander. 1 Press MENU. The... Press ID MODE ON on page 42 (GB). The menu returns to the normal screen. ON SET OFF You can operate a specific display without affecting other displays, as well.) 42 (GB) Select Set ENTER Exit MENU 2 Select "CUSTOM SETUP" and press ENTER. When you change the ...
Operating Instructions
Page 43
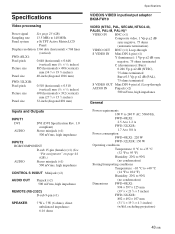
Specifications Video processing Preset signal See page 23 (GB). Sampling rate 13.5 MHz to 140 MHz Panel system a-Si TFT Active Matrix LCD Panel Display resolution 1366 dots (horizontal) × 768 lines (vertical) FWD-40LX1: Pixel pitch 0.648 (horizontal) × 0.648 (vertical) mm (1⁄32 × 1&#...Storing/transporting conditions Temperature: -10 °C to +40 °C (14 °F to 104 °F) Humidity: 20% to 90% (no condensation) Dimensions FWD-40LX1: 994 × 597 × 125 mm (39 1⁄4 × 23 5⁄8 × 5 inches) FWD-32LX1R: 802 × 492 × 107 mm ...
Specifications Video processing Preset signal See page 23 (GB). Sampling rate 13.5 MHz to 140 MHz Panel system a-Si TFT Active Matrix LCD Panel Display resolution 1366 dots (horizontal) × 768 lines (vertical) FWD-40LX1: Pixel pitch 0.648 (horizontal) × 0.648 (vertical) mm (1⁄32 × 1&#...Storing/transporting conditions Temperature: -10 °C to +40 °C (14 °F to 104 °F) Humidity: 20% to 90% (no condensation) Dimensions FWD-40LX1: 994 × 597 × 125 mm (39 1⁄4 × 23 5⁄8 × 5 inches) FWD-32LX1R: 802 × 492 × 107 mm ...
Operating Instructions
Page 44
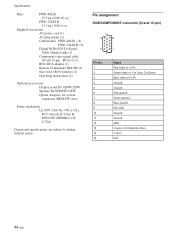
... (2) Operating instructions (1) Optional accessories Display stand SU-42FW/32FW Speaker SS-SP40FW/32FW Option Adaptors for system expansion, BKM-FW series Safety regulations UL1950, CSA No. 950 (c-UL), FCC Class B, IC Class B, EN60 950 (NEMKO), CE, C-Tick Design and specifications are subject to change without notice. Specifications Mass FWD-40LX1: 27.5 kg (60 lb 10...
... (2) Operating instructions (1) Optional accessories Display stand SU-42FW/32FW Speaker SS-SP40FW/32FW Option Adaptors for system expansion, BKM-FW series Safety regulations UL1950, CSA No. 950 (c-UL), FCC Class B, IC Class B, EN60 950 (NEMKO), CE, C-Tick Design and specifications are subject to change without notice. Specifications Mass FWD-40LX1: 27.5 kg (60 lb 10...
