Operating Instructions
Page 1
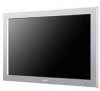
Sony Corporation Printed in China FWD-40LX2F/40LX2X/32LX2F/32LX2X 2-890-214-03(1) Flat Wide Display Monitor JP Operating Instructions GB Mode d'emploi FR Bedienungsanleitung DE Manual de instrucciones ES Istruzioni per l'uso IT CS FWD-40LX2F/40LX2X/32LX2F/32LX2X © 2006 Sony Corporation
Sony Corporation Printed in China FWD-40LX2F/40LX2X/32LX2F/32LX2X 2-890-214-03(1) Flat Wide Display Monitor JP Operating Instructions GB Mode d'emploi FR Bedienungsanleitung DE Manual de instrucciones ES Istruzioni per l'uso IT CS FWD-40LX2F/40LX2X/32LX2F/32LX2X © 2006 Sony Corporation
Operating Instructions
Page 42
... generates, uses, and can cause injury. Voor de klanten in this manual could void your Sony dealer regarding this equipment. NL The socket-outlet should be installed near ..., pursuant to Part 15 of the FCC Rules. Model No. If you carry the display unit, hold the unit itself, not the speakers. For customers in the spaces provided... SRS and ( ) symbol are registered trademarks of Conformity Trade Name: SONY Model: FWD-40LX2F/FWD- 40LX2X/FWD-32LX2F/ FWD-32LX2X Responsible Party: Sony Electronics Inc. WARNING Owner's Record The model and serial numbers are designed...
... generates, uses, and can cause injury. Voor de klanten in this manual could void your Sony dealer regarding this equipment. NL The socket-outlet should be installed near ..., pursuant to Part 15 of the FCC Rules. Model No. If you carry the display unit, hold the unit itself, not the speakers. For customers in the spaces provided... SRS and ( ) symbol are registered trademarks of Conformity Trade Name: SONY Model: FWD-40LX2F/FWD- 40LX2X/FWD-32LX2F/ FWD-32LX2X Responsible Party: Sony Electronics Inc. WARNING Owner's Record The model and serial numbers are designed...
Operating Instructions
Page 50
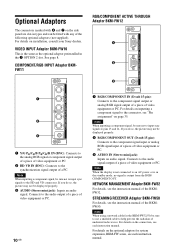
... standby mode, no signal is the same as the optional adaptor preinstalled in types and can be displayed properly. 3 AUDIO (Stereo mini jack): Inputs an audio signal. For details on page 35.... For details on inputting a component signal to pins 13 and 14. For details on the side panel are slot-in the 7 OPTION 2 slot. If you do so, the picture may not be ..."Pin assignment" on installation, consult your Sony dealers. If you do so, the picture may not be fitted with 5 and 7 on the connection, see each instruction manual. Optional Adaptors The connectors marked with any...
... standby mode, no signal is the same as the optional adaptor preinstalled in types and can be displayed properly. 3 AUDIO (Stereo mini jack): Inputs an audio signal. For details on page 35.... For details on inputting a component signal to pins 13 and 14. For details on the side panel are slot-in the 7 OPTION 2 slot. If you do so, the picture may not be ..."Pin assignment" on installation, consult your Sony dealers. If you do so, the picture may not be fitted with 5 and 7 on the connection, see each instruction manual. Optional Adaptors The connectors marked with any...

Operating Instructions
Page 51
...the speakers correctly. See page 17. Use these hooks to route the speaker cords, see the operating manual that came with a greater sense of presence. For details on how to install the display stand SU-42FW/32FW (not supplied). 11 GB For more details on the screen and enjoy viewing... with the speakers. Please be sure to a wall outlet. Rear Panel GB R L SPEAKER Parts 1 AC IN socket 2 SPEAKER socket 3 ...
...the speakers correctly. See page 17. Use these hooks to route the speaker cords, see the operating manual that came with a greater sense of presence. For details on how to install the display stand SU-42FW/32FW (not supplied). 11 GB For more details on the screen and enjoy viewing... with the speakers. Please be sure to a wall outlet. Rear Panel GB R L SPEAKER Parts 1 AC IN socket 2 SPEAKER socket 3 ...

Operating Instructions
Page 57
... the cord until it , grasp the plug and pull out the AC power cord. 17 GB Never pull the cable itself. • See the instruction manual of the equipment to be sure to connect the speakers correctly. A loose connection may cause hum and other noise. • To disconnect the cable, pull... Power Cord 1 Plug the AC power cord into the connectors or jacks. For more details on how to route the speaker cords, see the operating manual of the speakers. Connections Before you start • First make sure that the power of each piece of equipment is turned off. • Use cables...
... the cord until it , grasp the plug and pull out the AC power cord. 17 GB Never pull the cable itself. • See the instruction manual of the equipment to be sure to connect the speakers correctly. A loose connection may cause hum and other noise. • To disconnect the cable, pull... Power Cord 1 Plug the AC power cord into the connectors or jacks. For more details on how to route the speaker cords, see the operating manual of the speakers. Connections Before you start • First make sure that the power of each piece of equipment is turned off. • Use cables...
Operating Instructions
Page 67
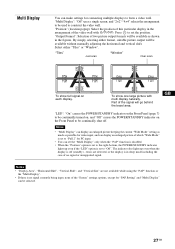
Select either format, suitable picture output will be selected. 27 GB To show full signal on the Front Panel to be available as possible for video input, and can display an enlarged picture of which "Wide Mode" is set to "Full 2" for PC input. • You can make ...settings for "PAP Setting" and "Multi Display" can be available without manually adjusting the horizontal and vertical shift. Notes • "Multi Display" can display an enlarged picture keeping the current "Wide Mode" setting as much as shown in the figures. Notes ...
Select either format, suitable picture output will be selected. 27 GB To show full signal on the Front Panel to be available as possible for video input, and can display an enlarged picture of which "Wide Mode" is set to "Full 2" for PC input. • You can make ...settings for "PAP Setting" and "Multi Display" can be available without manually adjusting the horizontal and vertical shift. Notes • "Multi Display" can display an enlarged picture keeping the current "Wide Mode" setting as much as shown in the figures. Notes ...

Operating Instructions
Page 68
... the "Screen" settings specific for video input (page 26). "Full 1": Select to enlarge the picture to fill the display area in the window. In such cases, manually adjust the options below. Auto Adjustment Select to move the position of the picture left and right in the vertical direction,... and "Pitch" are not available for PC input. 28 GB Horizontal Shift Vertical Shift Reset PAP Setting Allows you to automatically adjust the display position and phase of the picture up and down in its original horizontal-to-vertical aspect ratio. Note that "Auto Adjustment" may not ...
... the "Screen" settings specific for video input (page 26). "Full 1": Select to enlarge the picture to fill the display area in the window. In such cases, manually adjust the options below. Auto Adjustment Select to move the position of the picture left and right in the vertical direction,... and "Pitch" are not available for PC input. 28 GB Horizontal Shift Vertical Shift Reset PAP Setting Allows you to automatically adjust the display position and phase of the picture up and down in its original horizontal-to-vertical aspect ratio. Note that "Auto Adjustment" may not ...
Operating Instructions
Page 71
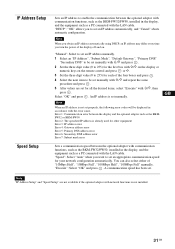
..."OK" allows you turn the power of "10Mbps Half", "10Mbps Full", "100Mbps Half", "100Mbps Full" manually. A communication speed has been set manually with F/f and press . 2 Set the three digit value (0 to 255) for the first box with F/f on the display or numeric keys on . You can also select either of the... display off and on the remote control and press or g. 3 Set the three digit value ...
..."OK" allows you turn the power of "10Mbps Half", "10Mbps Full", "100Mbps Half", "100Mbps Full" manually. A communication speed has been set manually with F/f and press . 2 Set the three digit value (0 to 255) for the first box with F/f on the display or numeric keys on . You can also select either of the... display off and on the remote control and press or g. 3 Set the three digit value ...
Operating Instructions
Page 76
... button 7 Input signal 33 IP Address Setup 21, 31 L Language 21, 29 LED 27 M Manual MENU b(IuPttoAndd7r,es1s2Setup) 31 MONITOR CONTROL ADAPTOR 9 Multi Display 21, 27, 28 Muting button 13 N NNoorismeaRl e1d4u,ct2i6o,n 20, 28 22 O On/Off Timer...DMobduetto2n0,1224 SSSoopuueannkddeSMr eOottudinteg2Rs0e,2se02t,42204, 24 SSPpeEeAdKSEetRupso2c1k,et3111 SRS WOW 24 SSttaannddairndst2al2l,ati2o3n, hooks 24 11 STANDBY button 13 Status Display 30 Swap 26 T TC Control 22, 23 TTTTiirrmleuebeselrCe2So72el0ott,rinC2g4on2t1r,ol2290, 23 V Vertical Vertical Shift Size 2211, , 26...
... button 7 Input signal 33 IP Address Setup 21, 31 L Language 21, 29 LED 27 M Manual MENU b(IuPttoAndd7r,es1s2Setup) 31 MONITOR CONTROL ADAPTOR 9 Multi Display 21, 27, 28 Muting button 13 N NNoorismeaRl e1d4u,ct2i6o,n 20, 28 22 O On/Off Timer...DMobduetto2n0,1224 SSSoopuueannkddeSMr eOottudinteg2Rs0e,2se02t,42204, 24 SSPpeEeAdKSEetRupso2c1k,et3111 SRS WOW 24 SSttaannddairndst2al2l,ati2o3n, hooks 24 11 STANDBY button 13 Status Display 30 Swap 26 T TC Control 22, 23 TTTTiirrmleuebeselrCe2So72el0ott,rinC2g4on2t1r,ol2290, 23 V Vertical Vertical Shift Size 2211, , 26...
Operating Instructions
Page 250
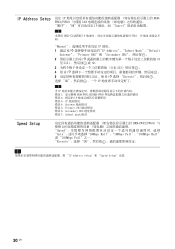
FW32/FW50 LAN DHCP":"OK IP Cancel 注 当使用 DHCP IP IP "Manual IP 地址。 1 通过 F/f IP Address"、"Subnet Mask"、"Default Gateway"、"Primary DNS"和 "Secondary DNS 2 F/f 0 至 255 g。 3 0 至 255 4 &#...
FW32/FW50 LAN DHCP":"OK IP Cancel 注 当使用 DHCP IP IP "Manual IP 地址。 1 通过 F/f IP Address"、"Subnet Mask"、"Default Gateway"、"Primary DNS"和 "Secondary DNS 2 F/f 0 至 255 g。 3 0 至 255 4 &#...
Operating Instructions
Page 255
...7 IP Address Setup (IP 地址设 定) 20, 30 L Language 20, 28 LED 26 M Manual (IP Address Setup) 30 MENU 键 7, 12 MONITOR CONTROL ADAPTOR 9 Multi Display 20, 26, 27 N Noise Reduction 19, 21 Normal 14, 25, 27 O On/Off Timer 28 OPTION 1/OPTION 2... 20, 25, 27 S S VIDEO IN/OUT 连接器 9 Screen 设定 20, 24 Setup 设定 20, 28 Sharpness 19, 21 32 Sony 标志 7, 29 SOUND 键 12 Sound Mode 19, 23 Sound Mode Reset 设) 19, 23 Sound 设定 19, 23 SPEAKER 插...
...7 IP Address Setup (IP 地址设 定) 20, 30 L Language 20, 28 LED 26 M Manual (IP Address Setup) 30 MENU 键 7, 12 MONITOR CONTROL ADAPTOR 9 Multi Display 20, 26, 27 N Noise Reduction 19, 21 Normal 14, 25, 27 O On/Off Timer 28 OPTION 1/OPTION 2... 20, 25, 27 S S VIDEO IN/OUT 连接器 9 Screen 设定 20, 24 Setup 设定 20, 28 Sharpness 19, 21 32 Sony 标志 7, 29 SOUND 键 12 Sound Mode 19, 23 Sound Mode Reset 设) 19, 23 Sound 设定 19, 23 SPEAKER 插...

