Operating Instructions
Page 43
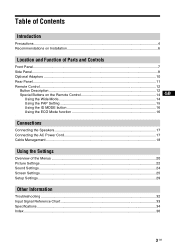
Table of Contents Introduction Precautions ...4 Recommendations on Installation 6 Location and Function of Parts and Controls Front Panel...7 Side Panel...8 Optional Adaptors ...10 Rear Panel ...11 Remote Control ...12 Button Description...12 Special Buttons on the Remote Control 14 GB Using the Wide Mode...14 Using the PAP Setting 15 ... Management...18 Using the Settings Overview of the Menus ...20 Picture Settings ...22 Sound Settings...24 Screen Settings...25 Setup Settings...29 Other Information Troubleshooting ...32 Input Signal Reference Chart 33 Specifications ...34 Index ...36 3 GB
Table of Contents Introduction Precautions ...4 Recommendations on Installation 6 Location and Function of Parts and Controls Front Panel...7 Side Panel...8 Optional Adaptors ...10 Rear Panel ...11 Remote Control ...12 Button Description...12 Special Buttons on the Remote Control 14 GB Using the Wide Mode...14 Using the PAP Setting 15 ... Management...18 Using the Settings Overview of the Menus ...20 Picture Settings ...22 Sound Settings...24 Screen Settings...25 Setup Settings...29 Other Information Troubleshooting ...32 Input Signal Reference Chart 33 Specifications ...34 Index ...36 3 GB
Operating Instructions
Page 53
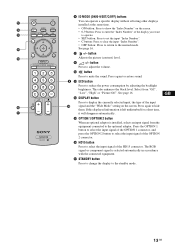
... with the connected equipment. STANDBY ON HD15 HDMI1 OPTION1 OPTION2 DISPLAY HDMI2 PICTURE ECO SOUND ON ID MODE OFF SET RM-FW001 9 ID MODE (ON/0-9/SET/C/OFF) buttons You can operate a specific display without affecting other displays installed at the same time. • ON button: Press... to show the "Index Number" on the screen. • 0-9 button: Press to enter the "Index Number" of the display you want to operate. • SET button...
... with the connected equipment. STANDBY ON HD15 HDMI1 OPTION1 OPTION2 DISPLAY HDMI2 PICTURE ECO SOUND ON ID MODE OFF SET RM-FW001 9 ID MODE (ON/0-9/SET/C/OFF) buttons You can operate a specific display without affecting other displays installed at the same time. • ON button: Press... to show the "Index Number" on the screen. • 0-9 button: Press to enter the "Index Number" of the display you want to operate. • SET button...
Operating Instructions
Page 56
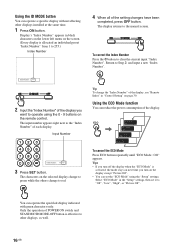
...Setup" settings, then set the "ECO Mode" using the 0 - 9 buttons on page 30. The characters on the display except "Picture Off". • You can operate a specific display without affecting other displays, as well. 16 GB Tips • If you want to red. Tip To change to operate using the "Setup.... Select "ECO Mode" in "Control Setting" on the remote control. Only the operation of the display you turn on the selected display change to 255.) Index Number 4 When all of the display. Index Number : 117 2 Input the "Index Number" of POWER ON switch and STANDBY/ID MODE...
...Setup" settings, then set the "ECO Mode" using the 0 - 9 buttons on page 30. The characters on the display except "Picture Off". • You can operate a specific display without affecting other displays, as well. 16 GB Tips • If you want to red. Tip To change to operate using the "Setup.... Select "ECO Mode" in "Control Setting" on the remote control. Only the operation of the display you turn on the selected display change to 255.) Index Number 4 When all of the display. Index Number : 117 2 Input the "Index Number" of POWER ON switch and STANDBY/ID MODE...
Operating Instructions
Page 63
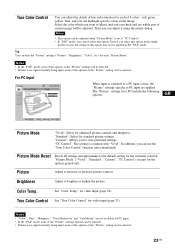
...": Select for enhanced picture contrast and sharpness. "TC Control": The setting is switched to a PC input source, the "Picture" settings specific to "TC Control". • In "PAP" mode, you can highlight specific colors in the single- See "Color Temp." True Color Control See "True Color Control" for the options grayed out). Notes...
...": Select for enhanced picture contrast and sharpness. "TC Control": The setting is switched to a PC input source, the "Picture" settings specific to "TC Control". • In "PAP" mode, you can highlight specific colors in the single- See "Color Temp." True Color Control See "True Color Control" for the options grayed out). Notes...

Operating Instructions
Page 68
.... Phase Select to adjust the pitch when the picture has unwanted vertical stripes. Resets the following options: Wide Mode "Normal": Select to display the picture in the vertical direction, keeping its original size. Note that "Auto Adjustment" may not work well with certain input signals. ... Pitch Select to adjust the phase when the screen flickers. "Full 1": Select to enlarge the picture to PC input source, the "Screen" settings specific for a PC include the following settings; Press F/f and press to -vertical aspect ratio. The "Screen" settings for PC input are applied. Note...
.... Phase Select to adjust the pitch when the picture has unwanted vertical stripes. Resets the following options: Wide Mode "Normal": Select to display the picture in the vertical direction, keeping its original size. Note that "Auto Adjustment" may not work well with certain input signals. ... Pitch Select to adjust the phase when the screen flickers. "Full 1": Select to enlarge the picture to PC input source, the "Screen" settings specific for a PC include the following settings; Press F/f and press to -vertical aspect ratio. The "Screen" settings for PC input are applied. Note...
Operating Instructions
Page 74
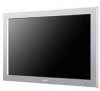
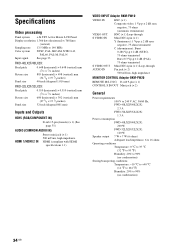
Specifications Video processing Panel system a-Si TFT Active Matrix LCD Panel Display resolution 1,366 dots (horizontal) × 768 lines (vertical) Sampling rate 13.5 MHz to 90% (no condensation) 34 GB FWD-40LX2F/40LX2X: Pixel pitch Picture size Panel size 0.648 (horizontal) × 0.648 (vertical) mm (1/32 × 1/32...60 Hz, FWD-40LX2F/40LX2X: 2.3 A FWD-32LX2F/32LX2X: 1.3 A Power consumption FWD-40LX2F/40LX2X: 200 W FWD-32LX2F/32LX2X: 120 W Speaker output 7 W + 7 W (6 ohms) Adequate load impedance, 6 to 16 ohms Operating conditions Temperature: 0 °C to 35 °C (32 °F ...
Specifications Video processing Panel system a-Si TFT Active Matrix LCD Panel Display resolution 1,366 dots (horizontal) × 768 lines (vertical) Sampling rate 13.5 MHz to 90% (no condensation) 34 GB FWD-40LX2F/40LX2X: Pixel pitch Picture size Panel size 0.648 (horizontal) × 0.648 (vertical) mm (1/32 × 1/32...60 Hz, FWD-40LX2F/40LX2X: 2.3 A FWD-32LX2F/32LX2X: 1.3 A Power consumption FWD-40LX2F/40LX2X: 200 W FWD-32LX2F/32LX2X: 120 W Speaker output 7 W + 7 W (6 ohms) Adequate load impedance, 6 to 16 ohms Operating conditions Temperature: 0 °C to 35 °C (32 °F ...
Operating Instructions
Page 75
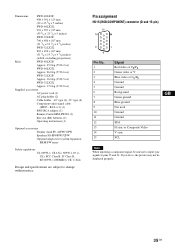
...V sync SCL GB Note When inputting a component signal, be displayed properly. 35 GB Dimensions FWD-40LX2F: 988 × 591 × 125 mm (39 × 23 3/8 × 5 inches) FWD-40LX2X: 994 × 597 × 125 mm (39 1/4 × 23 5/8 × 5 inches) FWD-32LX2F: 796 × 486 × 107 mm (31 3/8 ... (1) Optional accessories Display stand SU-42FW/32FW Speakers SS-SP40FW/32FW Optional adaptors for system expansion, BKM-FW series Safety regulations UL 60950-1, CSA No. 60950-1-03 (cUL), FCC Class B, IC Class B, EN 60950-1 (NEMKO), CE, C-Tick Design and specifications are subject to ...
...V sync SCL GB Note When inputting a component signal, be displayed properly. 35 GB Dimensions FWD-40LX2F: 988 × 591 × 125 mm (39 × 23 3/8 × 5 inches) FWD-40LX2X: 994 × 597 × 125 mm (39 1/4 × 23 5/8 × 5 inches) FWD-32LX2F: 796 × 486 × 107 mm (31 3/8 ... (1) Optional accessories Display stand SU-42FW/32FW Speakers SS-SP40FW/32FW Optional adaptors for system expansion, BKM-FW series Safety regulations UL 60950-1, CSA No. 60950-1-03 (cUL), FCC Class B, IC Class B, EN 60950-1 (NEMKO), CE, C-Tick Design and specifications are subject to ...
