Operating Instructions (CD/DVD Component)
Page 1
3-060-985-12(1) CD/DVD Player Operating Instructions DVP-S360 DVP-S363 DVP-S365 © 2000 Sony Corporation
3-060-985-12(1) CD/DVD Player Operating Instructions DVP-S360 DVP-S363 DVP-S365 © 2000 Sony Corporation
Operating Instructions (CD/DVD Component)
Page 2
... or more of the following measures: - Increase the separation between the equipment and receiver. - Record the serial number in this CD/DVD player is harmful to eyes, do not open the cabinet. NOTE: This equipment has been tested and found to disassemble the cabinet. ... installation. Refer to constitute a risk of the FCC Rules. Model No. DVP-S360/DVP-S363/DVP-S365 Serial No CAUTION You are located at the rear of optical instruments with the limits for purchasing the Sony CD/ DVD Player. Before operating the unit, please read this equipment. This label is located ...
... or more of the following measures: - Increase the separation between the equipment and receiver. - Record the serial number in this CD/DVD player is harmful to eyes, do not open the cabinet. NOTE: This equipment has been tested and found to disassemble the cabinet. ... installation. Refer to constitute a risk of the FCC Rules. Model No. DVP-S360/DVP-S363/DVP-S365 Serial No CAUTION You are located at the rear of optical instruments with the limits for purchasing the Sony CD/ DVD Player. Before operating the unit, please read this equipment. This label is located ...
Operating Instructions (CD/DVD Component)
Page 3
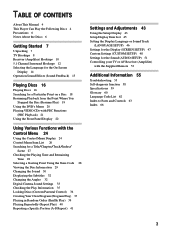
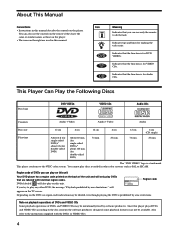
TABLE OF CONTENTS About This Manual 4 This Player Can Play the Following Discs 4 Precautions 6 Notes About the Discs 6 Getting Started 7 Unpacking 7 TV Hookups 8 Receiver (Amplifier) Hookups 10 5.1 Channel Surround Hookups 12 Selecting the ... 16 Searching for a Particular Point on a Disc 18 Resuming Playback from the Point Where You Stopped the Disc (Resume Play) 19 Using the DVD's Menu 20 Playing VIDEO CDs with PBC Functions (PBC Playback) 21 Using the Front Panel Display 22 Using Various Functions with the Control Menu 24 Using the Control...
TABLE OF CONTENTS About This Manual 4 This Player Can Play the Following Discs 4 Precautions 6 Notes About the Discs 6 Getting Started 7 Unpacking 7 TV Hookups 8 Receiver (Amplifier) Hookups 10 5.1 Channel Surround Hookups 12 Selecting the ... 16 Searching for a Particular Point on a Disc 18 Resuming Playback from the Point Where You Stopped the Disc (Resume Play) 19 Using the DVD's Menu 20 Playing VIDEO CDs with PBC Functions (PBC Playback) 21 Using the Front Panel Display 22 Using Various Functions with the Control Menu 24 Using the Control...
Operating Instructions (CD/DVD Component)
Page 4
... the function is for DVD VIDEOs. DVDs labeled ALL will also play on the TV screen. SONY CORPORATION MADE IN JAPAN 0-000-000-00 Region code appear on this unit. DVP-XXXX CD/DVD PLAYER AC 00V 00Hz 00W NO. The "DVD VIDEO" logo is prohibited by area limitations." Since this player plays DVDs and VIDEO CDs according to the disc...
... the function is for DVD VIDEOs. DVDs labeled ALL will also play on the TV screen. SONY CORPORATION MADE IN JAPAN 0-000-000-00 Region code appear on this unit. DVP-XXXX CD/DVD PLAYER AC 00V 00Hz 00W NO. The "DVD VIDEO" logo is prohibited by area limitations." Since this player plays DVDs and VIDEO CDs according to the disc...
Operating Instructions (CD/DVD Component)
Page 5
...the TV screen (PBC Playback), in CD-EXTRAs, DVD-ROMs, DVD-audio, HD (high density) layer of Super Audio CD etc., cannot be connected to easily locate the point you want on the disc. Use of the DVD player. CD-Rs, CD-ROMs including PHOTO CDs, data sections in addition to locate... the scene you want . When playing DTS*-encoded CDs, excessive noise will be authorized by Macrovision Corporation, and is assigned a scene...
...the TV screen (PBC Playback), in CD-EXTRAs, DVD-ROMs, DVD-audio, HD (high density) layer of Super Audio CD etc., cannot be connected to easily locate the point you want on the disc. Use of the DVD player. CD-Rs, CD-ROMs including PHOTO CDs, data sections in addition to locate... the scene you want . When playing DTS*-encoded CDs, excessive noise will be authorized by Macrovision Corporation, and is assigned a scene...
Operating Instructions (CD/DVD Component)
Page 6
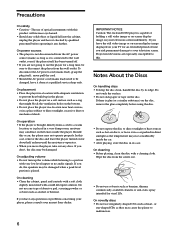
... still video image or on-screen display image displayed on for a long time, be damaged when a peak level portion is connected to your nearest Sony dealer. Do not touch the surface. • Do not stick paper or tape on your TV for an extended period of optical instruments with very... NOTICE Caution: The enclosed DVD player is glue (or a similar substance) on the lenses inside the car. • After playing, store the disc in direct sunlight as alcohol or benzine. The use irregularly shaped CDs such as heart- On novelty discs • Do not use of time you do, the speakers may ...
... still video image or on-screen display image displayed on for a long time, be damaged when a peak level portion is connected to your nearest Sony dealer. Do not touch the surface. • Do not stick paper or tape on your TV for an extended period of optical instruments with very... NOTICE Caution: The enclosed DVD player is glue (or a similar substance) on the lenses inside the car. • After playing, store the disc in direct sunlight as alcohol or benzine. The use irregularly shaped CDs such as heart- On novelty discs • Do not use of time you do, the speakers may ...
Operating Instructions (CD/DVD Component)
Page 7
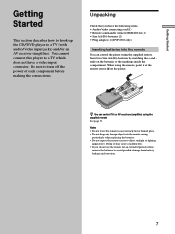
...have a video input connector. Getting Started Getting Started This section describes how to hook up the CD/DVD player to the markings inside the compartment. z You can control the player using the supplied remote. Unpacking Check that you do not use the remote for an extended period .../video connecting cord (1) • Remote commander (remote) RMT-D116A (1) • Size AA (R6) batteries (2) • Plug adaptor (1) (DVP-S365 only) Inserting batteries into the remote casing, particularly when replacing the batteries. • Do not expose the remote sensor to avoid possible damage ...
...have a video input connector. Getting Started Getting Started This section describes how to hook up the CD/DVD player to the markings inside the compartment. z You can control the player using the supplied remote. Unpacking Check that you do not use the remote for an extended period .../video connecting cord (1) • Remote commander (remote) RMT-D116A (1) • Size AA (R6) batteries (2) • Plug adaptor (1) (DVP-S365 only) Inserting batteries into the remote casing, particularly when replacing the batteries. • Do not expose the remote sensor to avoid possible damage ...
Operating Instructions (CD/DVD Component)
Page 8
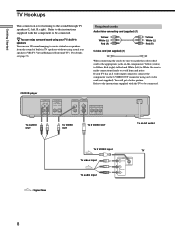
For details, see page 33. CD/DVD player AUDIO OUT R L 1 DIGITAL OUT PCM/DTS/ DOLBY DIGITAL COAXIAL OPTICAL 2 VIDEO OUT S VIDEO OUT 1 1 2 2 COMPONENT VIDEO OUT Y PB/B-Y PR/R-Y To AUDIO OUT To VIDEO OUT ...
For details, see page 33. CD/DVD player AUDIO OUT R L 1 DIGITAL OUT PCM/DTS/ DOLBY DIGITAL COAXIAL OPTICAL 2 VIDEO OUT S VIDEO OUT 1 1 2 2 COMPONENT VIDEO OUT Y PB/B-Y PR/R-Y To AUDIO OUT To VIDEO OUT ...
Operating Instructions (CD/DVD Component)
Page 9
...) of the same kind. For details, see page 47. 9 You will get a better picture. Setups for the player Some setup adjustments are necessary for the player depending on the TV or receiver (amplifier), sound distortion may appear in the picture. For details, see page 47. ...8226; Do not connect this case, set "TV TYPE" in the setup display. VCR TV CD/DVD player Connect directly • Depending on the TV or other components to "16:9/4:3 WIDE MODE." CD/DVD player COMPONENT VIDEO OUT Y PB/B-Y PR/R-Y Monitor or projector with component video input connectors COMPONENT VIDEO ...
...) of the same kind. For details, see page 47. 9 You will get a better picture. Setups for the player Some setup adjustments are necessary for the player depending on the TV or receiver (amplifier), sound distortion may appear in the picture. For details, see page 47. ...8226; Do not connect this case, set "TV TYPE" in the setup display. VCR TV CD/DVD player Connect directly • Depending on the TV or other components to "16:9/4:3 WIDE MODE." CD/DVD player COMPONENT VIDEO OUT Y PB/B-Y PR/R-Y Monitor or projector with component video input connectors COMPONENT VIDEO ...
Operating Instructions (CD/DVD Component)
Page 10
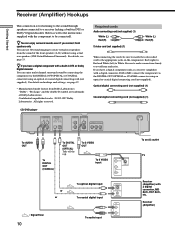
... S VIDEO R or or : Signal flow 10 To optical digital input To coaxial digital input To audio input DIGITAL IN OPTICAL COAXIAL CD L R To an AC outlet TV Receiver (Amplifier) with the component to a receiver lacking a built-in DTS or Dolby Digital... (not supplied). Confidential unpublished works. ©1992-1997 Dolby Laboratories. Optical digital connecting cord (not supplied) (1) Coaxial digital connecting cord (not supplied) (1) CD/DVD player AUDIO OUT R L 1 DIGITAL OUT PCM/DTS/ DOLBY DIGITAL COAXIAL OPTICAL 2 VIDEO OUT S VIDEO OUT 1 1 2 2 COMPONENT VIDEO OUT Y PB...
... S VIDEO R or or : Signal flow 10 To optical digital input To coaxial digital input To audio input DIGITAL IN OPTICAL COAXIAL CD L R To an AC outlet TV Receiver (Amplifier) with the component to a receiver lacking a built-in DTS or Dolby Digital... (not supplied). Confidential unpublished works. ©1992-1997 Dolby Laboratories. Optical digital connecting cord (not supplied) (1) Coaxial digital connecting cord (not supplied) (1) CD/DVD player AUDIO OUT R L 1 DIGITAL OUT PCM/DTS/ DOLBY DIGITAL COAXIAL OPTICAL 2 VIDEO OUT S VIDEO OUT 1 1 2 2 COMPONENT VIDEO OUT Y PB...

Operating Instructions (CD/DVD Component)
Page 12
... with a built-in Dolby Digital decoder, do not set "DTS" to be connected. • The cord connectors should be connected. The player outputs the surround sound signals from the DIGITAL OUT OPTICAL and COAXIAL connectors. For details on the next page. A loose connection may cause hum... built-in DTS or Dolby Digital decoder (not supplied). You do not set , press , then ENTER . Getting Started 5.1 Channel Surround Hookups With DVDs which contain DTS or Dolby Digital sound, you can enjoy even greater real audio presence in the comfort of these cords. Using a receiver (amplifier) having...
... with a built-in Dolby Digital decoder, do not set "DTS" to be connected. • The cord connectors should be connected. The player outputs the surround sound signals from the DIGITAL OUT OPTICAL and COAXIAL connectors. For details on the next page. A loose connection may cause hum... built-in DTS or Dolby Digital decoder (not supplied). You do not set , press , then ENTER . Getting Started 5.1 Channel Surround Hookups With DVDs which contain DTS or Dolby Digital sound, you can enjoy even greater real audio presence in the comfort of these cords. Using a receiver (amplifier) having...
Operating Instructions (CD/DVD Component)
Page 13
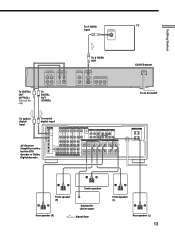
... L 1 DIGITAL OUT PCM/DTS/ DOLBY DIGITAL COAXIAL OPTICAL 2 To DIGITAL OUT (COAXIAL) To S VIDEO OUT VIDEO OUT S VIDEO OUT 1 1 2 2 COMPONENT VIDEO OUT Y PB/B-Y PR/R-Y CD/DVD player To an AC outlet To optical digital input To coaxial digital input AV Receiver (Amplifier) with a built-in DTS decoder or Dolby Digital decoder DIGITAL... TV/LD IN AC-3 RF DVD IN COAX DVD IN OPT TV/LD IN OPT CD IN OPT MD/DAT IN OPT SIGNAL GND IN MD/DAT OUT OPT TV/LD DVD VIDEO 2 VIDEO 1 MONITOR S-LINK CTRL A1 5.1 INPUT FRONT REAR CENTER PRE ...
... L 1 DIGITAL OUT PCM/DTS/ DOLBY DIGITAL COAXIAL OPTICAL 2 To DIGITAL OUT (COAXIAL) To S VIDEO OUT VIDEO OUT S VIDEO OUT 1 1 2 2 COMPONENT VIDEO OUT Y PB/B-Y PR/R-Y CD/DVD player To an AC outlet To optical digital input To coaxial digital input AV Receiver (Amplifier) with a built-in DTS decoder or Dolby Digital decoder DIGITAL... TV/LD IN AC-3 RF DVD IN COAX DVD IN OPT TV/LD IN OPT CD IN OPT MD/DAT IN OPT SIGNAL GND IN MD/DAT OUT OPT TV/LD DVD VIDEO 2 VIDEO 1 MONITOR S-LINK CTRL A1 5.1 INPUT FRONT REAR CENTER PRE ...
Operating Instructions (CD/DVD Component)
Page 14
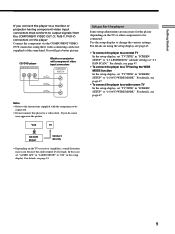
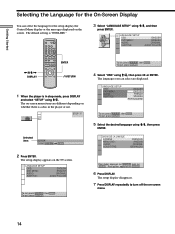
The default setting is "ENGLISH." 123 456 789 0 3 Select "LANGUAGE SETUP" using M/m, and then press ENTER. Getting Started Selecting the Language for the On-Screen Display You can select the language for the setup display, the Control Menu display or the messages displayed on the screen. LANGUAGE SETUP OSD: DVD MENU: AUDIO: SUBTITLE: ENGLISH ENGLISH ORIGINAL AUDIO FOLLOW
The default setting is "ENGLISH." 123 456 789 0 3 Select "LANGUAGE SETUP" using M/m, and then press ENTER. Getting Started Selecting the Language for the On-Screen Display You can select the language for the setup display, the Control Menu display or the messages displayed on the screen. LANGUAGE SETUP OSD: DVD MENU: AUDIO: SUBTITLE: ENGLISH ENGLISH ORIGINAL AUDIO FOLLOW

Operating Instructions (CD/DVD Component)
Page 16
... red. 3 Press A on the player, and place a disc on and the power indicator lights up in green. The disc tray closes and the player starts playback (continuous play a DVD/CD/VIDEO CD. Playing Discs This chapter describes how to play ). The player automatically turns on the disc tray. ...xWhen playing a VIDEO CD A menu may be different or restricted. Adjust the volume ...
... red. 3 Press A on the player, and place a disc on and the power indicator lights up in green. The disc tray closes and the player starts playback (continuous play a DVD/CD/VIDEO CD. Playing Discs This chapter describes how to play ). The player automatically turns on the disc tray. ...xWhen playing a VIDEO CD A menu may be different or restricted. Adjust the volume ...

Operating Instructions (CD/DVD Component)
Page 17
... as Program Play using the on a CD • Do not play and remove the disc Operation Press x Press X Press X or H Press > Press . To turn off the player Press @/1 on the player or by pressing !. To disconnect the power of the player, press ! on the remote. The player enters standby mode and the power indicator....) If you set the sound to off, see page 24. 17 To make the screen saver image go away, press H. (If you turn on DVDs. When you want to set the screen saver function to "1/L" or "2/R", no sound will come from the DIGITAL OUT OPTICAL and COAXIAL connectors even if...
... as Program Play using the on a CD • Do not play and remove the disc Operation Press x Press X Press X or H Press > Press . To turn off the player Press @/1 on the player or by pressing !. To disconnect the power of the player, press ! on the remote. The player enters standby mode and the power indicator....) If you set the sound to off, see page 24. 17 To make the screen saver image go away, press H. (If you turn on DVDs. When you want to set the screen saver function to "1/L" or "2/R", no sound will come from the DIGITAL OUT OPTICAL and COAXIAL connectors even if...
Operating Instructions (CD/DVD Component)
Page 18
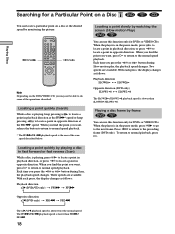
... at the FF1M* speed or keep pressing to locate a point in opposite direction. When the player is about twice the normal speed. Locating a point slowly by frame You can use this function only for DVDs or VIDEO CDs. Each time you press the or button during Slow-motion play, the playback speed changes...
... at the FF1M* speed or keep pressing to locate a point in opposite direction. When the player is about twice the normal speed. Locating a point slowly by frame You can use this function only for DVDs or VIDEO CDs. Each time you press the or button during Slow-motion play, the playback speed changes...
Operating Instructions (CD/DVD Component)
Page 19
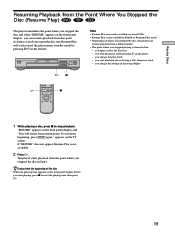
...settings in Step 1. "RESUME" appears on the front panel display and "Disc will work even if the player enters standby mode by pressing ! Notes • Resume Play may not be available on some DVDs. • Resume Play is not available in Shuffle or Program Play mode. • Depending on where you... stopped the disc, the player may resume playback from the beginning of the disc When the playing time appears ...
...settings in Step 1. "RESUME" appears on the front panel display and "Disc will work even if the player enters standby mode by pressing ! Notes • Resume Play may not be available on some DVDs. • Resume Play is not available in Shuffle or Program Play mode. • Depending on where you... stopped the disc, the player may resume playback from the beginning of the disc When the playing time appears ...
Operating Instructions (CD/DVD Component)
Page 20
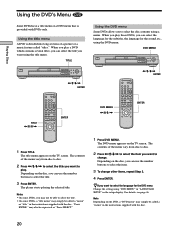
TITLE Using the DVD menu Some DVDs allow you to select the disc contents using the DVD menu. When you play a DVD which contains several titles, you can select the title you can select the language for the subtitles, the language for the sound, etc., using a menu. Playing Discs Using the DVD's Menu Some DVDs have a title menu or a DVD menu that is divided into long sections of a picture or a music feature called "titles." When you play these DVDs, you want using the title menu. Using the title menu A DVD is provided with DVDs only. DVD MENU
TITLE Using the DVD menu Some DVDs allow you to select the disc contents using the DVD menu. When you play a DVD which contains several titles, you can select the title you can select the language for the subtitles, the language for the sound, etc., using a menu. Playing Discs Using the DVD's Menu Some DVDs have a title menu or a DVD menu that is divided into long sections of a picture or a music feature called "titles." When you play these DVDs, you want using the title menu. Using the title menu A DVD is provided with DVDs only. DVD MENU

Operating Instructions (CD/DVD Component)
Page 22
... about the disc, such as shown in the following chart. Playing time and number of the current chapter DVD TITLE CHAP HOUR MIN SEC Remaining time of the current chapter DVD TITLE CHAP Press TIME/TEXT HOUR MIN SEC Playing time and number of the current title...front panel display. • While you are not displayed. 22 TIME/TEXT When playing back a DVD Displaying information while playing the disc Disc Playing type status Current chapter number DVD MPEG PGM SHUFFLE DTS ANGLE REPEAT1 Digital A-B TITLE CHAP HOUR MIN SEC Current surround format Current Current...
... about the disc, such as shown in the following chart. Playing time and number of the current chapter DVD TITLE CHAP HOUR MIN SEC Remaining time of the current chapter DVD TITLE CHAP Press TIME/TEXT HOUR MIN SEC Playing time and number of the current title...front panel display. • While you are not displayed. 22 TIME/TEXT When playing back a DVD Displaying information while playing the disc Disc Playing type status Current chapter number DVD MPEG PGM SHUFFLE DTS ANGLE REPEAT1 Digital A-B TITLE CHAP HOUR MIN SEC Current surround format Current Current...

Operating Instructions (CD/DVD Component)
Page 24
DISPLAY ENTER For details on the kind of the onscreen menu (Control Menu). Using the Control Menu Display Using the Control Menu display, you like, change the viewing angles, make Digital Cinema Sound settings, and other such operations. The possible operations are different depending on each Control Menu display item, see pages 27 to use the convenient features of disc. Using Various Functions with the Control Menu This chapter describes how to play scenes in any order you can select the starting point, play discs in various modes and how to 42.
DISPLAY ENTER For details on the kind of the onscreen menu (Control Menu). Using the Control Menu Display Using the Control Menu display, you like, change the viewing angles, make Digital Cinema Sound settings, and other such operations. The possible operations are different depending on each Control Menu display item, see pages 27 to use the convenient features of disc. Using Various Functions with the Control Menu This chapter describes how to play scenes in any order you can select the starting point, play discs in various modes and how to 42.


