Operating Instructions
Page 4
... to the Control Menu Display 12 Hookups Hooking Up the Player 15 Step 1: Unpacking 15 Step 2: Preparing the Remote 15 Step 3: Connecting the Video/HDMI Cords 17 Step 4: Connecting the Audio Cords 20 Step 5: Connecting the Power Cord 26 Step 6: Quick Setup 26 Playing Discs Inserting Discs 30 Playing ...Discs 32 Resuming Playback From the Point Where You Stopped the Disc (Multi-disc Resume 34 Using the DVD's Menu 35 Selecting "ORIGINAL" or "PLAY LIST" on a DVD-RW 36 Selecting a Playback Area for a Super Audio CD 37 Playing VIDEO CDs With PBC Functions (PBC Playback ...
... to the Control Menu Display 12 Hookups Hooking Up the Player 15 Step 1: Unpacking 15 Step 2: Preparing the Remote 15 Step 3: Connecting the Video/HDMI Cords 17 Step 4: Connecting the Audio Cords 20 Step 5: Connecting the Power Cord 26 Step 6: Quick Setup 26 Playing Discs Inserting Discs 30 Playing ...Discs 32 Resuming Playback From the Point Where You Stopped the Disc (Multi-disc Resume 34 Using the DVD's Menu 35 Selecting "ORIGINAL" or "PLAY LIST" on a DVD-RW 36 Selecting a Playback Area for a Super Audio CD 37 Playing VIDEO CDs With PBC Functions (PBC Playback ...
Operating Instructions
Page 8
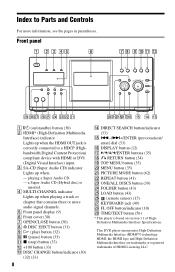
...) * This player is inserted. C SA-CD (Super Audio CD) indicator Lights up when the HDMI OUT jack is correctly connected to Parts and Controls For more audio signal channels. This DVD player incorporates High-Definition Multimedia Interface (HDMI™) technology. D MULTI CHANNEL indicator Lights up when playing a track or chapter that contains three...
...) * This player is inserted. C SA-CD (Super Audio CD) indicator Lights up when the HDMI OUT jack is correctly connected to Parts and Controls For more audio signal channels. This DVD player incorporates High-Definition Multimedia Interface (HDMI™) technology. D MULTI CHANNEL indicator Lights up when playing a track or chapter that contains three...

Operating Instructions
Page 10
...) D LINE OUT AUDIO L/R 1/2 jacks (21) (22) (23) E LINE OUT VIDEO 1/2 jacks (17) F S VIDEO OUT 1/2 jacks (17) G COMPONENT VIDEO OUT (Y, PB/ CB, PR/CR) jacks (17) H HDMI OUT (high-definition multimedia interface out) jack (17) 10 To turn off , and the FL OFF indicator on the player.
...) D LINE OUT AUDIO L/R 1/2 jacks (21) (22) (23) E LINE OUT VIDEO 1/2 jacks (17) F S VIDEO OUT 1/2 jacks (17) G COMPONENT VIDEO OUT (Y, PB/ CB, PR/CR) jacks (17) H HDMI OUT (high-definition multimedia interface out) jack (17) 10 To turn off , and the FL OFF indicator on the player.
Operating Instructions
Page 17
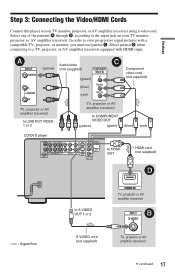
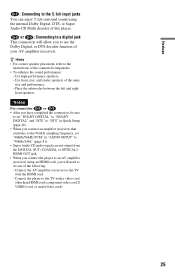
Hookups Step 3: Connecting the Video/HDMI Cords Connect this player to S VIDEO OUT 1 or 2 TV, projector or AV amplifier (receiver) S VIDEO cord (not supplied) TV, projector or AV amplifier (receiver) c continued ... AV amplifier (receiver) to LINE OUT VIDEO 1 or 2 TV, projector or AV amplifier (receiver) to COMPONENT VIDEO OUT (yellow) (green) (blue) (red) CD/DVD player to HDMI OUT HDMI cord (not supplied) l : Signal flow to your TV monitor, projector, or AV amplifier (receiver). Select one of the patterns A through D, according to view progressive...
Hookups Step 3: Connecting the Video/HDMI Cords Connect this player to S VIDEO OUT 1 or 2 TV, projector or AV amplifier (receiver) S VIDEO cord (not supplied) TV, projector or AV amplifier (receiver) c continued ... AV amplifier (receiver) to LINE OUT VIDEO 1 or 2 TV, projector or AV amplifier (receiver) to COMPONENT VIDEO OUT (yellow) (green) (blue) (red) CD/DVD player to HDMI OUT HDMI cord (not supplied) l : Signal flow to your TV monitor, projector, or AV amplifier (receiver). Select one of the patterns A through D, according to view progressive...
Operating Instructions
Page 18
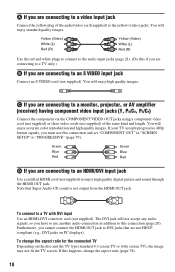
... To change the aspect ratio (page 78). 18 C If you are connecting to an HDMI/DVI input jack Use a certified HDMI cord (not supplied) to enjoy high quality digital picture and sound through the HDMI OUT jack. The DVI jack will enjoy standard quality images. You will enjoy high quality images...video input jack Connect the yellow plug of the same kind and length. Furthermore, you cannot connect the HDMI OUT jack to DVI jacks that Super Audio CD sound is not output from the HDMI OUT jack. Green Blue Red Green Blue Red D If you are connecting to a monitor, projector, or...
... To change the aspect ratio (page 78). 18 C If you are connecting to an HDMI/DVI input jack Use a certified HDMI cord (not supplied) to enjoy high quality digital picture and sound through the HDMI OUT jack. The DVI jack will enjoy standard quality images. You will enjoy high quality images...video input jack Connect the yellow plug of the same kind and length. Furthermore, you cannot connect the HDMI OUT jack to DVI jacks that Super Audio CD sound is not output from the HDMI OUT jack. Green Blue Red Green Blue Red D If you are connecting to a monitor, projector, or...
Operating Instructions
Page 22
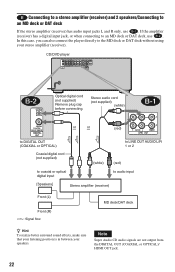
...) to LINE OUT AUDIO L/R 1 or 2 (white) (red) to coaxial or optical digital input to the MD deck or DAT deck without using your speakers. CD/DVD player Optical digital cord (not supplied) Remove plug cap before connecting. In this case, you can also connect the player directly to audio input [Speakers... listening position is in between your stereo amplifier (receiver). Note Super Audio CD audio signals are not output from the DIGITAL OUT (COAXIAL or OPTICAL)/ HDMI OUT jack. 22
...) to LINE OUT AUDIO L/R 1 or 2 (white) (red) to coaxial or optical digital input to the MD deck or DAT deck without using your speakers. CD/DVD player Optical digital cord (not supplied) Remove plug cap before connecting. In this case, you can also connect the player directly to audio input [Speakers... listening position is in between your stereo amplifier (receiver). Note Super Audio CD audio signals are not output from the DIGITAL OUT (COAXIAL or OPTICAL)/ HDMI OUT jack. 22
Operating Instructions
Page 23
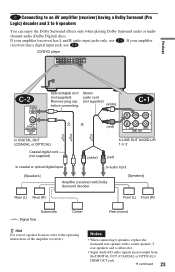
...Digital) discs. C Connecting to an AV amplifier (receiver) having a Dolby Surround (Pro Logic) decoder and 3 to the operating instructions of the amplifier (receiver). CD/DVD player Hookups Optical digital cord (not supplied) Remove plug cap before connecting. If your amplifier (receiver) has L and R audio input jacks only, use C-2 . Stereo ...) with a center speaker, 2 rear speakers and a subwoofer. • Super Audio CD audio signals are not output from the DIGITAL OUT (COAXIAL or OPTICAL)/ HDMI OUT jack. If your amplifier (receiver) has a digital input jack, use C-1 .
...Digital) discs. C Connecting to an AV amplifier (receiver) having a Dolby Surround (Pro Logic) decoder and 3 to the operating instructions of the amplifier (receiver). CD/DVD player Hookups Optical digital cord (not supplied) Remove plug cap before connecting. If your amplifier (receiver) has L and R audio input jacks only, use C-2 . Stereo ...) with a center speaker, 2 rear speakers and a subwoofer. • Super Audio CD audio signals are not output from the DIGITAL OUT (COAXIAL or OPTICAL)/ HDMI OUT jack. If your amplifier (receiver) has a digital input jack, use C-1 .
Operating Instructions
Page 24
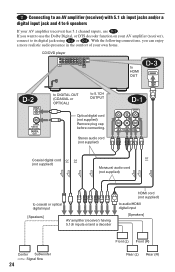
... (not supplied) to 5.1CH OUTPUT Optical digital cord (not supplied) Remove plug cap before connecting. CD/DVD player to HDMI OUT to DIGITAL OUT (COAXIAL or OPTICAL) to audio/HDMI digital input [Speakers] Center Subwoofer l: Signal flow 24 Front (L) Front (R) Rear (L) Rear (R) D Connecting to an AV amplifier (receiver) with 5.1 ch input jacks and...
... (not supplied) to 5.1CH OUTPUT Optical digital cord (not supplied) Remove plug cap before connecting. CD/DVD player to HDMI OUT to DIGITAL OUT (COAXIAL or OPTICAL) to audio/HDMI digital input [Speakers] Center Subwoofer l: Signal flow 24 Front (L) Front (R) Rear (L) Rear (R) D Connecting to an AV amplifier (receiver) with 5.1 ch input jacks and...
Operating Instructions
Page 25
...in "AUDIO SETUP" to "96kHz/24bit" (page 81). • Super Audio CD audio signals are not output from the DIGITAL OUT (COAXIAL or OPTICAL)/ HDMI OUT jack. • When you connect the player to an AV amplifier (receiver) using the internal Dolby Digital, DTS, or Super Audio CD Multi decoder.... z Hints • For correct speaker placement, refer to the 5.1ch input jacks You can enjoy 5.1ch surround sound using an HDMI cord, you to the TV with a video cord other than HDMI cord (component video cord, S VIDEO cord, or audio/video cord). 25 D-2 or D-3 : Connecting to a digital jack This ...
...in "AUDIO SETUP" to "96kHz/24bit" (page 81). • Super Audio CD audio signals are not output from the DIGITAL OUT (COAXIAL or OPTICAL)/ HDMI OUT jack. • When you connect the player to an AV amplifier (receiver) using the internal Dolby Digital, DTS, or Super Audio CD Multi decoder.... z Hints • For correct speaker placement, refer to the 5.1ch input jacks You can enjoy 5.1ch surround sound using an HDMI cord, you to the TV with a video cord other than HDMI cord (component video cord, S VIDEO cord, or audio/video cord). 25 D-2 or D-3 : Connecting to a digital jack This ...
Operating Instructions
Page 27
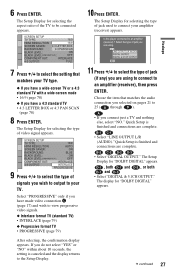
SCREEN SETUP TV TYPE: 16:9 HDMI RESOLUTION: AUTO SCREEN SAVER: ON BACKGROUND: BLUE BLACK LEVEL: ON BLACK LEVEL(COMPONENT OUT): OFF COMPONENT OUT: INTERLACE 4:3 OUTPUT: INTERLACE PROGRESSIVE 9 Press X/x ...both D-1 and D-2 , or both D-1 and D-3 • Select "DIGITAL & 5.1CH OUTPUT." Is this player connected to be connected appears. 6 Press ENTER. SCREEN SETUP TV TYPE: 16:9 HDMI RESOLUTION: 16:9 SCREEN SAVER: 4:3 LETTER BOX BACKGROUND: 4:3 PAN SCAN BLACK LEVEL: ON BLACK LEVEL(COMPONENT OUT): OFF COMPONENT OUT: INTERLACE 4:3 OUTPUT: FULL 7 Press X/x to select...
SCREEN SETUP TV TYPE: 16:9 HDMI RESOLUTION: AUTO SCREEN SAVER: ON BACKGROUND: BLUE BLACK LEVEL: ON BLACK LEVEL(COMPONENT OUT): OFF COMPONENT OUT: INTERLACE 4:3 OUTPUT: INTERLACE PROGRESSIVE 9 Press X/x ...both D-1 and D-2 , or both D-1 and D-3 • Select "DIGITAL & 5.1CH OUTPUT." Is this player connected to be connected appears. 6 Press ENTER. SCREEN SETUP TV TYPE: 16:9 HDMI RESOLUTION: 16:9 SCREEN SAVER: 4:3 LETTER BOX BACKGROUND: 4:3 PAN SCAN BLACK LEVEL: ON BLACK LEVEL(COMPONENT OUT): OFF COMPONENT OUT: INTERLACE 4:3 OUTPUT: FULL 7 Press X/x to select...
Operating Instructions
Page 28
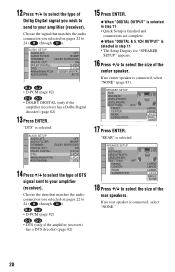
...AUDIO SETUP AUDIO ATT: OFF AUDIO FILTER: SHARP DOWNMIX: DOLBY SURROUND DIGITAL OUT: ON DOLBY DIGITAL: D-PCM DTS: D-PCM 48kHz/96kHz PCM: DOLBY DIGITAL AUDIO(HDMI): AUTO B-2 C-2 • D-PCM (page 82) D-2 D-3 • DOLBY DIGITAL (only if the amplifier (receiver) has a Dolby Digital decoder) (page... OFF AUDIO FILTER: SHARP DOWNMIX: DOLBY SURROUND DIGITAL OUT: ON DOLBY DIGITAL: D-PCM DTS: D-PCM 48kHz/96kHz PCM: D-PCM AUDIO(HDMI): DTS 14 Press X/x to select the type of DTS signal sent to your amplifier (receiver). If no center speaker is selected in ...
...AUDIO SETUP AUDIO ATT: OFF AUDIO FILTER: SHARP DOWNMIX: DOLBY SURROUND DIGITAL OUT: ON DOLBY DIGITAL: D-PCM DTS: D-PCM 48kHz/96kHz PCM: DOLBY DIGITAL AUDIO(HDMI): AUTO B-2 C-2 • D-PCM (page 82) D-2 D-3 • DOLBY DIGITAL (only if the amplifier (receiver) has a Dolby Digital decoder) (page... OFF AUDIO FILTER: SHARP DOWNMIX: DOLBY SURROUND DIGITAL OUT: ON DOLBY DIGITAL: D-PCM DTS: D-PCM 48kHz/96kHz PCM: D-PCM AUDIO(HDMI): DTS 14 Press X/x to select the type of DTS signal sent to your amplifier (receiver). If no center speaker is selected in ...
Operating Instructions
Page 32
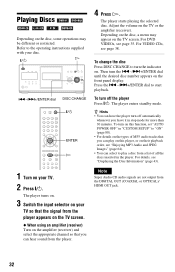
Then turn the indicator on. For details, see page 35. For DVD VIDEOs, see "Displaying the Disc Information" (page 43). For VIDEO CDs, see "Enjoying MP3 Audio and JPEG Images" (page 64). • You can select to ... order, see page 38. The player enters standby mode. To turn off automatically whenever you can play a disc from the DIGITAL OUT (COAXIAL or OPTICAL)/ HDMI OUT jack. 32 Note Super Audio CD audio signals are not output from a list of MP3 audio tracks that you leave it in the player...
Then turn the indicator on. For details, see page 35. For DVD VIDEOs, see "Displaying the Disc Information" (page 43). For VIDEO CDs, see "Enjoying MP3 Audio and JPEG Images" (page 64). • You can select to ... order, see page 38. The player enters standby mode. To turn off automatically whenever you can play a disc from the DIGITAL OUT (COAXIAL or OPTICAL)/ HDMI OUT jack. 32 Note Super Audio CD audio signals are not output from a list of MP3 audio tracks that you leave it in the player...

Operating Instructions
Page 76
.... The options for the selected item appear. Then press ENTER. The options for "SETUP" appear. 4 ALL ( 2 4 ) DVD VIDEO : : QUICK CUSTOM RESET QUICK 3 Press X/x to items such as picture and sound. Example: "TV TYPE" SCREEN SETUP TV TYPE: 16...BLACK LEVEL(COMPONENT OUT): OFF COMPONENT OUT: INTERLACE 4:3 OUTPUT: FULL Options 76 Example: "SCREEN SETUP" Selected item SCREEN SETUP TV TYPE: 16:9 HDMI RESOLUTION: AUTO SCREEN SAVER: ON BACKGROUND: JACKET PICTURE BLACK LEVEL: ON BLACK LEVEL(COMPONENT OUT): OFF COMPONENT OUT: INTERLACE 4:3 OUTPUT: FULL Setup...
.... The options for the selected item appear. Then press ENTER. The options for "SETUP" appear. 4 ALL ( 2 4 ) DVD VIDEO : : QUICK CUSTOM RESET QUICK 3 Press X/x to items such as picture and sound. Example: "TV TYPE" SCREEN SETUP TV TYPE: 16...BLACK LEVEL(COMPONENT OUT): OFF COMPONENT OUT: INTERLACE 4:3 OUTPUT: FULL Options 76 Example: "SCREEN SETUP" Selected item SCREEN SETUP TV TYPE: 16:9 HDMI RESOLUTION: AUTO SCREEN SAVER: ON BACKGROUND: JACKET PICTURE BLACK LEVEL: ON BLACK LEVEL(COMPONENT OUT): OFF COMPONENT OUT: INTERLACE 4:3 OUTPUT: FULL Setup...
Operating Instructions
Page 77
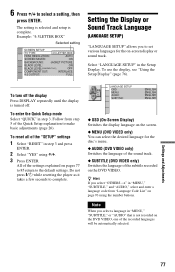
... AUDIO: SUBTITLE: ENGLISH ENGLISH ENGLISH ENGLISH ◆ OSD (On-Screen Display) Switches the display language on the screen. ◆ MENU (DVD VIDEO only) You can select the desired language for the on pages 77 to 85 return to the default settings. Note When you select ... "Language Code List" on page 93 using X/x. 3 Press ENTER. Example: "4:3LETTER BOX" Selected setting SCREEN SETUP TV TYPE: 4:3 LETTER BOX HDMI RESOLUTION: AUTO SCREEN SAVER: ON BACKGROUND: JACKET PICTURE BLACK LEVEL: ON BLACK LEVEL(COMPONENT OUT): OFF COMPONENT OUT: INTERLACE 4:3 OUTPUT: FULL Setting ...
... AUDIO: SUBTITLE: ENGLISH ENGLISH ENGLISH ENGLISH ◆ OSD (On-Screen Display) Switches the display language on the screen. ◆ MENU (DVD VIDEO only) You can select the desired language for the on pages 77 to 85 return to the default settings. Note When you select ... "Language Code List" on page 93 using X/x. 3 Press ENTER. Example: "4:3LETTER BOX" Selected setting SCREEN SETUP TV TYPE: 4:3 LETTER BOX HDMI RESOLUTION: AUTO SCREEN SAVER: ON BACKGROUND: JACKET PICTURE BLACK LEVEL: ON BLACK LEVEL(COMPONENT OUT): OFF COMPONENT OUT: INTERLACE 4:3 OUTPUT: FULL Setting ...
Operating Instructions
Page 78
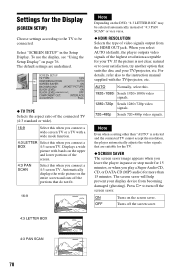
... TV. ◆ SCREEN SAVER The screen saver image appears when you leave the player in the Setup Display. SCREEN SETUP TV TYPE: 16:9 HDMI RESOLUTION: AUTO SCREEN SAVER: ON BACKGROUND: JACKET PICTURE BLACK LEVEL: ON BLACK LEVEL(COMPONENT OUT): OFF COMPONENT OUT: INTERLACE 4:3 OUTPUT: FULL ◆... BOX 4:3 PAN SCAN 78 To use the display, see "Using the Setup Display" on the screen saver. Automatically displays the wide picture on the DVD, "4:3 LETTER BOX" may be connected. The screen saver will help prevent your TV. Note Even when a setting other than 15 minutes. Press ...
... TV. ◆ SCREEN SAVER The screen saver image appears when you leave the player in the Setup Display. SCREEN SETUP TV TYPE: 16:9 HDMI RESOLUTION: AUTO SCREEN SAVER: ON BACKGROUND: JACKET PICTURE BLACK LEVEL: ON BLACK LEVEL(COMPONENT OUT): OFF COMPONENT OUT: INTERLACE 4:3 OUTPUT: FULL ◆... BOX 4:3 PAN SCAN 78 To use the display, see "Using the Setup Display" on the screen saver. Automatically displays the wide picture on the DVD, "4:3 LETTER BOX" may be connected. The screen saver will help prevent your TV. Note Even when a setting other than 15 minutes. Press ...
Operating Instructions
Page 79
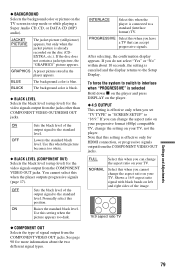
...the black level of the output signal to "16:9." INTERLACE Select this position. After selecting, the confirmation display appears. See page 90 for HDMI connection, or progressive signals output from the COMPONENT VIDEO OUT jacks. JACKET PICTURE The jacket picture (still picture) appears, but only when ... image. 16:9 aspect ratio TV ◆ COMPONENT OUT Selects the type of signal output from the jacks other than COMPONENT VIDEO OUT/HDMI OUT jacks. If you can accept progressive signals. To force the system to switch to the standard level. Note that can change the...
...the black level of the output signal to "16:9." INTERLACE Select this position. After selecting, the confirmation display appears. See page 90 for HDMI connection, or progressive signals output from the COMPONENT VIDEO OUT jacks. JACKET PICTURE The jacket picture (still picture) appears, but only when ... image. 16:9 aspect ratio TV ◆ COMPONENT OUT Selects the type of signal output from the jacks other than COMPONENT VIDEO OUT/HDMI OUT jacks. If you can accept progressive signals. To force the system to switch to the standard level. Note that can change the...
Operating Instructions
Page 81
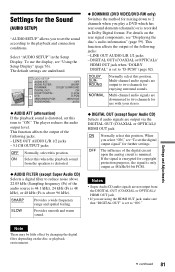
... the method for mixing down to 2 channels when you play a DVD which has rear sound elements (channels) or is above 22.05 kHz..."AUDIO SETUP" in Dolby Digital format. Select this when the playback sound from the DIGITAL OUT (COAXIAL or OPTICAL)/ HDMI OUT jack. • If you are output to two channels for use the display, see "Displaying the disc's... audio information" (page 59). DIGITAL OUT (COAXIAL or OPTICAL)/ HDMI OUT jack when "DOLBY DIGITAL" is set this position. Notes • Super Audio CD audio signals are output...
... the method for mixing down to 2 channels when you play a DVD which has rear sound elements (channels) or is above 22.05 kHz..."AUDIO SETUP" in Dolby Digital format. Select this when the playback sound from the DIGITAL OUT (COAXIAL or OPTICAL)/ HDMI OUT jack. • If you are output to two channels for use the display, see "Displaying the disc's... audio information" (page 59). DIGITAL OUT (COAXIAL or OPTICAL)/ HDMI OUT jack when "DOLBY DIGITAL" is set this position. Notes • Super Audio CD audio signals are output...
Operating Instructions
Page 82
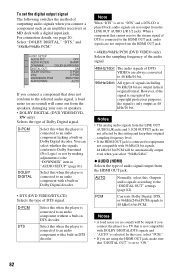
...an audio component without a built-in Dolby Digital decoder. When a component that "DIGITAL OUT" is connected to the HDMI OUT jack, audio signals are not output from the HDMI OUT jack. • 48kHz/96kHz PCM (DVD VIDEO only) Selects the sampling frequency of the audio signal. 48kHz/16bit The audio signals of...LINE OUT AUDIO L/R jacks and 5.1CH OUTPUT jacks are using the HDMI OUT jack, make sure that cannot receive the stream signal of DTS is set to an audio component with a built-in Dolby Digital decoder. • DTS (DVD VIDEO/DTS-CD) Selects the type of DTS signal. In this ...
...an audio component without a built-in Dolby Digital decoder. When a component that "DIGITAL OUT" is connected to the HDMI OUT jack, audio signals are not output from the HDMI OUT jack. • 48kHz/96kHz PCM (DVD VIDEO only) Selects the sampling frequency of the audio signal. 48kHz/16bit The audio signals of...LINE OUT AUDIO L/R jacks and 5.1CH OUTPUT jacks are using the HDMI OUT jack, make sure that cannot receive the stream signal of DTS is set to an audio component with a built-in Dolby Digital decoder. • DTS (DVD VIDEO/DTS-CD) Selects the type of DTS signal. In this ...
Operating Instructions
Page 85
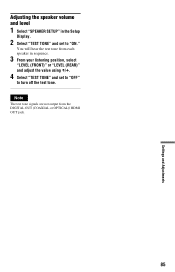
Note The test tone signals are not output from each speaker in the Setup Display. 2 Select "TEST TONE" and set to "OFF" to "ON." You will hear the test tone from the DIGITAL OUT (COAXIAL or OPTICAL)/ HDMI OUT jack. 85 Settings and Adjustments Adjusting the speaker volume and level 1 Select "SPEAKER SETUP" in sequence. 3 From your listening position, select "LEVEL (FRONT)" or "LEVEL (REAR)" and adjust the value using X/x. 4 Select "TEST TONE" and set to turn off the test tone.
Note The test tone signals are not output from each speaker in the Setup Display. 2 Select "TEST TONE" and set to "OFF" to "ON." You will hear the test tone from the DIGITAL OUT (COAXIAL or OPTICAL)/ HDMI OUT jack. 85 Settings and Adjustments Adjusting the speaker volume and level 1 Select "SPEAKER SETUP" in sequence. 3 From your listening position, select "LEVEL (FRONT)" or "LEVEL (REAR)" and adjust the value using X/x. 4 Select "TEST TONE" and set to turn off the test tone.
Operating Instructions
Page 86
... HDMI ...HDMI OUT jack. , The equipment connected to the HDMI OUT jack does not conform to the audio signal format, in this case set "AUDIO(HDMI... changing the "HDMI RESOLUTION" setting in...COAXIAL or OPTICAL)/ HDMI OUT jack, check ...HDMI OUT jack is connected to some DVD... programs could affect picture quality. Connect the TV and the player using the player, use this case, set "COMPONENT OUT" to help remedy the problem before requesting repairs. Should any of the disc is fixed on . , Check that is not HDCP compliant (the HDMI... on your DVD. Sound There...HDMI. Power The power... "HDMI RESOLUTION...
... HDMI ...HDMI OUT jack. , The equipment connected to the HDMI OUT jack does not conform to the audio signal format, in this case set "AUDIO(HDMI... changing the "HDMI RESOLUTION" setting in...COAXIAL or OPTICAL)/ HDMI OUT jack, check ...HDMI OUT jack is connected to some DVD... programs could affect picture quality. Connect the TV and the player using the player, use this case, set "COMPONENT OUT" to help remedy the problem before requesting repairs. Should any of the disc is fixed on . , Check that is not HDCP compliant (the HDMI... on your DVD. Sound There...HDMI. Power The power... "HDMI RESOLUTION...


