Operating Instructions
Page 4
... 3 About This Manual 6 This Player Can Play the Following Discs 6 Index to Parts and Controls 8 Guide to the Control Menu Display 12 Hookups Hooking Up the Player 15 Step 1: Unpacking 15 Step 2: Preparing the Remote 15 Step 3: Connecting the Video/HDMI Cords 17 Step 4: Connecting the Audio Cords 20 Step ...30 Playing Discs 32 Resuming Playback From the Point Where You Stopped the Disc (Multi-disc Resume 34 Using the DVD's Menu 35 Selecting "ORIGINAL" or "PLAY LIST" on a DVD-RW 36 Selecting a Playback Area for a Super Audio CD 37 Playing VIDEO CDs With PBC Functions (PBC Playback...
... 3 About This Manual 6 This Player Can Play the Following Discs 6 Index to Parts and Controls 8 Guide to the Control Menu Display 12 Hookups Hooking Up the Player 15 Step 1: Unpacking 15 Step 2: Preparing the Remote 15 Step 3: Connecting the Video/HDMI Cords 17 Step 4: Connecting the Audio Cords 20 Step ...30 Playing Discs 32 Resuming Playback From the Point Where You Stopped the Disc (Multi-disc Resume 34 Using the DVD's Menu 35 Selecting "ORIGINAL" or "PLAY LIST" on a DVD-RW 36 Selecting a Playback Area for a Super Audio CD 37 Playing VIDEO CDs With PBC Functions (PBC Playback...
Operating Instructions
Page 5
... or JPEG Image Files 65 Enjoying JPEG Images as a Slide Show 68 Using Various Additional Functions Locking Discs (CUSTOM PARENTAL CONTROL, PARENTAL CONTROL 70 Controlling Your TV or AV Amplifier (Receiver) With the Supplied Remote 73 Settings and Adjustments Using the Setup Display 76 Setting the Display or Sound Track Language (LANGUAGE SETUP) . . . . . 77...
... or JPEG Image Files 65 Enjoying JPEG Images as a Slide Show 68 Using Various Additional Functions Locking Discs (CUSTOM PARENTAL CONTROL, PARENTAL CONTROL 70 Controlling Your TV or AV Amplifier (Receiver) With the Supplied Remote 73 Settings and Adjustments Using the Setup Display 76 Setting the Display or Sound Track Language (LANGUAGE SETUP) . . . . . 77...
Operating Instructions
Page 6
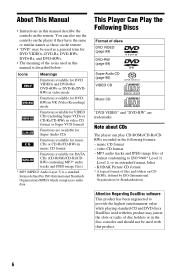
... files) * MP3 (MPEG1 Audio Layer 3) is a standard format defined by ISO (International Organization for DVD VIDEOs, DVD-Rs, DVD-RWs, DVD+Rs, and DVD+RWs. • The meaning of the icons used in this manual describe the controls on the remote. • "DVD" may jam in the slots or racks of format conforming to provide the highest entertainment...
... files) * MP3 (MPEG1 Audio Layer 3) is a standard format defined by ISO (International Organization for DVD VIDEOs, DVD-Rs, DVD-RWs, DVD+Rs, and DVD+RWs. • The meaning of the icons used in this manual describe the controls on the remote. • "DVD" may jam in the slots or racks of format conforming to provide the highest entertainment...
Operating Instructions
Page 8
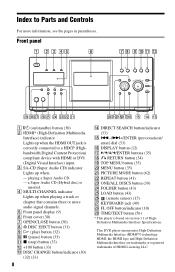
...35) T MENU button (35) U PICTURE MODE button (62) V REPEAT button (41) W ONE/ALL DISCS button (39) X FOLDER button (43) Y LOAD button (43) Z (remote sensor) (15) wj KEYBOARD jack (49) wk FL OFF button/indicator (10) wl TIME/TEXT button (56) * This player is inserted. This... DVD player incorporates High-Definition Multimedia Interface (HDMI™) technology. C SA-CD (Super Audio CD) indicator Lights up when the HDMI OUT jack is correctly connected to Parts and Controls For more audio signal channels. D MULTI CHANNEL indicator Lights ...
...35) T MENU button (35) U PICTURE MODE button (62) V REPEAT button (41) W ONE/ALL DISCS button (39) X FOLDER button (43) Y LOAD button (43) Z (remote sensor) (15) wj KEYBOARD jack (49) wk FL OFF button/indicator (10) wl TIME/TEXT button (56) * This player is inserted. This... DVD player incorporates High-Definition Multimedia Interface (HDMI™) technology. C SA-CD (Super Audio CD) indicator Lights up when the HDMI OUT jack is correctly connected to Parts and Controls For more audio signal channels. D MULTI CHANNEL indicator Lights ...
Operating Instructions
Page 15
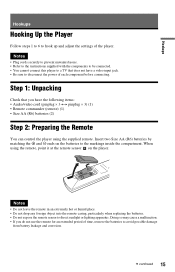
...• Audio/video cord (pinplug × 3 y pinplug × 3) (1) • Remote commander (remote) (1) • Size AA (R6) batteries (2) Step 2: Preparing the Remote You can control the player using the remote, point it at the remote sensor on the batteries to the markings inside the compartment. c continued 15 Notes • Plug... with the components to be connected. • You cannot connect this player to a TV that you do not use the remote for an extended period of time, remove the batteries to hook up and adjust the settings of each component before connecting. Insert...
...• Audio/video cord (pinplug × 3 y pinplug × 3) (1) • Remote commander (remote) (1) • Size AA (R6) batteries (2) Step 2: Preparing the Remote You can control the player using the remote, point it at the remote sensor on the batteries to the markings inside the compartment. c continued 15 Notes • Plug... with the components to be connected. • You cannot connect this player to a TV that you do not use the remote for an extended period of time, remove the batteries to hook up and adjust the settings of each component before connecting. Insert...
Operating Instructions
Page 34
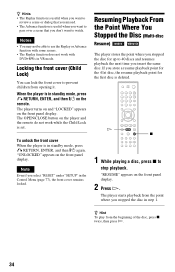
... in standby mode, press O RETURN, ENTER, and then [/1 on the remote. "UNLOCKED" appears on the player and the remote do not work with DVD+RWs in step 1. "RESUME" appears on the front panel display. If you select "RESET" under "SETUP" in the Control Menu (page 77), the front cover remains locked. When the player...
... in standby mode, press O RETURN, ENTER, and then [/1 on the remote. "UNLOCKED" appears on the player and the remote do not work with DVD+RWs in step 1. "RESUME" appears on the front panel display. If you select "RESET" under "SETUP" in the Control Menu (page 77), the front cover remains locked. When the player...
Operating Instructions
Page 73
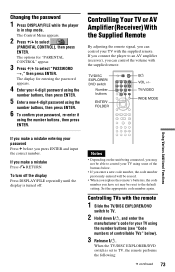
... Remote By adjusting the remote signal, you can control the volume with the supplied remote. If you connect the player to an AV amplifier (receiver), you have set to TV, the remote performs the following: c continued 73 Controlling TVs with the remote 1 Slide the TV/DISC EXPLORER/DVD switch... to select "PASSWORD t," then press ENTER. The display for your TV using some of controllable TVs" below . • If you enter...
... Remote By adjusting the remote signal, you can control the volume with the supplied remote. If you connect the player to an AV amplifier (receiver), you have set to TV, the remote performs the following: c continued 73 Controlling TVs with the remote 1 Slide the TV/DISC EXPLORER/DVD switch... to select "PASSWORD t," then press ENTER. The display for your TV using some of controllable TVs" below . • If you enter...

Operating Instructions
Page 74
... MODE Switches to TV. [/1 Turns the TV on or off VOL +/- buttons control the AV amplifier's volume. ◆ If you want to control the TV volume Slide the TV/DISC EXPLORER/DVD switch to or from the wide mode of a Sony wide TV TV/VIDEO Switches the TV's input source between the TV and... other input sources Code numbers of controllable TVs If more than one code number is listed, try entering them one at a time until you find the one that works with the remote 1 Slide the TV/DISC EXPLORER/DVD switch to DVD...
... MODE Switches to TV. [/1 Turns the TV on or off VOL +/- buttons control the AV amplifier's volume. ◆ If you want to control the TV volume Slide the TV/DISC EXPLORER/DVD switch to or from the wide mode of a Sony wide TV TV/VIDEO Switches the TV's input source between the TV and... other input sources Code numbers of controllable TVs If more than one code number is listed, try entering them one at a time until you find the one that works with the remote 1 Slide the TV/DISC EXPLORER/DVD switch to DVD...
Operating Instructions
Page 75
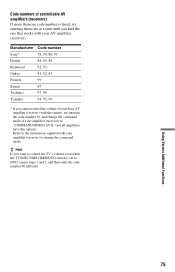
...amplifier (receiver). z Hint If you cannot control the volume of your Sony AV amplifier (receiver) with the remote, try entering them one at a time until you find the one that works with your amplifier (receiver) to change the command mode of controllable AV amplifiers (receivers) If more than one... code number is set to DVD, repeat steps 1 and...
...amplifier (receiver). z Hint If you cannot control the volume of your Sony AV amplifier (receiver) with the remote, try entering them one at a time until you find the one that works with your amplifier (receiver) to change the command mode of controllable AV amplifiers (receivers) If more than one... code number is set to DVD, repeat steps 1 and...
Operating Instructions
Page 94
... play DATA CD 64 DVD 32 Super Audio CD/CD/ VIDEO CD 32 Control Menu 12 CUSTOM 76 CUSTOM PARENTAL CONTROL 70 CUSTOM PICTURE MODE...94 Disc Explorer 43 Disc Memo 48 Disc Memo Input 48 Display Control Menu Display 12 Disc Explorer display 44 Front panel display 9, 57...DOWNMIX 81 DTS 24, 59, 82, 89 DVD VIDEO 6, 32, 89 DVD+RW 89 DVD/Super Audio CD/CD text 56 DVD-RW 6, 36, 89 E EDIT 48 EFFECT ...84 Loading Discs 43 Locating a point on a disc 52 M MENU 77 Menu DVD's menu 35 Top menu 35 MODE (MP3, JPEG) 68 MP3 6, 64 Multi...ORIGINAL/PLAY LIST 36 OSD 77 P PARENTAL CONTROL 70 PAUSE MODE 80 PBC Playback 38 PICTURE...
... play DATA CD 64 DVD 32 Super Audio CD/CD/ VIDEO CD 32 Control Menu 12 CUSTOM 76 CUSTOM PARENTAL CONTROL 70 CUSTOM PICTURE MODE...94 Disc Explorer 43 Disc Memo 48 Disc Memo Input 48 Display Control Menu Display 12 Disc Explorer display 44 Front panel display 9, 57...DOWNMIX 81 DTS 24, 59, 82, 89 DVD VIDEO 6, 32, 89 DVD+RW 89 DVD/Super Audio CD/CD text 56 DVD-RW 6, 36, 89 E EDIT 48 EFFECT ...84 Loading Discs 43 Locating a point on a disc 52 M MENU 77 Menu DVD's menu 35 Top menu 35 MODE (MP3, JPEG) 68 MP3 6, 64 Multi...ORIGINAL/PLAY LIST 36 OSD 77 P PARENTAL CONTROL 70 PAUSE MODE 80 PBC Playback 38 PICTURE...

