
Operating Instructions
Page 55
REC 55 When fading out, the picture gradually changes from black-and-white to color. FADER (mosaic) BOUNCE1) 2) OVERLAP2) WIPE2) DOT2) [b] STBY MONOTONE When fading in or out to give your recording a more professional appearance. [a] STBY REC FADER Advanced Recording Operations M. Using the fader You can fade in , the picture gradually changes from color to black-and-white. 1) YoucanusethebouncewhenDZOOMissettoOFFinthemenusettings. 2) Fadeinonly.
REC 55 When fading out, the picture gradually changes from black-and-white to color. FADER (mosaic) BOUNCE1) 2) OVERLAP2) WIPE2) DOT2) [b] STBY MONOTONE When fading in or out to give your recording a more professional appearance. [a] STBY REC FADER Advanced Recording Operations M. Using the fader You can fade in , the picture gradually changes from color to black-and-white. 1) YoucanusethebouncewhenDZOOMissettoOFFinthemenusettings. 2) Fadeinonly.
Operating Instructions
Page 193
... e-mail. You can view images recorded on the "Memory Stick" on the computer OS: Microsoft Windows 98SE, Windows Me, Windows 2000 Professional, Windows XP Home Edition or Windows XP Professional Standard installation is running Windows 98, but you can read still images. For Windows users Complete installation of the image files edited...
... e-mail. You can view images recorded on the "Memory Stick" on the computer OS: Microsoft Windows 98SE, Windows Me, Windows 2000 Professional, Windows XP Home Edition or Windows XP Professional Standard installation is running Windows 98, but you can read still images. For Windows users Complete installation of the image files edited...

Operating Instructions
Page 194
... other product names mentioned herein may not operate depending on the computer OS: Microsoft Windows 98, Windows 98SE, Windows Me, Windows 2000 Professional, Windows XP Home Edition or Windows XP Professional Standard installation is not assured if the above . • Windows and Windows Media are not mentioned in each case in this...
... other product names mentioned herein may not operate depending on the computer OS: Microsoft Windows 98, Windows 98SE, Windows Me, Windows 2000 Professional, Windows XP Home Edition or Windows XP Professional Standard installation is not assured if the above . • Windows and Windows Media are not mentioned in each case in this...

Operating Instructions
Page 195
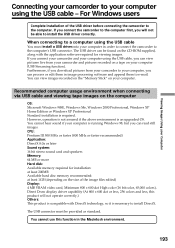
...221 for simply copying images from the camcorder onto your computer without connecting the USB cable to your computer using Windows 2000 Professional or Windows XP Home Edition/ Professional, log in the menu settings and select "PTP," you connect the USB cable before USB driver installation is ideal for... details. 195 Windows XP Home Edition/Professional users If you go to "USBCONNECT" in with the steps on the screen. If you are using the USB cable - Carry out installation...
...221 for simply copying images from the camcorder onto your computer without connecting the USB cable to your computer using Windows 2000 Professional or Windows XP Home Edition/ Professional, log in the menu settings and select "PTP," you connect the USB cable before USB driver installation is ideal for... details. 195 Windows XP Home Edition/Professional users If you go to "USBCONNECT" in with the steps on the screen. If you are using the USB cable - Carry out installation...
Operating Instructions
Page 196
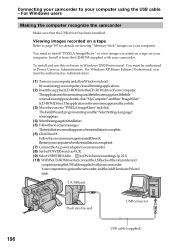
... to page 197 for details on viewing "Memory Stick" images on your computer. To install and use this software in Windows 2000 Professional. Your computer recognizes the camcorder, and the Add Hardware Wizard starts. (USB) jack Push into the end USB connector 196 USB ... Make sure that the USB driver has been installed. You must be authorized as Administrators. (1) TurnonyourcomputerandallowWindowstoload. For Windows XP Home Edition/Professional, you are using the USB cable - Restart your computer when the installation is complete. (6) ClickDirectX Follow the on-screen messages to...
... to page 197 for details on viewing "Memory Stick" images on your computer. To install and use this software in Windows 2000 Professional. Your computer recognizes the camcorder, and the Add Hardware Wizard starts. (USB) jack Push into the end USB connector 196 USB ... Make sure that the USB driver has been installed. You must be authorized as Administrators. (1) TurnonyourcomputerandallowWindowstoload. For Windows XP Home Edition/Professional, you are using the USB cable - Restart your computer when the installation is complete. (6) ClickDirectX Follow the on-screen messages to...

Operating Instructions
Page 197
... setting is not in your computer using the supplied USB cable. Viewing Images Using your Computer Connecting your camcorder to your camcorder. For Windows 2000 Professional, Windows XP Home Edition/Professional users (12) Afterthe"FileNeeded"screenappears.
... setting is not in your computer using the supplied USB cable. Viewing Images Using your Computer Connecting your camcorder to your camcorder. For Windows 2000 Professional, Windows XP Home Edition/Professional users (12) Afterthe"FileNeeded"screenappears.
Operating Instructions
Page 198
...Select"MyComputer" t"ControlPanel" t"System,"andclick"Device Manager." 5 Selectanddeletetheunderlineddevicesbelow. 198 Windows 98SE Windows Me Windows XP Home Edition/Professional: Select"Start" t"ControlPanel" t"System" t"Hardware,"andclickthe "Device manager" button. If there is no "System" inside.... 3 ConnecttheUSBconnectoronyourcomputertothe (USB) jack on your camcorder before installation of the USB driver was completed. Windows 2000 Professional: Select"MyComputer" t"ControlPanel" t"System" t"Hardware"tab, and click the "Device Manager" button. For Windows...
...Select"MyComputer" t"ControlPanel" t"System,"andclick"Device Manager." 5 Selectanddeletetheunderlineddevicesbelow. 198 Windows 98SE Windows Me Windows XP Home Edition/Professional: Select"Start" t"ControlPanel" t"System" t"Hardware,"andclickthe "Device manager" button. If there is no "System" inside.... 3 ConnecttheUSBconnectoronyourcomputertothe (USB) jack on your camcorder before installation of the USB driver was completed. Windows 2000 Professional: Select"MyComputer" t"ControlPanel" t"System" t"Hardware"tab, and click the "Device Manager" button. For Windows...

Operating Instructions
Page 199
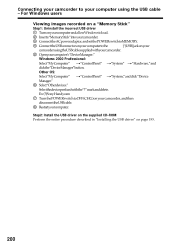
Connecting your camcorder to your Computer Windows 2000 Professional Windows XP Home Edition/Professional 6 TurnthePOWERswitchtoOFF(CHG)onyourcamcorder,andthen disconnect the USB cable. 7 Restartyourcomputer. Step 2: Install the USB driver on the supplied CD-ROM Perform the entire procedure described in "Installing the USB driver" on page 195. 199 For Windows users Viewing Images Using your computer using the USB cable -
Connecting your camcorder to your Computer Windows 2000 Professional Windows XP Home Edition/Professional 6 TurnthePOWERswitchtoOFF(CHG)onyourcamcorder,andthen disconnect the USB cable. 7 Restartyourcomputer. Step 2: Install the USB driver on the supplied CD-ROM Perform the entire procedure described in "Installing the USB driver" on page 195. 199 For Windows users Viewing Images Using your computer using the USB cable -
Operating Instructions
Page 200
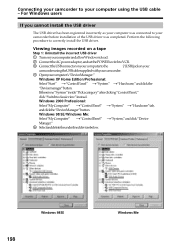
Windows 2000 Professional: Select"MyComputer" t"ControlPanel" t"System" t"Hardware,"and click the "Device Manager" button. Connecting your camcorder to your computer using the USB cable supplied with the "?" Other ... in "Installing the USB driver" on your camcorder. 5 Openyourcomputer's"DeviceManager." Select the device prefixed with your camcorder using the USB cable - mark and delete. Ex: (?)Sony Handycam 7 TurnthePOWERswitchtoOFF(CHG)onyourcamcorder,andthen disconnect the USB cable. 8 Restartyourcomputer.
Windows 2000 Professional: Select"MyComputer" t"ControlPanel" t"System" t"Hardware,"and click the "Device Manager" button. Connecting your camcorder to your computer using the USB cable supplied with the "?" Other ... in "Installing the USB driver" on your camcorder. 5 Openyourcomputer's"DeviceManager." Select the device prefixed with your camcorder using the USB cable - mark and delete. Ex: (?)Sony Handycam 7 TurnthePOWERswitchtoOFF(CHG)onyourcamcorder,andthen disconnect the USB cable. 8 Restartyourcomputer.

Operating Instructions
Page 201
... on your computer. The title screen appears. (5) Click onthescreen. (continued on your computer - SelectUSBSTREAMin toONinthemenusettings.(p.221) (4) Select"Start" t"Programs" t"PIXELA" t"ImageMixer" t"PIXELA ImageMixer Ver.1.0 for Sony." To install and use the software in Windows 2000 Professional, you must be authorized as Power Users or Administrators.
... on your computer. The title screen appears. (5) Click onthescreen. (continued on your computer - SelectUSBSTREAMin toONinthemenusettings.(p.221) (4) Select"Start" t"Programs" t"PIXELA" t"ImageMixer" t"PIXELA ImageMixer Ver.1.0 for Sony." To install and use the software in Windows 2000 Professional, you must be authorized as Power Users or Administrators.

Operating Instructions
Page 207
... Moving picture file Disconnect the USB cable and eject the "Memory Stick" or set the POWER switch to OFF(CHG). For Windows 2000 Professional/Me, Windows XP Home Edition/Professional users To disconnect the USB cable, eject the "Memory Stick" or set the POWER switch to OFF (CHG) following the procedure below...
... Moving picture file Disconnect the USB cable and eject the "Memory Stick" or set the POWER switch to OFF(CHG). For Windows 2000 Professional/Me, Windows XP Home Edition/Professional users To disconnect the USB cable, eject the "Memory Stick" or set the POWER switch to OFF (CHG) following the procedure below...
