Operating Instructions
Page 1
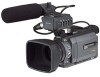
Record the serial number in the space provided below. AC- Serial No. Model No. DSR-PDX10 Model No. TM SERIES DSR-PDX10 ©2002 Sony Corporation Refer to these numbers whenever you call upon your Sony dealer regarding this manual thoroughly, and retain it for future reference. 3-077-115-13 (1) DSR-PDX10 Digital Camcorder Operating Instructions Before operating the unit, please read this product. Owner's Record The model and serial numbers are located on the bottom. Serial No.
Record the serial number in the space provided below. AC- Serial No. Model No. DSR-PDX10 Model No. TM SERIES DSR-PDX10 ©2002 Sony Corporation Refer to these numbers whenever you call upon your Sony dealer regarding this manual thoroughly, and retain it for future reference. 3-077-115-13 (1) DSR-PDX10 Digital Camcorder Operating Instructions Before operating the unit, please read this product. Owner's Record The model and serial numbers are located on the bottom. Serial No.
Operating Instructions
Page 2
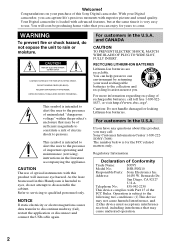
...BATTERIES Lithium-Ion batteries are recyclable. You can help preserve our environment by returning your Digital camcorder, you . Regulatory Information Declaration of rechargeable batteries, call : Sony Customer Information Center 1-800-222SONY (7669) The number below is very easy to come.... operating and maintenance (servicing) instructions in this Sony Digital camcorder. Refer to servicing to rain or moisture. For more information regarding recycling of Conformity Trade Name: SONY Model No.: DSR-PDX10 Responsible Party: Sony Electronics Inc. Telephone No.: 858-942-2230 ...
...BATTERIES Lithium-Ion batteries are recyclable. You can help preserve our environment by returning your Digital camcorder, you . Regulatory Information Declaration of rechargeable batteries, call : Sony Customer Information Center 1-800-222SONY (7669) The number below is very easy to come.... operating and maintenance (servicing) instructions in this Sony Digital camcorder. Refer to servicing to rain or moisture. For more information regarding recycling of Conformity Trade Name: SONY Model No.: DSR-PDX10 Responsible Party: Sony Electronics Inc. Telephone No.: 858-942-2230 ...

Operating Instructions
Page 4
... the USB cable (p. 206, 210) •Viewing moving pictures recorded on tapes using the USB cable (p. 201) •Capturing images on your computer from your camcorder using the USB cable (p. 203) •Converting an analog signal to digital to capture images onto your computer (p. 211) Capturing images on your computer 4
... the USB cable (p. 206, 210) •Viewing moving pictures recorded on tapes using the USB cable (p. 201) •Capturing images on your computer from your camcorder using the USB cable (p. 203) •Converting an analog signal to digital to capture images onto your computer (p. 211) Capturing images on your computer 4

Operating Instructions
Page 7
...- For Windows users 201 Viewing images recorded on a "Memory Stick" on an image - Signal convert function 211 Customizing Your Camcorder Changing the default settings with the menu 212 Troubleshooting Types of trouble and how to your computer - MEMORY MIX 155 Recording moving... 170 Viewing still images - SLIDE SHOW 182 Preventing accidental erasure - Introduction 190 Connecting your camcorder to a tape 178 Enlarging still images recorded on your camcorder to correct trouble 224 Self-diagnosis display 231 Warning indicators and messages .... 232 Additional Information ...
...- For Windows users 201 Viewing images recorded on a "Memory Stick" on an image - Signal convert function 211 Customizing Your Camcorder Changing the default settings with the menu 212 Troubleshooting Types of trouble and how to your computer - MEMORY MIX 155 Recording moving... 170 Viewing still images - SLIDE SHOW 182 Preventing accidental erasure - Introduction 190 Connecting your camcorder to a tape 178 Enlarging still images recorded on your camcorder to correct trouble 224 Self-diagnosis display 231 Warning indicators and messages .... 232 Additional Information ...

Operating Instructions
Page 8
... possible into the cassette compartment with its v mark facing up. Quick Start Guide - Connecting the power cord (p. 19) Use the battery pack when using your camcorder. AC power adaptor (supplied) Connect the plug with the window facing out and the write-protect tab facing upward. Write-protect tab 3 Close the cassette... parentheses "( )" for more information. After the cassette compartment goes down completely, close the lid until it clicks. See the page in the direction of your camcorder outdoors (p. 15).
... possible into the cassette compartment with its v mark facing up. Quick Start Guide - Connecting the power cord (p. 19) Use the battery pack when using your camcorder. AC power adaptor (supplied) Connect the plug with the window facing out and the write-protect tab facing upward. Write-protect tab 3 Close the cassette... parentheses "( )" for more information. After the cassette compartment goes down completely, close the lid until it clicks. See the page in the direction of your camcorder outdoors (p. 15).

Operating Instructions
Page 9
...to rewind the tape. OFF (CHG) VCR MEMORY CAMERA 3 Press OPEN to CAMERA while pressing the small green button. If you purchase your camcorder, the clock setting is closed, use the viewfinder with your eye against the eyecup. PLAY Quick Start Guide NOTE Do not pick up your ...eyesight (p. 29). POWER VCR Your camcorder OFF (CHG) starts recording. To MEMORY CAMERA stop recording, press START/STOP again. REW MEMORY CAMERA 3 Press N to off. Viewfinder When the ...
...to rewind the tape. OFF (CHG) VCR MEMORY CAMERA 3 Press OPEN to CAMERA while pressing the small green button. If you purchase your camcorder, the clock setting is closed, use the viewfinder with your eye against the eyecup. PLAY Quick Start Guide NOTE Do not pick up your ...eyesight (p. 29). POWER VCR Your camcorder OFF (CHG) starts recording. To MEMORY CAMERA stop recording, press START/STOP again. REW MEMORY CAMERA 3 Press N to off. Viewfinder When the ...

Operating Instructions
Page 10
... adaptor (supplied) Quick Start Guide Connect the plug with the B mark facing up . Connecting the power cord (p. 19) Use the battery pack when using your camcorder. Inserting a "Memory Stick" (p. 137) 1 Slide MEMORY OPEN in the direction of your...
... adaptor (supplied) Quick Start Guide Connect the plug with the B mark facing up . Connecting the power cord (p. 19) Use the battery pack when using your camcorder. Inserting a "Memory Stick" (p. 137) 1 Slide MEMORY OPEN in the direction of your...

Operating Instructions
Page 11
... picture appears on a "Memory Stick" (p. 144) 3 Press OPEN to open the LCD panel. OFF (CHG) MEMORY CAMERA 4 Press PHOTO 5 PressPHOTO lightly. If you purchase your camcorder by holding the viewfinder, the LCD panel, the battery pack or the microphone. 2 Press PLAY or PB. Recording a still image on the screen. 1 Remove the...
... picture appears on a "Memory Stick" (p. 144) 3 Press OPEN to open the LCD panel. OFF (CHG) MEMORY CAMERA 4 Press PHOTO 5 PressPHOTO lightly. If you purchase your camcorder by holding the viewfinder, the LCD panel, the battery pack or the microphone. 2 Press PLAY or PB. Recording a still image on the screen. 1 Remove the...
Operating Instructions
Page 12
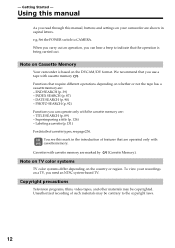
... For details of features that the operation is based on the country or region. Cassettes with the cassette memory are : - Note on Cassette Memory Your camcorder is being carried out. INDEX SEARCH (p. 87) - When you carry out an operation, you use a tape with cassette memory. Superimposing a title (p....89) - You see page 236. Note on TV color systems TV color systems differ depending on the DVCAM/DV format. To view your camcorder are shown in the introduction of cassette types, see this manual, buttons and settings on whether or not the tape has a cassette memory are :...
... For details of features that the operation is based on the country or region. Cassettes with the cassette memory are : - Note on Cassette Memory Your camcorder is being carried out. INDEX SEARCH (p. 87) - When you carry out an operation, you use a tape with cassette memory. Superimposing a title (p....89) - You see page 236. Note on TV color systems TV color systems differ depending on the DVCAM/DV format. To view your camcorder are shown in the introduction of cassette types, see this manual, buttons and settings on whether or not the tape has a cassette memory are :...

Operating Instructions
Page 13
... cannot be some tiny black points and/or bright points (white, red, blue or green in any way. •Do not let your camcorder away from rain and sea water. Exposing the LCD screen, the finder or the lens to direct sunlight for effective use. Take pictures of ...under direct sunlight[b]. •Be careful when placing the camera near a window or outdoors. However, there may be repaired [a]. •Never leave your camcorder exposed to temperatures above 60 °C (140 °F), such as dusk[d]. [a] [b] [c] [d] 13 These points are operational for long periods may cause your...
... cannot be some tiny black points and/or bright points (white, red, blue or green in any way. •Do not let your camcorder away from rain and sea water. Exposing the LCD screen, the finder or the lens to direct sunlight for effective use. Take pictures of ...under direct sunlight[b]. •Be careful when placing the camera near a window or outdoors. However, there may be repaired [a]. •Never leave your camcorder exposed to temperatures above 60 °C (140 °F), such as dusk[d]. [a] [b] [c] [d] 13 These points are operational for long periods may cause your...

Operating Instructions
Page 14
...) (1) (p. 29) qf Microphone (1), Wind screen (1) (p. 30) Contents of the recording cannot be compensated if recording or playback is not made due to a malfunction of the camcorder, storage media, etc. 14 qa qs qd qf 1 AC-L10A/L10B/L10C AC power adaptor (1), power cord (1) (p. 16) 2 NP-FM50 battery pack (1) (p. 15, 16) 3 A/V connecting..." (1) (p. 135) 9 USB cable (1) (p. 190) 0 CD-ROM (SPVD-008 USB Driver) (1) (p. 195) qa Cleaning cloth (1) (p. 245) qs Wide lens hood (1) (p. 32) qd XLR adaptor (with your camcorder. 1 2 3 4 5 6 7 8 9 q;
...) (1) (p. 29) qf Microphone (1), Wind screen (1) (p. 30) Contents of the recording cannot be compensated if recording or playback is not made due to a malfunction of the camcorder, storage media, etc. 14 qa qs qd qf 1 AC-L10A/L10B/L10C AC power adaptor (1), power cord (1) (p. 16) 2 NP-FM50 battery pack (1) (p. 15, 16) 3 A/V connecting..." (1) (p. 135) 9 USB cable (1) (p. 190) 0 CD-ROM (SPVD-008 USB Driver) (1) (p. 195) qa Cleaning cloth (1) (p. 245) qs Wide lens hood (1) (p. 32) qd XLR adaptor (with your camcorder. 1 2 3 4 5 6 7 8 9 q;

Operating Instructions
Page 15
Getting Started Step 1 Preparing the power supply Installing the battery pack (1) Lift up the viewfinder. (2) Slide the battery pack down until it clicks. 1 2 To remove the battery pack (1) Lift up the viewfinder. (2) Slide the battery pack out in the direction of the arrow while pressing BATT down. 1 2 2 BATT release button If you use the large capacity battery pack If you install the NP-FM70/QM71/FM90/FM91/QM91 battery pack on your camcorder, extend its viewfinder. 15
Getting Started Step 1 Preparing the power supply Installing the battery pack (1) Lift up the viewfinder. (2) Slide the battery pack down until it clicks. 1 2 To remove the battery pack (1) Lift up the viewfinder. (2) Slide the battery pack out in the direction of the arrow while pressing BATT down. 1 2 2 BATT release button If you use the large capacity battery pack If you install the NP-FM70/QM71/FM90/FM91/QM91 battery pack on your camcorder, extend its viewfinder. 15

Operating Instructions
Page 16
...charging it for details of "InfoLITHIUM" battery pack. (1) Open the DC IN jack cover and connect the AC power adaptor supplied with your camcorder to the DC IN jack with the "InfoLITHIUM" battery pack (M series). Fully charging the battery allows you to OFF (CHG). Charging begins.... See page 239 for your camcorder. 16 Step 1 Preparing the power supply Charging the battery pack Use the battery pack after normal charge is indicated in the display window. ...
...charging it for details of "InfoLITHIUM" battery pack. (1) Open the DC IN jack cover and connect the AC power adaptor supplied with your camcorder to the DC IN jack with the "InfoLITHIUM" battery pack (M series). Fully charging the battery allows you to OFF (CHG). Charging begins.... See page 239 for your camcorder. 16 Step 1 Preparing the power supply Charging the battery pack Use the battery pack after normal charge is indicated in the display window. ...

Operating Instructions
Page 17
... Approximate minutes when you use a fully charged battery and the XLR adaptor is extremely high or low because of the AC power adaptor. Until your camcorder calculates the actual remaining battery time "---- Recording time Battery pack NP-FM50 (supplied) NP-FM70 NP-QM71 NP-FM90 NP-FM91/QM91 Recording with the...
... Approximate minutes when you use a fully charged battery and the XLR adaptor is extremely high or low because of the AC power adaptor. Until your camcorder calculates the actual remaining battery time "---- Recording time Battery pack NP-FM50 (supplied) NP-FM70 NP-QM71 NP-FM90 NP-FM91/QM91 Recording with the...

Operating Instructions
Page 18
...minutes when you use a fully charged battery Note Approximate recording time and playing time at 25 shorter if you use your camcorder in an ambient temperature of Sony Corporation. 18 "InfoLITHIUM" M series battery packs have the mark. This unit is compatible with the "InfoLITHIUM" battery....power to operate Charge the battery pack fully again so that can exchange data such as battery consumption with compatible electronic equipment. Your camcorder operates only with the "InfoLITHIUM" battery pack (M series). Step 1 Preparing the power supply Playing time Battery pack NP-FM50 (...
...minutes when you use a fully charged battery Note Approximate recording time and playing time at 25 shorter if you use your camcorder in an ambient temperature of Sony Corporation. 18 "InfoLITHIUM" M series battery packs have the mark. This unit is compatible with the "InfoLITHIUM" battery....power to operate Charge the battery pack fully again so that can exchange data such as battery consumption with compatible electronic equipment. Your camcorder operates only with the "InfoLITHIUM" battery pack (M series). Step 1 Preparing the power supply Playing time Battery pack NP-FM50 (...

Operating Instructions
Page 19
...to a wall outlet. 1 2,3 PRECAUTION The set itself has been turned off. Notes • TheACpoweradaptorcansupplypowerevenifthebatterypackisattachedtoyour camcorder. • TheDCINjackhas"sourcepriority."Thismeansthatthebatterypackcannotsupply any power if the power cord is connected to the DC IN jack,... 1 Preparing the power supply Connecting to a wall outlet When you use your camcorder with your camcorder to the DC IN jack on your camcorder for further information. 19 Using a car battery Use Sony Car Battery Adaptor (optional). Connect the AC power adaptor supplied with the plug's...
...to a wall outlet. 1 2,3 PRECAUTION The set itself has been turned off. Notes • TheACpoweradaptorcansupplypowerevenifthebatterypackisattachedtoyour camcorder. • TheDCINjackhas"sourcepriority."Thismeansthatthebatterypackcannotsupply any power if the power cord is connected to the DC IN jack,... 1 Preparing the power supply Connecting to a wall outlet When you use your camcorder with your camcorder to the DC IN jack on your camcorder for further information. 19 Using a car battery Use Sony Car Battery Adaptor (optional). Connect the AC power adaptor supplied with the plug's...

Operating Instructions
Page 20
... dial. (6) Set the minute by turning the SEL/PUSH EXEC dial and pressing the dial by the time signal. If you do not use your camcorder for about four month,sthedateandtimemaybe cleared from memory (bars may appear) because the built-in rechargeable battery installed in that you set the POWER switch... SEL/PUSH EXEC dial to select the desired year, then press the dial. Set the year, month, day, hour and then the minute, in your camcorder for the first time. The clock starts to move. (7) Press MENU to display the menu settings while the POWER switch is set the date and...
... dial. (6) Set the minute by turning the SEL/PUSH EXEC dial and pressing the dial by the time signal. If you do not use your camcorder for about four month,sthedateandtimemaybe cleared from memory (bars may appear) because the built-in rechargeable battery installed in that you set the POWER switch... SEL/PUSH EXEC dial to select the desired year, then press the dial. Set the year, month, day, hour and then the minute, in your camcorder for the first time. The clock starts to move. (7) Press MENU to display the menu settings while the POWER switch is set the date and...

Operating Instructions
Page 21
... time "--:--:--" and are recorded on a 12-hour cycle. • 12:00AMstandsformidnight. • 12:00PMstandsfornoon. 21 Note on the time indicator The internal clock of your camcorder operates on the data code of the tape and the "Memory Stick."
... time "--:--:--" and are recorded on a 12-hour cycle. • 12:00AMstandsformidnight. • 12:00PMstandsfornoon. 21 Note on the time indicator The internal clock of your camcorder operates on the data code of the tape and the "Memory Stick."
Operating Instructions
Page 22
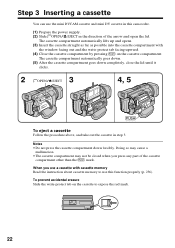
... in this function properly (p. 236). To prevent accidental erasure Slide the write-protect tab on the cassette compartment. Step 3 Inserting a cassette You can use this camcorder. (1) Prepare the power supply. (2) Slide OPEN/Z EJECT in the direction of the cassette compartment other than the mark. Doing so may cause a malfunction. •The...
... in this function properly (p. 236). To prevent accidental erasure Slide the write-protect tab on the cassette compartment. Step 3 Inserting a cassette You can use this camcorder. (1) Prepare the power supply. (2) Slide OPEN/Z EJECT in the direction of the cassette compartment other than the mark. Doing so may cause a malfunction. •The...

Operating Instructions
Page 23
Getting Started Step 4 Using the touch panel Your camcorder has operation buttons on a tape. (1) Prepare the power supply. (p. 15 to 19) (2) Press OPEN to open the LCD panel. (3) Set the POWER switch to CAMERA ...
Getting Started Step 4 Using the touch panel Your camcorder has operation buttons on a tape. (1) Prepare the power supply. (p. 15 to 19) (2) Press OPEN to open the LCD panel. (3) Set the POWER switch to CAMERA ...


