
Instruction Manual
Page 5
...(Applicable in the European Union and other European countries with the limits set out in the EMC Directive for EMC and product safety is Sony Corporation, 1-7-1 Konan Minato-ku Tokyo, 108-0075 Japan. Instead it shall be handed over to conserve natural resources. By ensuring this ...as household waste. For more detailed information about recycling of this unit. Attention The electromagnetic fields at the specific frequencies may influence the picture and sound of this product, please contact your local Civic Office, your household waste disposal service or the shop where you will help...
...(Applicable in the European Union and other European countries with the limits set out in the EMC Directive for EMC and product safety is Sony Corporation, 1-7-1 Konan Minato-ku Tokyo, 108-0075 Japan. Instead it shall be handed over to conserve natural resources. By ensuring this ...as household waste. For more detailed information about recycling of this unit. Attention The electromagnetic fields at the specific frequencies may influence the picture and sound of this product, please contact your local Civic Office, your household waste disposal service or the shop where you will help...

Instruction Manual
Page 7
...; The LCD monitor is not possible due to other cases: - To deal with the LCD monitor. When the camera warms up ) data to a malfunction of pictures in this manual are reproduced images, and are normal in the manufacturing process and do not affect the images in a cold location. When shooting a low... any way. Unauthorized recording of data loss, always copy (back up , the monitor will function normally. • Do not press against the LCD monitor. The pictures used in the following or other medium.
...; The LCD monitor is not possible due to other cases: - To deal with the LCD monitor. When the camera warms up ) data to a malfunction of pictures in this manual are reproduced images, and are normal in the manufacturing process and do not affect the images in a cold location. When shooting a low... any way. Unauthorized recording of data loss, always copy (back up , the monitor will function normally. • Do not press against the LCD monitor. The pictures used in the following or other medium.
Instruction Manual
Page 18
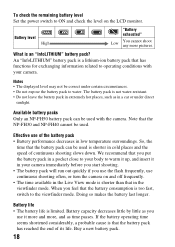
... can be used is a lithium-ion battery pack that has functions for exchanging information related to warm it up, and insert it more and more pictures. Doing so makes the battery last longer. If the battery operating time seems shortened considerably, a probable cause is limited. The battery pack is an "InfoLITHIUM...
... can be used is a lithium-ion battery pack that has functions for exchanging information related to warm it up, and insert it more and more pictures. Doing so makes the battery last longer. If the battery operating time seems shortened considerably, a probable cause is limited. The battery pack is an "InfoLITHIUM...
Instruction Manual
Page 56
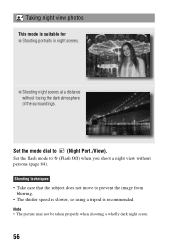
Taking night view photos This mode is recommended. Note • The picture may not be taken properly when shooting a wholly dark night scene. 56 Set the flash mode to prevent the image from blurring. • The shutter speed is slower, so using a tripod is suitable for z Shooting portraits in night scenes. Shooting techniques • Take care that the subject does not move to (Flash Off) when you shoot a night view without losing the dark atmosphere of the surroundings. Set the mode dial to (Night Port./View). z Shooting night scenes at a distance without persons (page 84).
Taking night view photos This mode is recommended. Note • The picture may not be taken properly when shooting a wholly dark night scene. 56 Set the flash mode to prevent the image from blurring. • The shutter speed is slower, so using a tripod is suitable for z Shooting portraits in night scenes. Shooting techniques • Take care that the subject does not move to (Flash Off) when you shoot a night view without losing the dark atmosphere of the surroundings. Set the mode dial to (Night Port./View). z Shooting night scenes at a distance without persons (page 84).
Instruction Manual
Page 57
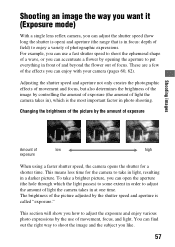
...how long the shutter is open) and aperture (the range that is in front of and beyond the flower out of field) to take a brighter picture, you can open the aperture (the hole through which is called "exposure." Shooting an image the way you want it (Exposure mode) With a ... shape of photographic expressions. To take in light, resulting in photo shooting. This means less time for a shorter time. The brightness of the picture adjusted by the amount of exposure Shooting images Amount of low high exposure When using a faster shutter speed, the camera opens the shutter for the...
...how long the shutter is open) and aperture (the range that is in front of and beyond the flower out of field) to take a brighter picture, you can open the aperture (the hole through which is called "exposure." Shooting an image the way you want it (Exposure mode) With a ... shape of photographic expressions. To take in light, resulting in photo shooting. This means less time for a shorter time. The brightness of the picture adjusted by the amount of exposure Shooting images Amount of low high exposure When using a faster shutter speed, the camera opens the shutter for the...
Instruction Manual
Page 78
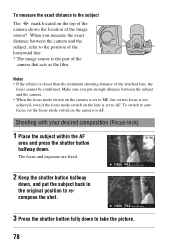
... to MF, the correct focus is closer than the minimum shooting distance of the image sensor*. To switch to auto focus, set to take the picture. 78 When you put the subject back in the original position to recompose the shot. 3 Press the shutter button fully down .
... to MF, the correct focus is closer than the minimum shooting distance of the image sensor*. To switch to auto focus, set to take the picture. 78 When you put the subject back in the original position to recompose the shot. 3 Press the shutter button fully down .

Instruction Manual
Page 89
...many pixels of pixels 3 Adjust the focus and shoot the subject. Shooting with the exposure compensation on the positive side brightens the whole picture, making the entire histogram shift to the plus or minus sides (page 101). Adjust the exposure if necessary and shoot again. 89 To... these area with the exposure shifted to the bright side (right side). Using the shooting function Number of a particular brightness exist in the picture. The right illustration is set when the exposure mode is an example. Both ends of the histogram show a highkey or low-key portion....
...many pixels of pixels 3 Adjust the focus and shoot the subject. Shooting with the exposure compensation on the positive side brightens the whole picture, making the entire histogram shift to the plus or minus sides (page 101). Adjust the exposure if necessary and shoot again. 89 To... these area with the exposure shifted to the bright side (right side). Using the shooting function Number of a particular brightness exist in the picture. The right illustration is set when the exposure mode is an example. Both ends of the histogram show a highkey or low-key portion....
Instruction Manual
Page 95
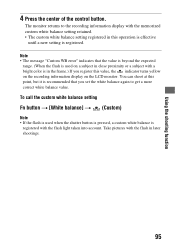
... balance again to the recording information display with the flash light taken into account. The monitor returns to get a more correct white balance value. Take pictures with a bright color is used on a subject in close proximity or a subject with the flash in this value, the indicator turns yellow on the recording...
... balance again to the recording information display with the flash light taken into account. The monitor returns to get a more correct white balance value. Take pictures with a bright color is used on a subject in close proximity or a subject with the flash in this value, the indicator turns yellow on the recording...
Instruction Manual
Page 115
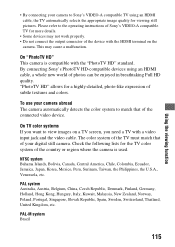
On "PhotoTV HD" This camera is used. Check the following lists for viewing still pictures. NTSC system Bahama Islands, Bolivia, Canada, Central America, Chile, Colombia, Ecuador, Jamaica, Japan, Korea, Mexico, Peru, Surinam, Taiwan, the Philippines, the U.S.A., Venezuela, etc. ... region where the camera is compatible with the HDMI terminal on a TV screen, you want to Sony's VIDEO-A compatible TV using an HDMI cable, a whole new world of the connected video device. To use your digital still camera. PAL-M system Brazil 115 "PhotoTV HD" allows for more details. • Some...
On "PhotoTV HD" This camera is used. Check the following lists for viewing still pictures. NTSC system Bahama Islands, Bolivia, Canada, Central America, Chile, Colombia, Ecuador, Jamaica, Japan, Korea, Mexico, Peru, Surinam, Taiwan, the Philippines, the U.S.A., Venezuela, etc. ... region where the camera is compatible with the HDMI terminal on a TV screen, you want to Sony's VIDEO-A compatible TV using an HDMI cable, a whole new world of the connected video device. To use your digital still camera. PAL-M system Brazil 115 "PhotoTV HD" allows for more details. • Some...

Instruction Manual
Page 122
... shooting. Disabling the noise reduction at high ISO sensitivity settings When shooting with the ISO set to AUTO or Scene Selection, you cannot take another picture. Select [Off] to a second or longer (Long exposure shooting), noise reduction is turned on for the same duration that becomes more noticeable when the camera...
... shooting. Disabling the noise reduction at high ISO sensitivity settings When shooting with the ISO set to AUTO or Scene Selection, you cannot take another picture. Select [Off] to a second or longer (Long exposure shooting), noise reduction is turned on for the same duration that becomes more noticeable when the camera...

Instruction Manual
Page 139
... Macintosh computers. Using the software To utilize images recorded with the camera, the following software is provided: • Sony Image Data Suite "Image Data Converter SR" "Image Data Lightbox SR" • Sony Picture Utility "PMB" (Picture Motion Browser) Note • "PMB" is recommended. CPU/Memory: Pentium 4 or faster is recommended, RAM 1 GB or more...
... Macintosh computers. Using the software To utilize images recorded with the camera, the following software is provided: • Sony Image Data Suite "Image Data Converter SR" "Image Data Lightbox SR" • Sony Picture Utility "PMB" (Picture Motion Browser) Note • "PMB" is recommended. CPU/Memory: Pentium 4 or faster is recommended, RAM 1 GB or more...

Instruction Manual
Page 140
... "Run Install.exe" and follow the instructions that appear on the screen to proceed with the installation. 2 Click [Install]. • Verify that both "Sony Image Data Suite" and "Sony Picture Utility" are checked and follow the instructions on your computer, and insert the CD-ROM (supplied) into the CD-ROM drive. The installation...
... "Run Install.exe" and follow the instructions that appear on the screen to proceed with the installation. 2 Click [Install]. • Verify that both "Sony Image Data Suite" and "Sony Picture Utility" are checked and follow the instructions on your computer, and insert the CD-ROM (supplied) into the CD-ROM drive. The installation...
Instruction Manual
Page 141
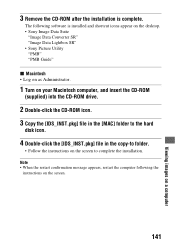
... the installation. 3 Remove the CD-ROM after the installation is installed and shortcut icons appear on the desktop. • Sony Image Data Suite "Image Data Converter SR" "Image Data Lightbox SR" • Sony Picture Utility "PMB" "PMB Guide" x Macintosh • Log on as Administrator. 1 Turn on your Macintosh computer, and insert the CD...
... the installation. 3 Remove the CD-ROM after the installation is installed and shortcut icons appear on the desktop. • Sony Image Data Suite "Image Data Converter SR" "Image Data Lightbox SR" • Sony Picture Utility "PMB" "PMB Guide" x Macintosh • Log on as Administrator. 1 Turn on your Macintosh computer, and insert the CD...

Instruction Manual
Page 143
...Double-click [Image Data Lightbox SR] on the upper-right corner of (PMB Guide) on the desktop. To start menu, click [Start] t [All Programs] t [Sony Picture Utility] t [Help] t [PMB Guide]. 143 Viewing images on "PMB," refer to view them. • Retouch (Red Eye Correction, etc.), print, and send still... exit, click the button on the desktop. When starting up from the start up from the Start menu, click [Start] t [All Programs] t [Sony Image Data Suite] t [Help] t [Image Data Lightbox SR]. To start "PMB Guide," double-click the shortcut of the screen. To start Help from...
...Double-click [Image Data Lightbox SR] on the upper-right corner of (PMB Guide) on the desktop. To start menu, click [Start] t [All Programs] t [Sony Picture Utility] t [Help] t [PMB Guide]. 143 Viewing images on "PMB," refer to view them. • Retouch (Red Eye Correction, etc.), print, and send still... exit, click the button on the desktop. When starting up from the start up from the Start menu, click [Start] t [All Programs] t [Sony Image Data Suite] t [Help] t [Image Data Lightbox SR]. To start "PMB Guide," double-click the shortcut of the screen. To start Help from...

Instruction Manual
Page 144
Note • The confirmation message of news, such as software updates. This function informs you of the Information tool appears on the screen when starting "PMB" for the first time. To exit the "PMB," click button on the desktop. Select [Start]. You can change the setting later. 144 To start up/exit "PMB" Double-click the (PMB) icon on the upper-right corner of the screen. Or, from the Start menu: Click [Start] t [All Programs] t [Sony Picture Utility] t [PMB].
Note • The confirmation message of news, such as software updates. This function informs you of the Information tool appears on the screen when starting "PMB" for the first time. To exit the "PMB," click button on the desktop. Select [Start]. You can change the setting later. 144 To start up/exit "PMB" Double-click the (PMB) icon on the upper-right corner of the screen. Or, from the Start menu: Click [Start] t [All Programs] t [Sony Picture Utility] t [PMB].
Instruction Manual
Page 152
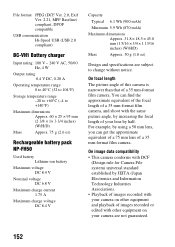
... system) universal standard established by JEITA (Japan Electronics and Information Technology Industries Association). • Playback of images recorded with the same picture angle, by half. On focal length The picture angle of this camera is narrower than that of your camera are subject to +140°F) Maximum dimensions Approx. 60 × 25...
... system) universal standard established by JEITA (Japan Electronics and Information Technology Industries Association). • Playback of images recorded with the same picture angle, by half. On focal length The picture angle of this camera is narrower than that of your camera are subject to +140°F) Maximum dimensions Approx. 60 × 25...

Instruction Manual
Page 157
... or hood is used, take it is beyond the flash range (the distance that the flash can reach), the pictures will be dark. Depending on the image (Ghosting). • The picture was taken under a strong light source, and excessive light has entered the lens. The eyes of the image to.... • Activate the red eye reduction function (page 86). • Get close to appear too dark (insufficient light). Attach a lens hood (sold separately). A picture taken with it (page 86). • In the following cases, the image may be dark because the flash light does not reach the subject. If...
... or hood is used, take it is beyond the flash range (the distance that the flash can reach), the pictures will be dark. Depending on the image (Ghosting). • The picture was taken under a strong light source, and excessive light has entered the lens. The eyes of the image to.... • Activate the red eye reduction function (page 86). • Get close to appear too dark (insufficient light). Attach a lens hood (sold separately). A picture taken with it (page 86). • In the following cases, the image may be dark because the flash light does not reach the subject. If...

Instruction Manual
Page 158
The use of a tripod or the flash is blurred. • The picture was recorded using the "Pixel mapping" function. 1 Set the LIVE VIEW/OVF switch to the Live View mode. The EV scale b B is flashing on the ...
The use of a tripod or the flash is blurred. • The picture was recorded using the "Pixel mapping" function. 1 Set the LIVE VIEW/OVF switch to the Live View mode. The EV scale b B is flashing on the ...


