Instruction Manual
Page 2
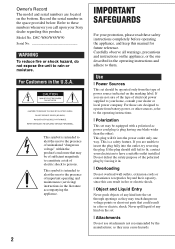
... the presence of important operating and maintenance (servicing) instructions in fire or electric shock. [ Object and Liquid Entry Never push objects of power source indicated on the bottom. Carefully observe all warnings, precautions and instructions on the set through openings as they may cause hazards. Use [ Power Sources This set may be of sufficient magnitude to persons. Owner's Record The model and serial numbers are not...
... the presence of important operating and maintenance (servicing) instructions in fire or electric shock. [ Object and Liquid Entry Never push objects of power source indicated on the bottom. Carefully observe all warnings, precautions and instructions on the set through openings as they may cause hazards. Use [ Power Sources This set may be of sufficient magnitude to persons. Owner's Record The model and serial numbers are not...
Instruction Manual
Page 3
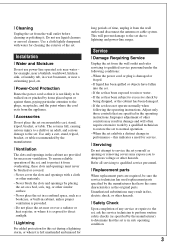
... this indicates a need for long periods of time, unplug it . Installation [ Water and Moisture Do not use liquid cleaners or aerosol cleaners. If the set . Adjust only those controls that are required, be walked on or pinched by the manufacturer. [ Ventilation The slots and openings in cabinet, unless proper ventilation is exposed to qualified service personnel under the following the operating instructions...
... this indicates a need for long periods of time, unplug it . Installation [ Water and Moisture Do not use liquid cleaners or aerosol cleaners. If the set . Adjust only those controls that are required, be walked on or pinched by the manufacturer. [ Ventilation The slots and openings in cabinet, unless proper ventilation is exposed to qualified service personnel under the following the operating instructions...
Instruction Manual
Page 5
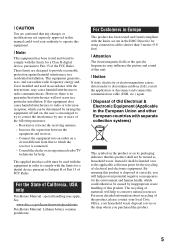
... electromagnetism causes data transfer to discontinue midway (fail), restart the application or disconnect and connect the communication cable (USB, etc.) again. [ Disposal of Old Electrical & Electronic Equipment (Applicable in the European Union and other European countries with the limits set out in the EMC Directive for help prevent potential negative consequences for a digital device pursuant to Subpart B of Part 15 of...
... electromagnetism causes data transfer to discontinue midway (fail), restart the application or disconnect and connect the communication cable (USB, etc.) again. [ Disposal of Old Electrical & Electronic Equipment (Applicable in the European Union and other European countries with the limits set out in the EMC Directive for help prevent potential negative consequences for a digital device pursuant to Subpart B of Part 15 of...
Instruction Manual
Page 7
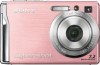
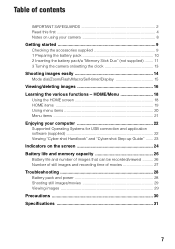
... 11 3 Turning the camera on the screen 24 Battery life and memory capacity 26 Battery life and number of images that can be recorded/viewed .......... 26 Number of still images and recording time of contents IMPORTANT SAFEGUARDS 2 Read this first 4 Notes on using your computer 22 Supported Operating Systems for USB connection and application software (supplied 22 Viewing "Cyber-shot Handbook" and "Cyber-shot Step-up Guide" ....... 23 Indicators on /setting the clock 13 Shooting images easily 14 Mode dial/Zoom/Flash/Macro/Self-timer/Display 15 Viewing/deleting images 16 Learning...
... 11 3 Turning the camera on the screen 24 Battery life and memory capacity 26 Battery life and number of images that can be recorded/viewed .......... 26 Number of still images and recording time of contents IMPORTANT SAFEGUARDS 2 Read this first 4 Notes on using your computer 22 Supported Operating Systems for USB connection and application software (supplied 22 Viewing "Cyber-shot Handbook" and "Cyber-shot Step-up Guide" ....... 23 Indicators on /setting the clock 13 Shooting images easily 14 Mode dial/Zoom/Flash/Macro/Self-timer/Display 15 Viewing/deleting images 16 Learning...
Instruction Manual
Page 8
... to record images, this may cause the malfunction of your camera are normal in the manufacturing process and do not affect the recording in color) that generates strong radio waves or emits radiation. Insert a charged battery pack and turn off the camera or remove the battery pack or "Memory Stick Duo" while the access lamp is lighted, as the internal memory data or "Memory Stick Duo" data may...
... to record images, this may cause the malfunction of your camera are normal in the manufacturing process and do not affect the recording in color) that generates strong radio waves or emits radiation. Insert a charged battery pack and turn off the camera or remove the battery pack or "Memory Stick Duo" while the access lamp is lighted, as the internal memory data or "Memory Stick Duo" data may...

Instruction Manual
Page 10
... is fully charged), the charge will last slightly longer. [ Charging time Full charge time Approx. 330 min. Charging may take longer under certain circumstances or conditions. • See page 26 for use with compatible Sony batteries. 10 The CHARGE lamp lights on, and charging starts. When the CHARGE lamp turns off the power by . • Even if the CHARGE lamp is not lit, the battery charger is not disconnected from the battery charger. •...
... is fully charged), the charge will last slightly longer. [ Charging time Full charge time Approx. 330 min. Charging may take longer under certain circumstances or conditions. • See page 26 for use with compatible Sony batteries. 10 The CHARGE lamp lights on, and charging starts. When the CHARGE lamp turns off the power by . • Even if the CHARGE lamp is not lit, the battery charger is not disconnected from the battery charger. •...
Instruction Manual
Page 11
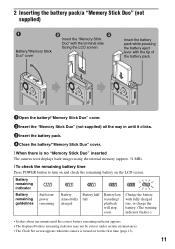
... until the correct battery remaining indicator appears. • The displayed battery remaining indicator may not be correct under certain circumstances. • The Clock Set screen appears when the camera is no "Memory Stick Duo" inserted The camera records/plays back images using the internal memory (approx. 31 MB). [ To check the remaining battery time Press POWER button to turn on and check the remaining battery on for the first time (page 13). 11...
... until the correct battery remaining indicator appears. • The displayed battery remaining indicator may not be correct under certain circumstances. • The Clock Set screen appears when the camera is no "Memory Stick Duo" inserted The camera records/plays back images using the internal memory (approx. 31 MB). [ To check the remaining battery time Press POWER button to turn on and check the remaining battery on for the first time (page 13). 11...
Instruction Manual
Page 15
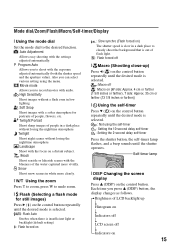
... control button repeatedly until the desired mode is selected. : Macro off r Indicators on ) The shutter speed is selected. : Not using the menu. Program Auto Allows you can select various setting using the self-timer : Setting the 10-second delay self-timer : Setting the 2-second delay self-timer Press the shutter button, the self-timer lamp flashes, and a beep sounds until the shutter operates. Soft Snap Shoot images with the exposure adjusted automatically (both the shutter speed and the aperture value). Movie mode Allows you press v (DISP) button, the display changes...
... control button repeatedly until the desired mode is selected. : Macro off r Indicators on ) The shutter speed is selected. : Not using the menu. Program Auto Allows you can select various setting using the self-timer : Setting the 10-second delay self-timer : Setting the 2-second delay self-timer Press the shutter button, the self-timer lamp flashes, and a beep sounds until the shutter operates. Soft Snap Shoot images with the exposure adjusted automatically (both the shutter speed and the aperture value). Movie mode Allows you press v (DISP) button, the display changes...

Instruction Manual
Page 17
... displayed. 2 Select [Delete] with v and select [Multiple Images] with b/B, then press z. 3 Select the image you want to the TV with the cable for deletion, then press z again. 4 Press MENU and select [OK] with v/V/b/B. To the multi connector Cable for multi-use terminal (supplied). To cancel a selection, select an image you press (Index), the number of pictures on the index screen changes. [ To delete images in index mode 1 Press MENU...
... displayed. 2 Select [Delete] with v and select [Multiple Images] with b/B, then press z. 3 Select the image you want to the TV with the cable for deletion, then press z again. 4 Press MENU and select [OK] with v/V/b/B. To the multi connector Cable for multi-use terminal (supplied). To cancel a selection, select an image you press (Index), the number of pictures on the index screen changes. [ To delete images in index mode 1 Press MENU...

Instruction Manual
Page 18
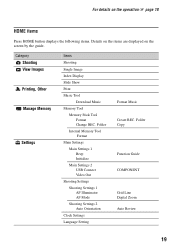
HOME/Menu Using the HOME screen The HOME screen is set to display the HOME screen. Category Item Guide 2 Select a category with b/B on the control button. 3 Select an item with v/V, then press z. [ When you select the (Manage Memory) or (Settings) category 1 Select the desired item with v/V on the control button. • This is functional only when you select (Settings). 2 Move to the right with B, select a setting with v/V, then...
HOME/Menu Using the HOME screen The HOME screen is set to display the HOME screen. Category Item Guide 2 Select a category with b/B on the control button. 3 Select an item with v/V, then press z. [ When you select the (Manage Memory) or (Settings) category 1 Select the desired item with v/V on the control button. • This is functional only when you select (Settings). 2 Move to the right with B, select a setting with v/V, then...
Instruction Manual
Page 19
... Shooting Settings Shooting Settings 1 AF Illuminator AF Mode Shooting Settings 2 Auto Orientation Clock Settings Language Setting Format Music Create REC. Category Shooting View Images Printing, Other Manage Memory Settings Items Shooting Single Image Index Display Slide Show Print Music Tool Download Music Memory Tool Memory Stick Tool Format Change REC. For details on the operation 1 page 18 HOME items Press HOME button displays the following items. Details on the items are displayed on the screen by the guide. Folder Copy Function Guide COMPONENT Grid Line Digital Zoom Auto Review...
... Shooting Settings Shooting Settings 1 AF Illuminator AF Mode Shooting Settings 2 Auto Orientation Clock Settings Language Setting Format Music Create REC. Category Shooting View Images Printing, Other Manage Memory Settings Items Shooting Single Image Index Display Slide Show Print Music Tool Download Music Memory Tool Memory Stick Tool Format Change REC. For details on the operation 1 page 18 HOME items Press HOME button displays the following items. Details on the items are displayed on the screen by the guide. Folder Copy Function Guide COMPONENT Grid Line Digital Zoom Auto Review...

Instruction Manual
Page 21
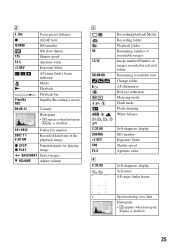
...Plays back a series of flash light. Menu for viewing (Delete) (Slide Show) (Retouch) (Protect) (Print) (Rotate) (Select Folder) Deletes images. Selects shooting settings. Menu for shooting Image Size Selects the still image size. Metering Mode Selects the metering mode. Retouches images. Only the available items are displayed on the camera mode. REC Mode Selects the continuous shooting method. Red Eye Reduction Sets to print out. SteadyShot SETUP Selects the anti-blur mode. Prevents accidental erasure. Rotates a still image. For details on the operation...
...Plays back a series of flash light. Menu for viewing (Delete) (Slide Show) (Retouch) (Protect) (Print) (Rotate) (Select Folder) Deletes images. Selects shooting settings. Menu for shooting Image Size Selects the still image size. Metering Mode Selects the metering mode. Retouches images. Only the available items are displayed on the camera mode. REC Mode Selects the continuous shooting method. Red Eye Reduction Sets to print out. SteadyShot SETUP Selects the anti-blur mode. Prevents accidental erasure. Rotates a still image. For details on the operation...
Instruction Manual
Page 22
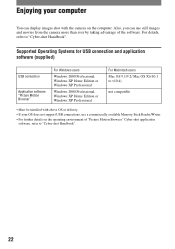
... delivery. • If your computer You can use a commercially available Memory Stick Reader/Writer. • For further details on the computer. Enjoying your OS does not support USB connections, use still images and movies from the camera more than ever by taking advantage of "Picture Motion Browser" Cyber-shot application software, refer to "Cyber-shot Handbook". 22 Also, you can display images shot with the camera on the operating environment of the...
... delivery. • If your computer You can use a commercially available Memory Stick Reader/Writer. • For further details on the computer. Enjoying your OS does not support USB connections, use still images and movies from the camera more than ever by taking advantage of "Picture Motion Browser" Cyber-shot application software, refer to "Cyber-shot Handbook". 22 Also, you can display images shot with the camera on the operating environment of the...
Instruction Manual
Page 25
...-0012 Folder-file number 2007 1 1 9:30 AM Recorded date/time of the playback image z STOP z PLAY Function guide for playing image BACK/NEXT Select images V VOLUME Adjust volume C 96 12/12 00:00:00 C:32:00 ISO400 +2.0EV 500 F3.5 D C:32:00 Recording/playback Media Recording folder Playback folder Remaining number of recordable images Image number/Number of images recorded in selected folder Remaining recordable time Change folder AF illuminator Red-eye reduction Metering mode Flash mode Flash charging White balance Self-diagnosis display ISO number Exposure Value Shutter speed Aperture...
...-0012 Folder-file number 2007 1 1 9:30 AM Recorded date/time of the playback image z STOP z PLAY Function guide for playing image BACK/NEXT Select images V VOLUME Adjust volume C 96 12/12 00:00:00 C:32:00 ISO400 +2.0EV 500 F3.5 D C:32:00 Recording/playback Media Recording folder Playback folder Remaining number of recordable images Image number/Number of images recorded in selected folder Remaining recordable time Change folder AF illuminator Red-eye reduction Metering mode Flash mode Flash charging White balance Self-diagnosis display ISO number Exposure Value Shutter speed Aperture...
Instruction Manual
Page 26
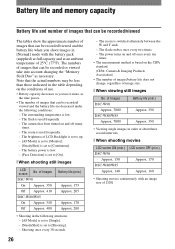
... image size of use. • Battery capacity decreases as you shoot images in the table depending on and off many times. - The brightness of images that can be recorded or viewed take into account changing the "Memory Stick Duo" as the time passes. • The number of LCD Backlight is set to up. - [AF Mode] is set to [Monitor]. - [SteadyShot] is switched alternately between the W and T ends. - The zoom is set to [Continuous...
... image size of use. • Battery capacity decreases as you shoot images in the table depending on and off many times. - The brightness of images that can be recorded or viewed take into account changing the "Memory Stick Duo" as the time passes. • The number of LCD Backlight is set to up. - [AF Mode] is set to [Monitor]. - [SteadyShot] is switched alternately between the W and T ends. - The zoom is set to [Continuous...
Instruction Manual
Page 27
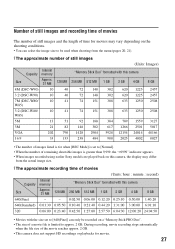
.... 2 GB. • This camera does not support HD recordings or playbacks for movies. 27 During recording, movie recording stops automatically when the file size of a movie file is greater than 9,999, the ">9999" indicator appears. • When images recorded using earlier Sony models are played back on this camera, the display may differ from the actual image size. [ The approximate recording time of movies (Units: hour : minute : second) Internal Capacity memory "Memory Stick Duo" formatted with this camera Size Approx. 31 MB...
.... 2 GB. • This camera does not support HD recordings or playbacks for movies. 27 During recording, movie recording stops automatically when the file size of a movie file is greater than 9,999, the ">9999" indicator appears. • When images recorded using earlier Sony models are played back on this camera, the display may differ from the actual image size. [ The approximate recording time of movies (Units: hour : minute : second) Internal Capacity memory "Memory Stick Duo" formatted with this camera Size Approx. 31 MB...
Instruction Manual
Page 28
... down the battery pack. Cannot turn on the screen, refer to "Cyber-shot Handbook". 2 Remove the battery pack, and insert the battery pack again after about three minutes while the power is dead. The power turns off automatically to "Cyber-shot Handbook" (PDF). Insert charged battery pack (page 10). • The battery pack is discharged. Replace it may take a little while to push the battery eject lever (page 11). Turn on the camera again...
... down the battery pack. Cannot turn on the screen, refer to "Cyber-shot Handbook". 2 Remove the battery pack, and insert the battery pack again after about three minutes while the power is dead. The power turns off automatically to "Cyber-shot Handbook" (PDF). Insert charged battery pack (page 10). • The battery pack is discharged. Replace it may take a little while to push the battery eject lever (page 11). Turn on the camera again...
Instruction Manual
Page 29
... cannot charge the battery pack using a model other than . • Set the mode dial to when shooting movies. • The image size is set to [640(Fine)] when recording movies. Delete unnecessary images (page 16). - By using the "Memory Stick Duo" with the write-protect switch, and the switch is set to the LOCK position. The battery remaining indicator is incorrect. • This phenomenon occurs when you can print or save images with a new one . Change the "Memory Stick Duo...
... cannot charge the battery pack using a model other than . • Set the mode dial to when shooting movies. • The image size is set to [640(Fine)] when recording movies. Delete unnecessary images (page 16). - By using the "Memory Stick Duo" with the write-protect switch, and the switch is set to the LOCK position. The battery remaining indicator is incorrect. • This phenomenon occurs when you can print or save images with a new one . Change the "Memory Stick Duo...
Instruction Manual
Page 30
... to charge this may cause malfunction or damage the camera. [ On cleaning Cleaning the LCD screen Wipe the screen surface with an LCD cleaning kit (not supplied) to remove fingerprints, dust, etc. This rechargeable battery is brought directly from a cold to a warm location, moisture may condense inside the lens, you will be unable to record clear images. [ On the internal rechargeable backup battery This camera...
... to charge this may cause malfunction or damage the camera. [ On cleaning Cleaning the LCD screen Wipe the screen surface with an LCD cleaning kit (not supplied) to remove fingerprints, dust, etc. This rechargeable battery is brought directly from a cold to a warm location, moisture may condense inside the lens, you will be unable to record clear images. [ On the internal rechargeable backup battery This camera...
Instruction Manual
Page 31
... DSC-W80/W85: Approx. 7 201 000 pixels Lens: Carl Zeiss Vario-Tessar 3× zoom lens f = 5.8 - 17.4 mm (35 - 105 mm when converted to a 35 mm still camera) F2.8 - 5.2 Exposure control: Automatic exposure, Scene Selection (7 modes) White balance: Automatic, Daylight, Cloudy, Fluorescent 1,2,3, Incandescent, Flash File format (DCF compliant): Still images: Exif Ver. 2.21 JPEG compliant, DPOF compatible Movies: MPEG1 compliant (Monaural) Recording media: Internal Memory (approx. 31 MB), "Memory Stick Duo" Flash:Flash range (ISO...
... DSC-W80/W85: Approx. 7 201 000 pixels Lens: Carl Zeiss Vario-Tessar 3× zoom lens f = 5.8 - 17.4 mm (35 - 105 mm when converted to a 35 mm still camera) F2.8 - 5.2 Exposure control: Automatic exposure, Scene Selection (7 modes) White balance: Automatic, Daylight, Cloudy, Fluorescent 1,2,3, Incandescent, Flash File format (DCF compliant): Still images: Exif Ver. 2.21 JPEG compliant, DPOF compatible Movies: MPEG1 compliant (Monaural) Recording media: Internal Memory (approx. 31 MB), "Memory Stick Duo" Flash:Flash range (ISO...


