Operating Instructions
Page 3
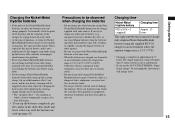
...cover after you should lose the fuse cover, please contact your used rechargeable batteries to radio or television reception, which the receiver is connected. -Consult the dealer or an experienced radio/TV technician for a digital device pursuant to which can help . You can be used with the ...equipment in the plug supplied need to be replaced, a 5 AMP fuse approved by returning your nearest Sony service station. Should the fuse in order to comply ...
...cover after you should lose the fuse cover, please contact your used rechargeable batteries to radio or television reception, which the receiver is connected. -Consult the dealer or an experienced radio/TV technician for a digital device pursuant to which can help . You can be used with the ...equipment in the plug supplied need to be replaced, a 5 AMP fuse approved by returning your nearest Sony service station. Should the fuse in order to comply ...
Operating Instructions
Page 6
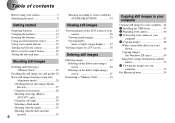
...- or triple- Table of contents Before using your camera 5 Identifying the parts 8 Getting started Preparing batteries 14 Charging the batteries 14 Inserting the batteries 17 Using an external power source 19 Using your camera abroad 19 Turning on/off your camera 20 How to use the control button 20 Setting the... date and time 21 Shooting still images Inserting and removing a "Memory Stick 23 Deciding the still image size and quality 24 Basic still image shooting (using auto adjustment mode 26 Checking the last shot image ...
...- or triple- Table of contents Before using your camera 5 Identifying the parts 8 Getting started Preparing batteries 14 Charging the batteries 14 Inserting the batteries 17 Using an external power source 19 Using your camera abroad 19 Turning on/off your camera 20 How to use the control button 20 Setting the... date and time 21 Shooting still images Inserting and removing a "Memory Stick 23 Deciding the still image size and quality 24 Basic still image shooting (using auto adjustment mode 26 Checking the last shot image ...
Operating Instructions
Page 7
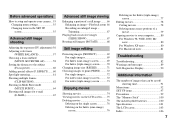
...images that can be saved/ shooting time 91 Menu items 92 SET UP items 97 Precautions 99 The "Memory Stick 100 The nickel hydride batteries 100 Specifications 101 The LCD screen 103 Index 106 7 EFFECT).......60 Spot light-metering 61 Shooting multiple frames (CLIP MOTION 62 Shooting in...exposure (EV adjustment) 56 Adjusting color tones (WHITE BALANCE 57 Choosing a focus method (MULTI AF/CENTER AF 58 Setting the distance to your camera ...55 Changing menu settings 55 Changing items in Multi Burst mode (MULTI BURST 64 Shooting still images for e-mail (E-MAIL 65 Advanced still ...
...images that can be saved/ shooting time 91 Menu items 92 SET UP items 97 Precautions 99 The "Memory Stick 100 The nickel hydride batteries 100 Specifications 101 The LCD screen 103 Index 106 7 EFFECT).......60 Spot light-metering 61 Shooting multiple frames (CLIP MOTION 62 Shooting in...exposure (EV adjustment) 56 Adjusting color tones (WHITE BALANCE 57 Choosing a focus method (MULTI AF/CENTER AF 58 Setting the distance to your camera ...55 Changing menu settings 55 Changing items in Multi Burst mode (MULTI BURST 64 Shooting still images for e-mail (E-MAIL 65 Advanced still ...
Operating Instructions
Page 9
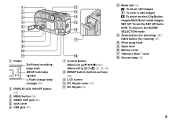
... UP items SCN: To shoot in the SCENE SELECTION mode M Zoom button (for shooting) (28)/ Index button (for viewing) (37) N Wrist strap hook O Open lever P Battery cover Q "Memory Stick" cover R Access lamp (23) 9 1 2 3 4 5 6 7 8 9 q;
... UP items SCN: To shoot in the SCENE SELECTION mode M Zoom button (for shooting) (28)/ Index button (for viewing) (37) N Wrist strap hook O Open lever P Battery cover Q "Memory Stick" cover R Access lamp (23) 9 1 2 3 4 5 6 7 8 9 q;
Operating Instructions
Page 11
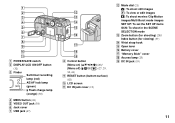
... UP items SCN: To shoot in the SCENE SELECTION mode M Zoom button (for shooting) (28)/ Index button (for viewing) (37) N Wrist strap hook O Open lever P Battery cover Q "Memory Stick" cover R Access lamp (23) S DC IN jack (19) 11 1 2 3 4 5 6 7 8 9 q;
... UP items SCN: To shoot in the SCENE SELECTION mode M Zoom button (for shooting) (28)/ Index button (for viewing) (37) N Wrist strap hook O Open lever P Battery cover Q "Memory Stick" cover R Access lamp (23) S DC IN jack (19) 11 1 2 3 4 5 6 7 8 9 q;
Operating Instructions
Page 13
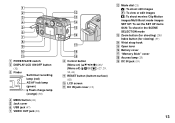
... UP items SCN: To shoot in the SCENE SELECTION mode M Zoom button (for shooting) (28)/ Index button (for viewing) (37) N Wrist strap hook O Open lever P Battery cover Q "Memory Stick" cover R Access lamp (23) S DC IN jack (19) 13
... UP items SCN: To shoot in the SCENE SELECTION mode M Zoom button (for shooting) (28)/ Index button (for viewing) (37) N Wrist strap hook O Open lever P Battery cover Q "Memory Stick" cover R Access lamp (23) S DC IN jack (19) 13
Operating Instructions
Page 14
...; Be sure to charge the Nickel-Metal Hydride batteries supplied with the DSC-P71) * Use of the following batteries in this camera. If the batteries are shorted, there is outside that cannot be used Manganese batteries, lithium batteries, nicad batteries, alkaline batteries (cannot be used , take note of AA alkaline batteries may not display the correct information. Charging starts...
...; Be sure to charge the Nickel-Metal Hydride batteries supplied with the DSC-P71) * Use of the following batteries in this camera. If the batteries are shorted, there is outside that cannot be used Manganese batteries, lithium batteries, nicad batteries, alkaline batteries (cannot be used , take note of AA alkaline batteries may not display the correct information. Charging starts...
Operating Instructions
Page 15
...called memory effect* can occur, and the low battery warning will charge faster. 15 Getting started If you use up the batteries completely, put the camera in approximately 13 hours. Never use them with your camera. Charging time Nickel-Metal Hydride battery NH-AA-DI × 2 (supplied) ... required to charge both Nickel-Metal Hydride batteries at the same time. • When the batteries are not being used they may leak, overheat, or explode, causing the danger of burns or other batteries except Sony Nickel-Metal Hydride batteries in an environment where the temperature range...
...called memory effect* can occur, and the low battery warning will charge faster. 15 Getting started If you use up the batteries completely, put the camera in approximately 13 hours. Never use them with your camera. Charging time Nickel-Metal Hydride battery NH-AA-DI × 2 (supplied) ... required to charge both Nickel-Metal Hydride batteries at the same time. • When the batteries are not being used they may leak, overheat, or explode, causing the danger of burns or other batteries except Sony Nickel-Metal Hydride batteries in an environment where the temperature range...
Operating Instructions
Page 16
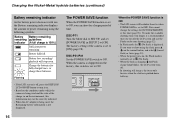
...may not be correctly indicated. • When the AC adaptor is being used and the state of the camera is set to ON. Charging the Nickel-Metal hydride batteries (continued) Battery remaining indicator As the battery power decreases with use the Finder to do your shooting (page 32). • In Flash mode, the...] at this switch is shipped from the factory, this time (page 98). If you can shoot for fully charged ones, or charge these batteries. When the camera is set [POWER SAVE] in SETUP 2 to ON. DSC-P51/P31 Set the POWER SAVE switch to OFF. When the POWER SAVE function...
...may not be correctly indicated. • When the AC adaptor is being used and the state of the camera is set to ON. Charging the Nickel-Metal hydride batteries (continued) Battery remaining indicator As the battery power decreases with use the Finder to do your shooting (page 32). • In Flash mode, the...] at this switch is shipped from the factory, this time (page 98). If you can shoot for fully charged ones, or charge these batteries. When the camera is set [POWER SAVE] in SETUP 2 to ON. DSC-P51/P31 Set the POWER SAVE switch to OFF. When the POWER SAVE function...
Operating Instructions
Page 17
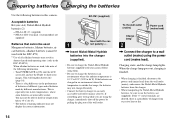
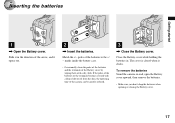
... a dry cloth. Close the Battery cover while holding the batteries in the direction of the camera can be greatly reduced. 3 , Close the Battery cover. Match the +/− poles of the batteries to the +/ − marks inside the battery case. • Occasionally clean the poles of the batteries and the terminals of the Battery cover by wiping them with...
... a dry cloth. Close the Battery cover while holding the batteries in the direction of the camera can be greatly reduced. 3 , Close the Battery cover. Match the +/− poles of the batteries to the +/ − marks inside the battery case. • Occasionally clean the poles of the batteries and the terminals of the Battery cover by wiping them with...
Operating Instructions
Page 18
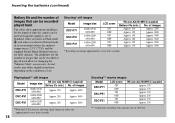
...can be recorded/ played back The tables show approximate guidelines for the length of time the camera can be used when picture quality is 25°C (77°F), and the supplied Nickel-Metal Hydride batteries are fully charged. Actual results may differ slightly from these, depending on , showing single images... size 2048×1536 640×480 1600×1200 640×480 1600×1200 640×480 R6 (size AA) Ni-MH (2) (supplied) Battery life (min.) No. of images Approx. 100 Approx. 2000 Approx. 120 Approx. 2400 Approx. 150 Approx. 3000 Approx. 180 Approx. 3600 Approx. 120...
...can be recorded/ played back The tables show approximate guidelines for the length of time the camera can be used when picture quality is 25°C (77°F), and the supplied Nickel-Metal Hydride batteries are fully charged. Actual results may differ slightly from these, depending on , showing single images... size 2048×1536 640×480 1600×1200 640×480 1600×1200 640×480 R6 (size AA) Ni-MH (2) (supplied) Battery life (min.) No. of images Approx. 100 Approx. 2000 Approx. 120 Approx. 2400 Approx. 150 Approx. 3000 Approx. 180 Approx. 3600 Approx. 120...
Operating Instructions
Page 19
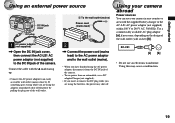
... supplied) to the wall outlet (mains). • When you have finished using the AC power adaptor, disconnect it from the DC IN jack of the camera. • To use power from an automobile, use a DC adaptor/Charger (not supplied). • If you insert or remove the DC plug while you are... power may cause a malfunction. 19 Connect the cable with the supplied battery charger or the AC-LS1 AC power adaptor (not supplied) within 100 V to 240 V AC, 50/60 Hz. Using your camera in any country or area with the v mark facing up. • Connect the AC power adaptor to an easily...
... supplied) to the wall outlet (mains). • When you have finished using the AC power adaptor, disconnect it from the DC IN jack of the camera. • To use power from an automobile, use a DC adaptor/Charger (not supplied). • If you insert or remove the DC plug while you are... power may cause a malfunction. 19 Connect the cable with the supplied battery charger or the AC-LS1 AC power adaptor (not supplied) within 100 V to 240 V AC, 50/60 Hz. Using your camera in any country or area with the v mark facing up. • Connect the AC power adaptor to an easily...
Operating Instructions
Page 20
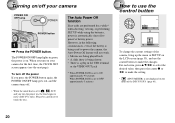
... use the control button to touch the lens. To turn off the power If you turn on /off your camera for a while* when shooting, viewing, or performing SET UP while using the batteries, power is automatically shut off . • When the mode dial is on , the lens begins to , , SCN and you... or SET UP on the menu of the DSC-P51/P31 (page 61). 20 However, in the following circumstances, even if the battery is being used to power the camera, the Auto Power Off feature will not work. • Movies are performed for the first time, the CLOCK SET screen appears (see...
... use the control button to touch the lens. To turn off the power If you turn on /off your camera for a while* when shooting, viewing, or performing SET UP while using the batteries, power is automatically shut off . • When the mode dial is on , the lens begins to , , SCN and you... or SET UP on the menu of the DSC-P51/P31 (page 61). 20 However, in the following circumstances, even if the battery is being used to power the camera, the Auto Power Off feature will not work. • Movies are performed for the first time, the CLOCK SET screen appears (see...
Operating Instructions
Page 21
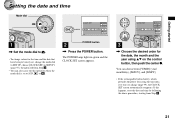
... carry out this happens, reset the date and time by following the above procedure, starting from [Y/M/D] (year/ month/day), [M/D/Y], and [D/M/Y]. • If the rechargeable button battery, which provides the power for the date, the month and the year using v/V on the control button, then push the center z. CLOCK SET Y/M/D M/D/Y D/M/Y 2002 / OK...
... carry out this happens, reset the date and time by following the above procedure, starting from [Y/M/D] (year/ month/day), [M/D/Y], and [D/M/Y]. • If the rechargeable button battery, which provides the power for the date, the month and the year using v/V on the control button, then push the center z. CLOCK SET Y/M/D M/D/Y D/M/Y 2002 / OK...
Operating Instructions
Page 27
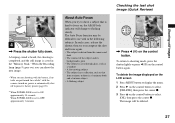
.... In such cases, release the shutter, then try to flashing slowly. The image will be difficult to use with the camera turned on, power is automatically shut off to preserve battery power (page 20). * When POWER SAVE is set to ON: approximately 90 seconds When POWER SAVE is set to OFF...: approximately 3 minutes About Auto Focus When you try to recompose the shot and focus again. • The subject is distant from the camera and dark • The...
.... In such cases, release the shutter, then try to flashing slowly. The image will be difficult to use with the camera turned on, power is automatically shut off to preserve battery power (page 20). * When POWER SAVE is set to ON: approximately 90 seconds When POWER SAVE is set to OFF...: approximately 3 minutes About Auto Focus When you try to recompose the shot and focus again. • The subject is distant from the camera and dark • The...
Operating Instructions
Page 32
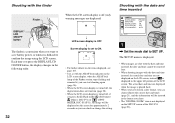
...displayed in the following order. 32 When the LCD screen display is off (only warning messages are shot with the date and time inserted, the date and time cannot be displayed on the screen for ...the finder Finder DISPLAY/ LCD ON/OFF button The finder is convenient when you want to save battery power, or when it is not displayed on the SET UP screen of the DSC-P31 (page...is difficult to confirm the image using the LCD screen. Shooting with the date and time inserted CAMERA MOVING IMAGE : DATE/TIME : DIGITAL ZOOM : RED EYE REDUCTION : AF ILLUMINATOR : MPEG MOVIE OFF ON OFF AUTO SELECT 1...
...displayed in the following order. 32 When the LCD screen display is off (only warning messages are shot with the date and time inserted, the date and time cannot be displayed on the screen for ...the finder Finder DISPLAY/ LCD ON/OFF button The finder is convenient when you want to save battery power, or when it is not displayed on the SET UP screen of the DSC-P31 (page...is difficult to confirm the image using the LCD screen. Shooting with the date and time inserted CAMERA MOVING IMAGE : DATE/TIME : DIGITAL ZOOM : RED EYE REDUCTION : AF ILLUMINATOR : MPEG MOVIE OFF ON OFF AUTO SELECT 1...
Operating Instructions
Page 82
extremely cold location. • The batteries are not charged enough. • The batteries are recording/playing back images in the remaining battery time information. - p Connect it with your camera, try the following solutions. 1 Check the items on pages 82 to your Sony dealer or local authorized Sony service facility. p Turn on . • The batteries are not installed correctly...
extremely cold location. • The batteries are not charged enough. • The batteries are recording/playing back images in the remaining battery time information. - p Connect it with your camera, try the following solutions. 1 Check the items on pages 82 to your Sony dealer or local authorized Sony service facility. p Turn on . • The batteries are not installed correctly...
Operating Instructions
Page 86
...; Your computer does not properly recognize the device because you connected the camera and your camera. Make sure that your computer correctly using the "PIXELA ImageMixer for Sony" software, click on the LCD screen (page 47). p Connect the camera and your OS suggests (pages 48, 49, 54). p Follow the... 20). p Check "Recommended computer environment" (page 44). p In Windows 2000, log on as Administrators (page 45). • The camera is turned off. • The battery level is too low. • You are not using the supplied USB cable. • The USB cable is not connected securely. &#...
...; Your computer does not properly recognize the device because you connected the camera and your camera. Make sure that your computer correctly using the "PIXELA ImageMixer for Sony" software, click on the LCD screen (page 47). p Connect the camera and your OS suggests (pages 48, 49, 54). p Follow the... 20). p Check "Recommended computer environment" (page 44). p In Windows 2000, log on as Administrators (page 45). • The camera is turned off. • The battery level is too low. • You are not using the supplied USB cable. • The USB cable is not connected securely. &#...
Operating Instructions
Page 87
... "Memory Stick" Symptom You cannot insert a "Memory Stick." You cannot record on HELP files for the "PIXELA ImageMixer for Sony" software. Solution p Charge the battery (page 14). Troubleshooting 87 p Click on a "Memory Stick." Then turn the power on a computer. You have formatted ...; You are deleted by mistake. p Connect it by formatting, and they cannot be performed. an image on and check that the camera works properly. Solution p Insert it backwards. Computers (continued) Symptom Cause The image is affected by mistake. image. p Change the ...
... "Memory Stick" Symptom You cannot insert a "Memory Stick." You cannot record on HELP files for the "PIXELA ImageMixer for Sony" software. Solution p Charge the battery (page 14). Troubleshooting 87 p Click on a "Memory Stick." Then turn the power on a computer. You have formatted ...; You are deleted by mistake. p Connect it by formatting, and they cannot be performed. an image on and check that the camera works properly. Solution p Insert it backwards. Computers (continued) Symptom Cause The image is affected by mistake. image. p Change the ...
Operating Instructions
Page 88
... about an hour and then try to 105). p Replace it with pointed object, then turn off the camera. (DSC-P71 only) The lens gets fogged. - • The battery pack is discharged. • Condensation is not working properly. The lens does not move when you turn the power on again. (This...AC power adaptor (not supplied) (pages 14, 17, 19). You cannot identify the indicator on , but the camera does not work , press the RESET button on the bottom of the camera with a charged battery or use it again (page 99). 88 If this doesn't work . Cause • The built-in microcomputer is...
... about an hour and then try to 105). p Replace it with pointed object, then turn off the camera. (DSC-P71 only) The lens gets fogged. - • The battery pack is discharged. • Condensation is not working properly. The lens does not move when you turn the power on again. (This...AC power adaptor (not supplied) (pages 14, 17, 19). You cannot identify the indicator on , but the camera does not work , press the RESET button on the bottom of the camera with a charged battery or use it again (page 99). 88 If this doesn't work . Cause • The built-in microcomputer is...


