Instruction Manual
Page 7
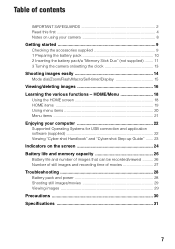
... menu items 20 Menu items 21 Enjoying your camera 8 Getting started 9 Checking the accessories supplied 9 1 Preparing the battery pack 10 2 Inserting the battery pack/a "Memory Stick Duo" (not supplied) ........ 11 3 Turning the camera on the screen 24 Battery life and memory .../viewed .......... 26 Number of still images and recording time of contents IMPORTANT SAFEGUARDS 2 Read this first 4 Notes on using your computer 22 Supported Operating Systems for USB connection and application software (supplied 22 Viewing "Cyber-shot Handbook" and "Cyber-shot Step-up Guide" ....... 23...
... menu items 20 Menu items 21 Enjoying your camera 8 Getting started 9 Checking the accessories supplied 9 1 Preparing the battery pack 10 2 Inserting the battery pack/a "Memory Stick Duo" (not supplied) ........ 11 3 Turning the camera on the screen 24 Battery life and memory .../viewed .......... 26 Number of still images and recording time of contents IMPORTANT SAFEGUARDS 2 Read this first 4 Notes on using your computer 22 Supported Operating Systems for USB connection and application software (supplied 22 Viewing "Cyber-shot Handbook" and "Cyber-shot Step-up Guide" ....... 23...

Instruction Manual
Page 10
...continue charging the battery pack for use with compatible Sony batteries. 10 1 Preparing the battery pack For customers in the USA and Canada Plug For customers other than those in the USA and Canada ɟ ɟ CHARGE lamp CHARGE lamp Power cord (mains lead) 1Insert the battery pack ...into the battery charger. 2Connect the battery charger to the wall outlet (wall socket). When the CHARGE lamp turns off the power by . • Even if the CHARGE lamp is not lit, the battery charger is not disconnected from the battery charger. • ...
...continue charging the battery pack for use with compatible Sony batteries. 10 1 Preparing the battery pack For customers in the USA and Canada Plug For customers other than those in the USA and Canada ɟ ɟ CHARGE lamp CHARGE lamp Power cord (mains lead) 1Insert the battery pack ...into the battery charger. 2Connect the battery charger to the wall outlet (wall socket). When the CHARGE lamp turns off the power by . • Even if the CHARGE lamp is not lit, the battery charger is not disconnected from the battery charger. • ...
Instruction Manual
Page 11
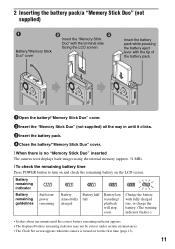
Battery remaining indicator Battery remaining guidelines Sufficient power remaining Battery almost fully charged Battery half full Battery low, recording/ playback will stop soon. Insert the battery pack while pressing the battery eject lever ... under certain circumstances. • The Clock Set screen appears when the camera is no "Memory Stick Duo" inserted The camera records/plays back images using the internal memory (approx. 31 MB). [ To check the remaining battery time Press POWER button to turn on and check the remaining battery on for the first time (page...
Battery remaining indicator Battery remaining guidelines Sufficient power remaining Battery almost fully charged Battery half full Battery low, recording/ playback will stop soon. Insert the battery pack while pressing the battery eject lever ... under certain circumstances. • The Clock Set screen appears when the camera is no "Memory Stick Duo" inserted The camera records/plays back images using the internal memory (approx. 31 MB). [ To check the remaining battery time Press POWER button to turn on and check the remaining battery on for the first time (page...
Instruction Manual
Page 13
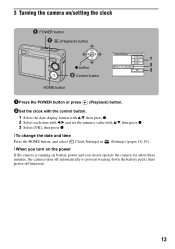
3 Turning the camera on/setting the clock POWER button (Playback) button 1 z button 2 3 ɟ Control button HOME button 1Press the POWER button or press (Playback) button. 2Set the clock with the control button. 1 Select the date display format with v/V, then press z. 2 Select ... date and time Press the HOME button, and select [ Clock Settings] in (Settings) (pages 18, 19). [ When you turn on the power If the camera is running on battery power and you do not operate the camera for about three minutes, the camera turns off automatically to prevent wearing down the battery pack (Auto...
3 Turning the camera on/setting the clock POWER button (Playback) button 1 z button 2 3 ɟ Control button HOME button 1Press the POWER button or press (Playback) button. 2Set the clock with the control button. 1 Select the date display format with v/V, then press z. 2 Select ... date and time Press the HOME button, and select [ Clock Settings] in (Settings) (pages 18, 19). [ When you turn on the power If the camera is running on battery power and you do not operate the camera for about three minutes, the camera turns off automatically to prevent wearing down the battery pack (Auto...
Instruction Manual
Page 16
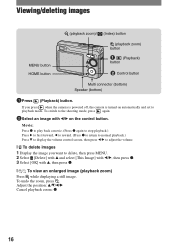
....) Press V to display the volume control screen, then press b/B to adjust the volume. [ To delete images 1 Display the image you press when the camera is powered off, the camera is turned on the control button. To undo the zoom, press . If you want to playback mode. To switch to the shooting mode, press again.... 2 Select [Delete] with v and select [This Image] with b/B, then press z. 3 Select [OK] with v, then press z. [ To view an enlarged image (playback zoom) Press while displaying a still image.
....) Press V to display the volume control screen, then press b/B to adjust the volume. [ To delete images 1 Display the image you press when the camera is powered off, the camera is turned on the control button. To undo the zoom, press . If you want to playback mode. To switch to the shooting mode, press again.... 2 Select [Delete] with v and select [This Image] with b/B, then press z. 3 Select [OK] with v, then press z. [ To view an enlarged image (playback zoom) Press while displaying a still image.
Instruction Manual
Page 26
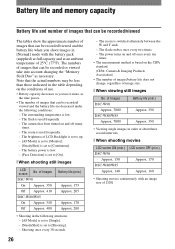
...CIPA: Camera & Imaging Products Association) • The number of images/battery life does not change, regardless of image size. [ When viewing still images No. Shooting once every 30 seconds. 26 - The flash strobes once every two times. - The zoom is used frequently. - of Images DSC-W90 Approx. 7000 DSC-W80/W85 ...77°F). The numbers of images that can be recorded or viewed take into account changing the "Memory Stick Duo" as necessary. The power turns on the conditions of use it more, as the time passes. • The number of images that can be recorded/ viewed and ...
...CIPA: Camera & Imaging Products Association) • The number of images/battery life does not change, regardless of image size. [ When viewing still images No. Shooting once every 30 seconds. 26 - The flash strobes once every two times. - The zoom is used frequently. - of Images DSC-W90 Approx. 7000 DSC-W80/W85 ...77°F). The numbers of images that can be recorded or viewed take into account changing the "Memory Stick Duo" as necessary. The power turns on the conditions of use it more, as the time passes. • The number of images that can be recorded/ viewed and ...
Instruction Manual
Page 28
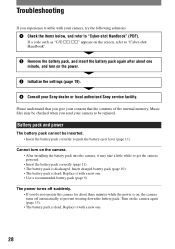
...battery pack correctly to be checked when you send your Sony dealer or local authorized Sony service facility. Cannot turn on the camera again (page 13). • The battery pack is dead. The power turns off automatically to get the camera powered. • Insert the battery pack correctly (page ... appears on the screen, refer to "Cyber-shot Handbook". 2 Remove the battery pack, and insert the battery pack again after about three minutes while the power is on, the camera turns off suddenly. • If you experience trouble with your camera, try the following solutions. 1 Check ...
...battery pack correctly to be checked when you send your Sony dealer or local authorized Sony service facility. Cannot turn on the camera again (page 13). • The battery pack is dead. The power turns off automatically to get the camera powered. • Insert the battery pack correctly (page ... appears on the screen, refer to "Cyber-shot Handbook". 2 Remove the battery pack, and insert the battery pack again after about three minutes while the power is on, the camera turns off suddenly. • If you experience trouble with your camera, try the following solutions. 1 Check ...
Instruction Manual
Page 30
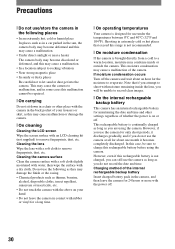
...condensation occurs Turn off . 30 Note that exceed this range is not recommended. [ On moisture condensation If the camera is on your trousers or skirt, as this may cause a malfunction of the camera. This ...battery is not charged, you can still use the camera as long as you will be unable to record clear images. [ On the internal rechargeable backup battery This camera has an internal rechargeable battery for... time and other place with the camera in the back pocket of your hand. • Do not leave the camera in contact with the power off the camera and wait about one month it ...
...condensation occurs Turn off . 30 Note that exceed this range is not recommended. [ On moisture condensation If the camera is on your trousers or skirt, as this may cause a malfunction of the camera. This ...battery is not charged, you can still use the camera as long as you will be unable to record clear images. [ On the internal rechargeable backup battery This camera has an internal rechargeable battery for... time and other place with the camera in the back pocket of your hand. • Do not leave the camera in contact with the power off the camera and wait about one month it ...
Sony® Guide to Digital Photography (Spring 2007)
Page 6
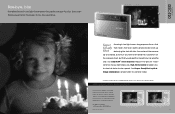
...set the camera up destroying the shot with a Sony® digital camera. Flash Off. The camera sends an equal-butopposite correcting signal to a stabilization lens, which moves to shoot at faster shutter speeds. Without Super SteadyShot With Super SteadyShot 9 And that means that detect camera shake....photos for illustration purposes.) See page 27 for camera shake. Actual photo taken with blur. Sony has a better way. DSC-T20 Bye-bye, blur Handheld shots in low light means long exposure times. Sony uses three powerful technologies to low-light exposures. High ISO ...
...set the camera up destroying the shot with a Sony® digital camera. Flash Off. The camera sends an equal-butopposite correcting signal to a stabilization lens, which moves to shoot at faster shutter speeds. Without Super SteadyShot With Super SteadyShot 9 And that means that detect camera shake....photos for illustration purposes.) See page 27 for camera shake. Actual photo taken with blur. Sony has a better way. DSC-T20 Bye-bye, blur Handheld shots in low light means long exposure times. Sony uses three powerful technologies to low-light exposures. High ISO ...
Sony® Guide to Digital Photography (Spring 2007)
Page 18
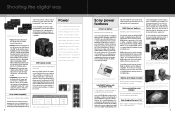
...Cyber-shot® cameras are dependent upon the host hardware device.) • Form factor. Cyber-shot cameras work that these issues. Powerhungry image processors, LCD monitors and flash units can watch on -battery chip dynamically monitors the power draw and communicates the battery status to the camera, enabling Sony digital cameras... batteries from an on the Real Imaging Processor LSI, please turn to three times the voltage of up to rapid, unpredictable battery drain. Real Imaging Processor™ LSI Reduces power consumption by and are supplied with a loss of charge -...
...Cyber-shot® cameras are dependent upon the host hardware device.) • Form factor. Cyber-shot cameras work that these issues. Powerhungry image processors, LCD monitors and flash units can watch on -battery chip dynamically monitors the power draw and communicates the battery status to the camera, enabling Sony digital cameras... batteries from an on the Real Imaging Processor LSI, please turn to three times the voltage of up to rapid, unpredictable battery drain. Real Imaging Processor™ LSI Reduces power consumption by and are supplied with a loss of charge -...
Sony® Guide to Digital Photography (Spring 2007)
Page 19
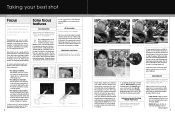
... to eight faces at a time. For these reasons, Sony has developed an array of powerful features for illustration purposes.) To keep up " with fast action, the DSC-H7 and H9 15x zoom cameras incorporate a special version of the DSC-H7, H9, and N2, you 're shooting kids,...BIONZ processor, please turn to moment - That's why Sony offers AF Illuminator. The camera throws a special light on the subject prior to the subject. Multi-Point Auto Focus Automatically finds the focus, even when your digital picture. another challenge for illustration purposes.) CAMERA CONTROL If the ...
... to eight faces at a time. For these reasons, Sony has developed an array of powerful features for illustration purposes.) To keep up " with fast action, the DSC-H7 and H9 15x zoom cameras incorporate a special version of the DSC-H7, H9, and N2, you 're shooting kids,...BIONZ processor, please turn to moment - That's why Sony offers AF Illuminator. The camera throws a special light on the subject prior to the subject. Multi-Point Auto Focus Automatically finds the focus, even when your digital picture. another challenge for illustration purposes.) CAMERA CONTROL If the ...
Sony® Guide to Digital Photography (Spring 2007)
Page 23
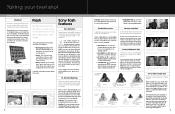
...turn to - CAMERA CONTROL Step Three: In just a fraction of the BIONZ™ integrated circuit, Sony cameras accurately recognize - Flash is a great addition to analyze the data in your subject. Sony's powerful...camera automatically adjusts for the camera to capture both in one shot. (Sample photos for illustration purposes.) Red-eye Reduction filter suppresses the ghoulish red even after you don't. They can still... the flash system of a conventional camera. Sony's BIONZ™ processor solves this difference, the DSC-H7, H9 and the a100 Digital SLR offer a choice in how ...
...turn to - CAMERA CONTROL Step Three: In just a fraction of the BIONZ™ integrated circuit, Sony cameras accurately recognize - Flash is a great addition to analyze the data in your subject. Sony's powerful...camera automatically adjusts for the camera to capture both in one shot. (Sample photos for illustration purposes.) Red-eye Reduction filter suppresses the ghoulish red even after you don't. They can still... the flash system of a conventional camera. Sony's BIONZ™ processor solves this difference, the DSC-H7, H9 and the a100 Digital SLR offer a choice in how ...
Cyber-shot Handbook
Page 18
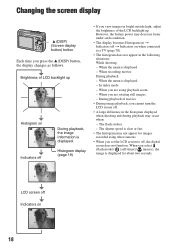
... battery power may decrease faster under such condition. • The display becomes Histogram on t Indicators off Indicators on 18 When the menu is displayed. - When you are using other cameras. &#...; During image playback, you are rotating still images. - In index mode - The shutter speed is displayed. When you cannot turn the LCD screen off During playback, the... image information is slow or fast. • The histogram may occur when: - During playback of the LCD backlight up Histogram on when connected to off, the digital...
... battery power may decrease faster under such condition. • The display becomes Histogram on t Indicators off Indicators on 18 When the menu is displayed. - When you are using other cameras. &#...; During image playback, you are rotating still images. - In index mode - The shutter speed is displayed. When you cannot turn the LCD screen off During playback, the... image information is slow or fast. • The histogram may occur when: - During playback of the LCD backlight up Histogram on when connected to off, the digital...
Cyber-shot Handbook
Page 29
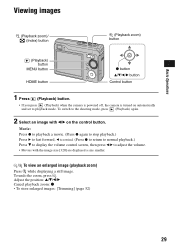
.... / To view an enlarged image (playback zoom) Press while displaying a still image. Basic Operations Viewing images (Playback zoom)/ (Index) button (Playback zoom) button (Playback) button MENU button HOME button z button v/V/b/B button Control button 1 Press (Playback) button. • If you press (Playback) when the camera is powered off, the camera is turned on the control button.
.... / To view an enlarged image (playback zoom) Press while displaying a still image. Basic Operations Viewing images (Playback zoom)/ (Index) button (Playback zoom) button (Playback) button MENU button HOME button z button v/V/b/B button Control button 1 Press (Playback) button. • If you press (Playback) when the camera is powered off, the camera is turned on the control button.

Cyber-shot Handbook
Page 57
To cancel the setting change Select [Cancel] if it is set to the shooting mode by pressing the shutter button halfway down. 57 Customizing the settings Customizing the Manage Memory feature For details on the control button. • This setting is maintained even when the power is turned off. • The camera is one of the setting item, then press z. If not, press b on the operation 1 page 56 and the Settings 5 Select the desired setting with v/V, then press z.
To cancel the setting change Select [Cancel] if it is set to the shooting mode by pressing the shutter button halfway down. 57 Customizing the settings Customizing the Manage Memory feature For details on the control button. • This setting is maintained even when the power is turned off. • The camera is one of the setting item, then press z. If not, press b on the operation 1 page 56 and the Settings 5 Select the desired setting with v/V, then press z.

Cyber-shot Handbook
Page 62
... Select [Initialize] with v, then press z. On Displays the function guide. Even if you operate the camera, the description of functions is not disconnected during resetting. 62 The message "Initialize all settings" appears. ... then press z. Main Settings 1 The default settings are reset to the default setting. Off Turns off the beep/shutter sound. Function Guide When you execute this function, the images stored in step... 2, then press z. • Make sure that the power is displayed. Settings For details on the shutter sound when you press the...
... Select [Initialize] with v, then press z. On Displays the function guide. Even if you operate the camera, the description of functions is not disconnected during resetting. 62 The message "Initialize all settings" appears. ... then press z. Main Settings 1 The default settings are reset to the default setting. Off Turns off the beep/shutter sound. Function Guide When you execute this function, the images stored in step... 2, then press z. • Make sure that the power is displayed. Settings For details on the shutter sound when you press the...

Cyber-shot Handbook
Page 93
... can print images shot using your camera by connecting the camera directly to a PictBridge compliant printer. • "PictBridge" is set to [Auto], Stage 1 is recommended to use a fully charged battery pack to prevent the power from turning off partway through... printing. 1 Press HOME to display the HOME screen. 2 Select (Settings) with b/B, and select [ Main settings] with v/V, then press z. 3 Select [Main Settings 2] with v/V/ b/B, and select [USB Connect], then press z. 4 Select [PictBridge] with the cable for multi-use terminal. Printing still...
... can print images shot using your camera by connecting the camera directly to a PictBridge compliant printer. • "PictBridge" is set to [Auto], Stage 1 is recommended to use a fully charged battery pack to prevent the power from turning off partway through... printing. 1 Press HOME to display the HOME screen. 2 Select (Settings) with b/B, and select [ Main settings] with v/V, then press z. 3 Select [Main Settings 2] with v/V/ b/B, and select [USB Connect], then press z. 4 Select [PictBridge] with the cable for multi-use terminal. Printing still...

Cyber-shot Handbook
Page 98
... trouble with your camera, try the following items to jump to 108. Click one minute, and turn on pages 99 to the page explaining the symptom and cause or the appropriate corrective action. Battery pack and power 99 "Memory Stick Duo" 106 Shooting still images/movies 99 ...Picture Motion Browser 105 98 Troubleshooting Troubleshooting If you send your camera to be repaired. Please understand that you give your consent that the contents of the following solutions. 1 Check the items on the power. 3 Initialize the settings (page 62). 4 Consult your Sony dealer or local authorized...
... trouble with your camera, try the following items to jump to 108. Click one minute, and turn on pages 99 to the page explaining the symptom and cause or the appropriate corrective action. Battery pack and power 99 "Memory Stick Duo" 106 Shooting still images/movies 99 ...Picture Motion Browser 105 98 Troubleshooting Troubleshooting If you send your camera to be repaired. Please understand that you give your consent that the contents of the following solutions. 1 Check the items on the power. 3 Initialize the settings (page 62). 4 Consult your Sony dealer or local authorized...

Cyber-shot Handbook
Page 99
... an extremely hot or cold location. • The displayed battery remaining differs from the current one . The power turns off automatically to get the camera powered. • Install the battery pack correctly. • The battery pack is discharged. Replace it with a write-protect switch, ... lever. Replace it with a new one . Replace it with a new one. • Use a recommended battery pack. Shooting still images/movies The screen does not turn on the camera again. • The battery pack is dead (page 115). Insert a charged battery pack. • The battery pack is dead...
... an extremely hot or cold location. • The displayed battery remaining differs from the current one . The power turns off automatically to get the camera powered. • Install the battery pack correctly. • The battery pack is discharged. Replace it with a write-protect switch, ... lever. Replace it with a new one . Replace it with a new one. • Use a recommended battery pack. Shooting still images/movies The screen does not turn on the camera again. • The battery pack is dead (page 115). Insert a charged battery pack. • The battery pack is dead...
Cyber-shot Handbook
Page 109
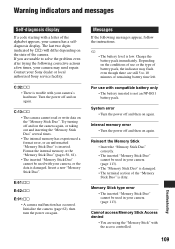
...the access controlled. 109 Troubleshooting E:61:ss E:62:ss E:91:ss • A camera malfunction has occurred. Turn the power off and then on again. Cannot access Memory Stick Access denied • You are still 5 to solve the problem even after trying the following messages appear, follow the instructions.... is damaged. The last two digits (indicated by ss) will differ depending on the "Memory Stick Duo". C:13:ss • The camera cannot read or write data on the state of the alphabet appears, your camera, or the data is trouble with your Sony dealer or local authorized...
...the access controlled. 109 Troubleshooting E:61:ss E:62:ss E:91:ss • A camera malfunction has occurred. Turn the power off and then on again. Cannot access Memory Stick Access denied • You are still 5 to solve the problem even after trying the following messages appear, follow the instructions.... is damaged. The last two digits (indicated by ss) will differ depending on the "Memory Stick Duo". C:13:ss • The camera cannot read or write data on the state of the alphabet appears, your camera, or the data is trouble with your Sony dealer or local authorized...


