Operating Instructions
Page 3
...receiver is fitted to correct the interference by one and approved by returning your nearest Sony service station. You can radiate radio frequency energy and, if not installed and used... the receiving antenna. - Consult the dealer or an experienced radio/TV technician for using connection cables shorter than 3 meters (9.8 feet). Increase the separation between the equipment and receiver. - Connect... is encouraged to try to this camera. For Customers in Europe This product has been tested and found to comply with the limits for a digital device pursuant to Part 15 of ...
...receiver is fitted to correct the interference by one and approved by returning your nearest Sony service station. You can radiate radio frequency energy and, if not installed and used... the receiving antenna. - Consult the dealer or an experienced radio/TV technician for using connection cables shorter than 3 meters (9.8 feet). Increase the separation between the equipment and receiver. - Connect... is encouraged to try to this camera. For Customers in Europe This product has been tested and found to comply with the limits for a digital device pursuant to Part 15 of ...
Operating Instructions
Page 20
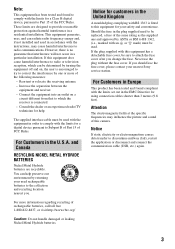
Recording date/time of images recorded in selected folder Self-diagnosis display (86) Counter (22) Indication Do not disconnect the USB cable (71) EV level value (30) ISO number (33) Metering mode (32) Flash White balance (33) 500 F3.5 Shutter speed (26) Aperture value (26) Playback image (t ...
Recording date/time of images recorded in selected folder Self-diagnosis display (86) Counter (22) Indication Do not disconnect the USB cable (71) EV level value (30) ISO number (33) Metering mode (32) Flash White balance (33) 500 F3.5 Shutter speed (26) Aperture value (26) Playback image (t ...
Operating Instructions
Page 23
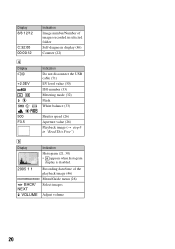
...to the internal memory. 23 This memory is no "Memory Stick" inserted [Recording]: Images are recorded using the internal memory. [Playback]: Images stored in the camera, you can copy data stored in [Copy] (page 51). B Internal memory When there is inserted B [Recording]: Images are recorded on the "Memory ... on images on images in the internal memory We recommend that you can record images using this internal memory. • Movies with a USB cable, you copy (back up) data without fail using the internal memory. On image data stored in the internal memory. To copy (back up...
...to the internal memory. 23 This memory is no "Memory Stick" inserted [Recording]: Images are recorded using the internal memory. [Playback]: Images stored in the camera, you can copy data stored in [Copy] (page 51). B Internal memory When there is inserted B [Recording]: Images are recorded on the "Memory ... on images on images in the internal memory We recommend that you can record images using this internal memory. • Movies with a USB cable, you copy (back up) data without fail using the internal memory. On image data stored in the internal memory. To copy (back up...
Operating Instructions
Page 53
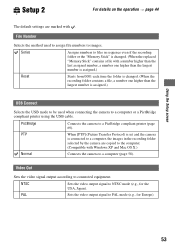
File Number Selects the method used when connecting the camera to a computer or a PictBridge compliant printer using the USB cable. PTP When [PTP] (Picture Transfer Protocol) is set and the camera is connected to a computer, the images in sequence even if the recording folder or the "Memory ...69). Series Assigns numbers to files in the recording folder selected by the camera are marked with Windows XP and Mac OS X.) Normal Connects the camera to a computer (page 58). PictBridge Connects the camera to connected equipment. PAL Sets the video output signal to NTSC mode ...
File Number Selects the method used when connecting the camera to a computer or a PictBridge compliant printer using the USB cable. PTP When [PTP] (Picture Transfer Protocol) is set and the camera is connected to a computer, the images in sequence even if the recording folder or the "Memory ...69). Series Assigns numbers to files in the recording folder selected by the camera are marked with Windows XP and Mac OS X.) Normal Connects the camera to a computer (page 58). PictBridge Connects the camera to connected equipment. PAL Sets the video output signal to NTSC mode ...
Operating Instructions
Page 58
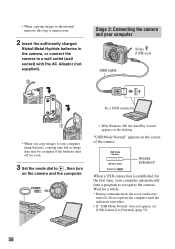
Do not operate the computer until the indicators turn on the camera and the computer. • With Windows XP, the AutoPlay wizard appears on the desktop. Wait for the first time, your computer using batteries, copying may ... is established for a while. * During communication, the access indicators turn red. USB Mode Normal Memory Stick Switch on the screen of the camera. Stage 3: Connecting the camera and your computer To the (USB) jack USB cable To a USB connector • When you copy images to your computer automatically runs a program to recognize the...
Do not operate the computer until the indicators turn on the camera and the computer. • With Windows XP, the AutoPlay wizard appears on the desktop. Wait for the first time, your computer using batteries, copying may ... is established for a while. * During communication, the access indicators turn red. USB Mode Normal Memory Stick Switch on the screen of the camera. Stage 3: Connecting the camera and your computer To the (USB) jack USB cable To a USB connector • When you copy images to your computer automatically runs a program to recognize the...

Operating Instructions
Page 60
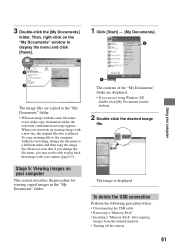
... 4-A: Copying images to a Computer • For Windows XP, follow the procedure explained in "Stage 3: Connecting the camera and your computer" on page 59. The wizard screen closes. • To continue copying other images, disconnect the USB cable (page 62) and reconnect it , then click [Next]. 1 Double-click [My Computer] t [Removable Disk] t [DCIM...
... 4-A: Copying images to a Computer • For Windows XP, follow the procedure explained in "Stage 3: Connecting the camera and your computer" on page 59. The wizard screen closes. • To continue copying other images, disconnect the USB cable (page 62) and reconnect it , then click [Next]. 1 Double-click [My Computer] t [Removable Disk] t [DCIM...
Operating Instructions
Page 61
... displayed. To delete the USB connection Perform the following procedure when: • Disconnecting the USB cable • Removing a "Memory Stick" • Inserting a "Memory Stick" after copying images from the internal memory • Turning off the camera 61 Stage 5: Viewing images on the desktop. 2 Double-click the desired image file. Then,... click [Paste]. 1 Click [Start] t [My Documents]. 2 Using your computer 1 2 The image files are not using Windows XP, double-click [My Documents] on your camera (page 63). 3 Double-click the [My Documents] folder. The image is deleted.
... displayed. To delete the USB connection Perform the following procedure when: • Disconnecting the USB cable • Removing a "Memory Stick" • Inserting a "Memory Stick" after copying images from the internal memory • Turning off the camera 61 Stage 5: Viewing images on the desktop. 2 Double-click the desired image file. Then,... click [Paste]. 1 Click [Start] t [My Documents]. 2 Using your computer 1 2 The image files are not using Windows XP, double-click [My Documents] on your camera (page 63). 3 Double-click the [My Documents] folder. The image is deleted.
Operating Instructions
Page 62
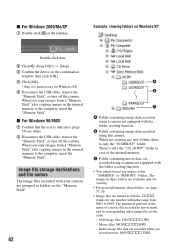
... any images to the computer, insert the "Memory Stick". ssss stands for Windows XP. 5 Disconnect the USB cable, remove the "Memory Stick", or turn off the camera. The numerical portions of the name of the internal memory. Image file storage destinations and file names The image ... about folders, see page 37, 50. • Image files are the same. - Example: viewing folders on Windows XP Double-click here 2 Click (Sony DSC) t [Stop]. 3 Confirm the device on the tasktray. When you copy images from 0001 to the computer, insert the "Memory Stick". x For Windows...
... any images to the computer, insert the "Memory Stick". ssss stands for Windows XP. 5 Disconnect the USB cable, remove the "Memory Stick", or turn off the camera. The numerical portions of the name of the internal memory. Image file storage destinations and file names The image ... about folders, see page 37, 50. • Image files are the same. - Example: viewing folders on Windows XP Double-click here 2 Click (Sony DSC) t [Stop]. 3 Confirm the device on the tasktray. When you copy images from 0001 to the computer, insert the "Memory Stick". x For Windows...
Operating Instructions
Page 66
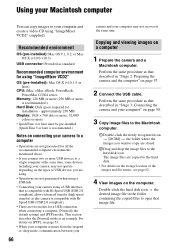
... computer. Perform the same procedure as that described in "Stage 3: Connecting the camera and your camera, may not recover at the same time, some devices, including your computer" on page 57. 2 Connect the USB cable. Recommended environment OS (pre-installed): Mac OS 9.1, 9.2, or Mac OS X... (v10.0-v10.3) USB connector: Provided as an example. Perform the same procedure as this camera is compatible with HiSpeed USB (USB 2.0 compliant). • There...
... computer. Perform the same procedure as that described in "Stage 3: Connecting the camera and your camera, may not recover at the same time, some devices, including your computer" on page 57. 2 Connect the USB cable. Recommended environment OS (pre-installed): Mac OS 9.1, 9.2, or Mac OS X... (v10.0-v10.3) USB connector: Provided as an example. Perform the same procedure as this camera is compatible with HiSpeed USB (USB 2.0 compliant). • There...
Operating Instructions
Page 67
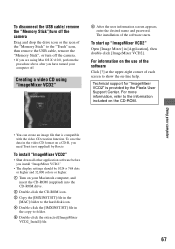
...for "ImageMixer VCD2" is compatible with the video CD creation function. For more information, refer to the information included on your computer off the camera. • If you are using "ImageMixer VCD2" 6 After the user information screen appears, enter the desired name and password. For information on... perform the procedure above after you need Toast (not supplied) by the Pixela User Support Center. To disconnect the USB cable/ remove the "Memory Stick"/turn off the camera Drag and drop the drive icon or the icon of the "Memory Stick" to the "Trash" icon, then remove the...
...for "ImageMixer VCD2" is compatible with the video CD creation function. For more information, refer to the information included on your computer off the camera. • If you are using "ImageMixer VCD2" 6 After the user information screen appears, enter the desired name and password. For information on... perform the procedure above after you need Toast (not supplied) by the Pixela User Support Center. To disconnect the USB cable/ remove the "Memory Stick"/turn off the camera Drag and drop the drive icon or the icon of the "Memory Stick" to the "Trash" icon, then remove the...
Operating Instructions
Page 69
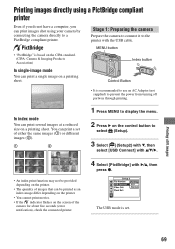
... on the printer. • You cannot print movies. • If the indicator flashes on the screen of images that can print images shot using a PictBridge compliant printer Even if you do not have a computer, you can be provided depending on the printer. • The quantity ...of the camera for about five seconds (error notification), check the connected printer. 4 Select [PictBridge] with the USB cable. • "PictBridge" is recommended to use an AC Adaptor (not supplied) to prevent the power ...
... on the printer. • You cannot print movies. • If the indicator flashes on the screen of images that can print images shot using a PictBridge compliant printer Even if you do not have a computer, you can be provided depending on the printer. • The quantity ...of the camera for about five seconds (error notification), check the connected printer. 4 Select [PictBridge] with the USB cable. • "PictBridge" is recommended to use an AC Adaptor (not supplied) to prevent the power ...

Operating Instructions
Page 70
..., the indicator appears Print All In This Folder DPOF image Select This image Cancel The camera is set to playback mode, then an image and the print menu appear on the ...image you can print a set [Index] to [On] in step 2, you want to print with the supplied USB cable. The mark appears on the control button, then press z. [All In This Folder] Prints all the images in the... 2 Select print settings with v/V/b/B. To the (USB) jack To the USB jack USB cable 2 Turn on the printer with b/B, then press z. Stage 2: Connecting the camera to the printer 1 Connect the (USB) jack on your...
..., the indicator appears Print All In This Folder DPOF image Select This image Cancel The camera is set to playback mode, then an image and the print menu appear on the ...image you can print a set [Index] to [On] in step 2, you want to print with the supplied USB cable. The mark appears on the control button, then press z. [All In This Folder] Prints all the images in the... 2 Select print settings with v/V/b/B. To the (USB) jack To the USB jack USB cable 2 Turn on the printer with b/B, then press z. Stage 2: Connecting the camera to the printer 1 Connect the (USB) jack on your...
Operating Instructions
Page 71
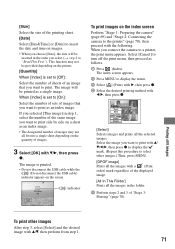
...all fit onto a single sheet depending on the quantity of images. 3 Select [OK] with the following. Select the image you connect the camera to a printer, the print menu appears. This function may not all the selected images. The image is set to [Off]: Select the number... (Index). When [Index] is printed. • Do not disconnect the USB cable while the (Do not disconnect the USB cable) indicator appears on the index screen Perform "Stage 1: Preparing the camera" (page 69) and "Stage 2: Connecting the camera to the printer" (page 70), then proceed with V/B, then press z. When you...
...all fit onto a single sheet depending on the quantity of images. 3 Select [OK] with the following. Select the image you connect the camera to a printer, the print menu appears. This function may not all the selected images. The image is set to [Off]: Select the number... (Index). When [Index] is printed. • Do not disconnect the USB cable while the (Do not disconnect the USB cable) indicator appears on the index screen Perform "Stage 1: Preparing the camera" (page 69) and "Stage 2: Connecting the camera to the printer" (page 70), then proceed with V/B, then press z. When you...

Operating Instructions
Page 74
Control button Images shot with the TV. VGA 2/9 , and turn Mode dial 1 Connect the A/V cable (supplied) to the A/V OUT (MONO) jack of the camera and the audio/video input jacks of a TV. 101-0002 2005 1 1 10:30PM BACK/NEXT VOLUME To audio/video input jacks A/V cable To A/VOUT (MONO) jack • If your TV... 53). 74 Press b/B on the control button to select the desired image. • When using your camera abroad, it may be necessary to switch the video signal output to match that of the A/V cable to the left audio jack. 2 Turn on the TV and set the TV/ video input switch to...
Control button Images shot with the TV. VGA 2/9 , and turn Mode dial 1 Connect the A/V cable (supplied) to the A/V OUT (MONO) jack of the camera and the audio/video input jacks of a TV. 101-0002 2005 1 1 10:30PM BACK/NEXT VOLUME To audio/video input jacks A/V cable To A/VOUT (MONO) jack • If your TV... 53). 74 Press b/B on the control button to select the desired image. • When using your camera abroad, it may be necessary to switch the video signal output to match that of the A/V cable to the left audio jack. 2 Turn on the TV and set the TV/ video input switch to...
Operating Instructions
Page 75
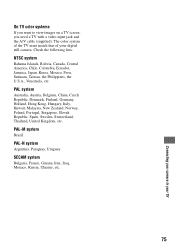
... TV must match that of your digital still camera. PAL-M system Brazil PAL-N system Argentina, Paraguay, Uruguay SECAM system Bulgaria, France, Guiana, Iran, Iraq, Monaco, Russia, Ukraine, etc. 75 Connecting your camera to view images on a TV screen, you need a TV with a video input jack and the A/V cable (supplied). PAL system Australia, Austria, Belgium...
... TV must match that of your digital still camera. PAL-M system Brazil PAL-N system Argentina, Paraguay, Uruguay SECAM system Bulgaria, France, Guiana, Iran, Iraq, Monaco, Russia, Ukraine, etc. 75 Connecting your camera to view images on a TV screen, you need a TV with a video input jack and the A/V cable (supplied). PAL system Australia, Austria, Belgium...
Operating Instructions
Page 80
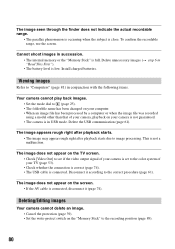
...Delete unnecessary images (t step 6 in conjunction with the following items. Your camera cannot play back images. • Set the mode dial to (page 25). • The folder/file name has been changed on the screen. • If the AV cable is close. The image does not appear on your computer. • When... an image file has been processed by a computer or when the image file was recorded using a model other than that of your camera, playback on the "Memory Stick" to the ...
...Delete unnecessary images (t step 6 in conjunction with the following items. Your camera cannot play back images. • Set the mode dial to (page 25). • The folder/file name has been changed on the screen. • If the AV cable is close. The image does not appear on your computer. • When... an image file has been processed by a computer or when the image file was recorded using a model other than that of your camera, playback on the "Memory Stick" to the ...
Operating Instructions
Page 81
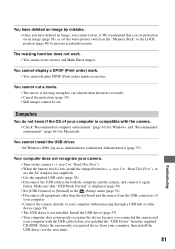
...First"). • When the battery level is not installed. We recommend that "USB Mode Normal" is compatible with the USB cable before you connected the camera and your computer, then install the USB driver (see the next item). 81 Troubleshooting You cannot install the USB driver. •... 2 in "Read This First"), or use the AC Adaptor (not supplied) . • Use the supplied USB cable (page 58). • Disconnect the USB cable from your computer with the camera. • Check "Recommended computer environment" (page 56) for Windows, and "Recommended environment" (page 66) for ...
...First"). • When the battery level is not installed. We recommend that "USB Mode Normal" is compatible with the USB cable before you connected the camera and your computer, then install the USB driver (see the next item). 81 Troubleshooting You cannot install the USB driver. •... 2 in "Read This First"), or use the AC Adaptor (not supplied) . • Use the supplied USB cable (page 58). • Disconnect the USB cable from your computer with the camera. • Check "Recommended computer environment" (page 56) for Windows, and "Recommended environment" (page 66) for ...
Operating Instructions
Page 82
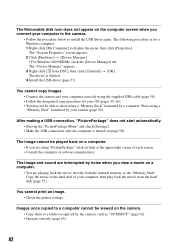
...(page 58). Shoot using a "Memory Stick" formatted by a computer. You cannot copy images. • Connect the camera and your computer correctly using the supplied USB cable (page 58). • Follow the designated copy procedure for a Windows computer. 1 Right-click [My Computer] to ... driver (page 57). Images once copied to a computer cannot be able to install the USB driver again. The "Device Manager" appears. 3 Right-click [ Sony DSC], then click [Uninstall] t [OK]. The "System Properties" screen appears. 2 Click [Hardware] t [Device Manager]. • For Windows 98/98SE/Me...
...(page 58). Shoot using a "Memory Stick" formatted by a computer. You cannot copy images. • Connect the camera and your computer correctly using the supplied USB cable (page 58). • Follow the designated copy procedure for a Windows computer. 1 Right-click [My Computer] to ... driver (page 57). Images once copied to a computer cannot be able to install the USB driver again. The "Device Manager" appears. 3 Right-click [ Sony DSC], then click [Uninstall] t [OK]. The "System Properties" screen appears. 2 Click [Hardware] t [Device Manager]. • For Windows 98/98SE/Me...

Operating Instructions
Page 84
...images, disconnect the USB cable, turn the printer off and then on, then connect the USB cable again. • Movies cannot be printed. • Images shot using the USB cable. • Turn on the date-inserted part of the image. • Images that the camera and the printer are properly... connected using cameras other than this camera or images modified with the ...
...images, disconnect the USB cable, turn the printer off and then on, then connect the USB cable again. • Movies cannot be printed. • Images shot using the USB cable. • Turn on the date-inserted part of the image. • Images that the camera and the printer are properly... connected using cameras other than this camera or images modified with the ...

Operating Instructions
Page 88
...to print images before the printer connection was selected. You cannot print until it is canceling the current print job. Disconnect and connect the USB cable again. No printable image • You tried to execute [DPOF image] without placing a DPOF (Print order) mark on the printer. •...to print is connected to a non-PictBridge compliant device. Enable printer to connect • [USB Connect] is set to [PictBridge], however the camera is corrupted. Connect to the printer may not be completed yet. This may take time, depending on the image(s). • You tried to execute...
...to print images before the printer connection was selected. You cannot print until it is canceling the current print job. Disconnect and connect the USB cable again. No printable image • You tried to execute [DPOF image] without placing a DPOF (Print order) mark on the printer. •...to print is connected to a non-PictBridge compliant device. Enable printer to connect • [USB Connect] is set to [PictBridge], however the camera is corrupted. Connect to the printer may not be completed yet. This may take time, depending on the image(s). • You tried to execute...


