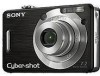

Instruction Manual
Page 5
..., your authority to operate this equipment. [ Note: This equipment has been tested and found compliant with the limits for a Class B digital device, pursuant to radio communications. By ensuring this product is connected. - Connect the equipment into an outlet on its packaging indicates that ...this product shall not be treated as household waste. This equipment generates, uses, and can be determined by turning the equipment off and on, the user is no guarantee that interference will help prevent potential negative consequences for the environment and ...
..., your authority to operate this equipment. [ Note: This equipment has been tested and found compliant with the limits for a Class B digital device, pursuant to radio communications. By ensuring this product is connected. - Connect the equipment into an outlet on its packaging indicates that ...this product shall not be treated as household waste. This equipment generates, uses, and can be determined by turning the equipment off and on, the user is no guarantee that interference will help prevent potential negative consequences for the environment and ...
Instruction Manual
Page 7
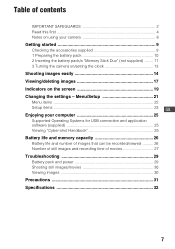
... the battery pack/a "Memory Stick Duo" (not supplied) ........ 11 3 Turning the camera on/setting the clock 13 Shooting images easily 14 Viewing/deleting images 17 Indicators on using your computer 25 Supported Operating Systems for USB connection and application software (supplied 25 Viewing "Cyber-shot Handbook 25 Battery life and memory capacity 26 Battery...
... the battery pack/a "Memory Stick Duo" (not supplied) ........ 11 3 Turning the camera on/setting the clock 13 Shooting images easily 14 Viewing/deleting images 17 Indicators on using your computer 25 Supported Operating Systems for USB connection and application software (supplied 25 Viewing "Cyber-shot Handbook 25 Battery life and memory capacity 26 Battery...
Instruction Manual
Page 8
...charged battery pack, then turn off the camera or remove the battery pack or "Memory Stick Duo" while the access lamp is lighted, as the internal memory data or "Memory Stick Duo" data may be some cases may not be repairable. • Do not aim the camera at the sun or other... may be contrary to the provisions of the copyright laws. [ No compensation for Camera File system) universal standard established by making a back up Do not turn on the camera again. [ On image data compatibility • This camera conforms with DCF (Design rule for contents of the recording The contents of such...
...charged battery pack, then turn off the camera or remove the battery pack or "Memory Stick Duo" while the access lamp is lighted, as the internal memory data or "Memory Stick Duo" data may be some cases may not be repairable. • Do not aim the camera at the sun or other... may be contrary to the provisions of the copyright laws. [ No compensation for Camera File system) universal standard established by making a back up Do not turn on the camera again. [ On image data compatibility • This camera conforms with DCF (Design rule for contents of the recording The contents of such...

Instruction Manual
Page 10
When the CHARGE lamp turns off the power by . • Even if the CHARGE lamp is not lit, the battery charger is not disconnected from the AC power source (mains) ... charge time Approx. 270 min. • Time required to the wall outlet (wall socket). If you continue charging the battery pack for use with compatible Sony batteries. 10 The CHARGE lamp lights on the battery life and memory capacity, see page 26. • Connect the battery charger to the wall outlet...
When the CHARGE lamp turns off the power by . • Even if the CHARGE lamp is not lit, the battery charger is not disconnected from the AC power source (mains) ... charge time Approx. 270 min. • Time required to the wall outlet (wall socket). If you continue charging the battery pack for use with compatible Sony batteries. 10 The CHARGE lamp lights on the battery life and memory capacity, see page 26. • Connect the battery charger to the wall outlet...
Instruction Manual
Page 11
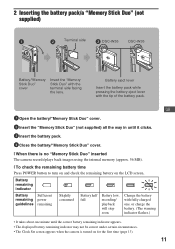
... battery remaining indicator may not be correct under certain circumstances. • The Clock Set screen appears when the camera is no "Memory Stick Duo" inserted The camera records/plays back images using the internal memory (approx. 56 MB). [ To check the remaining battery time Press... battery pack. 4 Close the battery/"Memory Stick Duo" cover. [ When there is turned on the LCD screen. 2 Inserting the battery pack/a "Memory Stick Duo" (not supplied) ɟ Terminal side ɠ DSC-W55 DSC-W35 Battery/"Memory Stick Duo" cover Insert the "Memory Stick Duo" with the tip ...
... battery remaining indicator may not be correct under certain circumstances. • The Clock Set screen appears when the camera is no "Memory Stick Duo" inserted The camera records/plays back images using the internal memory (approx. 56 MB). [ To check the remaining battery time Press... battery pack. 4 Close the battery/"Memory Stick Duo" cover. [ When there is turned on the LCD screen. 2 Inserting the battery pack/a "Memory Stick Duo" (not supplied) ɟ Terminal side ɠ DSC-W55 DSC-W35 Battery/"Memory Stick Duo" cover Insert the "Memory Stick Duo" with the tip ...
Instruction Manual
Page 13
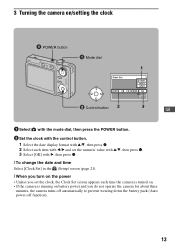
3 Turning the camera on/setting the clock POWER button Mode dial 1 ɟ Control button 2 3 GB 1 Select with the mode dial, then press the POWER button. 2 Set the clock ... power • Unless you set the clock, the Clock Set screen appears each time the camera is turned on. • If the camera is running on battery power and you do not operate the camera for about three minutes, the camera turns off automatically to prevent wearing down the battery pack (Auto power-off function). 13
3 Turning the camera on/setting the clock POWER button Mode dial 1 ɟ Control button 2 3 GB 1 Select with the mode dial, then press the POWER button. 2 Set the clock ... power • Unless you set the clock, the Clock Set screen appears each time the camera is turned on. • If the camera is running on battery power and you do not operate the camera for about three minutes, the camera turns off automatically to prevent wearing down the battery pack (Auto power-off function). 13

Instruction Manual
Page 16
To turn off the Image Size menu, press the button again. Still images Image size 7M : 7M 3:2 : 3:2 5M : 5M 3M : 3M 2M : 2M VGA: VGA 16:9: 16:9 ...×17" print Match 3:2 Aspect Ratio Up to A4/8×10" print Up to 13×18cm /5×7" print Up to shooting conditions. 16 To turn off the EV adjustment bar, press the b button again. [ DISP Changing the screen display Each time you press the DISP (Screen display switch) button, the...
To turn off the Image Size menu, press the button again. Still images Image size 7M : 7M 3:2 : 3:2 5M : 5M 3M : 3M 2M : 2M VGA: VGA 16:9: 16:9 ...×17" print Match 3:2 Aspect Ratio Up to A4/8×10" print Up to 13×18cm /5×7" print Up to shooting conditions. 16 To turn off the EV adjustment bar, press the b button again. [ DISP Changing the screen display Each time you press the DISP (Screen display switch) button, the...
Instruction Manual
Page 17
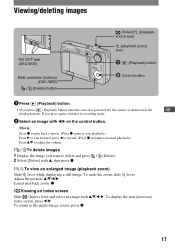
To display the next (previous) index screen, press b/B. Viewing/deleting images A/V OUT jack (DSC-W35) Multi connector (bottom) (DSC-W55) (Delete) button (Index)/ (playback zoom) lever (playback zoom) lever (Playback) button ɟ Control button 1 Press (Playback) button. • If you want to ... (Press z to return to normal playback.) Press v/V to adjust the volume. [ To delete images 1 Display the image you press (Playback) button when the camera is powered off, the camera is turned on the control button. If you press again, switches to the single-image screen, press z. 17
To display the next (previous) index screen, press b/B. Viewing/deleting images A/V OUT jack (DSC-W35) Multi connector (bottom) (DSC-W55) (Delete) button (Index)/ (playback zoom) lever (playback zoom) lever (Playback) button ɟ Control button 1 Press (Playback) button. • If you want to ... (Press z to return to normal playback.) Press v/V to adjust the volume. [ To delete images 1 Display the image you press (Playback) button when the camera is powered off, the camera is turned on the control button. If you press again, switches to the single-image screen, press z. 17
Instruction Manual
Page 19
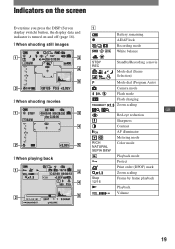
Indicators on the screen Everytime you press the DISP (Screen display switch) button, the display data and indicator is turned on and off (page 16). [ When shooting still images [ When shooting movies [ When playing back A z M WB Battery remaining AE/AF ...lock Recording mode White balance STBY REC Standby/Recording a movie Mode dial (Scene Selection) Mode dial (Program Auto) Camera mode SL Flash mode Flash charging 1.3 Zoom scaling GB Red-eye reduction Sharpness Contrast ON AF illuminator Metering mode RICH NATURAL SEPIA B&W Color mode Playback...
Indicators on the screen Everytime you press the DISP (Screen display switch) button, the display data and indicator is turned on and off (page 16). [ When shooting still images [ When shooting movies [ When playing back A z M WB Battery remaining AE/AF ...lock Recording mode White balance STBY REC Standby/Recording a movie Mode dial (Scene Selection) Mode dial (Program Auto) Camera mode SL Flash mode Flash charging 1.3 Zoom scaling GB Red-eye reduction Sharpness Contrast ON AF illuminator Metering mode RICH NATURAL SEPIA B&W Color mode Playback...
Instruction Manual
Page 21
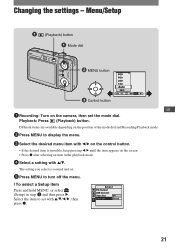
Different items are available depending on the position of the mode dial and Recording/Playback mode. 2 Press MENU to turn off the menu. [ To select a Setup item Press and hold MENU, or select (Setup) in the playback mode. 4 Select a setting with v/V/b/B, then press z. 21... Changing the settings - The setting you select is invisible, keep pressing b/B until the item appears on the camera, then set the mode dial. Select the item to set . 5 Press MENU to display the menu. 3 Select the desired menu item with b/B on the control...
Different items are available depending on the position of the mode dial and Recording/Playback mode. 2 Press MENU to turn off the menu. [ To select a Setup item Press and hold MENU, or select (Setup) in the playback mode. 4 Select a setting with v/V/b/B, then press z. 21... Changing the settings - The setting you select is invisible, keep pressing b/B until the item appears on the camera, then set the mode dial. Select the item to set . 5 Press MENU to display the menu. 3 Select the desired menu item with b/B on the control...
Instruction Manual
Page 25
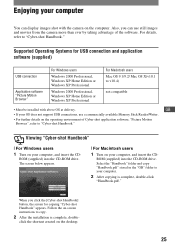
... "GB" folder to v10.4) not compatible • Must be installed with the camera on your computer, and insert the CD- Supported Operating Systems for copying "Cyber-shot Handbook" appears. Viewing "Cyber-shot Handbook" [ For Windows users 1 Turn on the computer. Also, you click the [Cyber-shot Handbook] button, the screen for USB connection and application software (supplied) USB...
... "GB" folder to v10.4) not compatible • Must be installed with the camera on your computer, and insert the CD- Supported Operating Systems for copying "Cyber-shot Handbook" appears. Viewing "Cyber-shot Handbook" [ For Windows users 1 Turn on the computer. Also, you click the [Cyber-shot Handbook] button, the screen for USB connection and application software (supplied) USB...
Instruction Manual
Page 26
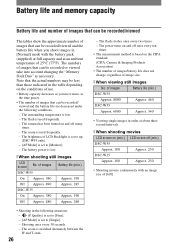
...Quality) is set to up (DSC-W55 only). - [AF Mode] is switched alternately between the W and T ends. 26 The flash strobes once every two times. - The zoom is set to [Single]. - The camera has been turned on and off many times. - of images Battery life (min.) DSC-W55 On Approx. 380 Approx. 190... Off Approx. 490 Approx. 245 DSC-W35 On Approx. 380 Approx. 190 Off Approx. 480 Approx. 240 - The...
...Quality) is set to up (DSC-W55 only). - [AF Mode] is switched alternately between the W and T ends. 26 The flash strobes once every two times. - The zoom is set to [Single]. - The camera has been turned on and off many times. - of images Battery life (min.) DSC-W55 On Approx. 380 Approx. 190... Off Approx. 490 Approx. 245 DSC-W35 On Approx. 380 Approx. 190 Off Approx. 480 Approx. 240 - The...
Instruction Manual
Page 29
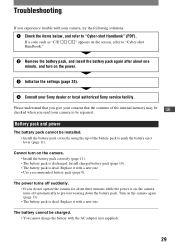
... the contents of the battery pack to prevent wearing down the battery pack. Cannot turn on the screen, refer to "Cyber-shot Handbook" (PDF). The power turns off suddenly. • If you do not operate the camera for about one . • Use a recommended battery pack (page 9). Replace ... internal memory may be GB checked when you give your Sony dealer or local authorized Sony service facility. Please understand that you send your camera, try the following solutions. 1 Check the items below, and refer to "Cyber-shot Handbook." 2 Remove the battery pack, and insert the ...
... the contents of the battery pack to prevent wearing down the battery pack. Cannot turn on the screen, refer to "Cyber-shot Handbook" (PDF). The power turns off suddenly. • If you do not operate the camera for about one . • Use a recommended battery pack (page 9). Replace ... internal memory may be GB checked when you give your Sony dealer or local authorized Sony service facility. Please understand that you send your camera, try the following solutions. 1 Check the items below, and refer to "Cyber-shot Handbook." 2 Remove the battery pack, and insert the ...
Instruction Manual
Page 31
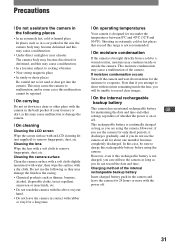
...date and time and other place with the camera in the back pocket of your hand. • Do not leave the camera in contact with a soft cloth to remove fingerprints, dust, etc. If moisture condensation occurs Turn off the camera and wait about one month it discharges gradually..., and if you are using the camera. Note that exceed this rechargeable battery before using the camera. This may cause the camera to malfunction, and in some cases this ...
...date and time and other place with the camera in the back pocket of your hand. • Do not leave the camera in contact with a soft cloth to remove fingerprints, dust, etc. If moisture condensation occurs Turn off the camera and wait about one month it discharges gradually..., and if you are using the camera. Note that exceed this rechargeable battery before using the camera. This may cause the camera to malfunction, and in some cases this ...
Service Manual
Page 5
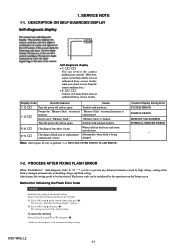
...camera malfunction.) • E: ss: ss Contact your Sony dealer or local authorized Sony service facility. Method for Initializing the Flash Error Code Initialize Initializes the setting to perform "1-2. DESCRIPTION ON SELF-DIAGNOSIS DISPLAY Self-diagnosis display • C: ss: ss You can be deactivated. Display Code Countermeasure Cause C:32:ss Turn...13:ss Format the "Memory Stick" or internal "Memory Stick" or internal memory is broken. Turn the power off and on again. DSC-W55_L2 1-1 The settings are retained. 1 Select [OK] with v, then press z. "Memory ...
...camera malfunction.) • E: ss: ss Contact your Sony dealer or local authorized Sony service facility. Method for Initializing the Flash Error Code Initialize Initializes the setting to perform "1-2. DESCRIPTION ON SELF-DIAGNOSIS DISPLAY Self-diagnosis display • C: ss: ss You can be deactivated. Display Code Countermeasure Cause C:32:ss Turn...13:ss Format the "Memory Stick" or internal "Memory Stick" or internal memory is broken. Turn the power off and on again. DSC-W55_L2 1-1 The settings are retained. 1 Select [OK] with v, then press z. "Memory ...
Service Manual
Page 7
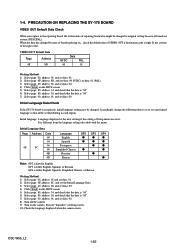
...repairing board also might be changed. 1-4. Initial language: Language displayed at the next starting if the setting of the set distributing in each region. DSC-W55_L2 1-3E VIDEO OUT Default Data Page Address 4F 8D Data NTSC PAL 00 01 Writing Method: 1) Select page: 00, address: 01, ... data is right. Execute "Initialize" of VIDEO OUT if destination code is "00". 7) Select page: 00, address: 01, and set data: 00. 8) Turn off the camera. 9) Turn on the SEUS screen. 5) Select page: 80, address: 34, and check that the data is "00". 6) Select page: 80, address: 30, and...
...repairing board also might be changed. 1-4. Initial language: Language displayed at the next starting if the setting of the set distributing in each region. DSC-W55_L2 1-3E VIDEO OUT Default Data Page Address 4F 8D Data NTSC PAL 00 01 Writing Method: 1) Select page: 00, address: 01, ... data is right. Execute "Initialize" of VIDEO OUT if destination code is "00". 7) Select page: 00, address: 01, and set data: 00. 8) Turn off the camera. 9) Turn on the SEUS screen. 5) Select page: 80, address: 34, and check that the data is "00". 6) Select page: 80, address: 30, and...

Service Manual
Page 8
...be left inside) DISCHARGING OF THE ST-133 BOARD'S CHARGING CAPACITOR (C901) The charging capacitor (C901) of the ST-133 board is simply turned off at wire of the resistor to the gilded flexible board. It is possible that a wire is handled by the charged voltage which comes off... . R:1 kΩ/1 W (Part code: 1-215-869-11) DSC-W55_L2 2-1 It is possible that the flat cable and flexible board are not cracked of 1 kΩ /1 W (1-215-869-11). Do not insert the cable ...
...be left inside) DISCHARGING OF THE ST-133 BOARD'S CHARGING CAPACITOR (C901) The charging capacitor (C901) of the ST-133 board is simply turned off at wire of the resistor to the gilded flexible board. It is possible that a wire is handled by the charged voltage which comes off... . R:1 kΩ/1 W (Part code: 1-215-869-11) DSC-W55_L2 2-1 It is possible that the flat cable and flexible board are not cracked of 1 kΩ /1 W (1-215-869-11). Do not insert the cable ...


