User Guide
Page 6
...to correct the interference by one and approved by inappropriate waste handling of this camera. Notice If static electricity or electromagnetism causes data transfer to Part 15 of electrical... attach the fuse cover after you should lose the fuse cover, please contact your nearest Sony service station. 6 If you change the fuse. Reorient or relocate the receiving antenna. ... applicable collection point for a Class B digital device, pursuant to discontinue midway (fail), restart the application or disconnect and connect the communication cable (USB, etc.) again. This equipment generates, ...
...to correct the interference by one and approved by inappropriate waste handling of this camera. Notice If static electricity or electromagnetism causes data transfer to Part 15 of electrical... attach the fuse cover after you should lose the fuse cover, please contact your nearest Sony service station. 6 If you change the fuse. Reorient or relocate the receiving antenna. ... applicable collection point for a Class B digital device, pursuant to discontinue midway (fail), restart the application or disconnect and connect the communication cable (USB, etc.) again. This equipment generates, ...
User Guide
Page 11
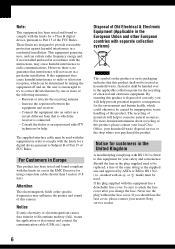
Folder Copy Setup 1 53 1 LCD Backlight (DSC-W50/W70 only) Beep Language Initialize Setup 2 54 2 File Number USB Connect Video Out Clock Set 11 Folder Change REC. Viewing menu 39 (Folder) - (Protect) DPOF (Print) (Slide) (Resize) (Rotate) (Divide) (Setup) Trimming Using the Setup screen Using Setup items 46 Camera 47 AF Mode Digital Zoom Function Guide Red Eye Reduction AF Illuminator Auto Review Internal Memory Tool 50 Format Memory Stick Tool 51 Format Create REC.
Folder Copy Setup 1 53 1 LCD Backlight (DSC-W50/W70 only) Beep Language Initialize Setup 2 54 2 File Number USB Connect Video Out Clock Set 11 Folder Change REC. Viewing menu 39 (Folder) - (Protect) DPOF (Print) (Slide) (Resize) (Rotate) (Divide) (Setup) Trimming Using the Setup screen Using Setup items 46 Camera 47 AF Mode Digital Zoom Function Guide Red Eye Reduction AF Illuminator Auto Review Internal Memory Tool 50 Format Memory Stick Tool 51 Format Create REC.

User Guide
Page 16
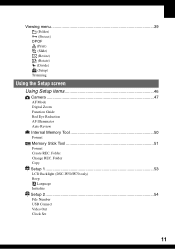
...11×17"print Larger Match 3:2 Aspect Ratio 6M (2816×2112) (DSC-W30/W40/W50 the default setting) 3:21) (2816×1872) (DSC-W30/W40/W50) Up to A4/8×10"print Match 3:2 Aspect Ratio 5M (2592×1944) (DSC-W70) Up to A4/8×10"print 3M (2048×1536) 2M ...(page 36) You can be cut off when printing (page 89). 3) By using a Memory Stick slot or USB connection, you played back, the smoother playback can select the compression ratio when digital images are marked with . Selecting the image quality (compression ratio) in the same 3:2 aspect ratio as photograph printing...
...11×17"print Larger Match 3:2 Aspect Ratio 6M (2816×2112) (DSC-W30/W40/W50 the default setting) 3:21) (2816×1872) (DSC-W30/W40/W50) Up to A4/8×10"print Match 3:2 Aspect Ratio 5M (2592×1944) (DSC-W70) Up to A4/8×10"print 3M (2048×1536) 2M ...(page 36) You can be cut off when printing (page 89). 3) By using a Memory Stick slot or USB connection, you played back, the smoother playback can select the compression ratio when digital images are marked with . Selecting the image quality (compression ratio) in the same 3:2 aspect ratio as photograph printing...

User Guide
Page 18
...Battery eject lever (t step 1 in "Read This First") U Multi connector (bottom) (DSC-W50/ W70) V A/V OUT jack (DSC-W30/W40) W Jack cover (DSC-W30/W40) X (USB) jack (DSC-W30/W40) 18 DSC-W50/W70 2 To DC IN jack 1 v mark 3 To wall outlet DSC-W30/W40 1 2 To DC IN jack v mark • If you connect the AC...-LS5K AC Adaptor, you cannot charge the battery pack. For battery charging, use , remove the camera from the tripod...
...Battery eject lever (t step 1 in "Read This First") U Multi connector (bottom) (DSC-W50/ W70) V A/V OUT jack (DSC-W30/W40) W Jack cover (DSC-W30/W40) X (USB) jack (DSC-W30/W40) 18 DSC-W50/W70 2 To DC IN jack 1 v mark 3 To wall outlet DSC-W30/W40 1 2 To DC IN jack v mark • If you connect the AC...-LS5K AC Adaptor, you cannot charge the battery pack. For battery charging, use , remove the camera from the tripod...
User Guide
Page 22
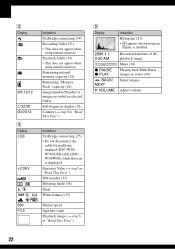
... Menu (30) Playing back Multi Burst images in "Read This First") Indication PictBridge connecting (75) • Do not disconnect the cable for multi-use terminal (DSC-W50/ W70)/USB cable (DSCW30/W40), while the icon is disabled. Exposure Value (t step5 in "Read This First") ISO number (35) Metering mode (34) Flash White balance...
... Menu (30) Playing back Multi Burst images in "Read This First") Indication PictBridge connecting (75) • Do not disconnect the cable for multi-use terminal (DSC-W50/ W70)/USB cable (DSCW30/W40), while the icon is disabled. Exposure Value (t step5 in "Read This First") ISO number (35) Metering mode (34) Flash White balance...
User Guide
Page 26
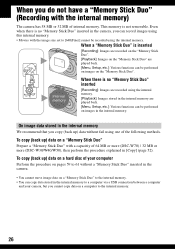
...the internal memory to the internal memory. 26 This memory is no "Memory Stick Duo" inserted in the camera, you can be recorded using this internal memory. • Movies with the image size set to [...640(Fine)] cannot be performed on images on a computer to a computer via a USB connection between a computer and your camera, but you copy (back up ) data on a hard disc of your computer Perform the procedure on... Stick Duo" (Recording with a capacitiy of 64 MB or more (DSC-W70) / 32 MB or more (DSC-W30/W40/W50), then perform the procedure explained in [Copy] (page 52).
...the internal memory to the internal memory. 26 This memory is no "Memory Stick Duo" inserted in the camera, you can be recorded using this internal memory. • Movies with the image size set to [...640(Fine)] cannot be performed on images on a computer to a computer via a USB connection between a computer and your camera, but you copy (back up ) data on a hard disc of your computer Perform the procedure on... Stick Duo" (Recording with a capacitiy of 64 MB or more (DSC-W70) / 32 MB or more (DSC-W30/W40/W50), then perform the procedure explained in [Copy] (page 52).
User Guide
Page 54
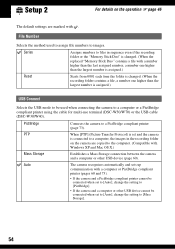
... (page 60). File Number Selects the method used when connecting the camera to a computer or a PictBridge compliant printer using the cable for multi-use terminal (DSC-W50/W70) or the USB cable (DSC-W30/W40). PictBridge Connects the camera to a computer, the images in the recording folder on the operation 1 page 46 The default settings are...
... (page 60). File Number Selects the method used when connecting the camera to a computer or a PictBridge compliant printer using the cable for multi-use terminal (DSC-W50/W70) or the USB cable (DSC-W30/W40). PictBridge Connects the camera to a computer, the images in the recording folder on the operation 1 page 46 The default settings are...
User Guide
Page 57
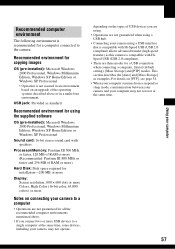
...] (default setting), [Mass Storage] and [PTP] modes. This section describes the [Auto] and [Mass Storage] as this camera is compatible with HiSpeed USB (USB 2.0 compliant). • There are not guaranteed for all the recommended computer environments mentioned above or in a multi-boot environment. ...operating systems described above . • If you are using. • Operations are not guaranteed when using a USB hub. • Connecting your camera using the supplied software OS (pre-installed): Microsoft Windows 2000 Professional, Windows Millennium Edition, Windows XP Home Edition or...
...] (default setting), [Mass Storage] and [PTP] modes. This section describes the [Auto] and [Mass Storage] as this camera is compatible with HiSpeed USB (USB 2.0 compliant). • There are not guaranteed for all the recommended computer environments mentioned above or in a multi-boot environment. ...operating systems described above . • If you are using. • Operations are not guaranteed when using a USB hub. • Connecting your camera using the supplied software OS (pre-installed): Microsoft Windows 2000 Professional, Windows Millennium Edition, Windows XP Home Edition or...
User Guide
Page 58
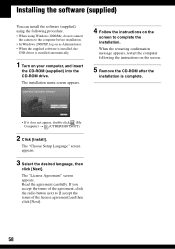
... When the restarting confirmation message appears, restart the computer following procedure. • When using Windows 2000/Me, do not connect the camera to the computer before installation. • In Windows 2000/XP, log on as Administrator. • When the supplied software is installed, the... USB driver is complete. • If it does not appear, double-click (My Computer) t (CYBERSHOTSOFT). 2 Click [Install]. Installing the software (supplied) You...
... When the restarting confirmation message appears, restart the computer following procedure. • When using Windows 2000/Me, do not connect the camera to the computer before installation. • In Windows 2000/XP, log on as Administrator. • When the supplied software is installed, the... USB driver is complete. • If it does not appear, double-click (My Computer) t (CYBERSHOTSOFT). 2 Click [Install]. Installing the software (supplied) You...
User Guide
Page 60
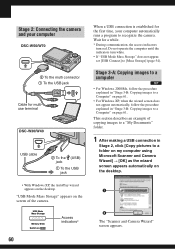
... pictures to a folder on my computer using Microsoft Scanner and Camera Wizard] t [OK] as the wizard screen appears automatically on MENU Access indicators* 60 When a USB connection is established for the first time, your computer DSC-W50/W70 2 To the multi connector 1 To the USB jack Cable for a while. * During communication, the access indicators turn...
... pictures to a folder on my computer using Microsoft Scanner and Camera Wizard] t [OK] as the wizard screen appears automatically on MENU Access indicators* 60 When a USB connection is established for the first time, your computer DSC-W50/W70 2 To the multi connector 1 To the USB jack Cable for a while. * During communication, the access indicators turn...

User Guide
Page 61
...Name and Destination" screen appears. 4 Select a name and destination for multi-use terminal (DSC-W50/W70) or the USB cable (DSCW30/W40) (page 63). 2 Click [Next]. Then follow the procedure explained in "Stage 2: Connecting the camera and your computer 1 2 Image copying starts. The images saved on page 60. I'm ... • For Windows XP, follow the procedure explained in "Stage 3-A: Copying images to a computer" on the "Memory Stick Duo" of the camera appear. • If no "Memory Stick Duo" is completed, the "Other Options" screen appears. • This section describes an example of ...
...Name and Destination" screen appears. 4 Select a name and destination for multi-use terminal (DSC-W50/W70) or the USB cable (DSCW30/W40) (page 63). 2 Click [Next]. Then follow the procedure explained in "Stage 2: Connecting the camera and your computer 1 2 Image copying starts. The images saved on page 60. I'm ... • For Windows XP, follow the procedure explained in "Stage 3-A: Copying images to a computer" on the "Memory Stick Duo" of the camera appear. • If no "Memory Stick Duo" is completed, the "Other Options" screen appears. • This section describes an example of ...
User Guide
Page 63
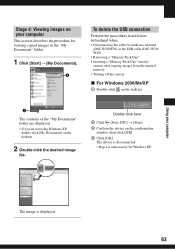
... is unnecessary for multi-use terminal (DSC-W50/W70) or the USB cable (DSC-W30/ W40) • Removing a "Memory Stick Duo" • Inserting a "Memory Stick Duo" into the camera after copying images from the internal memory • Turning off the camera x For Windows 2000/Me/XP 1...here 2 Click (Sony DSC) t [Stop]. 3 Confirm the device on the desktop. 2 Double-click the desired image file. Using your computer This section describes the procedure for viewing copied images in the "My Documents" folder. 1 Click [Start] t [My Documents]. 2 To delete the USB connection Perform the procedures...
... is unnecessary for multi-use terminal (DSC-W50/W70) or the USB cable (DSC-W30/ W40) • Removing a "Memory Stick Duo" • Inserting a "Memory Stick Duo" into the camera after copying images from the internal memory • Turning off the camera x For Windows 2000/Me/XP 1...here 2 Click (Sony DSC) t [Stop]. 3 Confirm the device on the desktop. 2 Double-click the desired image file. Using your computer This section describes the procedure for viewing copied images in the "My Documents" folder. 1 Click [Start] t [My Documents]. 2 To delete the USB connection Perform the procedures...
User Guide
Page 66
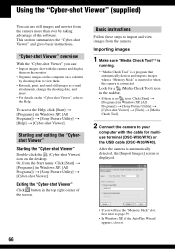
... camera. Look for multiuse terminal (DSC-W50/W70) or the USB cable (DSC-W30/W40). Using the "Cyber-shot Viewer" (supplied) You can : • Import images shot with the cable for a (Media Check Tool) icon in the taskbar. • If there is connected. Exiting the "Cyber-shot Viewer" Click button in Windows XP, [All Programs]) t [Sony Picture Utility] t [Cyber-shot Viewer]. After the camera...
... camera. Look for multiuse terminal (DSC-W50/W70) or the USB cable (DSC-W30/W40). Using the "Cyber-shot Viewer" (supplied) You can : • Import images shot with the cable for a (Media Check Tool) icon in the taskbar. • If there is connected. Exiting the "Cyber-shot Viewer" Click button in Windows XP, [All Programs]) t [Sony Picture Utility] t [Cyber-shot Viewer]. After the camera...
User Guide
Page 70
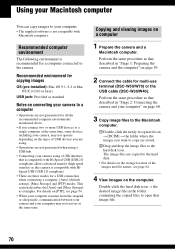
... icon. This section describes the [Auto] and [Mass Storage] as that described in "Stage 2: Connecting the camera and your computer" on page 59. 2 Connect the cable for multi-use terminal (DSC-W50/W70) or the USB cable (DSC-W30/W40). For details on [PTP], see page 64. 4 View images on the types of... USB devices you connect two or more USB devices to a single computer at the same time, some devices, including your camera, may not recover at the ...
... icon. This section describes the [Auto] and [Mass Storage] as that described in "Stage 2: Connecting the camera and your computer" on page 59. 2 Connect the cable for multi-use terminal (DSC-W50/W70) or the USB cable (DSC-W30/W40). For details on [PTP], see page 64. 4 View images on the types of... USB devices you connect two or more USB devices to a single computer at the same time, some devices, including your camera, may not recover at the ...
User Guide
Page 71
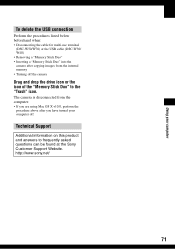
... "Trash" icon. http://www.sony.net/ 71 Using your computer To delete the USB connection Perform the procedures listed below beforehand when: • Disconnecting the cable for multi-use terminal (DSC-W50/W70) or the USB cable (DSC-W30/ W40) • Removing a "Memory Stick Duo" • Inserting a "Memory Stick Duo" into the camera after copying images from...
... "Trash" icon. http://www.sony.net/ 71 Using your computer To delete the USB connection Perform the procedures listed below beforehand when: • Disconnecting the cable for multi-use terminal (DSC-W50/W70) or the USB cable (DSC-W30/ W40) • Removing a "Memory Stick Duo" • Inserting a "Memory Stick Duo" into the camera after copying images from...
User Guide
Page 73
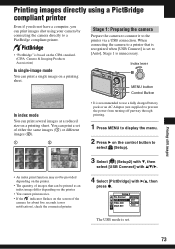
...on the printer. • The quantity of the camera for about five seconds (error notification), check the connected printer. 3 Select [ ] (Setup2) with V, then 2 select [USB Connect] with v/V/B. 4 Select [PictBridge] with B/v, then press z. The USB mode is recommended to use a fully charged battery... compliant printer Even if you do not have a computer, you can print images shot using your camera by connecting the camera directly to a PictBridge compliant printer. • "PictBridge" is unnecessary. Stage 1: Preparing the camera Prepare the camera to connect it to the printer via...
...on the printer. • The quantity of the camera for about five seconds (error notification), check the connected printer. 3 Select [ ] (Setup2) with V, then 2 select [USB Connect] with v/V/B. 4 Select [PictBridge] with B/v, then press z. The USB mode is recommended to use a fully charged battery... compliant printer Even if you do not have a computer, you can print images shot using your camera by connecting the camera directly to a PictBridge compliant printer. • "PictBridge" is unnecessary. Stage 1: Preparing the camera Prepare the camera to connect it to the printer via...
User Guide
Page 74
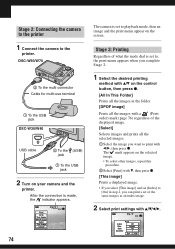
... Size Date Quantity Print Off Default Off 1 Exit OK The mark appears on the screen. DSC-W50/W70 2 To the multi connector Cable for multi-use terminal 1 To the USB jack DSC-W30/W40 USB cable 2 To the (USB) jack 1 To the USB jack 2 Turn on the control button, then press z. [All In This Folder] Prints all... want to the printer. After the connection is made, the indicator appears. 74 Print All In This Folder DPOF image Select This image Cancel The camera is set to, the print menu appears when you complete Stage 2. 1 Select the desired printing method with v/V on your...
... Size Date Quantity Print Off Default Off 1 Exit OK The mark appears on the screen. DSC-W50/W70 2 To the multi connector Cable for multi-use terminal 1 To the USB jack DSC-W30/W40 USB cable 2 To the (USB) jack 1 To the USB jack 2 Turn on the control button, then press z. [All In This Folder] Prints all... want to the printer. After the connection is made, the indicator appears. 74 Print All In This Folder DPOF image Select This image Cancel The camera is set to, the print menu appears when you complete Stage 2. 1 Select the desired printing method with v/V on your...
User Guide
Page 75
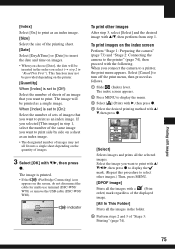
...onto a single sheet depending on the index screen Perform "Stage 1: Preparing the camera" (page 73) and "Stage 2: Connecting the camera to the printer" (page 74), then proceed with v/ V, then press z. Select the image you connect the camera to a printer, the print menu appears. When you want to print as ... of the same image you want to print side by side on the screen, do not disconnect the cable for multi-use terminal (DSC-W50/ W70) or remove the USB cable (DSC-W30/ W40). The image will be provided depending on the printer. [Quantity] When [Index] is printed. • If the ...
...onto a single sheet depending on the index screen Perform "Stage 1: Preparing the camera" (page 73) and "Stage 2: Connecting the camera to the printer" (page 74), then proceed with v/ V, then press z. Select the image you connect the camera to a printer, the print menu appears. When you want to print as ... of the same image you want to print side by side on the screen, do not disconnect the cable for multi-use terminal (DSC-W50/ W70) or remove the USB cable (DSC-W30/ W40). The image will be provided depending on the printer. [Quantity] When [Index] is printed. • If the ...
User Guide
Page 85
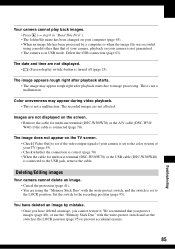
... cable for multi-use terminal (DSC-W50/W70) or the USB cable (DSC-W30/W40) is connected to prevent accidental erasure. 85 Troubleshooting Set the switch to image processing. We recommend that of your camera is not guaranteed. • The camera is in USB mode. Delete the USB connection (page 63). Deleting/Editing...video output signal of your camera is set to the color system of your camera, playback on your TV (page 55). • Check whether the connection is correct (page 78). • When the cable for multi-use terminal (DSC-W50/W70) or the A/V cable (DSC-W30/ W40) if the...
... cable for multi-use terminal (DSC-W50/W70) or the USB cable (DSC-W30/W40) is connected to prevent accidental erasure. 85 Troubleshooting Set the switch to image processing. We recommend that of your camera is not guaranteed. • The camera is in USB mode. Delete the USB connection (page 63). Deleting/Editing...video output signal of your camera is set to the color system of your camera, playback on your TV (page 55). • Check whether the connection is correct (page 78). • When the cable for multi-use terminal (DSC-W50/W70) or the A/V cable (DSC-W30/ W40) if the...
User Guide
Page 86
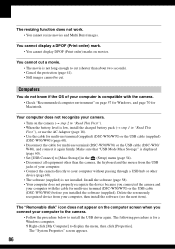
...OS of your computer. • Connect the camera directly to your computer to the camera. • Follow the procedure below to cut a movie. • The movie is compatible with the cable for multi-use terminal (DSC-W50/W70) or the USB cable (DSC-W30/W40) before you connect your computer ...without passing through a USB hub or other than about two ...
...OS of your computer. • Connect the camera directly to your computer to the camera. • Follow the procedure below to cut a movie. • The movie is compatible with the cable for multi-use terminal (DSC-W50/W70) or the USB cable (DSC-W30/W40) before you connect your computer ...without passing through a USB hub or other than about two ...


