Operating Instructions
Page 3
...Notice for customers in the EMC Directive for your nearest Sony service station. The supplied interface cable must be determined...batteries are designed to provide reasonable protection against harmful interference in the U.S.A. Should the fuse in order to comply with the limits for a Class B digital... device, pursuant to Part 15 of the following measures: - For more of the FCC Rules. If you . Note: This equipment has been tested and found compliant with the limits set out in the United Kingdom A moulded plug complying with BS 1363 is fitted to this camera...
...Notice for customers in the EMC Directive for your nearest Sony service station. The supplied interface cable must be determined...batteries are designed to provide reasonable protection against harmful interference in the U.S.A. Should the fuse in order to comply with the limits for a Class B digital... device, pursuant to Part 15 of the following measures: - For more of the FCC Rules. If you . Note: This equipment has been tested and found compliant with the limits set out in the United Kingdom A moulded plug complying with BS 1363 is fitted to this camera...
Operating Instructions
Page 4
... used by Carl Zeiss in insufficient light emission. See page 23 on how to maintain the batteries' functions (page 91). • For details on the usable batteries, see page 89. The camera may not be charged even if they are not completely discharged. The lens for contents of ...able to avoid the potential risk of data loss. Notes on recording/playback • This camera is . • If you can use the camera near a location that generates strong radio waves or emits radiation. Also, even if batteries are two types of "Memory Stick". • "Memory Stick": you can use a...
... used by Carl Zeiss in insufficient light emission. See page 23 on how to maintain the batteries' functions (page 91). • For details on the usable batteries, see page 89. The camera may not be charged even if they are not completely discharged. The lens for contents of ...able to avoid the potential risk of data loss. Notes on recording/playback • This camera is . • If you can use the camera near a location that generates strong radio waves or emits radiation. Also, even if batteries are two types of "Memory Stick". • "Memory Stick": you can use a...
Operating Instructions
Page 6
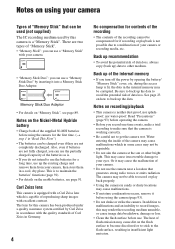
For full use of the digital still camera Prepare the camera and shoot in auto adjustment mode "Read This First" (separate volume) 1 Prepare the battery 2 Turn the camera on/set the clock 3 Insert a "Memory Stick" (not supplied) 4 Select the image size for use 5 Shoot images easily (Auto ...adjustment mode) Shoot still images (Scene Selection) 6 View images/Delete images Get more friendly with your camera This manual • Shoot...
For full use of the digital still camera Prepare the camera and shoot in auto adjustment mode "Read This First" (separate volume) 1 Prepare the battery 2 Turn the camera on/set the clock 3 Insert a "Memory Stick" (not supplied) 4 Select the image size for use 5 Shoot images easily (Auto ...adjustment mode) Shoot still images (Scene Selection) 6 View images/Delete images Get more friendly with your camera This manual • Shoot...
Operating Instructions
Page 7
... display 21 Number of still images and recording time of movies 22 When you do not have a "Memory Stick" (Recording with the internal memory 23 Battery life and number of contents Notes on a subject successfully 10 Exposure - Table of images that can be recorded/viewed 24 Using the mode dial 25...) (Flash Level) PFX (P.Effect) (Saturation) (Contrast) (Sharpness) (Setup) 7 Adjusting the light intensity 11 Color - On the effects of lighting 12 Quality - Focusing on using your camera 4 Enjoying the camera Basic techniques for better images 10 Focus -
... display 21 Number of still images and recording time of movies 22 When you do not have a "Memory Stick" (Recording with the internal memory 23 Battery life and number of contents Notes on a subject successfully 10 Exposure - Table of images that can be recorded/viewed 24 Using the mode dial 25...) (Flash Level) PFX (P.Effect) (Saturation) (Contrast) (Sharpness) (Setup) 7 Adjusting the light intensity 11 Color - On the effects of lighting 12 Quality - Focusing on using your camera 4 Enjoying the camera Basic techniques for better images 10 Focus -
Operating Instructions
Page 9
Using your computer Enjoying your Windows computer 55 Copying images to your computer 57 Viewing image files stored on a computer with your camera (using a "Memory Stick 63 Using the supplied software 64 Using your Macintosh computer 66 Printing still images How to print still ...images 68 Printing images directly using a PictBridge compliant printer 69 Printing at a shop 72 Connecting your camera to your TV Viewing images on a TV screen 74 Troubleshooting Troubleshooting 76 Warning indicators and messages 86 Others On the "Memory Stick 89 On...
Using your computer Enjoying your Windows computer 55 Copying images to your computer 57 Viewing image files stored on a computer with your camera (using a "Memory Stick 63 Using the supplied software 64 Using your Macintosh computer 66 Printing still images How to print still ...images 68 Printing images directly using a PictBridge compliant printer 69 Printing at a shop 72 Connecting your camera to your TV Viewing images on a TV screen 74 Troubleshooting Troubleshooting 76 Warning indicators and messages 86 Others On the "Memory Stick 89 On...
Operating Instructions
Page 16
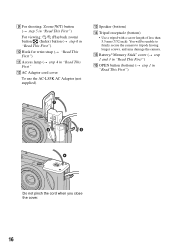
...") J Hook for wrist strap (t "Read This First") K Access lamp (t step 4 in "Read This First") Do not pinch the cord when you close the cover. 16 O Battery/"Memory Stick" cover (t step 1 and 3 in "Read This First") P OPEN button (bottom) (t step 1 in "Read This First" L AC Adaptor cord cover To use the AC...) M Speaker (bottom) N Tripod receptacle (bottom) • Use a tripod with a screw length of less than 5.5 mm (7/32 inch). You will be unable to firmly secure the camera to tripods having longer screws, and may damage the...
...") J Hook for wrist strap (t "Read This First") K Access lamp (t step 4 in "Read This First") Do not pinch the cord when you close the cover. 16 O Battery/"Memory Stick" cover (t step 1 and 3 in "Read This First") P OPEN button (bottom) (t step 1 in "Read This First" L AC Adaptor cord cover To use the AC...) M Speaker (bottom) N Tripod receptacle (bottom) • Use a tripod with a screw length of less than 5.5 mm (7/32 inch). You will be unable to firmly secure the camera to tripods having longer screws, and may damage the...
Operating Instructions
Page 17
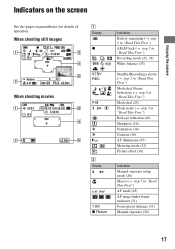
... 101 00:00:00 [00:28:25] C:32:00 + +2.0EV A Display z M WB STBY REC SL 5 6 ON B Display S AF M AF 1.0m z Return Indication Battery remaining (t step 1 in "Read This First") AE/AF lock (t step 5 in "Read This First") Recording mode (25, 34) White balance (33) Standby/Recording a movie (t ...47) Metering mode (32) Picture effect (36) Indication Manual exposure setup mode (26) Macro (t step 5 in parentheses for details of operation. Enjoying the camera Indicators on the screen See the pages in "Read This First") AF mode (45) AF range finder frame indicator (31) Focus preset distance (31) ...
... 101 00:00:00 [00:28:25] C:32:00 + +2.0EV A Display z M WB STBY REC SL 5 6 ON B Display S AF M AF 1.0m z Return Indication Battery remaining (t step 1 in "Read This First") AE/AF lock (t step 5 in "Read This First") Recording mode (25, 34) White balance (33) Standby/Recording a movie (t ...47) Metering mode (32) Picture effect (36) Indication Manual exposure setup mode (26) Macro (t step 5 in parentheses for details of operation. Enjoying the camera Indicators on the screen See the pages in "Read This First") AF mode (45) AF range finder frame indicator (31) Focus preset distance (31) ...

Operating Instructions
Page 18
...30" "Multi Burst interval (35) 400 Remaining number of vibration. However, we recommend holding the camera steadily and turning off the indicator to avoid the effects of recordable images (22) Self-timer ... Recording folder (50) • This does not appear when using the internal memory. Low battery warning (24) Spot metering cross hair (32) Display Indication AF range finder frame (31).../Guide menu (28) (not displayed on the screen on the previous page) 18 C Display Indication 7M (DSC-W7/ Image size (t step 4 in "Read This First") C:32:00 Self-diagnosis display (86) Date...
...30" "Multi Burst interval (35) 400 Remaining number of vibration. However, we recommend holding the camera steadily and turning off the indicator to avoid the effects of recordable images (22) Self-timer ... Recording folder (50) • This does not appear when using the internal memory. Low battery warning (24) Spot metering cross hair (32) Display Indication AF range finder frame (31).../Guide menu (28) (not displayed on the screen on the previous page) 18 C Display Indication 7M (DSC-W7/ Image size (t step 4 in "Read This First") C:32:00 Self-diagnosis display (86) Date...

Operating Instructions
Page 19
...; This does not appear when using the internal memory. Remaining internal memory capacity (22) Remaining "Memory Stick" capacity (22) 19 Enjoying the camera Playback folder (37) • This does not appear when using the internal memory. When playing back still images M VGA 101 101 12/12...0EV 500 F3.5 BACK/NEXT VOLUME When playing back movies A Display 7M 5M 3:2 3M 1M VGA FINE 640 STD 640 160 M N - 1.3 Step 12/16 Indication Battery remaining (t step 1 in "Read This First") Image size (t step 4 in "Read This First") Recording mode (25, 34) Playback (t step 6 in "Read ...
...; This does not appear when using the internal memory. Remaining internal memory capacity (22) Remaining "Memory Stick" capacity (22) 19 Enjoying the camera Playback folder (37) • This does not appear when using the internal memory. When playing back still images M VGA 101 101 12/12...0EV 500 F3.5 BACK/NEXT VOLUME When playing back movies A Display 7M 5M 3:2 3M 1M VGA FINE 640 STD 640 160 M N - 1.3 Step 12/16 Indication Battery remaining (t step 1 in "Read This First") Image size (t step 4 in "Read This First") Recording mode (25, 34) Playback (t step 6 in "Read ...
Operating Instructions
Page 24
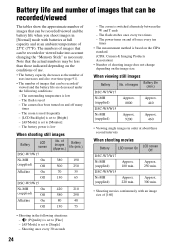
... not change depending on the CIPA standard. (CIPA: Camera & Imaging Products Association) • Number of images (Approx.) Battery life (min.) DSC-W7/W17 Ni-MH On 380 190 (supplied) Off 500 250 Alkaline On 70 35 Off 130 65 DSC-W5/W15 Ni-MH On 420 210 (supplied) Off 580... [LCD Backlight] is set to [Bright] - [AF Mode] is low When shooting still images Battery LCD screen No. of images Battery life (min.) DSC-W7/W17 Ni-MH (supplied) Approx. 8800 Approx. 440 DSC-W5/W15 Ni-MH (supplied) Approx. 9200 Approx. 460 • Viewing single images in order at an...
... not change depending on the CIPA standard. (CIPA: Camera & Imaging Products Association) • Number of images (Approx.) Battery life (min.) DSC-W7/W17 Ni-MH On 380 190 (supplied) Off 500 250 Alkaline On 70 35 Off 130 65 DSC-W5/W15 Ni-MH On 420 210 (supplied) Off 580... [LCD Backlight] is set to [Bright] - [AF Mode] is low When shooting still images Battery LCD screen No. of images Battery life (min.) DSC-W7/W17 Ni-MH (supplied) Approx. 8800 Approx. 440 DSC-W5/W15 Ni-MH (supplied) Approx. 9200 Approx. 460 • Viewing single images in order at an...
Operating Instructions
Page 34
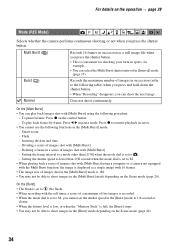
... z to shoot images in the [Burst] mode depending on the Scene mode (page 26). 34 Smart zoom - Deleting a frame in a series of images shot with [Multi Burst] using the following functions in series. • You cannot use the following procedure. - Setting the frame interval to a mode other than ...in succession as a single image with [Multi Burst] using a computer or a camera not equipped with the self timer, a series of a maximum of images in the [Burst] mode to 1/6 second or slower. • When the battery level is low, or when the "Memory Stick" is set the shutter speed ...
... z to shoot images in the [Burst] mode depending on the Scene mode (page 26). 34 Smart zoom - Deleting a frame in a series of images shot with [Multi Burst] using the following functions in series. • You cannot use the following procedure. - Setting the frame interval to a mode other than ...in succession as a single image with [Multi Burst] using a computer or a camera not equipped with the self timer, a series of a maximum of images in the [Burst] mode to 1/6 second or slower. • When the battery level is low, or when the "Memory Stick" is set the shutter speed ...
Operating Instructions
Page 45
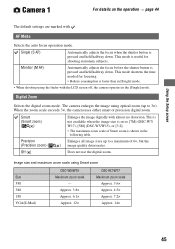
...DSC-W7/ W17), [5M] (DSC-W5/W15), or [3:2]. • The maximum zoom scale of 6×, but the ) image quality deteriorates. Digital Zoom Selects the digital zoom mode. Image size and maximum zoom scale using optical zoom (up to 3×). Smart (Smart zoom) ( ) Enlarges the image digitally with the LCD screen off, the camera...halfway down . When the zoom scale exceeds 3×, the camera uses either smart or precision digital zoom. This is not available when the image size is useful for focusing. • Battery consumption is shown in [Single] mode. • When ...
...DSC-W7/ W17), [5M] (DSC-W5/W15), or [3:2]. • The maximum zoom scale of 6×, but the ) image quality deteriorates. Digital Zoom Selects the digital zoom mode. Image size and maximum zoom scale using optical zoom (up to 3×). Smart (Smart zoom) ( ) Enlarges the image digitally with the LCD screen off, the camera...halfway down . When the zoom scale exceeds 3×, the camera uses either smart or precision digital zoom. This is not available when the image size is useful for focusing. • Battery consumption is shown in [Single] mode. • When ...

Operating Instructions
Page 51
... copied on the control button, then press z. OK See the following procedure. Select REC. Copying 102_COPY • Use fully charged Nickel-Metal Hydride batteries or the AC Adaptor (not supplied). Copying starts. Cancel Cancels the copying. 1 Insert a "Memory Stick" having 32 MB or larger capacity...., remove the "Memory Stick" after copying. Cancel Cancels changing the recording folder. 1 Select [OK] with little remaining charge, the batteries may run out, causing copying to a "Memory Stick". For details on the control button, then press z. Copy Copies all images ...
... copied on the control button, then press z. OK See the following procedure. Select REC. Copying 102_COPY • Use fully charged Nickel-Metal Hydride batteries or the AC Adaptor (not supplied). Copying starts. Cancel Cancels the copying. 1 Insert a "Memory Stick" having 32 MB or larger capacity...., remove the "Memory Stick" after copying. Cancel Cancels changing the recording folder. 1 Select [OK] with little remaining charge, the batteries may run out, causing copying to a "Memory Stick". For details on the control button, then press z. Copy Copies all images ...
Operating Instructions
Page 52
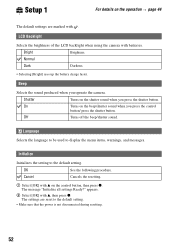
...Off Turns off the beep/shutter sound. Language Selects the language to be used to the default setting. appears. 2 Select [OK] with batteries. The message "Initialize all settings Ready?" OK See the following procedure. The settings are marked with v on the control button, then press ... resetting. 52 Shutter Turns on the beep/shutter sound when you operate the camera. Cancel Cancels the resetting. 1 Select [OK] with . Normal Dark Darkens. • Selecting [Bright] uses up the battery charge faster. Beep Selects the sound produced when you press the control button/...
...Off Turns off the beep/shutter sound. Language Selects the language to be used to the default setting. appears. 2 Select [OK] with batteries. The message "Initialize all settings Ready?" OK See the following procedure. The settings are marked with v on the control button, then press ... resetting. 52 Shutter Turns on the beep/shutter sound when you operate the camera. Cancel Cancels the resetting. 1 Select [OK] with . Normal Dark Darkens. • Selecting [Bright] uses up the battery charge faster. Beep Selects the sound produced when you press the control button/...
Operating Instructions
Page 58
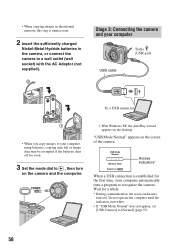
... a USB connection is unnecessary. 2 Insert the sufficiently charged Nickel-Metal Hydride batteries in the camera, or connect the camera to [Normal] (page 53). 58 Wait for the first time, your computer using batteries, copying may fail or image data may be corrupted if the batteries shut off too soon. 3 Set the mode dial to , then...
... a USB connection is unnecessary. 2 Insert the sufficiently charged Nickel-Metal Hydride batteries in the camera, or connect the camera to [Normal] (page 53). 58 Wait for the first time, your computer using batteries, copying may fail or image data may be corrupted if the batteries shut off too soon. 3 Set the mode dial to , then...
Operating Instructions
Page 76
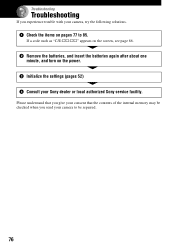
If a code such as "C/E:ss:ss" appears on the screen, see page 86. 2 Remove the batteries, and insert the batteries again after about one minute, and turn on pages 77 to be repaired. 76 Please understand that you give your consent that the contents of the internal memory may be checked when you experience trouble with your camera, try the following solutions. 1 Check the items on the power. 3 Initialize the settings (pages 52) 4 Consult your camera to 85. Troubleshooting Troubleshooting If you send your Sony dealer or local authorized Sony service facility.
If a code such as "C/E:ss:ss" appears on the screen, see page 86. 2 Remove the batteries, and insert the batteries again after about one minute, and turn on pages 77 to be repaired. 76 Please understand that you give your consent that the contents of the internal memory may be checked when you experience trouble with your camera, try the following solutions. 1 Check the items on the power. 3 Initialize the settings (pages 52) 4 Consult your camera to 85. Troubleshooting Troubleshooting If you send your Sony dealer or local authorized Sony service facility.
Operating Instructions
Page 77
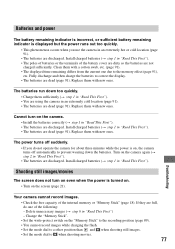
... the mode dial to correct the display. • The batteries are dead (page 91). Install charged batteries (t step 1 in "Read This First"). • The poles of batteries or the terminals of the battery cover are dirty so the batteries are full, do not operate the camera for about three minutes while the power is turned on...
... the mode dial to correct the display. • The batteries are dead (page 91). Install charged batteries (t step 1 in "Read This First"). • The poles of batteries or the terminals of the battery cover are dirty so the batteries are full, do not operate the camera for about three minutes while the power is turned on...
Operating Instructions
Page 80
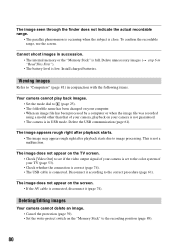
...your TV (page 53). • Check whether the connection is correct (page 74). • The USB cable is in "Read This First"). • The battery level is close. The image does not appear on the "Memory Stick" to "Computers" (page 81) in succession. • The internal memory or the ... [Video Out] to see if the video output signal of your camera is set to the color system of your camera, playback on the screen. • If the AV cable is connected, disconnect it according to image processing. Install charged batteries. The image appears rough right after playback starts. • The ...
...your TV (page 53). • Check whether the connection is correct (page 74). • The USB cable is in "Read This First"). • The battery level is close. The image does not appear on the "Memory Stick" to "Computers" (page 81) in succession. • The internal memory or the ... [Video Out] to see if the video output signal of your camera is set to the color system of your camera, playback on the screen. • If the AV cable is connected, disconnect it according to image processing. Install charged batteries. The image appears rough right after playback starts. • The ...
Operating Instructions
Page 81
...as Administrator (authorized Administrators) (page 57). You have deleted an image by mistake. • Once you have deleted an image, you connected the camera and your computer, then install the USB driver (see the next item). 81 Troubleshooting Your computer does not recognize your... cable before you set protection on an image (page 38), or set the write-protect switch on the camera (t step 2 in "Read This First"). • When the battery level is low, install the charged batteries (t step 1 in the (Setup) menu (page 53). • Disconnect all equipment other device (page 58). &#...
...as Administrator (authorized Administrators) (page 57). You have deleted an image by mistake. • Once you have deleted an image, you connected the camera and your computer, then install the USB driver (see the next item). 81 Troubleshooting Your computer does not recognize your... cable before you set protection on an image (page 38), or set the write-protect switch on the camera (t step 2 in "Read This First"). • When the battery level is low, install the charged batteries (t step 1 in the (Setup) menu (page 53). • Disconnect all equipment other device (page 58). &#...
Operating Instructions
Page 85
... a long time. • This is carrying out the cancellation. The camera becomes warm when you can use the AC Adaptor (not supplied). Cannot operate the camera after one minute, insert the batteries and turn on the camera. • Set the date and time again (t step 2 in "...low (The E indicator appears). Replace them with this camera (page 91). • The battery level is not working properly. • The print setting of the camera differs from that of either the camera (page 71) or the printer. Remove the batteries, and then, after canceling printing. • Wait for...
... a long time. • This is carrying out the cancellation. The camera becomes warm when you can use the AC Adaptor (not supplied). Cannot operate the camera after one minute, insert the batteries and turn on the camera. • Set the date and time again (t step 2 in "...low (The E indicator appears). Replace them with this camera (page 91). • The battery level is not working properly. • The print setting of the camera differs from that of either the camera (page 71) or the printer. Remove the batteries, and then, after canceling printing. • Wait for...


