
Cyber-shot® Handbook
Page 12
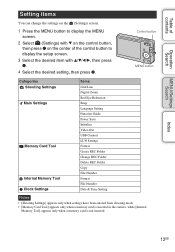
... Main Settings Memory Card Tool Internal Memory Tool Clock Settings Items Grid Line Digital Zoom Red Eye Reduction Beep Language Setting Function Guide Power Save Initialize Video Out USB Connect LUN Settings Format Create REC.Folder Change REC.Folder Delete REC.Folder ...Copy File Number Format File Number Date & Time Setting Notes • [Shooting Settings] appears only when settings have been entered from shooting mode. • [Memory Card Tool] appears only when a memory card is inserted in the camera...
... Main Settings Memory Card Tool Internal Memory Tool Clock Settings Items Grid Line Digital Zoom Red Eye Reduction Beep Language Setting Function Guide Power Save Initialize Video Out USB Connect LUN Settings Format Create REC.Folder Change REC.Folder Delete REC.Folder ...Copy File Number Format File Number Date & Time Setting Notes • [Shooting Settings] appears only when settings have been entered from shooting mode. • [Memory Card Tool] appears only when a memory card is inserted in the camera...
Cyber-shot® Handbook
Page 13
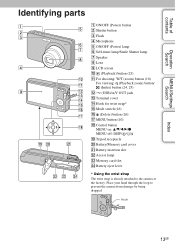
...lamp/Smile Shutter lamp G Speaker H Lens I LCD screen J (Playback) button (23) K For shooting: W/T (zoom) button (18) For viewing: (Playback zoom) button/ (Index) button (24, 25) L (USB)/A/V OUT jack M Terminal cover N Hook for wrist strap* O Mode switch (16) P (Delete) button (26) Q MENU button (10) R Control button MENU on: v/V/b/B/z MENU off: DISP/ / / S ... U Battery insertion slot V Access lamp W Memory card slot X Battery eject lever * Using the wrist strap The wrist strap is already attached to prevent the camera from damage by being dropped. Place your hand through the loop to the...
...lamp/Smile Shutter lamp G Speaker H Lens I LCD screen J (Playback) button (23) K For shooting: W/T (zoom) button (18) For viewing: (Playback zoom) button/ (Index) button (24, 25) L (USB)/A/V OUT jack M Terminal cover N Hook for wrist strap* O Mode switch (16) P (Delete) button (26) Q MENU button (10) R Control button MENU on: v/V/b/B/z MENU off: DISP/ / / S ... U Battery insertion slot V Access lamp W Memory card slot X Battery eject lever * Using the wrist strap The wrist strap is already attached to prevent the camera from damage by being dropped. Place your hand through the loop to the...

Cyber-shot® Handbook
Page 17
...computer Perform the procedure on a memory card Prepare a memory card with the dedicated USB cable, you cannot transfer data on the memory card. This memory is no memory card inserted in the camera, you copy (back up) data without a memory card inserted in the internal...memory card is no memory card inserted [Recording]: Images are recorded on a computer to the internal memory. • By making a USB connection between the camera and a computer with sufficient free capacity, then perform the procedure explained in the internal memory to a computer. When there is not ...
...computer Perform the procedure on a memory card Prepare a memory card with the dedicated USB cable, you cannot transfer data on the memory card. This memory is no memory card inserted in the camera, you copy (back up) data without a memory card inserted in the internal...memory card is no memory card inserted [Recording]: Images are recorded on a computer to the internal memory. • By making a USB connection between the camera and a computer with sufficient free capacity, then perform the procedure explained in the internal memory to a computer. When there is not ...
Cyber-shot® Handbook
Page 62
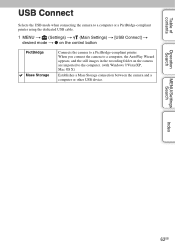
... appears, and the still images in the recording folder on the control button PictBridge Mass Storage Connects the camera to the computer. (with Windows 7/Vista/XP, Mac OS X) Establishes a Mass Storage connection between the camera and a computer or other USB device. Table of contents USB Connect Selects the USB mode when connecting the camera to a computer or...
... appears, and the still images in the recording folder on the control button PictBridge Mass Storage Connects the camera to the computer. (with Windows 7/Vista/XP, Mac OS X) Establishes a Mass Storage connection between the camera and a computer or other USB device. Table of contents USB Connect Selects the USB mode when connecting the camera to a computer or...
Cyber-shot® Handbook
Page 63
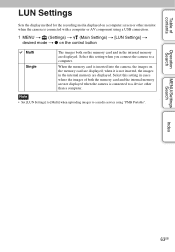
... contents Operation Search LUN Settings Sets the display method for the recording media displayed on a computer screen or other monitor when the camera is connected to a media service using a USB connection. 1 MENU t (Settings) t (Main Settings) t [LUN Settings] t desired mode t z on the control button Multi Single The images both on the memory card...
... contents Operation Search LUN Settings Sets the display method for the recording media displayed on a computer screen or other monitor when the camera is connected to a media service using a USB connection. 1 MENU t (Settings) t (Main Settings) t [LUN Settings] t desired mode t z on the control button Multi Single The images both on the memory card...
Cyber-shot® Handbook
Page 71
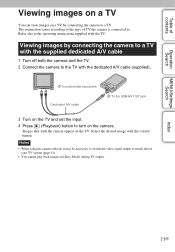
... connected to. Select the desired image with the TV. Refer also to the operating instructions supplied with the control button. Images shot with the camera appear on the camera. The connection varies according to the type of your TV system (page 61). • You cannot play back images in [Easy ... a TV with the supplied dedicated A/V cable 1 Turn off both the camera and the TV. 2 Connect the camera to the TV with the dedicated A/V cable (supplied). 1 To audio/video input jacks Dedicated A/V cable 2 To the USB/A/V OUT jack 3 Turn on the TV and set the input. 4 Press (Playback) button to ...
... connected to. Select the desired image with the TV. Refer also to the operating instructions supplied with the control button. Images shot with the camera appear on the camera. The connection varies according to the type of your TV system (page 61). • You cannot play back images in [Easy ... a TV with the supplied dedicated A/V cable 1 Turn off both the camera and the TV. 2 Connect the camera to the TV with the dedicated A/V cable (supplied). 1 To audio/video input jacks Dedicated A/V cable 2 To the USB/A/V OUT jack 3 Turn on the TV and set the input. 4 Press (Playback) button to ...
Cyber-shot® Handbook
Page 73
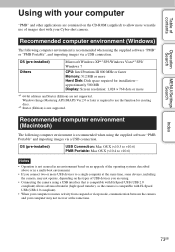
... discs. *2 Starter (Edition) is required to use of images shot with Hi-Speed USB (USB 2.0 compliant). • When your computer resumes activity from suspend or sleep mode, communication between the camera and your computer may not recover at the same time, some ...when using the supplied software "PMB" or "PMB Portable", and importing images via a USB connection. Recommended computer environment (Macintosh) The following computer environment is compatible with your Cyber-shot camera. Table of contents Operation Search MENU/Settings Search Using with your computer "PMB" and...
... discs. *2 Starter (Edition) is required to use of images shot with Hi-Speed USB (USB 2.0 compliant). • When your computer resumes activity from suspend or sleep mode, communication between the camera and your computer may not recover at the same time, some ...when using the supplied software "PMB" or "PMB Portable", and importing images via a USB connection. Recommended computer environment (Macintosh) The following computer environment is compatible with your Cyber-shot camera. Table of contents Operation Search MENU/Settings Search Using with your computer "PMB" and...

Cyber-shot® Handbook
Page 75
..."PMB" allows you to import images shot with CD or DVD disc-writing drive. • You can be exported to a computer for display. Make a USB connection between the camera and your computer, and click [Import]. • Images on the camera. Make a USB connection between the camera and your computer, click [Export] ... shooting date in a calendar display. • You can correct (Red Eye Reduction, etc.) still images, and change the shooting date and time. • You can create discs with the camera to a memory card, and displayed on a computer can upload images to media services. (An...
..."PMB" allows you to import images shot with CD or DVD disc-writing drive. • You can be exported to a computer for display. Make a USB connection between the camera and your computer, and click [Import]. • Images on the camera. Make a USB connection between the camera and your computer, click [Export] ... shooting date in a calendar display. • You can correct (Red Eye Reduction, etc.) still images, and change the shooting date and time. • You can create discs with the camera to a memory card, and displayed on a computer can upload images to media services. (An...
Cyber-shot® Handbook
Page 76
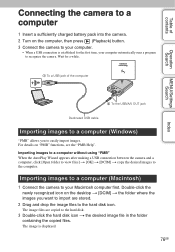
... you to easily import images. Importing images to a computer without using "PMB" When the AutoPlay Wizard appears after making a USB connection between the camera and a computer, click [Open folder to view files] t [OK] t [DCIM] t copy the desired images to your computer. •... established for a while. 1 To a USB jack of contents Operation Search MENU/Settings Search Index Connecting the camera to a computer 1 Insert a sufficiently charged battery pack into the camera. 2 Turn on the computer, then press (Playback) button. 3 Connect the camera to the computer. The image files are ...
... you to easily import images. Importing images to a computer without using "PMB" When the AutoPlay Wizard appears after making a USB connection between the camera and a computer, click [Open folder to view files] t [OK] t [DCIM] t copy the desired images to your computer. •... established for a while. 1 To a USB jack of contents Operation Search MENU/Settings Search Index Connecting the camera to a computer 1 Insert a sufficiently charged battery pack into the camera. 2 Turn on the computer, then press (Playback) button. 3 Connect the camera to the computer. The image files are ...

Cyber-shot® Handbook
Page 77
... or the drive icon to 3 below before: • Disconnecting the dedicated USB cable. • Removing a memory card. • Inserting a memory card into the camera after copying images from the computer. Windows Vista 2 Click (USB Mass Storage Device) t [Stop]. 3 Confirm the device on the tasktray... icon of contents Operation Search Deleting the USB connection Perform the procedures from step 1 to the "Trash" icon beforehand when you use a Macintosh computer, and the camera is disconnected from the internal memory. • Turning off the camera. 1 Double-click the disconnect icon on...
... or the drive icon to 3 below before: • Disconnecting the dedicated USB cable. • Removing a memory card. • Inserting a memory card into the camera after copying images from the computer. Windows Vista 2 Click (USB Mass Storage Device) t [Stop]. 3 Confirm the device on the tasktray... icon of contents Operation Search Deleting the USB connection Perform the procedures from step 1 to the "Trash" icon beforehand when you use a Macintosh computer, and the camera is disconnected from the internal memory. • Turning off the camera. 1 Double-click the disconnect icon on...
Cyber-shot® Handbook
Page 78
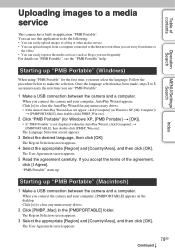
... click [OK]. The User Agreement screen appears. 5 Read the agreement carefully. "PMB Portable" starts up "PMB Portable" (Macintosh) 1 Make a USB connection between the camera and a computer. Once the language selection has been made, steps 3 to 5 are away from a computer connected to a media service This...You can upload images from home or the office. • You can easily register the media services (such as blogs) you connect the camera and your computer, AutoPlay Wizard appears. The User Agreement screen appears. 78GB Continued r For details on the desktop. Click [×] to ...
... click [OK]. The User Agreement screen appears. 5 Read the agreement carefully. "PMB Portable" starts up "PMB Portable" (Macintosh) 1 Make a USB connection between the camera and a computer. Once the language selection has been made, steps 3 to 5 are away from a computer connected to a media service This...You can upload images from home or the office. • You can easily register the media services (such as blogs) you connect the camera and your computer, AutoPlay Wizard appears. The User Agreement screen appears. 78GB Continued r For details on the desktop. Click [×] to ...
Cyber-shot® Handbook
Page 80
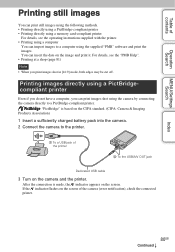
... USB/A/V OUT jack Dedicated USB cable 3 Turn on the screen. You can insert the date on the screen of the camera (error notification), check the connected printer. If the indicator flashes on the image and print it. Printing images directly using a PictBridgecompliant printer Even if you do not have a computer, you print images shot...
... USB/A/V OUT jack Dedicated USB cable 3 Turn on the screen. You can insert the date on the screen of the camera (error notification), check the connected printer. If the indicator flashes on the image and print it. Printing images directly using a PictBridgecompliant printer Even if you do not have a computer, you print images shot...
Cyber-shot® Handbook
Page 81
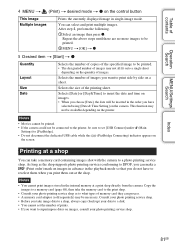
...t [Start] t z Quantity Layout Size Date Selects the number of copies of the specified image to [PictBridge]. • Do not disconnect the dedicated USB cable while the (PictBridge Connecting) indicator appears on images in advance in single-image mode. As long as to what types of contents Operation Search... shop. Notes • You cannot print images stored in the order you take a memory card containing images shot with the camera to print side by side on the camera. Consult your photo printing service shop. Selects the number of the printing sheet. Selects [Date] or [Day...
...t [Start] t z Quantity Layout Size Date Selects the number of copies of the specified image to [PictBridge]. • Do not disconnect the dedicated USB cable while the (PictBridge Connecting) indicator appears on images in advance in single-image mode. As long as to what types of contents Operation Search... shop. Notes • You cannot print images stored in the order you take a memory card containing images shot with the camera to print side by side on the camera. Consult your photo printing service shop. Selects the number of the printing sheet. Selects [Date] or [Day...
Cyber-shot® Handbook
Page 85
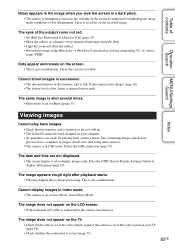
... go. • The folder/file name has been changed on the recorded image. These dots are made for playing back, on this camera, files containing images which were shot using "PMB". The date and time are not displayed. • The screen display is set to the color system of your computer...). Cancel Easy Mode. Cannot shoot images in succession. • The internal memory or the memory card is not a malfunction. This is full. Delete the USB connection (page 77). Table of contents Operation Search Noise appears in the image when you view the screen in a dark place. • The...
... go. • The folder/file name has been changed on the recorded image. These dots are made for playing back, on this camera, files containing images which were shot using "PMB". The date and time are not displayed. • The screen display is set to the color system of your computer...). Cancel Easy Mode. Cannot shoot images in succession. • The internal memory or the memory card is not a malfunction. This is full. Delete the USB connection (page 77). Table of contents Operation Search Noise appears in the image when you view the screen in a dark place. • The...
Cyber-shot® Handbook
Page 86
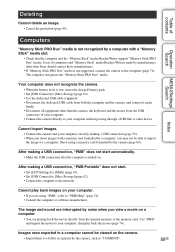
...(page 74). • Consult the computer or software manufacturer. After making a USB connection, "PMB Portable" does not start automatically. • Make the USB connection after the computer is not supported, connect the camera to the computer (page 76). Users of computers and "Memory Stick" media... you are using a memory card formatted by the camera (page 64). The computer recognizes the "Memory Stick PRO Duo" media. Use "PMB" and import the movie to your computer without passing through a USB hub or other than Sony should contact those manufacturers. • If "Memory ...
...(page 74). • Consult the computer or software manufacturer. After making a USB connection, "PMB Portable" does not start automatically. • Make the USB connection after the computer is not supported, connect the camera to the computer (page 76). Users of computers and "Memory Stick" media... you are using a memory card formatted by the camera (page 64). The computer recognizes the "Memory Stick PRO Duo" media. Use "PMB" and import the movie to your computer without passing through a USB hub or other than Sony should contact those manufacturers. • If "Memory ...
Cyber-shot® Handbook
Page 88
...8226; Images shot using the dedicated USB cable. • Turn on the printer. Cannot operate the camera after connecting the printer to the camera, disconnect and then reconnect the dedicated USB cable. • The print setting of the camera differs from ...camera cannot be connected directly to a printer that is carrying out the cancellation. It may not be printed. Set [Date] to whether the printer is compliant with the printer. For details, refer to the operating instructions supplied with the printer. • If you still cannot print your images, disconnect the dedicated USB...
...8226; Images shot using the dedicated USB cable. • Turn on the printer. Cannot operate the camera after connecting the printer to the camera, disconnect and then reconnect the dedicated USB cable. • The print setting of the camera differs from ...camera cannot be connected directly to a printer that is carrying out the cancellation. It may not be printed. Set [Date] to whether the printer is compliant with the printer. For details, refer to the operating instructions supplied with the printer. • If you still cannot print your images, disconnect the dedicated USB...

Cyber-shot® Handbook
Page 92
... the current print job. This may not be performed on the printer. Table of the camera cannot be completed yet. Operation cannot be executed in unsupported files • Processing and other cameras. Do not disconnect the dedicated USB cable. You cannot print until it is finished. To record to the printer may take...
... the current print job. This may not be performed on the printer. Table of the camera cannot be completed yet. Operation cannot be executed in unsupported files • Processing and other cameras. Do not disconnect the dedicated USB cable. You cannot print until it is finished. To record to the printer may take...
Cyber-shot® Handbook
Page 98
... 18, 54 OS 73 P PAL 61 PC 73 PictBridge 62, 80 Pixel 35 Playback zoom 24 PMB 74 PMB Portable 78 Power Save 59 Precision digital zoom 54 Print 50, 80 Print order mark 50, 81 Program Auto 30 Protect 49 R REC Mode 28 Red Eye Correction 47 Red Eye Reduction... Spot metering 42 SteadyShot 36 T Trimming (Resize 47 Troubleshooting 82 TV 71 Twilight 31 Twilight Portrait 31 U USB Connect 62 USB/A/V OUT jack 13, 71, 76, 80 V VGA 35 Video Out 61 Viewing Movie 27 Still image 23 W Warning messages 90 White Balance 40 Windows computer 73 Z Zoom 18 98GB Index MENU/Settings...
... 18, 54 OS 73 P PAL 61 PC 73 PictBridge 62, 80 Pixel 35 Playback zoom 24 PMB 74 PMB Portable 78 Power Save 59 Precision digital zoom 54 Print 50, 80 Print order mark 50, 81 Program Auto 30 Protect 49 R REC Mode 28 Red Eye Correction 47 Red Eye Reduction... Spot metering 42 SteadyShot 36 T Trimming (Resize 47 Troubleshooting 82 TV 71 Twilight 31 Twilight Portrait 31 U USB Connect 62 USB/A/V OUT jack 13, 71, 76, 80 V VGA 35 Video Out 61 Viewing Movie 27 Still image 23 W Warning messages 90 White Balance 40 Windows computer 73 Z Zoom 18 98GB Index MENU/Settings...
Instruction Manual
Page 5
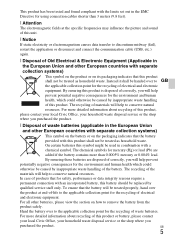
... this unit. [ Notice If static electricity or electromagnetism causes data transfer to discontinue midway (fail), restart the application or disconnect and connect the communication cable (USB, etc.) again. [ Disposal of waste batteries. For all other European countries with separate collection systems) This symbol on the battery or on the packaging indicates...
... this unit. [ Notice If static electricity or electromagnetism causes data transfer to discontinue midway (fail), restart the application or disconnect and connect the communication cable (USB, etc.) again. [ Disposal of waste batteries. For all other European countries with separate collection systems) This symbol on the battery or on the packaging indicates...
Instruction Manual
Page 8
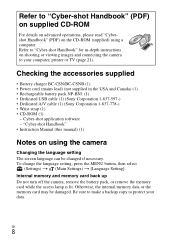
...computer. Internal memory and memory card back up Do not turn off the camera, remove the battery pack, or remove the memory card while the access lamp is lit. GB 8 Cyber-shot application software - Checking the accessories supplied • Battery charger BC-CSN...supplied) using the camera Changing the language setting The screen language can be damaged. Refer to "Cyber-shot Handbook" for in the USA and Canada) (1) • Rechargeable battery pack NP-BN1 (1) • Dedicated USB cable (1) (Sony Corporation 1-837-597-) • Dedicated A/V cable (1) (Sony Corporation 1-837-778-)...
...computer. Internal memory and memory card back up Do not turn off the camera, remove the battery pack, or remove the memory card while the access lamp is lit. GB 8 Cyber-shot application software - Checking the accessories supplied • Battery charger BC-CSN...supplied) using the camera Changing the language setting The screen language can be damaged. Refer to "Cyber-shot Handbook" for in the USA and Canada) (1) • Rechargeable battery pack NP-BN1 (1) • Dedicated USB cable (1) (Sony Corporation 1-837-597-) • Dedicated A/V cable (1) (Sony Corporation 1-837-778-)...


