Instruction Manual
Page 8
...established by JEITA (Japan Electronics and Information Technology Industries Association). • Sony does not guarantee that the camera will play back images. • Using the camera in insufficient light emission. 8GB Notes on the LCD screen and lens • The LCD screen is not a malfunction. A message will... not affect the recording. • When the battery level becomes low, the lens might stop moving. Notes on recording/playback • Before you can perform the next operation. Otherwise, the camera may cause a malfunction and you can no longer record movies. Be sure to...
...established by JEITA (Japan Electronics and Information Technology Industries Association). • Sony does not guarantee that the camera will play back images. • Using the camera in insufficient light emission. 8GB Notes on the LCD screen and lens • The LCD screen is not a malfunction. A message will... not affect the recording. • When the battery level becomes low, the lens might stop moving. Notes on recording/playback • Before you can perform the next operation. Otherwise, the camera may cause a malfunction and you can no longer record movies. Be sure to...
Instruction Manual
Page 11
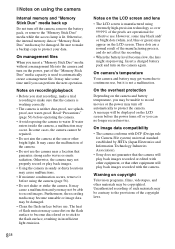
Getting started Identifying parts Bottom A Shutter button B (Smile) button C Flash D ON/OFF (Power) button E Speaker F Microphone G Self-timer lamp/Smile Shutter lamp/ AF illuminator H Lens I LCD screen J For shooting: W/T (Zoom) button For viewing: (Playback zoom) button/ (Index) button K Mode dial L Hook for wrist strap M (Playback) button N Control button Menu on: v/V/b/B/z .../"Memory Stick Duo" media cover T "Memory Stick Duo" media slot U Access lamp V Battery eject lever W Battery insertion slot 11GB Otherwise, you cannot firmly secure the camera, and damage to the...
Getting started Identifying parts Bottom A Shutter button B (Smile) button C Flash D ON/OFF (Power) button E Speaker F Microphone G Self-timer lamp/Smile Shutter lamp/ AF illuminator H Lens I LCD screen J For shooting: W/T (Zoom) button For viewing: (Playback zoom) button/ (Index) button K Mode dial L Hook for wrist strap M (Playback) button N Control button Menu on: v/V/b/B/z .../"Memory Stick Duo" media cover T "Memory Stick Duo" media slot U Access lamp V Battery eject lever W Battery insertion slot 11GB Otherwise, you cannot firmly secure the camera, and damage to the...

Instruction Manual
Page 14
With the terminal side facing the lens, insert the "Memory Stick Duo" media until it clicks into place. 3 Insert the battery pack. Getting started Inserting the battery pack/a "Memory Stick Duo" media (sold separately) 1 Open the cover. 2 Insert the "Memory Stick Duo" media (sold separately). Insert the battery while pressing the lever in the direction of the arrow. 4 Close the cover. 14GB
With the terminal side facing the lens, insert the "Memory Stick Duo" media until it clicks into place. 3 Insert the battery pack. Getting started Inserting the battery pack/a "Memory Stick Duo" media (sold separately) 1 Open the cover. 2 Insert the "Memory Stick Duo" media (sold separately). Insert the battery while pressing the lever in the direction of the arrow. 4 Close the cover. 14GB
Instruction Manual
Page 18
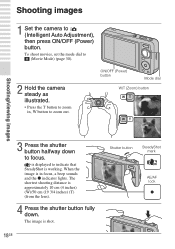
... button Shooting/viewing images 3 Press the shutter button halfway down . Shooting/viewing images Shooting images 1 Set the camera to focus. is displayed to indicate that SteadyShot is shot. 18GB Shutter button SteadyShot mark AE/AF lock The image is working. When the image is approximately 10 cm...(W)/50 cm (19 3/4 inches) (T) (from the lens). 4 Press the shutter button fully down to (Intelligent Auto Adjustment), then press ON/OFF (Power) button. To shoot movies, set the mode dial to (Movie Mode) (page 30). 2 Hold the camera steady as illustrated. • Press the T button...
... button Shooting/viewing images 3 Press the shutter button halfway down . Shooting/viewing images Shooting images 1 Set the camera to focus. is displayed to indicate that SteadyShot is shot. 18GB Shutter button SteadyShot mark AE/AF lock The image is working. When the image is approximately 10 cm...(W)/50 cm (19 3/4 inches) (T) (from the lens). 4 Press the shutter button fully down to (Intelligent Auto Adjustment), then press ON/OFF (Power) button. To shoot movies, set the mode dial to (Movie Mode) (page 30). 2 Hold the camera steady as illustrated. • Press the T button...

Instruction Manual
Page 46
...Duo" media. ( This Image/ Multiple Images) Prints images using a PictBridge compliant printer. ( This Image/ Multiple Images) Rotates a still image. Selects the playback date list. Changes settings other than shooting settings. 46GB Selects the folder for viewing images. Prevents accidental erasure. ...The displayed text differs according to print in succession along with effects and music. Retouches still images. ( Trimming/ Red Eye Correction/ Unsharp masking/ Soft Focus/ Partial Color/ Fisheye Lens/ Cross Filter/ Radial Blur/ Retro/ Happy Faces) Changes the image size according ...
...Duo" media. ( This Image/ Multiple Images) Prints images using a PictBridge compliant printer. ( This Image/ Multiple Images) Rotates a still image. Selects the playback date list. Changes settings other than shooting settings. 46GB Selects the folder for viewing images. Prevents accidental erasure. ...The displayed text differs according to print in succession along with effects and music. Retouches still images. ( Trimming/ Red Eye Correction/ Unsharp masking/ Soft Focus/ Partial Color/ Fisheye Lens/ Cross Filter/ Radial Blur/ Retro/ Happy Faces) Changes the image size according ...

Instruction Manual
Page 47
...portrait position. Displays the recorded image on the screen. Changing camera settings 47GB Selects the digital zoom mode. Category (Shooting Settings) Item AF Illuminator Grid Line Digital Zoom Conversion Lens Auto Orientation Auto Review Description The AF illuminator supplies fill ...light to turn off the setting screen. Using the (Settings) items You can change and displays the image in dark surroundings. Sets for approximately two seconds immediately after shooting a still...
...portrait position. Displays the recorded image on the screen. Changing camera settings 47GB Selects the digital zoom mode. Category (Shooting Settings) Item AF Illuminator Grid Line Digital Zoom Conversion Lens Auto Orientation Auto Review Description The AF illuminator supplies fill ...light to turn off the setting screen. Using the (Settings) items You can change and displays the image in dark surroundings. Sets for approximately two seconds immediately after shooting a still...

Instruction Manual
Page 51
D Display C:32:00 Indication Self-timer Self-diagnosis display Destination Overheating warning Conversion Lens Face Detection Burst/Bracket Management file full AF range finder frame +2.0EV 500 F3.5 N 35° 37' 32" N 139° 44' 31" E Spot metering cross hair Exposure value Shutter speed Aperture value PictBridge connecting Playback Playback bar Latitude and Longitude display Histogram • appears when histogram display is disabled. Volume Others 51GB
D Display C:32:00 Indication Self-timer Self-diagnosis display Destination Overheating warning Conversion Lens Face Detection Burst/Bracket Management file full AF range finder frame +2.0EV 500 F3.5 N 35° 37' 32" N 139° 44' 31" E Spot metering cross hair Exposure value Shutter speed Aperture value PictBridge connecting Playback Playback bar Latitude and Longitude display Histogram • appears when histogram display is disabled. Volume Others 51GB
Instruction Manual
Page 56
...cloth slightly moistened with water, then wipe the surface with any of the camera. On operating temperatures Your camera is on your trousers or skirt, as this rechargeable battery is not charged, you can still use the camera, but the date and time will be repaired. However, even if ...this may condense inside the lens, you do not use under the temperatures between 0°C ...
...cloth slightly moistened with water, then wipe the surface with any of the camera. On operating temperatures Your camera is on your trousers or skirt, as this rechargeable battery is not charged, you can still use the camera, but the date and time will be repaired. However, even if ...this may condense inside the lens, you do not use under the temperatures between 0°C ...
Instruction Manual
Page 57
...Daylight, Cloudy, Fluorescent 1,2,3, Incandescent, Flash Underwater White Balance: Auto, Underwater 1,2 Recording interval for Burst mode: Approx. 1.8 seconds File format: Still images: JPEG (DCF Ver. 2.0, Exif Ver. 2.21, MPF Baseline) compliant, DPOF compatible Movies: MPEG-4 Visual Recording media: Internal Memory (...: Hi-Speed USB (USB 2.0 compliant) [LCD screen] LCD panel: DSC-W290: 7.5 cm (3.0 type) TFT drive DSC-W270/W275: 6.7 cm (2.7 type) TFT drive Total number of camera: Approx. 12.1 Megapixels Lens: Carl Zeiss Vario-Tessar 5× zoom lens f = 5 mm - 25 mm (28 mm - 140 mm (...
...Daylight, Cloudy, Fluorescent 1,2,3, Incandescent, Flash Underwater White Balance: Auto, Underwater 1,2 Recording interval for Burst mode: Approx. 1.8 seconds File format: Still images: JPEG (DCF Ver. 2.0, Exif Ver. 2.21, MPF Baseline) compliant, DPOF compatible Movies: MPEG-4 Visual Recording media: Internal Memory (...: Hi-Speed USB (USB 2.0 compliant) [LCD screen] LCD panel: DSC-W290: 7.5 cm (3.0 type) TFT drive DSC-W270/W275: 6.7 cm (2.7 type) TFT drive Total number of camera: Approx. 12.1 Megapixels Lens: Carl Zeiss Vario-Tessar 5× zoom lens f = 5 mm - 25 mm (28 mm - 140 mm (...

Cyber-shot® Handbook
Page 3
...pack as examples in this Handbook are reproduced images, and are not actual images shot using this Handbook are of Carl Zeiss in Germany. When using a "Memory Stick Duo" media with the quality standards of the DSC-W290 unless noted otherwise. 3GB In addition, even if the battery pack is not a... malfunction. • Be careful not to bump the movable lens, and be used as is to maintain the battery pack functions. • For details on "Memory Stick Duo" media, see page 140. The lens for the camera ...
...pack as examples in this Handbook are reproduced images, and are not actual images shot using this Handbook are of Carl Zeiss in Germany. When using a "Memory Stick Duo" media with the quality standards of the DSC-W290 unless noted otherwise. 3GB In addition, even if the battery pack is not a... malfunction. • Be careful not to bump the movable lens, and be used as is to maintain the battery pack functions. • For details on "Memory Stick Duo" media, see page 140. The lens for the camera ...
Cyber-shot® Handbook
Page 12
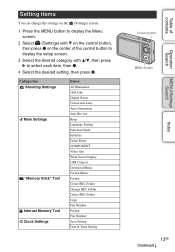
... z. 4 Select the desired setting, then press z. Categories Shooting Settings Main Settings "Memory Stick" Tool Internal Memory Tool Clock Settings Items AF Illuminator Grid Line Digital Zoom Conversion Lens Auto Orientation Auto Review Beep Language Setting Function Guide Initialize Demo Mode COMPONENT Video Out Wide Zoom Display USB Connect Download Music Format Music...
... z. 4 Select the desired setting, then press z. Categories Shooting Settings Main Settings "Memory Stick" Tool Internal Memory Tool Clock Settings Items AF Illuminator Grid Line Digital Zoom Conversion Lens Auto Orientation Auto Review Beep Language Setting Function Guide Initialize Demo Mode COMPONENT Video Out Wide Zoom Display USB Connect Download Music Format Music...

Cyber-shot® Handbook
Page 14
.../Settings Search Index Identifying parts A Shutter button B (Smile) button (26) C Flash D ON/OFF (Power) button E Speaker F Microphone G Self-timer lamp/Smile Shutter lamp/AF illuminator H Lens I LCD screen J For shooting: W/T (zoom) button (27) For viewing: (Playback zoom) button/ (Index) button (32, 33) K Mode dial (15) L Hook for wrist strap M (Playback) button...
.../Settings Search Index Identifying parts A Shutter button B (Smile) button (26) C Flash D ON/OFF (Power) button E Speaker F Microphone G Self-timer lamp/Smile Shutter lamp/AF illuminator H Lens I LCD screen J For shooting: W/T (zoom) button (27) For viewing: (Playback zoom) button/ (Index) button (32, 33) K Mode dial (15) L Hook for wrist strap M (Playback) button...
Cyber-shot® Handbook
Page 19
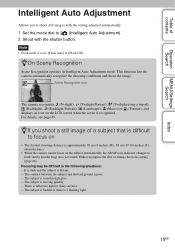
... an icon on the subject automatically, the AE/AF lock indicator changes to flash slowly and the beep does not sound. Either recompose the shot or change the focus setting (page 46). It is dark and the subject is recognized. There is seen through glass. - The subject .../Settings Search Index Intelligent Auto Adjustment Allows you shoot a still image of a subject that is difficult to focus on • The shortest shooting distance is approximately 10 cm (4 inches) (W), 50 cm (19 3/4 inches) (T) (from the lens). • When the camera cannot focus on the LCD screen when the scene is...
... an icon on the subject automatically, the AE/AF lock indicator changes to flash slowly and the beep does not sound. Either recompose the shot or change the focus setting (page 46). It is dark and the subject is recognized. There is seen through glass. - The subject .../Settings Search Index Intelligent Auto Adjustment Allows you shoot a still image of a subject that is difficult to focus on • The shortest shooting distance is approximately 10 cm (4 inches) (W), 50 cm (19 3/4 inches) (T) (from the lens). • When the camera cannot focus on the LCD screen when the scene is...

Cyber-shot® Handbook
Page 30
...with the control button. (Flash Auto) Flashes when there is in a dark place to the lens. zWhen the "White circular spots" appears in a dark place. Notes • The flash strobes twice. Index 30GB Camera Subject Particles (dust, pollen, etc.) in the air How can the "White circular spots" ...be slower under low-light conditions, or in flash photos This is caused by the camera's flash, they are accentuated by particles (dust, pollen, etc.) floating close to clearly shoot the background that case, use the flash during ...
...with the control button. (Flash Auto) Flashes when there is in a dark place to the lens. zWhen the "White circular spots" appears in a dark place. Notes • The flash strobes twice. Index 30GB Camera Subject Particles (dust, pollen, etc.) in the air How can the "White circular spots" ...be slower under low-light conditions, or in flash photos This is caused by the camera's flash, they are accentuated by particles (dust, pollen, etc.) floating close to clearly shoot the background that case, use the flash during ...

Cyber-shot® Handbook
Page 46
...the AF range finder frame. Focus Table of the finder frame automatically. AF stands for still image) operates with automatic focusing, such as not to (Underwater) mode, focus operation ...the area that adjusts the focus automatically. 1 Set the mode dial to underwater shooting. Hold the camera steady so as when shooting a subject through a net or window. • Focuses on a...automatically. Notes • When you cannot use [Digital Zoom] or [AF Illuminator], the AF range finder frame is difficult to the T side or the lens is set distance (Semi-manual). Focuses on a...
...the AF range finder frame. Focus Table of the finder frame automatically. AF stands for still image) operates with automatic focusing, such as not to (Underwater) mode, focus operation ...the area that adjusts the focus automatically. 1 Set the mode dial to underwater shooting. Hold the camera steady so as when shooting a subject through a net or window. • Focuses on a...automatically. Notes • When you cannot use [Digital Zoom] or [AF Illuminator], the AF range finder frame is difficult to the T side or the lens is set distance (Semi-manual). Focuses on a...

Cyber-shot® Handbook
Page 69
...2 Adjust the desired range to retouch with the W/T (zoom) button t [OK] t z. (Fisheye Lens) Applies a fisheye effect around a chosen point. 1 Select the center point of the desired image to retouch...zoom) button t [OK] t z. (Radial Blur) Decides the center point for expressing movement in the still image. 1 Select the center point of the desired image to retouch with the control button t MENU. 2... the focus and lowering the surrounding light so that it appears as if it was taken by an old camera. 1 Select the level of retouch with the control button t z. 2 Adjust the desired range to retouch...
...2 Adjust the desired range to retouch with the W/T (zoom) button t [OK] t z. (Fisheye Lens) Applies a fisheye effect around a chosen point. 1 Select the center point of the desired image to retouch...zoom) button t [OK] t z. (Radial Blur) Decides the center point for expressing movement in the still image. 1 Select the center point of the desired image to retouch with the control button t MENU. 2... the focus and lowering the surrounding light so that it appears as if it was taken by an old camera. 1 Select the level of retouch with the control button t z. 2 Adjust the desired range to retouch...

Cyber-shot® Handbook
Page 76
... illuminator emits very bright light. Although there is no health hazard, do not look directly into the AF illuminator emitter at this time. 1 Set the camera to shooting mode. 2 MENU t (Settings) t (Shooting Settings) t [AF Illuminator] t desired mode t z on the control button Auto Off Uses the AF illuminator...to reach the center of the subject. • You cannot use the AF illuminator when: - [Focus] is set to Semi-manual mode. - [Conversion Lens] is set to a mode other than [Off]. - (Landscape) mode, (Twilight) mode or (Fireworks) mode is selected in dark surroundings. The indicator ...
... illuminator emits very bright light. Although there is no health hazard, do not look directly into the AF illuminator emitter at this time. 1 Set the camera to shooting mode. 2 MENU t (Settings) t (Shooting Settings) t [AF Illuminator] t desired mode t z on the control button Auto Off Uses the AF illuminator...to reach the center of the subject. • You cannot use the AF illuminator when: - [Focus] is set to Semi-manual mode. - [Conversion Lens] is set to a mode other than [Off]. - (Landscape) mode, (Twilight) mode or (Fireworks) mode is selected in dark surroundings. The indicator ...

Cyber-shot® Handbook
Page 79
... blocked, causing the shadow to appear. • A reflected image of contents Operation Search Conversion Lens Sets for achieving appropriate focus when attaching a conversion lens (sold separately), then attach a conversion lens. 1 Set the camera to shooting mode. 2 MENU t (Settings) t (Shooting Settings) t [Conversion Lens] t desired mode t z on close subjects in (Landscape) mode and (Twilight) mode. • If...
... blocked, causing the shadow to appear. • A reflected image of contents Operation Search Conversion Lens Sets for achieving appropriate focus when attaching a conversion lens (sold separately), then attach a conversion lens. 1 Set the camera to shooting mode. 2 MENU t (Settings) t (Shooting Settings) t [Conversion Lens] t desired mode t z on close subjects in (Landscape) mode and (Twilight) mode. • If...
Cyber-shot® Handbook
Page 123
...The subject is not visible on the screen. • The camera is working . 123GB Press (Playback) button to switch to...be recorded on the image size (page 78). • You cannot use the digital zoom when: - If it fully down ; The image is out of focus.... distance (approximately 10 cm (4 inches) (W)/50 cm (19 3/4 inches) (T) from the lens). • (Twilight), (Landscape) or (Fireworks) mode is selected in low light conditions,... • When shooting a still image, set the mode dial to the playback mode. Smile Shutter function does not work. • No image is shot if a smiling face is ...
...The subject is not visible on the screen. • The camera is working . 123GB Press (Playback) button to switch to...be recorded on the image size (page 78). • You cannot use the digital zoom when: - If it fully down ; The image is out of focus.... distance (approximately 10 cm (4 inches) (W)/50 cm (19 3/4 inches) (T) from the lens). • (Twilight), (Landscape) or (Fireworks) mode is selected in low light conditions,... • When shooting a still image, set the mode dial to the playback mode. Smile Shutter function does not work. • No image is shot if a smiling face is ...

Cyber-shot® Handbook
Page 130
... off with the power left off the camera and leave it for about an hour before using it for 24 hours or more with the lens portion extended. • The battery pack is not a malfunction. The Clock Set screen appears when you use it . Insert a charged ...[Date & Time Setting]. Turn off . Table of contents Operation Search MENU/Settings Search Index Others The lens gets fogged. • Moisture condensation has occurred. The camera becomes warm when you turn the camera on the camera. • Set the date and time again (page 100). • The internal rechargeable backup battery...
... off with the power left off the camera and leave it for about an hour before using it for 24 hours or more with the lens portion extended. • The battery pack is not a malfunction. The Clock Set screen appears when you use it . Insert a charged ...[Date & Time Setting]. Turn off . Table of contents Operation Search MENU/Settings Search Index Others The lens gets fogged. • Moisture condensation has occurred. The camera becomes warm when you turn the camera on the camera. • Set the date and time again (page 100). • The internal rechargeable backup battery...


