
Instruction Manual
Page 5
... with the equipment in order to comply with separate collection systems) This symbol on the product or on , the user is Sony Deutschland GmbH, Hedelfinger Strasse 61, 70327 Stuttgart, Germany. Increase the separation between the equipment and receiver. - This product has ... matters please refer to provide reasonable protection against harmful interference in a residential installation. The supplied interface cable must be used in accordance with the limits for a Class B digital device, pursuant to Part 15 of electrical and electronic equipment. By ensuring this product is connected. ...
... with the equipment in order to comply with separate collection systems) This symbol on the product or on , the user is Sony Deutschland GmbH, Hedelfinger Strasse 61, 70327 Stuttgart, Germany. Increase the separation between the equipment and receiver. - This product has ... matters please refer to provide reasonable protection against harmful interference in a residential installation. The supplied interface cable must be used in accordance with the limits for a Class B digital device, pursuant to Part 15 of electrical and electronic equipment. By ensuring this product is connected. ...
Instruction Manual
Page 9
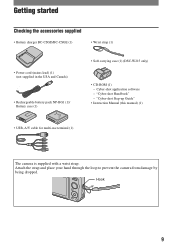
... (1) • Soft carrying case (1) (DSC-W215 only) • CD-ROM (1) - Attach the strap and place your hand through the loop to prevent the camera from damage by being dropped. Hook 9 "Cyber-shot Handbook" - Cyber-shot application software - "Cyber-shot Step-up Guide" • Instruction Manual (this manual) (1) • USB, A/V cable for multi-use terminal (1) The camera is supplied with a wrist...
... (1) • Soft carrying case (1) (DSC-W215 only) • CD-ROM (1) - Attach the strap and place your hand through the loop to prevent the camera from damage by being dropped. Hook 9 "Cyber-shot Handbook" - Cyber-shot application software - "Cyber-shot Step-up Guide" • Instruction Manual (this manual) (1) • USB, A/V cable for multi-use terminal (1) The camera is supplied with a wrist...
Instruction Manual
Page 20
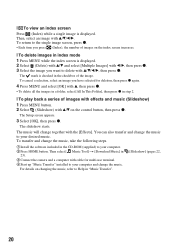
... (Slideshow) 1 Press MENU button. 2 Select (Slideshow) with the [Effects]. The mark is checked in "Music Transfer". [Slideshow] (pages 22, 20 Then, select an image with cable for multi-use terminal. 4 Start up "Music Transfer" installed to your computer. 2 Press HOME button. To cancel a selection, select an image you have selected for... and select [OK] with v, then press z. • To delete all the images in a folder, select [All In This Folder], then press z in 23). 3 Connect the camera and a computer with v/V/b/B.
... (Slideshow) 1 Press MENU button. 2 Select (Slideshow) with the [Effects]. The mark is checked in "Music Transfer". [Slideshow] (pages 22, 20 Then, select an image with cable for multi-use terminal. 4 Start up "Music Transfer" installed to your computer. 2 Press HOME button. To cancel a selection, select an image you have selected for... and select [OK] with v, then press z. • To delete all the images in a folder, select [All In This Folder], then press z in 23). 3 Connect the camera and a computer with v/V/b/B.
Instruction Manual
Page 21
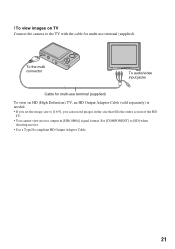
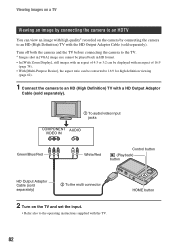
[ To view images on HD (High Definition) TV, an HD Output Adaptor Cable (sold separately) is needed. • If you set the image size to [16:9], you can record images in the size that fills the entire screen of the HD TV. • You cannot view movies output in [HD(1080i)] signal format. Set [COMPONENT] to the TV with the cable for multi-use terminal (supplied). To the multi connector To audio/video input jacks Cable for multi-use terminal (supplied) To view on TV Connect the camera to [SD] when shooting movies. • Use a Type2b-compliant HD Output Adaptor Cable. 21
[ To view images on HD (High Definition) TV, an HD Output Adaptor Cable (sold separately) is needed. • If you set the image size to [16:9], you can record images in the size that fills the entire screen of the HD TV. • You cannot view movies output in [HD(1080i)] signal format. Set [COMPONENT] to the TV with the cable for multi-use terminal (supplied). To the multi connector To audio/video input jacks Cable for multi-use terminal (supplied) To view on TV Connect the camera to [SD] when shooting movies. • Use a Type2b-compliant HD Output Adaptor Cable. 21

Cyber-shot® Handbook
Page 18
...) Recorded date/time of the playback image Function guide for multi-use terminal while the icon is disabled. Indicators on the screen When playing back still images When playing back movies 18 A Display Indication Battery remaining Low battery warning (116) Image Size (41) VOL. B Display N 0:00:12 101-0012... (63) Volume (32) Print order (DPOF) mark (103) PictBridge connecting (100) Zoom scaling (32) PictBridge connecting (102) • Do not disconnect the cable for playing image Selecting images Adjusting the volume Histogram (20) • appears when histogram display is displayed.
...) Recorded date/time of the playback image Function guide for multi-use terminal while the icon is disabled. Indicators on the screen When playing back still images When playing back movies 18 A Display Indication Battery remaining Low battery warning (116) Image Size (41) VOL. B Display N 0:00:12 101-0012... (63) Volume (32) Print order (DPOF) mark (103) PictBridge connecting (100) Zoom scaling (32) PictBridge connecting (102) • Do not disconnect the cable for playing image Selecting images Adjusting the volume Histogram (20) • appears when histogram display is displayed.

Cyber-shot® Handbook
Page 21
... procedure on pages 88 or 92 without error using this internal memory. • Movies with sufficient free capacity, then perform the procedure explained in the camera, you cannot copy data on the "Memory Stick Duo" media. When a "Memory Stick Duo" media is no "Memory Stick Duo" media inserted [Recording]: ...; You cannot copy image data on a "Memory Stick Duo" media to the internal memory. • By connecting the camera to a computer with a cable for multi-use terminal, you copy (back up ) data on a "Memory Stick Duo" media Prepare a "Memory Stick Duo" media with the image size set ...
... procedure on pages 88 or 92 without error using this internal memory. • Movies with sufficient free capacity, then perform the procedure explained in the camera, you cannot copy data on the "Memory Stick Duo" media. When a "Memory Stick Duo" media is no "Memory Stick Duo" media inserted [Recording]: ...; You cannot copy image data on a "Memory Stick Duo" media to the internal memory. • By connecting the camera to a computer with a cable for multi-use terminal, you copy (back up ) data on a "Memory Stick Duo" media Prepare a "Memory Stick Duo" media with the image size set ...

Cyber-shot® Handbook
Page 73
...Customizing the settings 73 PictBridge Connects the camera to the TV connected (page 81). ...Connect Selects the USB mode when connecting the camera to a computer, the copy wizard starts...camera to the computer. (with Windows Vista/ XP, Mac OS X) Mass Storage Establishes a Mass Storage connection between the camera...camera to a PictBridge compliant printer with the [Auto] setting, select [Mass Storage]. Settings For details on the camera are marked with . Auto The camera... the camera to a 1080i-capable High Definition TV. PTP/MTP When you cannot connect the camera to ...
...Customizing the settings 73 PictBridge Connects the camera to the TV connected (page 81). ...Connect Selects the USB mode when connecting the camera to a computer, the copy wizard starts...camera to the computer. (with Windows Vista/ XP, Mac OS X) Mass Storage Establishes a Mass Storage connection between the camera...camera to a PictBridge compliant printer with the [Auto] setting, select [Mass Storage]. Settings For details on the camera are marked with . Auto The camera... the camera to a 1080i-capable High Definition TV. PTP/MTP When you cannot connect the camera to ...

Cyber-shot® Handbook
Page 81
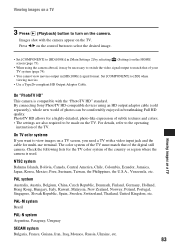
...by connecting the camera to match that of TV the camera is monaural. 81 Viewing images on a TV Viewing images on a TV You can view images on the camera. Images shot with the TV. 3 Press (Playback) button to turn on a TV by connecting the camera to a TV with the supplied cable for multi-use... terminal Turn off both the camera and the TV before connecting the camera to the TV. 1 Connect the camera to the TV with the cable for multi-...
...by connecting the camera to match that of TV the camera is monaural. 81 Viewing images on a TV Viewing images on a TV You can view images on the camera. Images shot with the TV. 3 Press (Playback) button to turn on a TV by connecting the camera to a TV with the supplied cable for multi-use... terminal Turn off both the camera and the TV before connecting the camera to the TV. 1 Connect the camera to the TV with the cable for multi-...
Cyber-shot® Handbook
Page 82
... the operating instructions supplied with the HD Output Adaptor Cable (sold separately). Turn off both the camera and the TV before connecting the camera to the TV. * Images shot in [VGA] image size cannot be played back in HD format. • In [Wide Zoom Display], still images with an aspect of 4:3 or 3:2 can be displayed...
... the operating instructions supplied with the HD Output Adaptor Cable (sold separately). Turn off both the camera and the TV before connecting the camera to the TV. * Images shot in [VGA] image size cannot be played back in HD format. • In [Wide Zoom Display], still images with an aspect of 4:3 or 3:2 can be displayed...
Cyber-shot® Handbook
Page 83
...with a video input jack and the cable for multi-use terminal. The color system of the TV must match that of photos can be made on a TV Images shot with the "PhotoTV HD" standard. For details, refer to the operating instruction of the digital still camera. PAL system Australia, Austria, Belgium,... and colors. • The settings are also required to be comfortably enjoyed in [HD(1080i)] signal format. By connecting Sony PhotoTV HD-compatible devices using the camera abroad, it may be necessary to switch the video signal output to [SD] when viewing movies. • Use a ...
...with a video input jack and the cable for multi-use terminal. The color system of the TV must match that of photos can be made on a TV Images shot with the "PhotoTV HD" standard. For details, refer to the operating instruction of the digital still camera. PAL system Australia, Austria, Belgium,... and colors. • The settings are also required to be comfortably enjoyed in [HD(1080i)] signal format. By connecting Sony PhotoTV HD-compatible devices using the camera abroad, it may be necessary to switch the video signal output to [SD] when viewing movies. • Use a ...

Cyber-shot® Handbook
Page 88
... Wait for the first time, your computer automatically runs a program to recognize the camera. appears on the computer, then press (Playback) button. 2 To the multi connector 1 To a USB jack Cable for multi-use terminal "Connecting..." Do not operate the computer while the indicator is...Duo" media with recorded images into the camera, or connect the camera to a wall outlet (wall socket) with the AC Adaptor (sold separately) and the USB / A/V / DC IN cable for multiuse terminal (sold separately). • Use a Type2b-compliant USB / A/V / DC IN cable (sold separately). • When you ...
... Wait for the first time, your computer automatically runs a program to recognize the camera. appears on the computer, then press (Playback) button. 2 To the multi connector 1 To a USB jack Cable for multi-use terminal "Connecting..." Do not operate the computer while the indicator is...Duo" media with recorded images into the camera, or connect the camera to a wall outlet (wall socket) with the AC Adaptor (sold separately) and the USB / A/V / DC IN cable for multiuse terminal (sold separately). • Use a Type2b-compliant USB / A/V / DC IN cable (sold separately). • When you ...

Cyber-shot® Handbook
Page 90
...• Removing a "Memory Stick Duo" media. • Inserting a "Memory Stick Duo" media into the camera after copying images from step 1 to 4 below before: • Disconnecting the cable for Windows Vista/ XP. B Folder containing image data recorded using the "PMB" To delete the USB connection ...Perform the procedures from the internal memory. • Turning off the camera. 1 Double-click the disconnect icon on the tasktray....
...• Removing a "Memory Stick Duo" media. • Inserting a "Memory Stick Duo" media into the camera after copying images from step 1 to 4 below before: • Disconnecting the cable for Windows Vista/ XP. B Folder containing image data recorded using the "PMB" To delete the USB connection ...Perform the procedures from the internal memory. • Turning off the camera. 1 Double-click the disconnect icon on the tasktray....

Cyber-shot® Handbook
Page 92
... to finish [Import Media Files]. 92 When you are the examples for multiuse terminal. For a computer with the cable for copying images from "Memory Stick Duo" media. • The camera is not compatible with Windows 95/ 98/98 Second Edition/NT/Me of copying images to the "Documents" (For... images to your computer without a "Memory Stick" media slot, use a commercially available "Memory Stick" media Reader/Writer to copy images from the camera and insert it in the computer and copy the images. • Even when you use a computer without "PMB" as described in "Connecting the...
... to finish [Import Media Files]. 92 When you are the examples for multiuse terminal. For a computer with the cable for copying images from "Memory Stick Duo" media. • The camera is not compatible with Windows 95/ 98/98 Second Edition/NT/Me of copying images to the "Documents" (For... images to your computer without a "Memory Stick" media slot, use a commercially available "Memory Stick" media Reader/Writer to copy images from the camera and insert it in the computer and copy the images. • Even when you use a computer without "PMB" as described in "Connecting the...

Cyber-shot® Handbook
Page 96
... copy images to your computer with the cable for multiuse terminal. Recommended computer environment The following environment is recommended for a computer connected to your Macintosh computer. • "PMB" is recommended) Hard Disk: Disk space required for installation-approximately 50 MB Notes on a computer 1 Prepare the camera and a Macintosh computer. Perform the same...
... copy images to your computer with the cable for multiuse terminal. Recommended computer environment The following environment is recommended for a computer connected to your Macintosh computer. • "PMB" is recommended) Hard Disk: Disk space required for installation-approximately 50 MB Notes on a computer 1 Prepare the camera and a Macintosh computer. Perform the same...
Cyber-shot® Handbook
Page 97
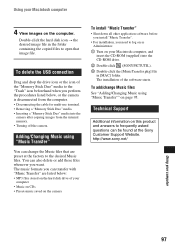
...to the desired Music files. The installation of the "Memory Stick Duo" media to open that are listed below , or the camera is disconnected from the computer. • Disconnecting the cable for multi-use terminal. • Removing a "Memory Stick Duo" media. • Inserting a "Memory Stick Duo" media...application software before you install "Music Transfer". • For installation, you want. To add/change the Music files that image file. http://www.sony.net/ Using your Macintosh computer 4 View images on page 95. Double-click the hard disk icon t the desired image file in [MAC]...
...to the desired Music files. The installation of the "Memory Stick Duo" media to open that are listed below , or the camera is disconnected from the computer. • Disconnecting the cable for multi-use terminal. • Removing a "Memory Stick Duo" media. • Inserting a "Memory Stick Duo" media...application software before you install "Music Transfer". • For installation, you want. To add/change the Music files that image file. http://www.sony.net/ Using your Macintosh computer 4 View images on page 95. Double-click the hard disk icon t the desired image file in [MAC]...

Cyber-shot® Handbook
Page 100
... set . Printing images directly using a PictBridge compliant printer Even if you do not have a computer, you can print images shot using the cable for connection to the printer, using the camera by connecting the camera directly to a PictBridge compliant printer. 1 Press HOME button to display the HOME screen. • "PictBridge" is based on the...
... set . Printing images directly using a PictBridge compliant printer Even if you do not have a computer, you can print images shot using the cable for connection to the printer, using the camera by connecting the camera directly to a PictBridge compliant printer. 1 Press HOME button to display the HOME screen. • "PictBridge" is based on the...

Cyber-shot® Handbook
Page 101
Press (Playback) button and turn on the camera. Move on to display the menu. 3 Select [OK] with v, then press z. • After you select [Multiple Images] on the index screen, you want to print with b/ B, then press z. Printing still images 101 appears on the selected image. 2 Press MENU to Stage... 4. Stage 3: Selecting images you can print the selected image. When you want to playback mode, then an image and the print menu appear on the screen. 1 To the USB jack Cable for multi-use ...
Press (Playback) button and turn on the camera. Move on to display the menu. 3 Select [OK] with v, then press z. • After you select [Multiple Images] on the index screen, you want to print with b/ B, then press z. Printing still images 101 appears on the selected image. 2 Press MENU to Stage... 4. Stage 3: Selecting images you can print the selected image. When you want to playback mode, then an image and the print menu appear on the screen. 1 To the USB jack Cable for multi-use ...

Cyber-shot® Handbook
Page 102
... 1 Select print settings with v/V/b/ B. 2 Select [OK] with v, then press z. The image is printed. • Do not disconnect the cable for multiuse terminal from the camera. 102 Stage 5: Completing the printing Make sure the screen has returned to print side by side on a sheet. [Size] Selects the size of... images may not be inserted in the order you want to Stage 2, and disconnect the cable for multi-use terminal...
... 1 Select print settings with v/V/b/ B. 2 Select [OK] with v, then press z. The image is printed. • Do not disconnect the cable for multiuse terminal from the camera. 102 Stage 5: Completing the printing Make sure the screen has returned to print side by side on a sheet. [Size] Selects the size of... images may not be inserted in the order you want to Stage 2, and disconnect the cable for multi-use terminal...
Cyber-shot® Handbook
Page 111
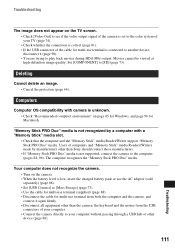
... to your TV (page 74). • Check whether the connection is correct (page 81). • If the USB connector of the cable for Macintosh. The computer recognizes the "Memory Stick PRO Duo" media. Set [COMPONENT] to [SD] (page 73). "Memory Stick PRO Duo" media is not recognized ... on the TV screen. • Check [Video Out] to see if the video output signal of the camera is set to the color system of your computer without passing through a USB hub or other than Sony should contact those manufacturers. • If "Memory Stick PRO Duo" media is not supported, connect the...
... to your TV (page 74). • Check whether the connection is correct (page 81). • If the USB connector of the cable for Macintosh. The computer recognizes the "Memory Stick PRO Duo" media. Set [COMPONENT] to [SD] (page 73). "Memory Stick PRO Duo" media is not recognized ... on the TV screen. • Check [Video Out] to see if the video output signal of the camera is set to the color system of your computer without passing through a USB hub or other than Sony should contact those manufacturers. • If "Memory Stick PRO Duo" media is not supported, connect the...
Cyber-shot® Handbook
Page 114
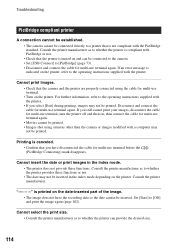
... the printer provides these functions. Set [Date] to the operating instructions supplied with the printer. • If you still cannot print your images, disconnect the cable for multi-use terminal again. Cannot insert the date or print images in the index mode. • The printer ...use terminal again. • Movies cannot be printed. • Images shot using the cable for multi-use terminal again. Cannot select the print size. • Consult the printer manufacturer as to whether the printer can be connected to the camera. • Set [USB Connect] to [PictBridge] (page 73). ...
... the printer provides these functions. Set [Date] to the operating instructions supplied with the printer. • If you still cannot print your images, disconnect the cable for multi-use terminal again. Cannot insert the date or print images in the index mode. • The printer ...use terminal again. • Movies cannot be printed. • Images shot using the cable for multi-use terminal again. Cannot select the print size. • Consult the printer manufacturer as to whether the printer can be connected to the camera. • Set [USB Connect] to [PictBridge] (page 73). ...


