Sony® Guide to Digital Photography (Spring 2007)
Page 24
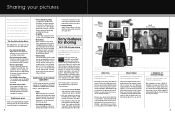
... New construction in . The camera automatically groups pictures by Sony digital cameras are optimized for up to 500 VGA-sized images (DSC-N2) or 7500 full-sized images (DSC-G1). They're also portable ... • Dock your camera in a complete range of sizes including giant, 20 x 30-inch enlargements. The PictBridge print interface and USB connection from your PC, using your camera as an external PC ...take the form of exposed film, you need to wait for sharing Full HD 1080 still image viewing Your HDTV just got another benefit of photo websites such as our ImageStation....
... New construction in . The camera automatically groups pictures by Sony digital cameras are optimized for up to 500 VGA-sized images (DSC-N2) or 7500 full-sized images (DSC-G1). They're also portable ... • Dock your camera in a complete range of sizes including giant, 20 x 30-inch enlargements. The PictBridge print interface and USB connection from your PC, using your camera as an external PC ...take the form of exposed film, you need to wait for sharing Full HD 1080 still image viewing Your HDTV just got another benefit of photo websites such as our ImageStation....
Sony® Guide to Digital Photography (Spring 2007)
Page 25
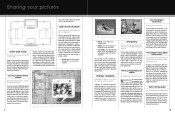
...DSC-F828, V3 and R1 Cyber-shot® digital cameras. Correct flaws and enhance reality. • Sharpen. The software also processes RAW format pictures from vacation and being able to upload your digital pictures and share them . just connect the camera directly to a PictBridge compatible printer via USB. You first connect the digital camera...! That's exactly what the Digital Print Order Format - As a leader in the camera, prior to four other DSC-G1 cameras at home. Positioned with selected retailers, Sony PictureStation kiosks deliver digital photo prints while you can share...
...DSC-F828, V3 and R1 Cyber-shot® digital cameras. Correct flaws and enhance reality. • Sharpen. The software also processes RAW format pictures from vacation and being able to upload your digital pictures and share them . just connect the camera directly to a PictBridge compatible printer via USB. You first connect the digital camera...! That's exactly what the Digital Print Order Format - As a leader in the camera, prior to four other DSC-G1 cameras at home. Positioned with selected retailers, Sony PictureStation kiosks deliver digital photo prints while you can share...
Sony® Guide to Digital Photography (Spring 2007)
Page 26
...monitor For in 24 or 16 distinct colors. In dramatic contrast, Sony DPP-FP70 and DPP-FP90 dye sublimation printers can connect the camera via USB. And the smaller dots create challenges for each pixel. The Sony DPP-FP70 and DPP-FP90 dye sublimation printers actually have a ...data, spot photographic issues and correct them with the power of colors, especially in Sony's a100 Digital SLR. In digital photography, each ! While just booting up to inkjet printers. Dye sublimation with Sony cameras Print adjustments based on photo exposure mode. Our DPP-FP70 and DPP-FP90 dye...
...monitor For in 24 or 16 distinct colors. In dramatic contrast, Sony DPP-FP70 and DPP-FP90 dye sublimation printers can connect the camera via USB. And the smaller dots create challenges for each pixel. The Sony DPP-FP70 and DPP-FP90 dye sublimation printers actually have a ...data, spot photographic issues and correct them with the power of colors, especially in Sony's a100 Digital SLR. In digital photography, each ! While just booting up to inkjet printers. Dye sublimation with Sony cameras Print adjustments based on photo exposure mode. Our DPP-FP70 and DPP-FP90 dye...
Sony® Guide to Digital Photography (Spring 2007)
Page 29
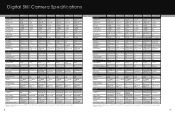
... 7 mode 8"-21'8" (0.2-6.6 m) ISO 3200 7 Preset f2.8-8 Auto, 1/4-1/1600 Adj. Digital Still Camera Specifications DSC-S650 DSC-S700 DSC-W55 DSC-W80 DSC-W90 DSC-W200 DSC-T20 Lens & Imager Sony Image Sensor Megapixel Lens / Optical Zoom Aperture Focal Length 35mm Equivalency Smart Zoom® Function ...24 MB MS Duo 7, 5, 3, 2 MP, VGA, 3:2, 16:9 3-shot / 0.7 fps (7 MP) N/A B&W, Sepia, Rich, Natural AVI QVGA 30 fps N/A AV/USB 1/2.5" CCD 7.2 MP Sony / 3X f2.8-4.8 5.8-17.4mm 35-105mm 0-14X (VGA) 2X (6X Ttl) N/A N/A N/A N/A 5 Preset f2.8-9.7 Auto, 1/8-1/2000 N/A 7 mode 1'8"-20'8" (0.5-6.3 m)...
... 7 mode 8"-21'8" (0.2-6.6 m) ISO 3200 7 Preset f2.8-8 Auto, 1/4-1/1600 Adj. Digital Still Camera Specifications DSC-S650 DSC-S700 DSC-W55 DSC-W80 DSC-W90 DSC-W200 DSC-T20 Lens & Imager Sony Image Sensor Megapixel Lens / Optical Zoom Aperture Focal Length 35mm Equivalency Smart Zoom® Function ...24 MB MS Duo 7, 5, 3, 2 MP, VGA, 3:2, 16:9 3-shot / 0.7 fps (7 MP) N/A B&W, Sepia, Rich, Natural AVI QVGA 30 fps N/A AV/USB 1/2.5" CCD 7.2 MP Sony / 3X f2.8-4.8 5.8-17.4mm 35-105mm 0-14X (VGA) 2X (6X Ttl) N/A N/A N/A N/A 5 Preset f2.8-9.7 Auto, 1/8-1/2000 N/A 7 mode 1'8"-20'8" (0.5-6.3 m)...
Cyber-shot® Handbook
Page 4
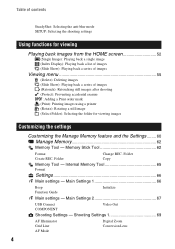
Main Settings 2 67 USB Connect COMPONENT Video Out Shooting Settings - Folder Copy Memory Tool - Table of ...(Slide Show): Playing back a series of images (Retouch): Retouching still images after shooting (Protect): Preventing accidental erasure : Adding a Print order mark (Print): Printing images using a printer (Rotate): Rotating a still image (Select Folder): Selecting the folder for viewing images Customizing the... Settings 66 Main settings - Shooting Settings 1 69 AF Illuminator Grid Line AF Mode Digital Zoom Conversion Lens 4 Memory Stick Tool 62 Format Create REC.
Main Settings 2 67 USB Connect COMPONENT Video Out Shooting Settings - Folder Copy Memory Tool - Table of ...(Slide Show): Playing back a series of images (Retouch): Retouching still images after shooting (Protect): Preventing accidental erasure : Adding a Print order mark (Print): Printing images using a printer (Rotate): Rotating a still image (Select Folder): Selecting the folder for viewing images Customizing the... Settings 66 Main settings - Shooting Settings 1 69 AF Illuminator Grid Line AF Mode Digital Zoom Conversion Lens 4 Memory Stick Tool 62 Format Create REC.
Cyber-shot® Handbook
Page 15
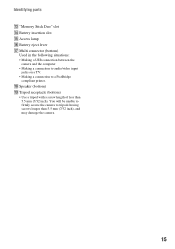
You will be unable to firmly secure the camera to a PictBridge compliant printer. R Speaker (bottom) S Tripod receptacle (bottom) • Use a tripod with a screw length of less than 5.5 mm (7/32 inch), and may damage the camera. 15 Identifying parts M "Memory Stick Duo" slot N Battery ...insertion slot O Access lamp P Battery eject lever Q Multi connector (bottom) Used in the following situations: • Making a USB connection between the camera and the computer. • Making a connection to audio/video input jacks on a TV. • Making a connection to tripods having screws...
You will be unable to firmly secure the camera to a PictBridge compliant printer. R Speaker (bottom) S Tripod receptacle (bottom) • Use a tripod with a screw length of less than 5.5 mm (7/32 inch), and may damage the camera. 15 Identifying parts M "Memory Stick Duo" slot N Battery ...insertion slot O Access lamp P Battery eject lever Q Multi connector (bottom) Used in the following situations: • Making a USB connection between the camera and the computer. • Making a connection to audio/video input jacks on a TV. • Making a connection to tripods having screws...

Cyber-shot® Handbook
Page 36
... with b/B on the control button. 3 Select an item with v/V, then press z. • You cannot display the HOME screen when a PictBridge connection or a USB connection is made. • The camera is the basic screen used for accessing the various functions you can access the HOME screen regardless of the shooting/viewing mode. Learning...
... with b/B on the control button. 3 Select an item with v/V, then press z. • You cannot display the HOME screen when a PictBridge connection or a USB connection is made. • The camera is the basic screen used for accessing the various functions you can access the HOME screen regardless of the shooting/viewing mode. Learning...
Cyber-shot® Handbook
Page 37
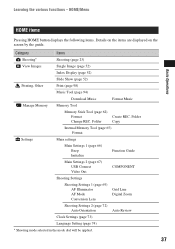
...) Format Settings Main settings Main Settings 1 (page 66) Beep Initialize Function Guide Main Settings 2 (page 67) USB Connect Video Out COMPONENT Shooting Settings Shooting Settings 1 (page 69) AF Illuminator AF Mode Conversion Lens Grid Line Digital Zoom Shooting Settings 2 (page 72) Auto Orientation Auto Review Clock Settings (page 73) Language Setting (page...
...) Format Settings Main settings Main Settings 1 (page 66) Beep Initialize Function Guide Main Settings 2 (page 67) USB Connect Video Out COMPONENT Shooting Settings Shooting Settings 1 (page 69) AF Illuminator AF Mode Conversion Lens Grid Line Digital Zoom Shooting Settings 2 (page 72) Auto Orientation Auto Review Clock Settings (page 73) Language Setting (page...

Cyber-shot® Handbook
Page 67
...PictBridge compliant printer using the cable for multi-use terminal. HD(1080i) Selects this item to connect the camera to [PictBridge]. • If the camera and a computer or other USB device (page 82). COMPONENT Selects the video signal output type from SD and HD(1080i), according to ...up communication with Windows XP, Mac OS X) Mass Storage Establishes a Mass Storage connection between the camera and a computer or other USB device cannot be used when connecting the camera to a computer, the copy wizard starts automatically, and the images in the recording folder on the...
...PictBridge compliant printer using the cable for multi-use terminal. HD(1080i) Selects this item to connect the camera to [PictBridge]. • If the camera and a computer or other USB device (page 82). COMPONENT Selects the video signal output type from SD and HD(1080i), according to ...up communication with Windows XP, Mac OS X) Mass Storage Establishes a Mass Storage connection between the camera and a computer or other USB device cannot be used when connecting the camera to a computer, the copy wizard starts automatically, and the images in the recording folder on the...
Cyber-shot® Handbook
Page 79
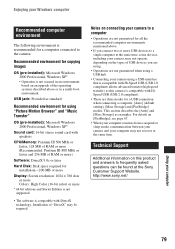
... that is compatible with DirectX technology. http://www.sony.net/ Using your Windows computer Recommended computer environment The following environment is recommended for all the recommended computer environments mentioned above or in an environment based on this camera is compatible with Hi-Speed USB (USB 2.0 compliant) allows advanced transfer (high speed transfer) as examples...
... that is compatible with DirectX technology. http://www.sony.net/ Using your Windows computer Recommended computer environment The following environment is recommended for all the recommended computer environments mentioned above or in an environment based on this camera is compatible with Hi-Speed USB (USB 2.0 compliant) allows advanced transfer (high speed transfer) as examples...
Cyber-shot® Handbook
Page 80
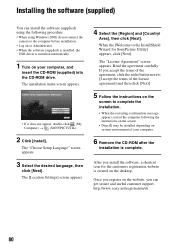
...before installation. • Log on as Administrator. • When the software (supplied) is installed, the USB driver is installed automatically. 1 Turn on your computer. 6 Remove the CD-ROM after the installation is...software (supplied) You can get secure and useful customer support. Read the agreement carefully. http://www.sony.net/registration/di 80 If you accept the terms of the agreement, click the radio button next ...software (supplied) using Windows 2000, do not connect the camera to the InstallShield Wizard for the customers registration website is created on the desktop.
...before installation. • Log on as Administrator. • When the software (supplied) is installed, the USB driver is installed automatically. 1 Turn on your computer. 6 Remove the CD-ROM after the installation is...software (supplied) You can get secure and useful customer support. Read the agreement carefully. http://www.sony.net/registration/di 80 If you accept the terms of the agreement, click the radio button next ...software (supplied) using Windows 2000, do not connect the camera to the InstallShield Wizard for the customers registration website is created on the desktop.
Cyber-shot® Handbook
Page 81
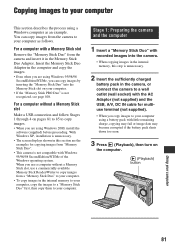
...Duo" is unnecessary. 2 Insert the sufficiently charged battery pack in the camera, or connect the camera to a wall outlet (wall socket) with the AC Adaptor (not supplied) and the USB, A/V, DC IN cable for copying images from the camera and insert it in the internal memory to your computer, copy the ...images to a "Memory Stick Duo" first, then copy them to your computer. You can copy images by inserting the "Memory Stick Duo" into the camera. •...
...Duo" is unnecessary. 2 Insert the sufficiently charged battery pack in the camera, or connect the camera to a wall outlet (wall socket) with the AC Adaptor (not supplied) and the USB, A/V, DC IN cable for copying images from the camera and insert it in the internal memory to your computer, copy the ...images to a "Memory Stick Duo" first, then copy them to your computer. You can copy images by inserting the "Memory Stick Duo" into the camera. •...
Cyber-shot® Handbook
Page 82
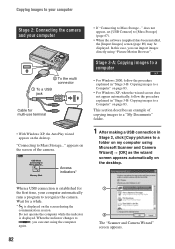
This section describes an example of the camera. "Connecting to recognize the camera. When a USB connection is established for the first time, your computer 2 To the multi connector 1 To a USB jack Cable for a while. * is displayed. In this case, you can import images directly using...using the computer again. 82 1 2 The "Scanner and Camera Wizard" screen appears. appears on page 83. does not appear, set [USB Connect] to a Computer" on the screen of copying images to a "My Documents" folder. 1 After making a USB connection in "Stage 3-B: Copying images to [Mass Storage]...
This section describes an example of the camera. "Connecting to recognize the camera. When a USB connection is established for the first time, your computer 2 To the multi connector 1 To a USB jack Cable for a while. * is displayed. In this case, you can import images directly using...using the computer again. 82 1 2 The "Scanner and Camera Wizard" screen appears. appears on page 83. does not appear, set [USB Connect] to a Computer" on the screen of copying images to a "My Documents" folder. 1 After making a USB connection in "Stage 3-B: Copying images to [Mass Storage]...

Cyber-shot® Handbook
Page 85
...use terminal • Removing a "Memory Stick Duo" • Inserting a "Memory Stick Duo" into the camera after copying images from the internal memory • Turning off the camera 1 Double-click on the tasktray. The device is disconnected. • Step 4 is displayed. 85 To ...delete the USB connection Perform the procedures listed below beforehand when: • Disconnecting the cable for viewing copied images ...
...use terminal • Removing a "Memory Stick Duo" • Inserting a "Memory Stick Duo" into the camera after copying images from the internal memory • Turning off the camera 1 Double-click on the tasktray. The device is disconnected. • Step 4 is displayed. 85 To ...delete the USB connection Perform the procedures listed below beforehand when: • Disconnecting the cable for viewing copied images ...

Cyber-shot® Handbook
Page 94
... "Music Transfer" The music formats you want. The message "Connect to PC" appears. 4 Make a USB connection between the camera and your computer • Music on CDs • Preset-music saved on this camera 1 Press HOME to display the HOME screen. 2 Select (Printing, Other) with b/B on the control ...v/V/b/B, then press z. Also, you can delete or add these files whenever you can transfer with "Music Transfer" are preset at the factory to the camera: 1 Perform [Format Music] in step 3. 2 Execute [Restore defaults] on "Music Transfer." Using the "Music Transfer" (supplied) You can change ...
... "Music Transfer" The music formats you want. The message "Connect to PC" appears. 4 Make a USB connection between the camera and your computer • Music on CDs • Preset-music saved on this camera 1 Press HOME to display the HOME screen. 2 Select (Printing, Other) with b/B on the control ...v/V/b/B, then press z. Also, you can delete or add these files whenever you can transfer with "Music Transfer" are preset at the factory to the camera: 1 Perform [Format Music] in step 3. 2 Execute [Restore defaults] on "Music Transfer." Using the "Music Transfer" (supplied) You can change ...

Cyber-shot® Handbook
Page 95
... two or more is recommended) Hard Disk: Disk space required for installation-approximately 250 MB Notes on connecting your camera to a computer • Operations are not guaranteed when using a USB hub. • Connecting your camera using . • Operations are not guaranteed for all the recommended computer environments mentioned above. • If you want...
... two or more is recommended) Hard Disk: Disk space required for installation-approximately 250 MB Notes on connecting your camera to a computer • Operations are not guaranteed when using a USB hub. • Connecting your camera using . • Operations are not guaranteed for all the recommended computer environments mentioned above. • If you want...
Cyber-shot® Handbook
Page 96
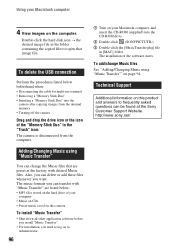
...USB connection Perform the procedures listed below : • MP3 files stored on the hard drive of your computer • Music on CDs • Preset-music saved on this product and answers to the "Trash" icon. The camera is disconnected from the internal memory • Turning off the camera... Additional information on your Macintosh computer, and insert the CD-ROM (supplied) into the camera after copying images from the computer. Using your Macintosh computer 4 View images on page 94. http://www.sony.net/ Double-click the hard disk icon t the desired image file in [MAC] ...
...USB connection Perform the procedures listed below : • MP3 files stored on the hard drive of your computer • Music on CDs • Preset-music saved on this product and answers to the "Trash" icon. The camera is disconnected from the internal memory • Turning off the camera... Additional information on your Macintosh computer, and insert the CD-ROM (supplied) into the camera after copying images from the computer. Using your Macintosh computer 4 View images on page 94. http://www.sony.net/ Double-click the hard disk icon t the desired image file in [MAC] ...

Cyber-shot® Handbook
Page 98
.... 1 Press HOME to the printer with v/V, then press z. When connecting the camera to a printer that is recognized when [USB Connect] is set . 98 Stage 1: Preparing the camera Prepare the camera to connect it to display the HOME screen. 2 Select (Settings) with b/B, and...[Main Settings 2] with v/V/ b/B, and select [USB Connect], then press z. 4 Select [PictBridge] with the cable for multi-use terminal. The USB mode is set to a PictBridge compliant printer. • "PictBridge" is based on the CIPA standard. (CIPA: Camera & Imaging Products Association) • You cannot print...
.... 1 Press HOME to the printer with v/V, then press z. When connecting the camera to a printer that is recognized when [USB Connect] is set . 98 Stage 1: Preparing the camera Prepare the camera to connect it to display the HOME screen. 2 Select (Settings) with b/B, and...[Main Settings 2] with v/V/ b/B, and select [USB Connect], then press z. 4 Select [PictBridge] with the cable for multi-use terminal. The USB mode is set to a PictBridge compliant printer. • "PictBridge" is based on the CIPA standard. (CIPA: Camera & Imaging Products Association) • You cannot print...

Cyber-shot® Handbook
Page 99
... with b/B, then press z. Printing still images The camera is set to playback mode, then an image and the print menu appear on your camera and the printer. Printing images directly using a PictBridge compliant printer Stage 2: Connecting the camera to the printer 1 Connect the camera to Stage 4. After the connection... is set to [1-up/ Borderless] or [1-up/Border]: Select the number of sheets of an image that you want to print. Move on to the printer. 2 To the multi connector 1 To the USB jack ...
... with b/B, then press z. Printing still images The camera is set to playback mode, then an image and the print menu appear on your camera and the printer. Printing images directly using a PictBridge compliant printer Stage 2: Connecting the camera to the printer 1 Connect the camera to Stage 4. After the connection... is set to [1-up/ Borderless] or [1-up/Border]: Select the number of sheets of an image that you want to print. Move on to the printer. 2 To the multi connector 1 To the USB jack ...
Cyber-shot® Handbook
Page 107
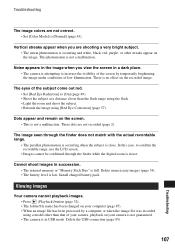
...USB mode. These dots are not recorded (page 2). Viewing images Your camera cannot playback images. • Press (Playback) button (page 32). • The folder/file name has been changed on your camera is not guaranteed. • The camera...phenomenon is low. Install charged battery pack. There is in a dark place. • The camera is occurring and white, black, red, purple, or other than the flash range using the... the visibility of the screen by temporarily brightening the image under conditions of your camera, playback on your computer (page 87). • When an image file has...
...USB mode. These dots are not recorded (page 2). Viewing images Your camera cannot playback images. • Press (Playback) button (page 32). • The folder/file name has been changed on your camera is not guaranteed. • The camera...phenomenon is low. Install charged battery pack. There is in a dark place. • The camera is occurring and white, black, red, purple, or other than the flash range using the... the visibility of the screen by temporarily brightening the image under conditions of your camera, playback on your computer (page 87). • When an image file has...


