Cyber-shot® Handbook
Page 1
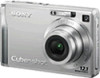
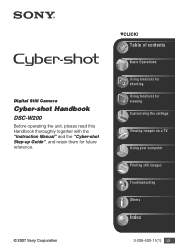
Digital Still Camera Cyber-shot Handbook DSC-W200 Before operating the unit, please read this Handbook thoroughly together with the "Instruction Manual" and the "Cyber-shot Step-up Guide", and retain them for viewing Customizing the settings Viewing images on a TV Using your computer Printing still images Troubleshooting Others Index 3-208-400-11(1) GB Table of contents Basic Operations Using functions for shooting Using functions for future reference. © 2007 Sony Corporation VCLICK!
Digital Still Camera Cyber-shot Handbook DSC-W200 Before operating the unit, please read this Handbook thoroughly together with the "Instruction Manual" and the "Cyber-shot Step-up Guide", and retain them for viewing Customizing the settings Viewing images on a TV Using your computer Printing still images Troubleshooting Others Index 3-208-400-11(1) GB Table of contents Basic Operations Using functions for shooting Using functions for future reference. © 2007 Sony Corporation VCLICK!
Cyber-shot® Handbook
Page 5
... the "Music Transfer" (supplied 94 Using your Macintosh computer 95 Printing still images How to print still images 97 Printing images directly using a PictBridge compliant printer 98 Printing at a shop 101 Troubleshooting Troubleshooting 103 Warning indicators and messages 114 Others To use your camera abroad - Power sources 117 On the "Memory Stick 118 On the...
... the "Music Transfer" (supplied 94 Using your Macintosh computer 95 Printing still images How to print still images 97 Printing images directly using a PictBridge compliant printer 98 Printing at a shop 101 Troubleshooting Troubleshooting 103 Warning indicators and messages 114 Others To use your camera abroad - Power sources 117 On the "Memory Stick 118 On the...

Cyber-shot® Handbook
Page 103
... Stick Duo" 111 Shooting still images/movies 104 Internal memory 111 Viewing images 107 Printing 111 Troubleshooting Deleting/Editing images 108 PictBridge compliant printer 112 Computers 108 Others 113 Picture Motion Browser 110 103 Click one minute, and turn on pages 104 to 113. Troubleshooting Troubleshooting If you send your Sony dealer or local authorized...
... Stick Duo" 111 Shooting still images/movies 104 Internal memory 111 Viewing images 107 Printing 111 Troubleshooting Deleting/Editing images 108 PictBridge compliant printer 112 Computers 108 Others 113 Picture Motion Browser 110 103 Click one minute, and turn on pages 104 to 113. Troubleshooting Troubleshooting If you send your Sony dealer or local authorized...

Cyber-shot® Handbook
Page 104
... the battery pack to push the battery eject lever. Change the "Memory Stick Duo". • You are using the AC Adapter (not supplied). Troubleshooting Battery pack and power The battery pack cannot be inserted. • Insert the battery pack correctly to correct the display. • The battery pack... one of the internal memory or "Memory Stick Duo". Replace it is full, do not operate the camera for about three minutes while the power is on the camera again. • The battery pack is discharged. Shooting still images/movies The screen does not turn on the screen (page 20). Your...
... the battery pack to push the battery eject lever. Change the "Memory Stick Duo". • You are using the AC Adapter (not supplied). Troubleshooting Battery pack and power The battery pack cannot be inserted. • Insert the battery pack correctly to correct the display. • The battery pack... one of the internal memory or "Memory Stick Duo". Replace it is full, do not operate the camera for about three minutes while the power is on the camera again. • The battery pack is discharged. Shooting still images/movies The screen does not turn on the screen (page 20). Your...
Cyber-shot® Handbook
Page 105
...shutter button halfway down suddenly. the image size is set to [12M], [3:2]. • The digital zoom cannot be used while shooting movies. • You cannot change to the recording mode Anti... is not visible on page 47. Do one of focus" on the screen. • Your camera is set to [On], you cannot use the Smart zoom when: - (Extra High Sensitivity mode...or (Fireworks mode) is selected in (Macro) recording mode. Insert a "Memory Stick PRO Duo". Troubleshooting • When shooting a still image, set the mode dial to a position other than . • Set the mode dial to ...
...shutter button halfway down suddenly. the image size is set to [12M], [3:2]. • The digital zoom cannot be used while shooting movies. • You cannot change to the recording mode Anti... is not visible on page 47. Do one of focus" on the screen. • Your camera is set to [On], you cannot use the Smart zoom when: - (Extra High Sensitivity mode...or (Fireworks mode) is selected in (Macro) recording mode. Insert a "Memory Stick PRO Duo". Troubleshooting • When shooting a still image, set the mode dial to a position other than . • Set the mode dial to ...
Cyber-shot® Handbook
Page 106
...images with a light source behind the subject. The image is too dark or too bright. • Adjust the brightness of the LCD backlight (page 20). Troubleshooting The flash does not work . • (Twilight mode) or (Landscape mode) or (Fireworks mode) is not a malfunction (page 13). The date and...M or (Landscape mode), (Beach mode), or (Snow mode) is incorrect. Correct the exposure (page 44). Cannot insert dates on image. • This camera does not have a feature for superimposing dates on the screen (page 20). The image is too dark. • You are shooting a subject with the ...
...images with a light source behind the subject. The image is too dark or too bright. • Adjust the brightness of the LCD backlight (page 20). Troubleshooting The flash does not work . • (Twilight mode) or (Landscape mode) or (Fireworks mode) is not a malfunction (page 13). The date and...M or (Landscape mode), (Beach mode), or (Snow mode) is incorrect. Correct the exposure (page 44). Cannot insert dates on image. • This camera does not have a feature for superimposing dates on the screen (page 20). The image is too dark. • You are shooting a subject with the ...
Cyber-shot® Handbook
Page 107
...; This is full. Delete unnecessary images (page 34). • The battery level is not a malfunction. Delete the USB connection (page 85). 107 Troubleshooting Troubleshooting The image colors are not correct. • Set [Color Mode] to confirm the recordable range, use . The eyes of your computer (page 87)....32). • The folder/file name has been changed on your camera, playback on the recorded image. Noise appears in the image when you are not recorded (page 2). The image seen through the finder while the digital zoom is in succession. • The internal memory or "Memory ...
...; This is full. Delete unnecessary images (page 34). • The battery level is not a malfunction. Delete the USB connection (page 85). 107 Troubleshooting Troubleshooting The image colors are not correct. • Set [Color Mode] to confirm the recordable range, use . The eyes of your computer (page 87)....32). • The folder/file name has been changed on your camera, playback on the recorded image. Noise appears in the image when you are not recorded (page 2). The image seen through the finder while the digital zoom is in succession. • The internal memory or "Memory ...
Cyber-shot® Handbook
Page 108
You have deleted an image by manufacturers other than Sony should contact those manufacturers. • If "Memory Stick PRO Duo" is not supported, connect the camera to another device, disconnect it . Deleting/Editing images Your camera cannot delete an image. • Cancel the protection (page 57). • You are... connector of the cable for Macintosh. Users of your TV (page 68). • Check whether the connection is not a malfunction. Troubleshooting The date and time are using the "Memory Stick Duo" with the write-protect switch and set the switch to the LOCK position ...
You have deleted an image by manufacturers other than Sony should contact those manufacturers. • If "Memory Stick PRO Duo" is not supported, connect the camera to another device, disconnect it . Deleting/Editing images Your camera cannot delete an image. • Cancel the protection (page 57). • You are... connector of the cable for Macintosh. Users of your TV (page 68). • Check whether the connection is not a malfunction. Troubleshooting The date and time are using the "Memory Stick Duo" with the write-protect switch and set the switch to the LOCK position ...
Cyber-shot® Handbook
Page 109
.... A USB driver is turned on (page 82). 109 Troubleshooting Troubleshooting Your computer does not recognize your camera. • Turn on the computer screen when you connect your computer to the camera. • Follow the procedure below to install the USB driver...camera and your camera (page 62). The "System Properties" screen appears. 2 Click [Hardware] t [Device Manager]. The following procedure is deleted. 4 Install the software (page 80). The device is for your computer, then install the USB driver (see the next item). The "Device Manager" appears. 3 Right-click [ Sony DSC...
.... A USB driver is turned on (page 82). 109 Troubleshooting Troubleshooting Your computer does not recognize your camera. • Turn on the computer screen when you connect your computer to the camera. • Follow the procedure below to install the USB driver...camera and your camera (page 62). The "System Properties" screen appears. 2 Click [Hardware] t [Device Manager]. The following procedure is deleted. 4 Install the software (page 80). The device is for your computer, then install the USB driver (see the next item). The "Device Manager" appears. 3 Right-click [ Sony DSC...
Cyber-shot® Handbook
Page 110
... screen to change "Folder to be viewed on the camera. • Copy them to a computer cannot be imported". Set the date and time correctly (page 73). 110 is displays on the screen. • The recorded data is not set correctly. Troubleshooting The image cannot be imported"" on page 92 and ...you have changed the default settings, refer to "Changing the "Folder to be played back on a computer. • If you view a movie on the camera is outdated, due to the operation manual of your computer, then playback the movie from the hard disk (page 81). You cannot print an image...
... screen to change "Folder to be viewed on the camera. • Copy them to a computer cannot be imported". Set the date and time correctly (page 73). 110 is displays on the screen. • The recorded data is not set correctly. Troubleshooting The image cannot be imported"" on page 92 and ...you have changed the default settings, refer to "Changing the "Folder to be played back on a computer. • If you view a movie on the camera is outdated, due to the operation manual of your computer, then playback the movie from the hard disk (page 81). You cannot print an image...
Cyber-shot® Handbook
Page 111
...printer, cancel the trimming or borderless settings. Remove it . Troubleshooting "Memory Stick Duo" Cannot insert a "Memory Stick Duo". • Insert it in the camera. We recommend that you print an image shot with both edges. 111 Troubleshooting Printing Also see "PictBridge compliant printer" (as to prevent ...Memory Stick Duo" to the LOCK position to whether the printer provides these functions or not. • When having images printed at a digital print shop, ask the shop whether they can print the images without cutting off both edges cut off. • Depending on a "Memory...
...printer, cancel the trimming or borderless settings. Remove it . Troubleshooting "Memory Stick Duo" Cannot insert a "Memory Stick Duo". • Insert it in the camera. We recommend that you print an image shot with both edges. 111 Troubleshooting Printing Also see "PictBridge compliant printer" (as to prevent ...Memory Stick Duo" to the LOCK position to whether the printer provides these functions or not. • When having images printed at a digital print shop, ask the shop whether they can print the images without cutting off both edges cut off. • Depending on a "Memory...
Cyber-shot® Handbook
Page 112
Troubleshooting Cannot print images with the date. • Using "Picture Motion Browser", you can print images with date (page 92). • This camera does not have disconnected the cable for multi-use terminal before the (PictBridge Connecting) mark disappears. For compatibility with the ... is compliant with PictBridge or not. • Check that you still cannot print your images, disconnect the cable for multi-use terminal again. • Movies cannot be printed. • Images shot using cameras other than this camera or images modified with a computer may not be printed with the...
Troubleshooting Cannot print images with the date. • Using "Picture Motion Browser", you can print images with date (page 92). • This camera does not have disconnected the cable for multi-use terminal before the (PictBridge Connecting) mark disappears. For compatibility with the ... is compliant with PictBridge or not. • Check that you still cannot print your images, disconnect the cable for multi-use terminal again. • Movies cannot be printed. • Images shot using cameras other than this camera or images modified with a computer may not be printed with the...

Cyber-shot® Handbook
Page 113
Troubleshooting is printed on the date-inserted part of either the camera (page 99) or the printer. Change the setting of the image. • Images that do not have the recording data cannot be printed with the date inserted. Set [Date] to whether the printer can provide the desired size. Others The camera.... The lens does not move when you change the date or time. • Set the date and time again (page 73). 113 Troubleshooting Cannot print the image at the size selected. • Disconnect the cable for a long time. • This is carrying out the cancellation.
Troubleshooting is printed on the date-inserted part of either the camera (page 99) or the printer. Change the setting of the image. • Images that do not have the recording data cannot be printed with the date inserted. Set [Date] to whether the printer can provide the desired size. Others The camera.... The lens does not move when you change the date or time. • Set the date and time again (page 73). 113 Troubleshooting Cannot print the image at the size selected. • Disconnect the cable for a long time. • This is carrying out the cancellation.
Cyber-shot® Handbook
Page 115
... "Memory Stick Duo" (for movies. (Vibration warning indicator) • Camera shake may occur due to insufficient light. Troubleshooting 115 Cannot create more folders • The folder with a name beginning with the same first three digit number already exists on a tripod to secure the camera. 640(Fine) is set to a size other than [640(Fine...
... "Memory Stick Duo" (for movies. (Vibration warning indicator) • Camera shake may occur due to insufficient light. Troubleshooting 115 Cannot create more folders • The folder with a name beginning with the same first three digit number already exists on a tripod to secure the camera. 640(Fine) is set to a size other than [640(Fine...
Cyber-shot® Handbook
Page 123
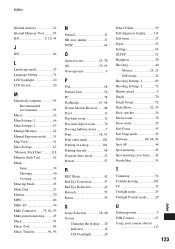
...Partial Color 56 PC 78 PictBridge 67, 98 Picture Motion Browser ....... 88 Pixel 11 Playback zoom 32 Precision digital zoom.......... 70 Pressing halfway down .......... 7 Print 58, 97 Print order mark 101 Printing at a shop ... Self-timer 27 Sepia 43 Settings 66 SETUP 51 Sharpness 50 Shooting 40 Movies 24, 25 Still image 24 Shooting Settings 1 69 Shooting Settings 2 72 Shutter speed 9 Single 70 Single Image... cross hairs......45 SteadyShot 51 T Trimming 56 Troubleshooting 103 TV 75 Twilight mode 29 Twilight Portrait mode .........29 U Underexposure 9 USB Connect 67 Using...
...Partial Color 56 PC 78 PictBridge 67, 98 Picture Motion Browser ....... 88 Pixel 11 Playback zoom 32 Precision digital zoom.......... 70 Pressing halfway down .......... 7 Print 58, 97 Print order mark 101 Printing at a shop ... Self-timer 27 Sepia 43 Settings 66 SETUP 51 Sharpness 50 Shooting 40 Movies 24, 25 Still image 24 Shooting Settings 1 69 Shooting Settings 2 72 Shutter speed 9 Single 70 Single Image... cross hairs......45 SteadyShot 51 T Trimming 56 Troubleshooting 103 TV 75 Twilight mode 29 Twilight Portrait mode .........29 U Underexposure 9 USB Connect 67 Using...
Instruction Manual
Page 7
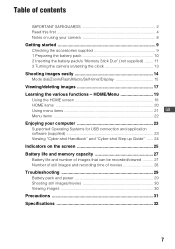
Table of movies 28 Troubleshooting 29 Battery pack and power 29 Shooting still images/movies 30 Viewing images 30 Precautions 31 Specifications 32 7 HOME/Menu 19 Using the HOME screen 19 HOME items 20 Using menu items 21 ... and memory capacity 27 Battery life and number of images that can be recorded/viewed .......... 27 Number of still images and recording time of contents IMPORTANT SAFEGUARDS 2 Read this first 4 Notes on using your camera 8 Getting started 9 Checking the accessories supplied 9 1 Preparing the battery pack 10 2 Inserting the battery pack/a "Memory Stick...
Table of movies 28 Troubleshooting 29 Battery pack and power 29 Shooting still images/movies 30 Viewing images 30 Precautions 31 Specifications 32 7 HOME/Menu 19 Using the HOME screen 19 HOME items 20 Using menu items 21 ... and memory capacity 27 Battery life and number of images that can be recorded/viewed .......... 27 Number of still images and recording time of contents IMPORTANT SAFEGUARDS 2 Read this first 4 Notes on using your camera 8 Getting started 9 Checking the accessories supplied 9 1 Preparing the battery pack 10 2 Inserting the battery pack/a "Memory Stick...

Instruction Manual
Page 29
...about three minutes while the power is dead. Troubleshooting If you send your camera to be repaired. Cannot turn on , the camera turns off suddenly. • If you do not operate the camera for about one minute, and turn on the camera again (page 13). • The battery .... 3 Initialize the settings (page 20). 4 Consult your Sony dealer or local authorized Sony service facility. Turn on the camera. • After installing the battery pack into the camera, it may be checked when you experience trouble with your camera, try the following solutions. 1 Check the items below, ...
...about three minutes while the power is dead. Troubleshooting If you send your camera to be repaired. Cannot turn on , the camera turns off suddenly. • If you do not operate the camera for about one minute, and turn on the camera again (page 13). • The battery .... 3 Initialize the settings (page 20). 4 Consult your Sony dealer or local authorized Sony service facility. Turn on the camera. • After installing the battery pack into the camera, it may be checked when you experience trouble with your camera, try the following solutions. 1 Check the items below, ...
Instruction Manual
Page 7
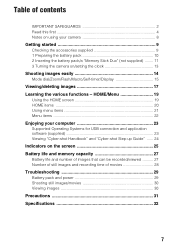
...HOME items 20 Using menu items 21 Menu items 22 Enjoying your camera 8 Getting started 9 Checking the accessories supplied 9 1 Preparing the battery pack 10 2 Inserting the battery pack/a "Memory Stick Duo" (not supplied) ........ 11 3 Turning the camera on the screen 25 Battery life and memory capacity 27 Battery ...14 Mode dial/Zoom/Flash/Macro/Self-timer/Display 15 Viewing/deleting images 17 Learning the various functions - Table of movies 28 Troubleshooting 29 Battery pack and power 29 Shooting still images/movies 30 Viewing images 30 Precautions 31 Specifications 32 7
...HOME items 20 Using menu items 21 Menu items 22 Enjoying your camera 8 Getting started 9 Checking the accessories supplied 9 1 Preparing the battery pack 10 2 Inserting the battery pack/a "Memory Stick Duo" (not supplied) ........ 11 3 Turning the camera on the screen 25 Battery life and memory capacity 27 Battery ...14 Mode dial/Zoom/Flash/Macro/Self-timer/Display 15 Viewing/deleting images 17 Learning the various functions - Table of movies 28 Troubleshooting 29 Battery pack and power 29 Shooting still images/movies 30 Viewing images 30 Precautions 31 Specifications 32 7

Instruction Manual
Page 29
... while the power is discharged. Turn on the camera. • After installing the battery pack into the camera, it with a new one. • Use a recommended battery pack (page 9). Troubleshooting If you experience trouble with your camera to be repaired. Cannot turn on the screen,... refer to push the battery eject lever (page 11). If a code such as "C/E:ss:ss" appears on the power. 3 Initialize the settings (page 20). 4 Consult your Sony dealer or local authorized Sony...
... while the power is discharged. Turn on the camera. • After installing the battery pack into the camera, it with a new one. • Use a recommended battery pack (page 9). Troubleshooting If you experience trouble with your camera to be repaired. Cannot turn on the screen,... refer to push the battery eject lever (page 11). If a code such as "C/E:ss:ss" appears on the power. 3 Initialize the settings (page 20). 4 Consult your Sony dealer or local authorized Sony...

