Instruction Manual
Page 7
... "Cyber-shot Handbook 27 Indicators on the screen 28 Battery life and memory capacity 30 Battery life and number of images you can record/view 30 Recordable number of still images and recordable time of contents IMPORTANT SAFEGUARDS 2 Read this first 4 Notes on using the camera ...8 Getting started 9 Checking the accessories supplied 9 1 Preparing the battery pack 10 2 Inserting the battery pack/a "Memory Stick Duo" (not supplied) ........ 11 3 Turning the camera on/...
... "Cyber-shot Handbook 27 Indicators on the screen 28 Battery life and memory capacity 30 Battery life and number of images you can record/view 30 Recordable number of still images and recordable time of contents IMPORTANT SAFEGUARDS 2 Read this first 4 Notes on using the camera ...8 Getting started 9 Checking the accessories supplied 9 1 Preparing the battery pack 10 2 Inserting the battery pack/a "Memory Stick Duo" (not supplied) ........ 11 3 Turning the camera on/...
Instruction Manual
Page 10
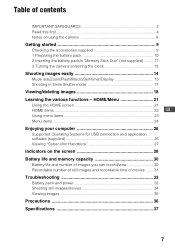
... • Connect the battery charger to the wall outlet (wall socket). Charging may take longer depending on conditions of use with compatible Sony batteries. 10 1 Preparing the battery pack For customers in the USA and Canada Plug For customers in countries/regions other than the USA...battery pack at a temperature of 25 °C (77 °F). When the CHARGE lamp turns off the power by disconnecting the plug from the wall outlet (wall socket). • When charging is finished, disconnect the power cord (mains lead) from the wall outlet (wall socket), and remove the battery pack...
... • Connect the battery charger to the wall outlet (wall socket). Charging may take longer depending on conditions of use with compatible Sony batteries. 10 1 Preparing the battery pack For customers in the USA and Canada Plug For customers in countries/regions other than the USA...battery pack at a temperature of 25 °C (77 °F). When the CHARGE lamp turns off the power by disconnecting the plug from the wall outlet (wall socket). • When charging is finished, disconnect the power cord (mains lead) from the wall outlet (wall socket), and remove the battery pack...
Instruction Manual
Page 11
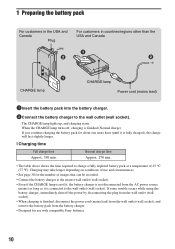
...4 Close the battery/"Memory Stick Duo" cover. [ When there is no "Memory Stick Duo" inserted The camera records/plays back images using the internal memory (approx. 15 MB). [ To check the remaining battery charge Press POWER to turn on the LCD screen. 2 Inserting the battery pack/a "Memory Stick Duo" (not supplied) ɟ ɠ... the battery pack while pressing the battery eject lever with fully charged one, or charge the battery. (The warning indicator flashes.) • If you turn on and check the remaining battery charge on the camera for the first time (page 13). 11
...4 Close the battery/"Memory Stick Duo" cover. [ When there is no "Memory Stick Duo" inserted The camera records/plays back images using the internal memory (approx. 15 MB). [ To check the remaining battery charge Press POWER to turn on the LCD screen. 2 Inserting the battery pack/a "Memory Stick Duo" (not supplied) ɟ ɠ... the battery pack while pressing the battery eject lever with fully charged one, or charge the battery. (The warning indicator flashes.) • If you turn on and check the remaining battery charge on the camera for the first time (page 13). 11
Instruction Manual
Page 13
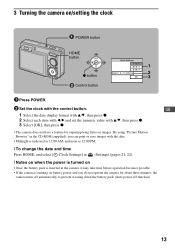
... 21, 22). [ Notes on when the power is turned on • Once the battery pack is inserted in the camera, it may take time before operation becomes possible. • If the camera is running on battery power and you do not operate the camera for superimposing dates on /setting the clock POWER button HOME button 1 2 z button 3 ɟ...
... 21, 22). [ Notes on when the power is turned on • Once the battery pack is inserted in the camera, it may take time before operation becomes possible. • If the camera is running on battery power and you do not operate the camera for superimposing dates on /setting the clock POWER button HOME button 1 2 z button 3 ɟ...
Instruction Manual
Page 18
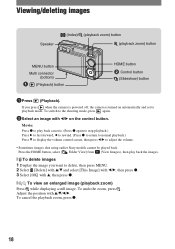
... image you press when the camera is powered off, the camera is turned on the control button. To undo the zoom, press . Adjust the position with v, then press z. [ To view an enlarged image (playback zoom) Press while displaying a still image. To switch to adjust the volume. • Sometimes images shot using earlier Sony models cannot be played...
... image you press when the camera is powered off, the camera is turned on the control button. To undo the zoom, press . Adjust the position with v, then press z. [ To view an enlarged image (playback zoom) Press while displaying a still image. To switch to adjust the volume. • Sometimes images shot using earlier Sony models cannot be played...
Instruction Manual
Page 30
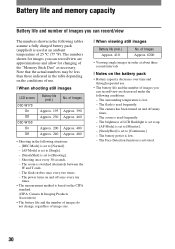
...; Battery capacity decreases over time and through repeated use . [ When shooting still images LCD screen DSC-W170 On Off DSC-W150 On Off Battery life (min.) Approx. 195 Approx. 230 Approx. 200 ...- The surrounding temperature is set to [Continuous]. - The flash strobes once every two times. - The power turns on and off many times. - The numbers shown for changing of use . • The battery life ...every ten times. • The measurement method is based on the CIPA standard. (CIPA: Camera & Imaging Products Association) • The battery life and the number of images do not ...
...; Battery capacity decreases over time and through repeated use . [ When shooting still images LCD screen DSC-W170 On Off DSC-W150 On Off Battery life (min.) Approx. 195 Approx. 230 Approx. 200 ...- The surrounding temperature is set to [Continuous]. - The flash strobes once every two times. - The power turns on and off many times. - The numbers shown for changing of use . • The battery life ...every ten times. • The measurement method is based on the CIPA standard. (CIPA: Camera & Imaging Products Association) • The battery life and the number of images do not ...
Instruction Manual
Page 33
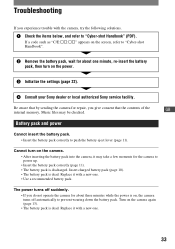
...moments for the camera to "Cyber-shot Handbook" (PDF). Battery pack and power Cannot insert the battery pack. • Insert the battery pack correctly to prevent wearing down the battery pack. Cannot turn on , the camera turns off suddenly. • If you do not operate the camera for repair, ... new one. 33 The power turns off automatically to push the battery eject lever (page 11). Turn on the camera again (page 13). • The battery pack is on the power. 3 Initialize the settings (page 22). 4 Consult your Sony dealer or local authorized Sony service facility. Replace it...
...moments for the camera to "Cyber-shot Handbook" (PDF). Battery pack and power Cannot insert the battery pack. • Insert the battery pack correctly to prevent wearing down the battery pack. Cannot turn on , the camera turns off suddenly. • If you do not operate the camera for repair, ... new one. 33 The power turns off automatically to push the battery eject lever (page 11). Turn on the camera again (page 13). • The battery pack is on the power. 3 Initialize the settings (page 22). 4 Consult your Sony dealer or local authorized Sony service facility. Replace it...
Instruction Manual
Page 36
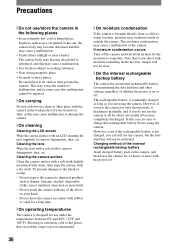
... carrying Do not sit down in a chair or other settings regardless of whether the power is not charged, you can still use the camera, but the date and time will not be indicated. If moisture condensation occurs Turn off the camera and wait about one month it discharges gradually, and if you do not use... the camera at all for about an hour for the moisture to let sand or ...
... carrying Do not sit down in a chair or other settings regardless of whether the power is not charged, you can still use the camera, but the date and time will not be indicated. If moisture condensation occurs Turn off the camera and wait about one month it discharges gradually, and if you do not use... the camera at all for about an hour for the moisture to let sand or ...
Cyber-shot® Handbook
Page 21
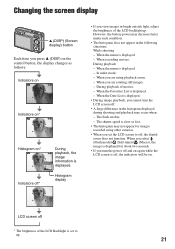
... up . 21 When the menu is displayed. - When you are using other cameras. • When you set to off , the indicators will be on. When the Favorites List is displayed. - However, the battery power may decrease faster under such condition. • The histogram does not appear in ...- When the menu is displayed. When you are rotating still images. - During playback of the LCD Backlight is off , the digital zoom does not function. When the Date List is displayed. • During image playback, you cannot turn the power off and on again while the LCD screen is set the...
... up . 21 When the menu is displayed. - When you are using other cameras. • When you set to off , the indicators will be on. When the Favorites List is displayed. - However, the battery power may decrease faster under such condition. • The histogram does not appear in ...- When the menu is displayed. When you are rotating still images. - During playback of the LCD Backlight is off , the digital zoom does not function. When the Date List is displayed. • During image playback, you cannot turn the power off and on again while the LCD screen is set the...

Cyber-shot® Handbook
Page 33
.... • Sometimes images shot using earlier Sony models cannot be played back...turned on the control button. Movie: Press z to play back the images. / To view an enlarged image (playback zoom) Press while displaying a still... image. To switch to adjust the volume. • Movies of the whole image. Viewing images Basic Operations (Index)/ (Playback zoom) button z button v/V/b/B button Control button (Playback zoom) button MENU button HOME button (Playback) button 1 Press the (Playback) button. • If you press the (Playback) button when the camera is powered off, the camera...
.... • Sometimes images shot using earlier Sony models cannot be played back...turned on the control button. Movie: Press z to play back the images. / To view an enlarged image (playback zoom) Press while displaying a still... image. To switch to adjust the volume. • Movies of the whole image. Viewing images Basic Operations (Index)/ (Playback zoom) button z button v/V/b/B button Control button (Playback zoom) button MENU button HOME button (Playback) button 1 Press the (Playback) button. • If you press the (Playback) button when the camera is powered off, the camera...
Cyber-shot® Handbook
Page 75
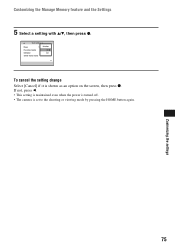
Customizing the settings Customizing the Manage Memory feature and the Settings 5 Select a setting with v/V, then press z. To cancel the setting change Select [Cancel] if it is set to the shooting or viewing mode by pressing the HOME button again. 75 If not, press b. • This setting is maintained even when the power is turned off. • The camera is shown as an option on the screen, then press z.
Customizing the settings Customizing the Manage Memory feature and the Settings 5 Select a setting with v/V, then press z. To cancel the setting change Select [Cancel] if it is set to the shooting or viewing mode by pressing the HOME button again. 75 If not, press b. • This setting is maintained even when the power is turned off. • The camera is shown as an option on the screen, then press z.
Cyber-shot® Handbook
Page 79
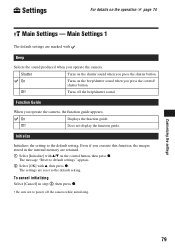
... For details on the control button, then press z. Off Does not display the function guide. Shutter Turns on the beep/shutter sound when you operate the camera. The message "Reset to the default setting. On Displays the function guide. Even if you execute ... with . On Turns on the shutter sound when you operate the camera, the function guide appears. The settings are marked with v/V on the operation 1 page 74 Main Settings - Off Turns off the camera while initializing. Main Settings 1 The default settings are reset to power off the beep/shutter...
... For details on the control button, then press z. Off Does not display the function guide. Shutter Turns on the beep/shutter sound when you operate the camera. The message "Reset to the default setting. On Displays the function guide. Even if you execute ... with . On Turns on the shutter sound when you operate the camera, the function guide appears. The settings are marked with v/V on the operation 1 page 74 Main Settings - Off Turns off the camera while initializing. Main Settings 1 The default settings are reset to power off the beep/shutter...
Cyber-shot® Handbook
Page 109
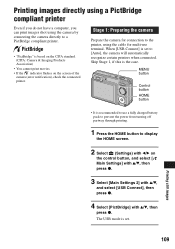
...PictBridge compliant printer Even if you do not have a computer, you can print images shot using the cable for multi-use a fully charged battery pack to prevent the power from turning off partway through printing. 1 Press the HOME button to display the HOME screen. ...camera (error notification), check the connected printer. Stage 1: Preparing the camera Prepare the camera for connection to the printer, using the camera by connecting the camera directly to [Auto], the camera will automatically recognize certain printers when connected. When [USB Connect] is the case. Printing still...
...PictBridge compliant printer Even if you do not have a computer, you can print images shot using the cable for multi-use a fully charged battery pack to prevent the power from turning off partway through printing. 1 Press the HOME button to display the HOME screen. ...camera (error notification), check the connected printer. Stage 1: Preparing the camera Prepare the camera for connection to the printer, using the camera by connecting the camera directly to [Auto], the camera will automatically recognize certain printers when connected. When [USB Connect] is the case. Printing still...
Cyber-shot® Handbook
Page 114
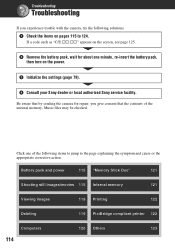
...camera for about one of the internal memory, Music files may be checked. Click one minute, re-insert the battery pack, then turn on pages 115 to the page explaining the symptom and cause or the appropriate corrective action. Battery pack and power 115 "Memory Stick Duo" 121 Shooting still... with the camera, try the following items to jump to 124. Troubleshooting Troubleshooting If you give consent that the contents of the following solutions. 1 Check the items on the power. 3 Initialize the settings (page 79). 4 Consult your Sony dealer or local authorized Sony service facility....
...camera for about one of the internal memory, Music files may be checked. Click one minute, re-insert the battery pack, then turn on pages 115 to the page explaining the symptom and cause or the appropriate corrective action. Battery pack and power 115 "Memory Stick Duo" 121 Shooting still... with the camera, try the following items to jump to 124. Troubleshooting Troubleshooting If you give consent that the contents of the following solutions. 1 Check the items on the power. 3 Initialize the settings (page 79). 4 Consult your Sony dealer or local authorized Sony service facility....
Cyber-shot® Handbook
Page 115
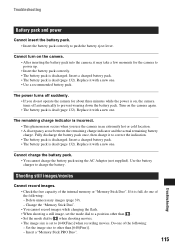
...• This phenomenon occurs when you do one . Do one . • Use a recommended battery pack. The power turns off suddenly. • If you use the camera in an extremely hot or cold location. • A discrepancy arose between the remaining charge indicator and the actual remaining... Use the battery charger to push the battery eject lever. Shooting still images/movies Cannot record images. • Check the free capacity of the following : - Delete unnecessary images (page 39). - Cannot turn on the camera again. • The battery pack is dead (page 132). ...
...• This phenomenon occurs when you do one . Do one . • Use a recommended battery pack. The power turns off suddenly. • If you use the camera in an extremely hot or cold location. • A discrepancy arose between the remaining charge indicator and the actual remaining... Use the battery charger to push the battery eject lever. Shooting still images/movies Cannot record images. • Check the free capacity of the following : - Delete unnecessary images (page 39). - Cannot turn on the camera again. • The battery pack is dead (page 132). ...
Cyber-shot® Handbook
Page 124
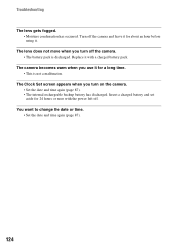
The camera becomes warm when you use it for 24 hours or more with a...This is discharged. The Clock Set screen appears when you turn on the camera. • Set the date and time again (page 87). • The internal rechargeable backup battery has discharged. Turn off the camera. • The battery pack is not a malfunction. ...Troubleshooting The lens gets fogged. • Moisture condensation has occurred. The lens does not move when you turn off the camera and leave it for ...
The camera becomes warm when you use it for 24 hours or more with a...This is discharged. The Clock Set screen appears when you turn on the camera. • Set the date and time again (page 87). • The internal rechargeable backup battery has discharged. Turn off the camera. • The battery pack is not a malfunction. ...Troubleshooting The lens gets fogged. • Moisture condensation has occurred. The lens does not move when you turn off the camera and leave it for ...

Cyber-shot® Handbook
Page 125
...Sony dealer or local authorized Sony service facility. C:13:ss • The camera cannot read or write data on the camera is damaged. • The terminal section of battery pack, the indicator may need repair. Messages If the following corrective actions a few times, the camera may flash even though there are still... the battery pack immediately. Try turning off and then on again. Initialize the camera (page 79), then turn the power on the state of use with the camera, or the data is trouble with the camera's hardware. The last two digits (indicated by ss) will differ...
...Sony dealer or local authorized Sony service facility. C:13:ss • The camera cannot read or write data on the camera is damaged. • The terminal section of battery pack, the indicator may need repair. Messages If the following corrective actions a few times, the camera may flash even though there are still... the battery pack immediately. Try turning off and then on again. Initialize the camera (page 79), then turn the power on the state of use with the camera, or the data is trouble with the camera's hardware. The last two digits (indicated by ss) will differ...

Cyber-shot® Handbook
Page 128
Self-Timer is invalid • The self-timer is unavailable under these settings (page 30). Recover data Recovering data • Date information or other data is recovered in cases where images have been deleted on the image. Delete images from the Date View. 128 Warning indicators and messages Unable to detect face for retouch • Retouching may not be possible depending on the PC. • The number of images exceeds that for which date management by the camera is possible. Turn the power off and on again • The lens malfunction.
Self-Timer is invalid • The self-timer is unavailable under these settings (page 30). Recover data Recovering data • Date information or other data is recovered in cases where images have been deleted on the image. Delete images from the Date View. 128 Warning indicators and messages Unable to detect face for retouch • Retouching may not be possible depending on the PC. • The number of images exceeds that for which date management by the camera is possible. Turn the power off and on again • The lens malfunction.


