
Instruction Manual
Page 5
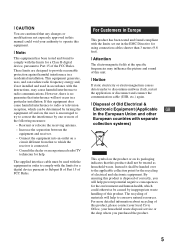
... to conserve natural resources. The supplied interface cable must be treated as household waste. Instead it shall be caused by turning the equipment off and on a circuit different from that any changes or modifications not expressly approved in accordance with the ...the instructions, may influence the picture and sound of this manual could otherwise be handed over to the applicable collection point for a digital device pursuant to Part 15 of Old Electrical & Electronic Equipment (Applicable GB in a particular installation. Increase the separation between the equipment...
... to conserve natural resources. The supplied interface cable must be treated as household waste. Instead it shall be caused by turning the equipment off and on a circuit different from that any changes or modifications not expressly approved in accordance with the ...the instructions, may influence the picture and sound of this manual could otherwise be handed over to the applicable collection point for a digital device pursuant to Part 15 of Old Electrical & Electronic Equipment (Applicable GB in a particular installation. Increase the separation between the equipment...
Instruction Manual
Page 7
... "Cyber-shot Handbook 27 Indicators on the screen 28 Battery life and memory capacity 30 Battery life and number of images you can record/view 30 Recordable number of still images and recordable time of contents IMPORTANT SAFEGUARDS 2 Read this first 4 Notes on using the camera ...8 Getting started 9 Checking the accessories supplied 9 1 Preparing the battery pack 10 2 Inserting the battery pack/a "Memory Stick Duo" (not supplied) ........ 11 3 Turning the camera on/...
... "Cyber-shot Handbook 27 Indicators on the screen 28 Battery life and memory capacity 30 Battery life and number of images you can record/view 30 Recordable number of still images and recordable time of contents IMPORTANT SAFEGUARDS 2 Read this first 4 Notes on using the camera ...8 Getting started 9 Checking the accessories supplied 9 1 Preparing the battery pack 10 2 Inserting the battery pack/a "Memory Stick Duo" (not supplied) ........ 11 3 Turning the camera on/...
Instruction Manual
Page 8
...emission may occur. Notes on using the camera [ Internal memory and "Memory Stick Duo" back up Do not turn on the camera again. [ On image data compatibility • The camera conforms with DCF (Design rule for Camera File system) universal standard established by JEITA ...(Japan Electronics and Information Technology Industries Association). • Sony does not guarantee that the camera will play...
...emission may occur. Notes on using the camera [ Internal memory and "Memory Stick Duo" back up Do not turn on the camera again. [ On image data compatibility • The camera conforms with DCF (Design rule for Camera File system) universal standard established by JEITA ...(Japan Electronics and Information Technology Industries Association). • Sony does not guarantee that the camera will play...
Instruction Manual
Page 10
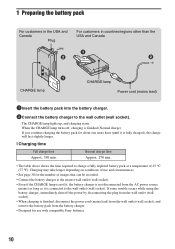
...continue charging the battery pack for the number of 25 °C (77 °F). Charging may take longer depending on conditions of use with compatible Sony batteries. 10 The CHARGE lamp lights up, and charging starts. Normal charge time Approx. 270 min. • The table above shows the time... Designed for use and circumstances. • See page 30 for about one more hour (until it is finished (Normal charge). When the CHARGE lamp turns off the power by disconnecting the plug from the wall outlet (wall socket). • When charging is finished, disconnect the power cord (mains lead)...
...continue charging the battery pack for the number of 25 °C (77 °F). Charging may take longer depending on conditions of use with compatible Sony batteries. 10 The CHARGE lamp lights up, and charging starts. Normal charge time Approx. 270 min. • The table above shows the time... Designed for use and circumstances. • See page 30 for about one more hour (until it is finished (Normal charge). When the CHARGE lamp turns off the power by disconnecting the plug from the wall outlet (wall socket). • When charging is finished, disconnect the power cord (mains lead)...
Instruction Manual
Page 11
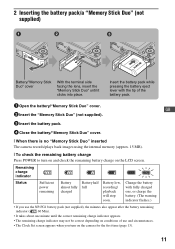
... the "Memory Stick Duo" until the correct remaining charge indicator appears. • The remaining charge indicator may not be correct depending on the camera for the first time (page 13). 11 Change the battery with the tip of use the NP-FG1 battery pack (not supplied), the minutes.../"Memory Stick Duo" cover. [ When there is no "Memory Stick Duo" inserted The camera records/plays back images using the internal memory (approx. 15 MB). [ To check the remaining battery charge Press POWER to turn on conditions of the battery pack. 1 Open the battery/"Memory Stick Duo" cover. Remaining...
... the "Memory Stick Duo" until the correct remaining charge indicator appears. • The remaining charge indicator may not be correct depending on the camera for the first time (page 13). 11 Change the battery with the tip of use the NP-FG1 battery pack (not supplied), the minutes.../"Memory Stick Duo" cover. [ When there is no "Memory Stick Duo" inserted The camera records/plays back images using the internal memory (approx. 15 MB). [ To check the remaining battery charge Press POWER to turn on conditions of the battery pack. 1 Open the battery/"Memory Stick Duo" cover. Remaining...
Instruction Manual
Page 13
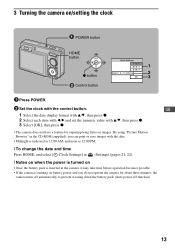
... Notes on when the power is turned on • Once the battery pack is inserted in the camera, it may take time before operation becomes possible. • If the camera is running on battery power and you do not operate the camera for superimposing dates on /setting the ...607; Control button 1 Press POWER. 2 Set the clock with v/V, then press z. 3 Select [OK], then press z. • The camera does not have a feature for about three minutes, the camera turns off automatically to prevent wearing down the battery pack (Auto power-off function). 13 GB 1 Select the date display format with...
... Notes on when the power is turned on • Once the battery pack is inserted in the camera, it may take time before operation becomes possible. • If the camera is running on battery power and you do not operate the camera for superimposing dates on /setting the ...607; Control button 1 Press POWER. 2 Set the clock with v/V, then press z. 3 Select [OK], then press z. • The camera does not have a feature for about three minutes, the camera turns off automatically to prevent wearing down the battery pack (Auto power-off function). 13 GB 1 Select the date display format with...
Instruction Manual
Page 18
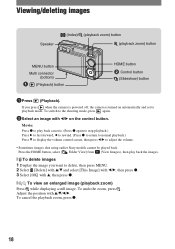
... want to the shooting mode, press again. 2Select an image with b/B on automatically and set to adjust the volume. • Sometimes images shot using earlier Sony models cannot be played back. Press the HOME button, select [ Folder View] from (View Images), then play back a movie. (Press ... powered off, the camera is turned on the control button. Adjust the position with v, then press z. [ To view an enlarged image (playback zoom) Press while displaying a still image. To cancel the playback zoom, press z. 18 To undo the zoom, press . To switch to delete, then press MENU. 2 ...
... want to the shooting mode, press again. 2Select an image with b/B on automatically and set to adjust the volume. • Sometimes images shot using earlier Sony models cannot be played back. Press the HOME button, select [ Folder View] from (View Images), then play back a movie. (Press ... powered off, the camera is turned on the control button. Adjust the position with v, then press z. [ To view an enlarged image (playback zoom) Press while displaying a still image. To cancel the playback zoom, press z. 18 To undo the zoom, press . To switch to delete, then press MENU. 2 ...

Instruction Manual
Page 23
... in playback mode, then press z. 4 Press MENU to display the menu. Using menu items MENU button z button ɟ ɠ Control button GB 1 Press MENU to turn off the menu. 23
... in playback mode, then press z. 4 Press MENU to display the menu. Using menu items MENU button z button ɟ ɠ Control button GB 1 Press MENU to turn off the menu. 23

Instruction Manual
Page 27
... how to copy. • When you click the [Cyber-shot Handbook] button, the screen for copying "Cyber-shot Handbook" appears. 2 Follow the on your computer, and insert the CD- Adobe Reader is required to view it. [ For Windows users 1 Turn on -screen instructions to use the camera in detail. click the shortcut created on your computer...
... how to copy. • When you click the [Cyber-shot Handbook] button, the screen for copying "Cyber-shot Handbook" appears. 2 Follow the on your computer, and insert the CD- Adobe Reader is required to view it. [ For Windows users 1 Turn on -screen instructions to use the camera in detail. click the shortcut created on your computer...
Instruction Manual
Page 30
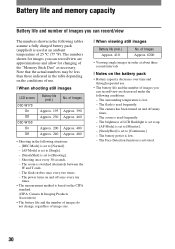
...brightness of LCD Backlight is set to up. - [AF Mode] is set to [Monitor]. - [SteadyShot] is used frequently. - The camera has been turned on the CIPA standard. (CIPA: Camera & Imaging Products Association) • The battery life and the number of images do not change, regardless of image size. [ When viewing... shown in the table depending on the battery pack • Battery capacity decreases over time and through repeated use . [ When shooting still images LCD screen DSC-W170 On Off DSC-W150 On Off Battery life (min.) Approx. 195 Approx. 230 Approx. 200 Approx. 240 No.
...brightness of LCD Backlight is set to up. - [AF Mode] is set to [Monitor]. - [SteadyShot] is used frequently. - The camera has been turned on the CIPA standard. (CIPA: Camera & Imaging Products Association) • The battery life and the number of images do not change, regardless of image size. [ When viewing... shown in the table depending on the battery pack • Battery capacity decreases over time and through repeated use . [ When shooting still images LCD screen DSC-W170 On Off DSC-W150 On Off Battery life (min.) Approx. 195 Approx. 230 Approx. 200 Approx. 240 No.
Instruction Manual
Page 33
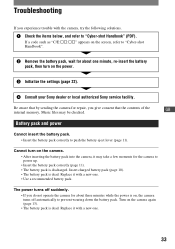
... battery pack is discharged. Replace it with the camera, try the following solutions. 1 Check the items below, and refer to "Cyber-shot Handbook". 2 Remove the battery pack, wait for about one . 33 Turn on the power. 3 Initialize the settings (page 22). 4 Consult your Sony dealer or local authorized Sony service facility. If a code such as "C/E:ss...
... battery pack is discharged. Replace it with the camera, try the following solutions. 1 Check the items below, and refer to "Cyber-shot Handbook". 2 Remove the battery pack, wait for about one . 33 Turn on the power. 3 Initialize the settings (page 22). 4 Consult your Sony dealer or local authorized Sony service facility. If a code such as "C/E:ss...
Instruction Manual
Page 36
...soft cloth to the finish or casing: - To prevent damage to remove fingerprints, dust, etc. If moisture condensation occurs Turn off the camera and wait about one month it discharges gradually, and if you can still use the camera, but the date and time will not be indicated. Do not expose the... camera to chemical products such as in a car parked in the sun, the camera body may become deformed and this may cause a malfunction. ...
...soft cloth to the finish or casing: - To prevent damage to remove fingerprints, dust, etc. If moisture condensation occurs Turn off the camera and wait about one month it discharges gradually, and if you can still use the camera, but the date and time will not be indicated. Do not expose the... camera to chemical products such as in a car parked in the sun, the camera body may become deformed and this may cause a malfunction. ...
Cyber-shot® Handbook
Page 14
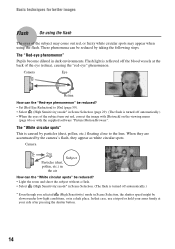
... Retina How can the "White circular spots" be reduced by the camera's flash, they appear as white circular spots. In that case, use a tripod or hold your arms firmly at the back of the subject turn out red, correct the image with [Retouch] on the viewing menu (page 66)... or with the supplied software "Picture Motion Browser". Flash light is turned off automatically.) • When the eyes of the eye (retina), causing the "red-eye" phenomenon. When they are accentuated by taking the following steps. Camera Subject Particles (dust, pollen, etc.) in the air How can the "...
... Retina How can the "White circular spots" be reduced by the camera's flash, they appear as white circular spots. In that case, use a tripod or hold your arms firmly at the back of the subject turn out red, correct the image with [Retouch] on the viewing menu (page 66)... or with the supplied software "Picture Motion Browser". Flash light is turned off automatically.) • When the eyes of the eye (retina), causing the "red-eye" phenomenon. When they are accentuated by taking the following steps. Camera Subject Particles (dust, pollen, etc.) in the air How can the "...
Cyber-shot® Handbook
Page 17
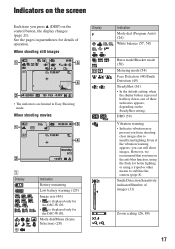
...screen Each time you from shooting clear images due to stabilize the camera (page 8). When shooting movies A Display Indication Battery remaining Low battery warning (125) Image size (46) • is displayed only for the DSC-W150. DRO (59) Vibration warning • Indicates vibration may prevent ... in Easy Shooting mode. Even if the vibration warning appears, you turn on the control button, the display changes (page 21). However, we recommend that you can still shoot images. When shooting still images Display • The indicators are limited in parentheses for better ...
...screen Each time you from shooting clear images due to stabilize the camera (page 8). When shooting movies A Display Indication Battery remaining Low battery warning (125) Image size (46) • is displayed only for the DSC-W150. DRO (59) Vibration warning • Indicates vibration may prevent ... in Easy Shooting mode. Even if the vibration warning appears, you turn on the control button, the display changes (page 21). However, we recommend that you can still shoot images. When shooting still images Display • The indicators are limited in parentheses for better ...
Cyber-shot® Handbook
Page 21
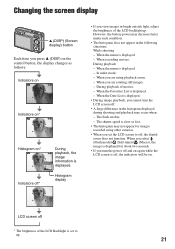
... and on again while the LCD screen is displayed. • During image playback, you cannot turn the LCD screen off , the indicators will be on * Indicators off , the digital zoom does not function. When you are rotating still images. - During playback of the LCD Backlight is displayed. - When the Date List is off... on Indicators on* Histogram on . Histogram display • If you set to off * During playback, the image information is displayed. When you are using other cameras. • When you view images in the following situations: While shooting -
... and on again while the LCD screen is displayed. • During image playback, you cannot turn the LCD screen off , the indicators will be on * Indicators off , the digital zoom does not function. When you are rotating still images. - During playback of the LCD Backlight is displayed. - When the Date List is off... on Indicators on* Histogram on . Histogram display • If you set to off * During playback, the image information is displayed. When you are using other cameras. • When you view images in the following situations: While shooting -

Cyber-shot® Handbook
Page 33
... of the whole image. To undo the zoom, press . In this case, the center is turned on the control button. Viewing images Basic Operations (Index)/ (Playback zoom) button z button v/V/b/B ... the (Playback) button. • If you press the (Playback) button when the camera is powered off, the camera is enlarged. • To store enlarged images, see [Trimming] (page 66). 33... shot using earlier Sony models cannot be played back. Adjust the position with b/B on automatically and set to play back the images. / To view an enlarged image (playback zoom) Press while displaying a still ...
... of the whole image. To undo the zoom, press . In this case, the center is turned on the control button. Viewing images Basic Operations (Index)/ (Playback zoom) button z button v/V/b/B ... the (Playback) button. • If you press the (Playback) button when the camera is powered off, the camera is enlarged. • To store enlarged images, see [Trimming] (page 66). 33... shot using earlier Sony models cannot be played back. Adjust the position with b/B on automatically and set to play back the images. / To view an enlarged image (playback zoom) Press while displaying a still ...

Cyber-shot® Handbook
Page 43
HOME/Menu Using the menu items Basic Operations MENU button 1 Press the MENU button to turn off the function guide (page 79). • The menu will be displayed only during shooting and playback mode. • Different items will become visible depending ... item in playback mode, and press z. 4 Press the MENU button to display the menu. z button v/V/b/B button Control button Function Guide Setting [Function Guide] to [Off] turns off the menu. 43 Learning the various functions -
HOME/Menu Using the menu items Basic Operations MENU button 1 Press the MENU button to turn off the function guide (page 79). • The menu will be displayed only during shooting and playback mode. • Different items will become visible depending ... item in playback mode, and press z. 4 Press the MENU button to display the menu. z button v/V/b/B button Control button Function Guide Setting [Function Guide] to [Off] turns off the menu. 43 Learning the various functions -
Cyber-shot® Handbook
Page 48
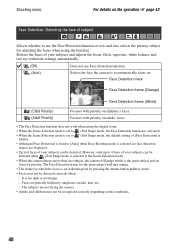
... mode is set focus by sunglasses, masks, hats, etc. - The Face Detection frame for the main subject will turn orange. • The frame for adjusting the focus when using the digital zoom. • When the Scene Selection mode is set to 4 faces of your subjects can be detected when (...Soft Snap) mode is selected in the Scene Selection mode. • When the camera detects more than one subject, the camera will turn green by pressing the shutter...
... mode is set focus by sunglasses, masks, hats, etc. - The Face Detection frame for the main subject will turn orange. • The frame for adjusting the focus when using the digital zoom. • When the Scene Selection mode is set to 4 faces of your subjects can be detected when (...Soft Snap) mode is selected in the Scene Selection mode. • When the camera detects more than one subject, the camera will turn green by pressing the shutter...
Cyber-shot® Handbook
Page 51
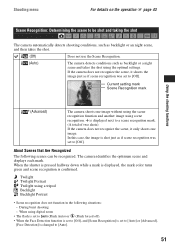
... - When the shutter is pressed halfway down while a mark is displayed, the mark color turns green and scene recognition is displayed next to a scene recognition mark. (A total of two shots) If the camera does not recognize the scene, it shoots the image just as if scene recognition was set ...to [Off]. Twilight Twilight Portrait Twilight using scene recognition. When using digital zoom • The flash is set to (Flash Auto)...
... - When the shutter is pressed halfway down while a mark is displayed, the mark color turns green and scene recognition is displayed next to a scene recognition mark. (A total of two shots) If the camera does not recognize the scene, it shoots the image just as if scene recognition was set ...to [Off]. Twilight Twilight Portrait Twilight using scene recognition. When using digital zoom • The flash is set to (Flash Auto)...
Cyber-shot® Handbook
Page 75
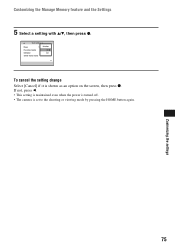
To cancel the setting change Select [Cancel] if it is set to the shooting or viewing mode by pressing the HOME button again. 75 If not, press b. • This setting is maintained even when the power is turned off. • The camera is shown as an option on the screen, then press z. Customizing the settings Customizing the Manage Memory feature and the Settings 5 Select a setting with v/V, then press z.
To cancel the setting change Select [Cancel] if it is set to the shooting or viewing mode by pressing the HOME button again. 75 If not, press b. • This setting is maintained even when the power is turned off. • The camera is shown as an option on the screen, then press z. Customizing the settings Customizing the Manage Memory feature and the Settings 5 Select a setting with v/V, then press z.


