Read This First
Page 1
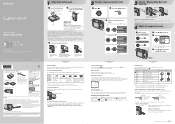
Digital Still Camera Read This First DSC-W100 Operating Instructions Before operating the unit, please read this manual and "User's Guide/Troubleshooting" (separate volume) thoroughly, and retain them for use a "Memory Stick" with v/V, then press z. However, there may cause malfunction. • The following screen appears when the camera... NP-BG1 (1)/Battery case (1) • CD-ROM (Cyber-shot application software) (1) • Operating instructions: "Read This First" (this may be cut off when printing t "User's Guide/Troubleshooting" (page 91) 3) By using the battery charger, ...
Digital Still Camera Read This First DSC-W100 Operating Instructions Before operating the unit, please read this manual and "User's Guide/Troubleshooting" (separate volume) thoroughly, and retain them for use a "Memory Stick" with v/V, then press z. However, there may cause malfunction. • The following screen appears when the camera... NP-BG1 (1)/Battery case (1) • CD-ROM (Cyber-shot application software) (1) • Operating instructions: "Read This First" (this may be cut off when printing t "User's Guide/Troubleshooting" (page 91) 3) By using the battery charger, ...
Read This First
Page 2
...: - Recompose the shot and focus again. Subjects difficult to clearly shoot the background that cannot be in -focus range becomes narrow, and the complete subject may not be displayed on the screen t "User's Guide/Troubleshooting" (page 20) To turn off , the camera is turned on )... display switch) button longer (above ) for still images Before step 2, press v ( ) on the [Digital Zoom] settings and the image quality t "User's Guide/Troubleshooting" (page 49) • You cannot change the zoom scale while shooting a movie. Shoot still images (Scene Selection) 1 Select the desired ...
...: - Recompose the shot and focus again. Subjects difficult to clearly shoot the background that cannot be in -focus range becomes narrow, and the complete subject may not be displayed on the screen t "User's Guide/Troubleshooting" (page 20) To turn off , the camera is turned on )... display switch) button longer (above ) for still images Before step 2, press v ( ) on the [Digital Zoom] settings and the image quality t "User's Guide/Troubleshooting" (page 49) • You cannot change the zoom scale while shooting a movie. Shoot still images (Scene Selection) 1 Select the desired ...
User Guide
Page 1
...DSC-W100 Serial No © 2006 Sony Corporation Enjoying the camera Using the menu Using the Setup screen Using your computer Printing still images Connecting your camera to your Sony dealer regarding this product. Operating Instructions Before operating the unit, please read this product and answers to these numbers whenever you call upon your TV Troubleshooting... No. Printed in the space provided below. Record the serial number in Japan Digital Still Camera User's Guide/ Troubleshooting DSC-W100 "Read This First" (separate volume) Explains the set-up and basic operations ...
...DSC-W100 Serial No © 2006 Sony Corporation Enjoying the camera Using the menu Using the Setup screen Using your computer Printing still images Connecting your camera to your Sony dealer regarding this product. Operating Instructions Before operating the unit, please read this product and answers to these numbers whenever you call upon your TV Troubleshooting... No. Printed in the space provided below. Record the serial number in Japan Digital Still Camera User's Guide/ Troubleshooting DSC-W100 "Read This First" (separate volume) Explains the set-up and basic operations ...
User Guide
Page 12
... a "Memory Stick Duo 67 Using the "Cyber-shot Viewer" (supplied 68 Using your Macintosh computer 72 Printing still images How to print still images 74 Printing images directly using a PictBridge compliant printer 75 Printing at a shop 78 Connecting your camera to your TV Viewing images on a TV screen 80 Troubleshooting Troubleshooting 82 Warning indicators and messages 94...
... a "Memory Stick Duo 67 Using the "Cyber-shot Viewer" (supplied 68 Using your Macintosh computer 72 Printing still images How to print still images 74 Printing images directly using a PictBridge compliant printer 75 Printing at a shop 78 Connecting your camera to your TV Viewing images on a TV screen 80 Troubleshooting Troubleshooting 82 Warning indicators and messages 94...

User Guide
Page 82
Please understand that you give your consent that the contents of the internal memory may be checked when you experience trouble with your camera, try the following solutions. 1 Check the items on the power. 3 Initialize the settings (page 55). 4 Consult your camera to 93. Troubleshooting Troubleshooting If you send your Sony dealer or local authorized Sony service facility. If a code such as "C/E:ss:ss" appears on the screen, see page 94. 2 Remove the battery pack, and insert the battery pack again after about one minute, and turn on pages 83 to be repaired. 82
Please understand that you give your consent that the contents of the internal memory may be checked when you experience trouble with your camera, try the following solutions. 1 Check the items on the power. 3 Initialize the settings (page 55). 4 Consult your camera to 93. Troubleshooting Troubleshooting If you send your Sony dealer or local authorized Sony service facility. If a code such as "C/E:ss:ss" appears on the screen, see page 94. 2 Remove the battery pack, and insert the battery pack again after about one minute, and turn on pages 83 to be repaired. 82

User Guide
Page 83
...First"). • The battery pack is discharged. The power turns off suddenly. • If you do not operate the camera for about three minutes while the power is on the camera again (t step 2 in "Read This First"). • The battery pack is dirty. Replace it with a new one... location (page 99). • The displayed battery remaining differs from the current one. Cannot turn on the camera. • Install the battery pack correctly (t step 1 in "Read This First"). 83 Troubleshooting The battery pack runs down too quickly. • Charge it with a cotton swab, etc., and charge...
...First"). • The battery pack is discharged. The power turns off suddenly. • If you do not operate the camera for about three minutes while the power is on the camera again (t step 2 in "Read This First"). • The battery pack is dirty. Replace it with a new one... location (page 99). • The displayed battery remaining differs from the current one. Cannot turn on the camera. • Install the battery pack correctly (t step 1 in "Read This First"). 83 Troubleshooting The battery pack runs down too quickly. • Charge it with a cotton swab, etc., and charge...

User Guide
Page 85
...image size is set to . • Set the flash to (Flash forced on the screen (page 24). 85 Troubleshooting Only during playback, the date and time are not displayed. Correct the exposure (page 30, t step5 in "... (page 24, t step5 in "Read This First" ). Shooting in the image. Shooting movies. Fuzzy specks appear in images shot using the flash. • Dust in the air reflected the flash light and appeared in Multi Burst mode. - The close-up...; While shooting, the date and time are displayed. Smart zoom does not function. • Set [Digital Zoom] to [8M] or [3:2]. -
...image size is set to . • Set the flash to (Flash forced on the screen (page 24). 85 Troubleshooting Only during playback, the date and time are not displayed. Correct the exposure (page 30, t step5 in "... (page 24, t step5 in "Read This First" ). Shooting in the image. Shooting movies. Fuzzy specks appear in images shot using the flash. • Dust in the air reflected the flash light and appeared in Multi Burst mode. - The close-up...; While shooting, the date and time are displayed. Smart zoom does not function. • Set [Digital Zoom] to [8M] or [3:2]. -

User Guide
Page 87
...function does not work. • You cannot resize movies and Multi Burst images. 87 Troubleshooting The date and time are using a model other than that you cannot restore it. Deleting/Editing images Your camera cannot delete an image. • Cancel the protection (page 43). • You .... • (Screen display switch) button is not a malfunction. Color unevenness may appear rough right after playback starts due to image processing. Your camera cannot play back images. • Press (t step 6 in "Read This First"). • The folder/file name has been changed on your ...
...function does not work. • You cannot resize movies and Multi Burst images. 87 Troubleshooting The date and time are using a model other than that you cannot restore it. Deleting/Editing images Your camera cannot delete an image. • Cancel the protection (page 43). • You .... • (Screen display switch) button is not a malfunction. Color unevenness may appear rough right after playback starts due to image processing. Your camera cannot play back images. • Press (t step 6 in "Read This First"). • The folder/file name has been changed on your ...
User Guide
Page 89
..., then play back the movie from the internal memory or the "Memory Stick Duo". Shoot using "Cyber-shot Viewer," refer to the hard disk of the images is turned on the camera. • Copy them to a folder recognized by noise when you view a movie on a computer...Cyber-shot Viewer" Images are playing back the movie directly from the hard disk (page 61). If the images are using a "Memory Stick Duo" formatted by a computer, you are not displayed even if the folder is also installed automatically. The USB driver is registered in the "My Pictures" folder. 89 Troubleshooting...
..., then play back the movie from the internal memory or the "Memory Stick Duo". Shoot using "Cyber-shot Viewer," refer to the hard disk of the images is turned on the camera. • Copy them to a folder recognized by noise when you view a movie on a computer...Cyber-shot Viewer" Images are playing back the movie directly from the hard disk (page 61). If the images are using a "Memory Stick Duo" formatted by a computer, you are not displayed even if the folder is also installed automatically. The USB driver is registered in the "My Pictures" folder. 89 Troubleshooting...

User Guide
Page 91
...images using your computer cannot play back the data in the (Setup) menu (page 56). 91 Troubleshooting Cannot copy the data stored in the internal memory to [PictBridge] in the internal memory. •...• When having images printed at a digital print shop, ask the shop whether they can be cut off. • When you print an image shot with both edges cut off both edges of ... memory to format the internal memory after copying. The free capacity of the image may be connected to the camera. • Set [USB Connect] to a "Memory Stick Duo". • The "Memory Stick Duo" ...
...images using your computer cannot play back the data in the (Setup) menu (page 56). 91 Troubleshooting Cannot copy the data stored in the internal memory to [PictBridge] in the internal memory. •...• When having images printed at a digital print shop, ask the shop whether they can be cut off. • When you print an image shot with both edges cut off both edges of ... memory to format the internal memory after copying. The free capacity of the image may be connected to the camera. • Set [USB Connect] to a "Memory Stick Duo". • The "Memory Stick Duo" ...

User Guide
Page 93
...pack (t step 1 in microcomputer is discharged. Remove the battery pack, and then, after one minute, insert the battery pack and turn on the camera. • Set the date and time again (t step 2 in "Read This First") or use the AC Adaptor (not supplied). Cannot identify an ... move when you use with a charged battery pack (t Step 1 in "Read This First"). 93 Troubleshooting The lens gets fogged. • Moisture condensation has occurred. The camera becomes warm when you turn off the camera and leave it for a long time. • This is low (The E indicator appears). Turn...
...pack (t step 1 in microcomputer is discharged. Remove the battery pack, and then, after one minute, insert the battery pack and turn on the camera. • Set the date and time again (t step 2 in "Read This First") or use the AC Adaptor (not supplied). Cannot identify an ... move when you use with a charged battery pack (t Step 1 in "Read This First"). 93 Troubleshooting The lens gets fogged. • Moisture condensation has occurred. The camera becomes warm when you turn off the camera and leave it for a long time. • This is low (The E indicator appears). Turn...

User Guide
Page 95
... You are trying to play back a file that cannot be played back on your computer (page 67). Troubleshooting 95 Select a different folder (page 54). Use the flash or mount the camera on this is not compatible with "999" exists on the "Memory Stick Duo" (For example: 123MSDCF and... create more folders • The folder with a name beginning with the camera. (Vibration warning indicator) • Camera shake may occur due to be recorded only using the "Memory Stick Duo" with the same first three digit number already exists on the "Memory Stick Duo". Image size over •...
... You are trying to play back a file that cannot be played back on your computer (page 67). Troubleshooting 95 Select a different folder (page 54). Use the flash or mount the camera on this is not compatible with "999" exists on the "Memory Stick Duo" (For example: 123MSDCF and... create more folders • The folder with a name beginning with the camera. (Vibration warning indicator) • Camera shake may occur due to be recorded only using the "Memory Stick Duo" with the same first three digit number already exists on the "Memory Stick Duo". Image size over •...

User Guide
Page 106
... snap mode t step 5 in "Read This First" Software 68 Specifications 103 Spot metering 36 Spot metering cross hairs ..... 36 Standard 38 T Trimming 47 Troubleshooting 82 TV 80 Twilight mode t step 5 in "Read This First" Twilight portrait mode t step 5 in "Read This First" U Underexposure 14 USB ...Connect 56 Using your camera abroad t step 1 in "Read This First" V VGA t step 4 in "Read This First" Video Out 57 Viewing Movie t step 6 in "Read This First" Still image t step 6 in "Read This First" Viewing menu 41 Vivid 34 Volume t...
... snap mode t step 5 in "Read This First" Software 68 Specifications 103 Spot metering 36 Spot metering cross hairs ..... 36 Standard 38 T Trimming 47 Troubleshooting 82 TV 80 Twilight mode t step 5 in "Read This First" Twilight portrait mode t step 5 in "Read This First" U Underexposure 14 USB ...Connect 56 Using your camera abroad t step 1 in "Read This First" V VGA t step 4 in "Read This First" Video Out 57 Viewing Movie t step 6 in "Read This First" Still image t step 6 in "Read This First" Viewing menu 41 Vivid 34 Volume t...

