
Operating Instructions
Page 5
Trademarks • is a trademark of Sony Corporation. • "Memory Stick," , "Memory Stick PRO," , "Memory Stick Duo," , "Memory Stick PRO Duo," , "MagicGate" and are trademarks of Sony Corporation. • "InfoLITHIUM" is a trademark of Sony Corporation. • Picture Package is capable of reproducing fine images....Macromedia and Flash are trademarks or registered trademarks of Macromedia, Inc. The lens for cameras developed jointly by Carl Zeiss, in Germany, and Sony Corporation, and offers the same quality as examples of pictures in this manual are ...
Trademarks • is a trademark of Sony Corporation. • "Memory Stick," , "Memory Stick PRO," , "Memory Stick Duo," , "Memory Stick PRO Duo," , "MagicGate" and are trademarks of Sony Corporation. • "InfoLITHIUM" is a trademark of Sony Corporation. • Picture Package is capable of reproducing fine images....Macromedia and Flash are trademarks or registered trademarks of Macromedia, Inc. The lens for cameras developed jointly by Carl Zeiss, in Germany, and Sony Corporation, and offers the same quality as examples of pictures in this manual are ...
Operating Instructions
Page 6
... on a TV screen 44 Deleting still images Deleting images 46 Formatting a recording medium 48 Before advanced operations How to setup and operate your camera... 50 Changing the menu settings 50 Changing the items in the SET UP screen 51 How to use the control button 17 Setting the date...18 Changing the language setting 20 Shooting still image Inserting and removing a recording medium 21 Switching the recording medium........ 21 Inserting and removing a "Memory Stick 22 Inserting and removing a CF card ...... 23 Setting the still image size 24 Image size and quality 26 Number of your...
... on a TV screen 44 Deleting still images Deleting images 46 Formatting a recording medium 48 Before advanced operations How to setup and operate your camera... 50 Changing the menu settings 50 Changing the items in the SET UP screen 51 How to use the control button 17 Setting the date...18 Changing the language setting 20 Shooting still image Inserting and removing a recording medium 21 Switching the recording medium........ 21 Inserting and removing a "Memory Stick 22 Inserting and removing a CF card ...... 23 Setting the still image size 24 Image size and quality 26 Number of your...

Operating Instructions
Page 8
... appears ..... 132 Additional information Number of images that can be saved or shooting time 133 Menu items 136 SET UP items 140 Precautions 143 On "Memory Stick 144 On "InfoLITHIUM" battery pack......... 146 Specifications 147 The LCD screen 149 Index Index 154 8
... appears ..... 132 Additional information Number of images that can be saved or shooting time 133 Menu items 136 SET UP items 140 Precautions 143 On "Memory Stick 144 On "InfoLITHIUM" battery pack......... 146 Specifications 147 The LCD screen 149 Index Index 154 8
Operating Instructions
Page 10
... items on the LCD screen, see page 149 to 153. MENU button (50, 136) (Display/LCD screen on/off) button (36) /CF ("Memory Stick"/CF card) switch (21) Jog dial (51) For shooting: Zoom (W/T) button (31) For viewing: / (Playback zoom) button (83)/ (Index) button (42) ...
... items on the LCD screen, see page 149 to 153. MENU button (50, 136) (Display/LCD screen on/off) button (36) /CF ("Memory Stick"/CF card) switch (21) Jog dial (51) For shooting: Zoom (W/T) button (31) For viewing: / (Playback zoom) button (83)/ (Index) button (42) ...
Operating Instructions
Page 11
... Battery insertion slot (13) Battery eject lever (14) CF card insertion slot (23) RESET button (119) Access lamp (22) 4 "Memory Stick" insertion slot (22) 5 • Use a tripod with a screw length of less than 6 5.5 mm (7/32 inch). qa 11 You will be unable to firmly...
... Battery insertion slot (13) Battery eject lever (14) CF card insertion slot (23) RESET button (119) Access lamp (22) 4 "Memory Stick" insertion slot (22) 5 • Use a tripod with a screw length of less than 6 5.5 mm (7/32 inch). qa 11 You will be unable to firmly...
Operating Instructions
Page 13
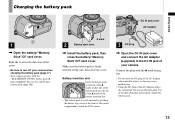
... compartment toward the LCD screen. 3 DC plug Open the DC IN jack cover and connect the AC Adaptor (supplied) to turn off your camera. Use of the dirty plug may cause malfunction. • Clean the DC plug of the mark on the battery insertion slot. •... The battery pack is firmly inserted all the way, then close the battery/"Memory Stick"/CF card cover. Charging the battery pack Getting started 1 2 1 Open the battery/"Memory Stick"/CF card cover. DC IN jack cover AC Adaptor mark 2 Battery eject lever ...
... compartment toward the LCD screen. 3 DC plug Open the DC IN jack cover and connect the AC Adaptor (supplied) to turn off your camera. Use of the dirty plug may cause malfunction. • Clean the DC plug of the mark on the battery insertion slot. •... The battery pack is firmly inserted all the way, then close the battery/"Memory Stick"/CF card cover. Charging the battery pack Getting started 1 2 1 Open the battery/"Memory Stick"/CF card cover. DC IN jack cover AC Adaptor mark 2 Battery eject lever ...
Operating Instructions
Page 14
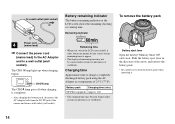
... screen on the LCD screen shows the remaining shooting or viewing time. To remove the battery pack Battery eject lever Open the battery/"Memory Stick"/CF card cover. Battery remaining indicator The battery remaining indicator on /off when charging is completed. • After charging the ...battery pack, disconnect the AC Adaptor both from the DC IN jack of the camera and from a wall outlet (wall socket). To a wall outlet (wall socket) 4 Power cord (mains lead) Connect the ...
... screen on the LCD screen shows the remaining shooting or viewing time. To remove the battery pack Battery eject lever Open the battery/"Memory Stick"/CF card cover. Battery remaining indicator The battery remaining indicator on /off when charging is completed. • After charging the ...battery pack, disconnect the AC Adaptor both from the DC IN jack of the camera and from a wall outlet (wall socket). To a wall outlet (wall socket) 4 Power cord (mains lead) Connect the ...
Operating Instructions
Page 15
...zoom is set to [Single] in the SET UP settings The measurement method is used - min. The zoom is based on CIPA standard. (CIPA: Camera & Imaging Products Association) Viewing still images2) Recording medium NP-FR1 (supplied) No. The battery power is set to [Bright] in the SET UP ...supplied) at about three second intervals Shooting movies3) Recording medium NP-FR1 (supplied) LCD screen LCD screen On Off "Memory Approx. 120 Approx. 170 Stick" min. The camera has been turned on the conditions of use. • The battery capacity decreases as necessary. Note that can be ...
...zoom is set to [Single] in the SET UP settings The measurement method is used - min. The zoom is based on CIPA standard. (CIPA: Camera & Imaging Products Association) Viewing still images2) Recording medium NP-FR1 (supplied) No. The battery power is set to [Bright] in the SET UP ...supplied) at about three second intervals Shooting movies3) Recording medium NP-FR1 (supplied) LCD screen LCD screen On Off "Memory Approx. 120 Approx. 170 Stick" min. The camera has been turned on the conditions of use. • The battery capacity decreases as necessary. Note that can be ...

Operating Instructions
Page 21
... operation of all CF cards. • Copying between media cannot be done with this camera. • For more information about the "Memory Stick", see page 144. • Before using this camera. CompactFlash card Switching the recording medium CF /CF switch Select the recording medium... card or playing back images from a "Memory Stick". Otherwise, satisfactory performance may not be sure to format it using a CF card, be obtained (page 48). This camera is not compliant with the /CF switch. : When recording images onto a "Memory Stick" or playing back images from a CF...
... operation of all CF cards. • Copying between media cannot be done with this camera. • For more information about the "Memory Stick", see page 144. • Before using this camera. CompactFlash card Switching the recording medium CF /CF switch Select the recording medium... card or playing back images from a "Memory Stick". Otherwise, satisfactory performance may not be sure to format it using a CF card, be obtained (page 48). This camera is not compliant with the /CF switch. : When recording images onto a "Memory Stick" or playing back images from a CF...
Operating Instructions
Page 22
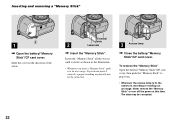
...• Whenever the access lamp is lit, the camera is recording or reading out an image. Never remove the "Memory Stick" or turn off the power at this time. To remove the "Memory Stick" Open the battery/"Memory Stick"/CF card cover, then push the "Memory Stick" to pop it correctly, a proper recording ...or playback may be carried out. 3 Access lamp Close the battery/"Memory Stick"/CF card cover. Insert the "Memory Stick" all the way in the direction of the arrow. The data may not be corrupted. 22 Slide the cover in until it...
...• Whenever the access lamp is lit, the camera is recording or reading out an image. Never remove the "Memory Stick" or turn off the power at this time. To remove the "Memory Stick" Open the battery/"Memory Stick"/CF card cover, then push the "Memory Stick" to pop it correctly, a proper recording ...or playback may be carried out. 3 Access lamp Close the battery/"Memory Stick"/CF card cover. Insert the "Memory Stick" all the way in the direction of the arrow. The data may not be corrupted. 22 Slide the cover in until it...
Operating Instructions
Page 23
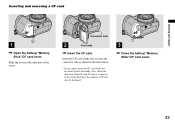
Connector side 2 Front side Insert the CF card. Slide the cover in the wrong direction, the camera or CF card may be damaged. 2 1 3 Close the battery/"Memory Stick"/CF card cover. 23 Insert the CF card all the way in, do not push it in the direction of the CF card... as shown in the illustration. • If you try to insert it forcefully. Shooting still images Inserting and removing a CF card 1 2 1 Open the battery/"Memory Stick"/CF card cover.
Connector side 2 Front side Insert the CF card. Slide the cover in the wrong direction, the camera or CF card may be damaged. 2 1 3 Close the battery/"Memory Stick"/CF card cover. 23 Insert the CF card all the way in, do not push it in the direction of the CF card... as shown in the illustration. • If you try to insert it forcefully. Shooting still images Inserting and removing a CF card 1 2 1 Open the battery/"Memory Stick"/CF card cover.

Operating Instructions
Page 24
... 7M 3:2 5M 3M 1M Image Size CF card eject lever Access lamp • Whenever the access lamp is lit, the camera is ejected. To remove the CF card Open the battery/"Memory Stick"/CF card cover, then push the CF card eject lever so that the CF card is recording or reading...
... 7M 3:2 5M 3M 1M Image Size CF card eject lever Access lamp • Whenever the access lamp is lit, the camera is ejected. To remove the CF card Open the battery/"Memory Stick"/CF card cover, then push the CF card eject lever so that the CF card is recording or reading...

Operating Instructions
Page 28
... 2) For more information about the image quality (compression ratio), see page 52. • When images recorded using earlier Sony models are viewed on the LCD screen of the camera, they all look the same size. • The number of shooting images may differ from these values according to the... of images that can be recorded on a recording medium that has been formatted by this camera, the display may differ from the actual image size. • When the images are played back on this camera. "Memory Stick" (Units: number of images) Capacity 16MB Image size 32MB 64MB 128MB 256MB 512MB...
... 2) For more information about the image quality (compression ratio), see page 52. • When images recorded using earlier Sony models are viewed on the LCD screen of the camera, they all look the same size. • The number of shooting images may differ from these values according to the... of images that can be recorded on a recording medium that has been formatted by this camera, the display may differ from the actual image size. • When the images are played back on this camera. "Memory Stick" (Units: number of images) Capacity 16MB Image size 32MB 64MB 128MB 256MB 512MB...
Operating Instructions
Page 49
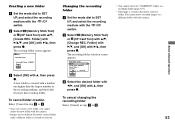
...not be used immediately. • Be sure to format the CF card using this message disappears, the format is complete. • The "Memory Stick" is already formatted, and can be obtained. 49 OK Cancel 2 When you format a CF card, select (CF Card Tool)...;. 3 Select [OK] with / on the control button, then press . Folder: 1 2 Memory Stick Tool 1 Format: OK 2 Create REC. Folder: Cancel Change REC. When this camera. The message "Formatting" appears. Folder: Cancel Change REC. Folder: 1 2 60min Format All data will be erased Ready?...
...not be used immediately. • Be sure to format the CF card using this message disappears, the format is complete. • The "Memory Stick" is already formatted, and can be obtained. 49 OK Cancel 2 When you format a CF card, select (CF Card Tool)...;. 3 Select [OK] with / on the control button, then press . Folder: 1 2 Memory Stick Tool 1 Format: OK 2 Create REC. Folder: Cancel Change REC. When this camera. The message "Formatting" appears. Folder: Cancel Change REC. Folder: 1 2 60min Format All data will be erased Ready?...
Operating Instructions
Page 53
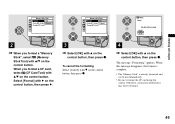
...102 2/2 Folder Name:102MSDCF No. You cannot move recorded images to SET UP, and select the recording medium with the /CF switch. Select (Memory Stick Tool) or (CF Card Tool) with /, [Change REC. Folder] with /, and [OK] with , then press...Folder] with and [OK] with , then press . Changing the recording folder Set the mode dial to a different folder with the camera. • Images are recorded in the newly selected folder. The recording folder selection screen appears. Of Files: 0 Created: 2005 1 1 1:05:34AM...
...102 2/2 Folder Name:102MSDCF No. You cannot move recorded images to SET UP, and select the recording medium with the /CF switch. Select (Memory Stick Tool) or (CF Card Tool) with /, [Change REC. Folder] with /, and [OK] with , then press...Folder] with and [OK] with , then press . Changing the recording folder Set the mode dial to a different folder with the camera. • Images are recorded in the newly selected folder. The recording folder selection screen appears. Of Files: 0 Created: 2005 1 1 1:05:34AM...

Operating Instructions
Page 74
...white balance may not be set to P, S, A, M, SCN or . Press MENU. When the white balance has been adjusted and stored in the memory, (One push) is selected again. • When the indicator flashes slowly, the white balance is recorded in [Auto] mode (except in automatic white... balance mode. • Do not shake or strike the camera while the indicator flashes quickly. • When flash mode is adjusted to the flash conditions. MENU Control button Mode dial &#...
...white balance may not be set to P, S, A, M, SCN or . Press MENU. When the white balance has been adjusted and stored in the memory, (One push) is selected again. • When the indicator flashes slowly, the white balance is recorded in [Auto] mode (except in automatic white... balance mode. • Do not shake or strike the camera while the indicator flashes quickly. • When flash mode is adjusted to the flash conditions. MENU Control button Mode dial &#...

Operating Instructions
Page 89
... connecting the camera directly to a PictBridge compatible printer. See the users manual supplied with the printer for the printer operation method. Printing at a shop (page 95) Just bring the "Memory Stick" or CF card to a print service shop. Direct printing (PictBridge compatible printer) (page 90) You can print by the following methods...
... connecting the camera directly to a PictBridge compatible printer. See the users manual supplied with the printer for the printer operation method. Printing at a shop (page 95) Just bring the "Memory Stick" or CF card to a print service shop. Direct printing (PictBridge compatible printer) (page 90) You can print by the following methods...
Operating Instructions
Page 95
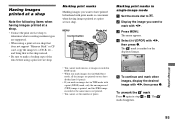
... button Mode dial Marking print marks in Multi Burst mode, all the images are supported. • When using a print service shop that does not support "Memory Stick" or CF card, copy the images to a CD-R, etc., and bring that to the shop instead. • Be sure to mark with a print (DPOF...
... button Mode dial Marking print marks in Multi Burst mode, all the images are supported. • When using a print service shop that does not support "Memory Stick" or CF card, copy the images to a CD-R, etc., and bring that to the shop instead. • Be sure to mark with a print (DPOF...
Operating Instructions
Page 97
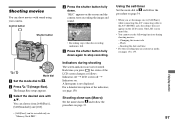
... 134, 135. 97 Enjoying movies The Image Size setup appears. Select the desired size with sound using your camera. A histogram is full. Press the shutter button fully down . "REC" appears on the LCD screen. ... the mode dial to the A/V (MONO) jack, the subject does not appear on the screen and the camera starts recording the image and sound. 60min STD 640 101 REC 00:00:02[00:10:48] •...mode, see page 150. Shooting movies You can be recorded only on "Memory Stick PRO". Press the shutter button fully down again to stop recording.
... 134, 135. 97 Enjoying movies The Image Size setup appears. Select the desired size with sound using your camera. A histogram is full. Press the shutter button fully down . "REC" appears on the LCD screen. ... the mode dial to the A/V (MONO) jack, the subject does not appear on the screen and the camera starts recording the image and sound. 60min STD 640 101 REC 00:00:02[00:10:48] •...mode, see page 150. Shooting movies You can be recorded only on "Memory Stick PRO". Press the shutter button fully down again to stop recording.
Operating Instructions
Page 104
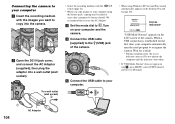
...Memory Stick Access indicators* Switch on MENU "USB Mode Normal" appears on the desktop. Wait for the first time, your computer automatically runs the used program to recognize the camera. Do not operate the computer until the indicators turn red. Proceed to [Normal]. Turn on your computer and the camera.... Connect the USB cable (supplied) to the (USB) jack of the camera. Connect the USB cable to your computer using Windows XP, the AutoPlay wizard automatically...
...Memory Stick Access indicators* Switch on MENU "USB Mode Normal" appears on the desktop. Wait for the first time, your computer automatically runs the used program to recognize the camera. Do not operate the computer until the indicators turn red. Proceed to [Normal]. Turn on your computer and the camera.... Connect the USB cable (supplied) to the (USB) jack of the camera. Connect the USB cable to your computer using Windows XP, the AutoPlay wizard automatically...

