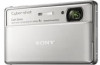
Instruction Manual
Page 2
... sunlight or in a GB car parked in the sun. 2 • Do not incinerate or dispose of the proper configuration for the power outlet. DSC-TX100/TX100V Serial No Model No. AC-UB10/UB10B Serial No WARNING To reduce fire or shock hazard, do not expose the unit to these numbers whenever... you call your Sony dealer regarding this product. IMPORTANT SAFETY INSTRUCTIONS -SAVE THESE INSTRUCTIONS DANGER TO REDUCE THE RISK OF FIRE OR ELECTRIC SHOCK, ...
... sunlight or in a GB car parked in the sun. 2 • Do not incinerate or dispose of the proper configuration for the power outlet. DSC-TX100/TX100V Serial No Model No. AC-UB10/UB10B Serial No WARNING To reduce fire or shock hazard, do not expose the unit to these numbers whenever... you call your Sony dealer regarding this product. IMPORTANT SAFETY INSTRUCTIONS -SAVE THESE INSTRUCTIONS DANGER TO REDUCE THE RISK OF FIRE OR ELECTRIC SHOCK, ...
Instruction Manual
Page 3
...described in the instructions. [ AC Adaptor Connect the AC Adaptor to the nearest wall outlet (wall socket). If some trouble occurs while using a genuine Sony battery charger or a device that may call toll free 1-800-822-8837, or visit http://www.rbrc.org/ Caution: Do not handle damaged or... interference, and (2) this device must accept any questions about this camera only, and should not be used with the same or equivalent type recommended by Sony. • Dispose of small children. • Keep the battery pack dry. • Replace only with other electrical equipment. The UL Mark on ...
...described in the instructions. [ AC Adaptor Connect the AC Adaptor to the nearest wall outlet (wall socket). If some trouble occurs while using a genuine Sony battery charger or a device that may call toll free 1-800-822-8837, or visit http://www.rbrc.org/ Caution: Do not handle damaged or... interference, and (2) this device must accept any questions about this camera only, and should not be used with the same or equivalent type recommended by Sony. • Dispose of small children. • Keep the battery pack dry. • Replace only with other electrical equipment. The UL Mark on ...
Instruction Manual
Page 4
... Rules. Operation is connected. - If this equipment. [ Note: This equipment has been tested and found to comply with Part15 of Conformity Trade Name: SONY Model No.: DSC-TX100V Responsible Party: Sony Electronics Inc. Reorient or relocate the receiving antenna. - [ Regulatory Information Declaration of the FCC Rules. Telephone No.: 858-942-2230 This device complies...
... Rules. Operation is connected. - If this equipment. [ Note: This equipment has been tested and found to comply with Part15 of Conformity Trade Name: SONY Model No.: DSC-TX100V Responsible Party: Sony Electronics Inc. Reorient or relocate the receiving antenna. - [ Regulatory Information Declaration of the FCC Rules. Telephone No.: 858-942-2230 This device complies...
Instruction Manual
Page 5
...documents. For details, please access the following URL: GB http://www.compliance.sony.de/ [ Notice for the recycling of electrical and electronic equipment. GB 5 For Customers in Europe Hereby, Sony Corporation, declares that this product shall not be treated as household waste. ... 3 meters (9.8 feet). [ Attention The electromagnetic fields at the specific frequencies may influence the picture and sound of this DSC-TX100V Digital Still Camera is Sony Corporation, 1-7-1 Konan Minato-ku Tokyo, 108-0075 Japan. The recycling of materials will help to discontinue midway (fail),...
...documents. For details, please access the following URL: GB http://www.compliance.sony.de/ [ Notice for the recycling of electrical and electronic equipment. GB 5 For Customers in Europe Hereby, Sony Corporation, declares that this product shall not be treated as household waste. ... 3 meters (9.8 feet). [ Attention The electromagnetic fields at the specific frequencies may influence the picture and sound of this DSC-TX100V Digital Still Camera is Sony Corporation, 1-7-1 Konan Minato-ku Tokyo, 108-0075 Japan. The recycling of materials will help to discontinue midway (fail),...
Instruction Manual
Page 6
.... If you should be caused by qualified service staff only. On certain batteries this product or battery, please contact your local Civic Office, your nearest Sony service station. [ Disposal of waste batteries (applicable in the European Union and other batteries, please view the section on the packaging indicates that for mercury...
.... If you should be caused by qualified service staff only. On certain batteries this product or battery, please contact your local Civic Office, your nearest Sony service station. [ Disposal of waste batteries (applicable in the European Union and other batteries, please view the section on the packaging indicates that for mercury...
Instruction Manual
Page 7
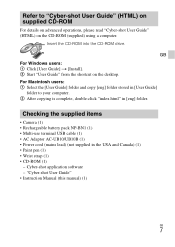
GB For Windows users: 1 Click [User Guide] t [Install]. 2 Start "User Guide" from the shortcut on the CD-ROM (supplied) using a computer. "Cyber-shot User Guide" • Instruction Manual (this manual) (1) GB 7 Checking the supplied items • Camera (1) • Rechargeable battery pack NP-BN1 (1) • Multi-use terminal USB cable (1) • AC Adaptor AC-UB10/UB10B (1) • Power cord (mains lead) (not supplied in [eng] folder. Cyber-shot application software - For Macintosh users: 1 Select the [User Guide] folder and copy [eng] folder stored in [User Guide] folder to "...
GB For Windows users: 1 Click [User Guide] t [Install]. 2 Start "User Guide" from the shortcut on the CD-ROM (supplied) using a computer. "Cyber-shot User Guide" • Instruction Manual (this manual) (1) GB 7 Checking the supplied items • Camera (1) • Rechargeable battery pack NP-BN1 (1) • Multi-use terminal USB cable (1) • AC Adaptor AC-UB10/UB10B (1) • Power cord (mains lead) (not supplied in [eng] folder. Cyber-shot application software - For Macintosh users: 1 Select the [User Guide] folder and copy [eng] folder stored in [User Guide] folder to "...
Instruction Manual
Page 8
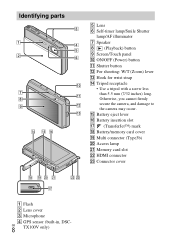
...;) mark R Battery/memory card cover S Multi connector (Type3b) T Access lamp U Memory card slot V HDMI connector W Connector cover A Flash B Lens cover C Microphone D GPS sensor (built-in, DSC- Identifying parts E Lens F Self-timer lamp/Smile Shutter lamp/AF illuminator G Speaker H (Playback) button I Screen/Touch panel J ON/OFF (Power) button K Shutter button L For shooting...; Use a tripod with a screw less than 5.5 mm (7/32 inches) long. Otherwise, you cannot firmly secure the camera, and damage to the camera may occur. GB 8 TX100V only)
...;) mark R Battery/memory card cover S Multi connector (Type3b) T Access lamp U Memory card slot V HDMI connector W Connector cover A Flash B Lens cover C Microphone D GPS sensor (built-in, DSC- Identifying parts E Lens F Self-timer lamp/Smile Shutter lamp/AF illuminator G Speaker H (Playback) button I Screen/Touch panel J ON/OFF (Power) button K Shutter button L For shooting...; Use a tripod with a screw less than 5.5 mm (7/32 inches) long. Otherwise, you cannot firmly secure the camera, and damage to the camera may occur. GB 8 TX100V only)

Instruction Manual
Page 9
Make sure that the battery eject lever locks after insertion. Charging the battery pack For customers in the USA, Canada Power cord (Mains lead) For customers in countries/regions other than the USA and Canada Power/Charge lamp Lit: Charging Off: Charging finished GB 9 Inserting the battery pack Eject lever GB 1 Open the cover. 2 Insert the battery pack. • While pressing the battery eject lever, insert the battery pack as illustrated.
Make sure that the battery eject lever locks after insertion. Charging the battery pack For customers in the USA, Canada Power cord (Mains lead) For customers in countries/regions other than the USA and Canada Power/Charge lamp Lit: Charging Off: Charging finished GB 9 Inserting the battery pack Eject lever GB 1 Open the cover. 2 Insert the battery pack. • While pressing the battery eject lever, insert the battery pack as illustrated.
Instruction Manual
Page 10
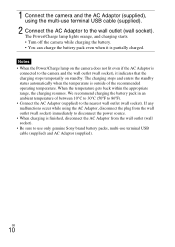
... the power source. • When charging is finished, disconnect the AC Adaptor from the wall outlet (wall socket). • Be sure to use only genuine Sony brand battery packs, multi-use terminal USB cable (supplied). 2 Connect the AC Adaptor to the camera and the wall outlet (wall socket), it is outside...
... the power source. • When charging is finished, disconnect the AC Adaptor from the wall outlet (wall socket). • Be sure to use only genuine Sony brand battery packs, multi-use terminal USB cable (supplied). 2 Connect the AC Adaptor to the camera and the wall outlet (wall socket), it is outside...
Instruction Manual
Page 11
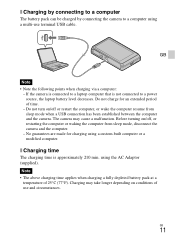
Do not charge for charging using the AC Adaptor (supplied). Note • The above charging time applies when charging a fully depleted battery pack at a temperature of time. - Before turning on/off or restart the computer, or wake the computer resume from sleep mode, disconnect the camera and the computer. - x Charging time The charging time is not connected to a computer using a multi-use and circumstances. Do not turn on conditions of use terminal USB cable. No guarantees are made for an extended period of 25°C (77°F). If the camera is connected to a laptop ...
Do not charge for charging using the AC Adaptor (supplied). Note • The above charging time applies when charging a fully depleted battery pack at a temperature of time. - Before turning on/off or restart the computer, or wake the computer resume from sleep mode, disconnect the camera and the computer. - x Charging time The charging time is not connected to a computer using a multi-use and circumstances. Do not turn on conditions of use terminal USB cable. No guarantees are made for an extended period of 25°C (77°F). If the camera is connected to a laptop ...
Instruction Manual
Page 12
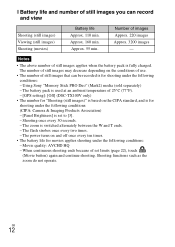
Using Sony "Memory Stick PRO Duo" (Mark2) media (sold separately) - The flash strobes once every two times. - GB 12 Approx. 160 min. Approx. 55 min. The power ... the W and T ends. - Shooting once every 30 seconds. - The battery pack is used at an ambient temperature of 25°C (77°F). - [GPS setting]: [Off] (DSC-TX100V only) • The number for "Shooting (still images)" is based on the conditions of use. • The number of still images that can record and...
Using Sony "Memory Stick PRO Duo" (Mark2) media (sold separately) - The flash strobes once every two times. - GB 12 Approx. 160 min. Approx. 55 min. The power ... the W and T ends. - Shooting once every 30 seconds. - The battery pack is used at an ambient temperature of 25°C (77°F). - [GPS setting]: [Off] (DSC-TX100V only) • The number for "Shooting (still images)" is based on the conditions of use. • The number of still images that can record and...
Instruction Manual
Page 13
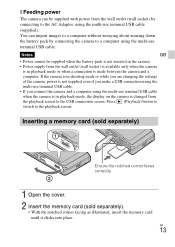
GB 13 Inserting a memory card (sold separately) Ensure the notched corner faces correctly. 1 Open the cover. 2 Insert the memory card (sold separately). • With the notched corner facing as illustrated, insert the memory card until it clicks into place. x Feeding power The camera can import images to a computer without worrying about wearing down the battery pack by connecting to the playback screen. Notes GB • Power cannot be supplied with power from the playback screen to the USB connection screen. If the camera is in shooting mode or while you are changing the ...
GB 13 Inserting a memory card (sold separately) Ensure the notched corner faces correctly. 1 Open the cover. 2 Insert the memory card (sold separately). • With the notched corner facing as illustrated, insert the memory card until it clicks into place. x Feeding power The camera can import images to a computer without worrying about wearing down the battery pack by connecting to the playback screen. Notes GB • Power cannot be supplied with power from the playback screen to the USB connection screen. If the camera is in shooting mode or while you are changing the ...
Instruction Manual
Page 14
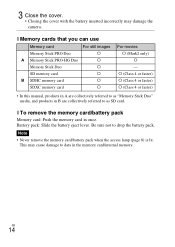
Note • Never remove the memory card/battery pack when the access lamp (page 8) is lit. x To remove the memory card/battery pack Memory card: Push the memory card in B are collectively referred to as "Memory Stick Duo" media, and products in once. This may damage the camera. Battery pack: Slide the battery eject lever. x Memory cards that you can use Memory card For still images Memory Stick PRO Duo a A Memory Stick PRO-HG Duo a Memory Stick Duo a SD memory card a B SDHC memory card a SDXC memory card a For movies a (Mark2 only) a - 3 Close the cover. &#...
Note • Never remove the memory card/battery pack when the access lamp (page 8) is lit. x To remove the memory card/battery pack Memory card: Push the memory card in B are collectively referred to as "Memory Stick Duo" media, and products in once. This may damage the camera. Battery pack: Slide the battery eject lever. x Memory cards that you can use Memory card For still images Memory Stick PRO Duo a A Memory Stick PRO-HG Duo a Memory Stick Duo a SD memory card a B SDHC memory card a SDXC memory card a For movies a (Mark2 only) a - 3 Close the cover. &#...

Instruction Manual
Page 15
... [NEXT]. • Midnight is indicated as 12:00 AM, and noon as 12:00 PM. 5 Touch [OK]. 6 Select the desired display color and [GPS setting] (DSC-TX100V), following the instructions on the screen, then touch [OK]. • The battery pack will run out quickly if you set [GPS setting] to [On...
... [NEXT]. • Midnight is indicated as 12:00 AM, and noon as 12:00 PM. 5 Touch [OK]. 6 Select the desired display color and [GPS setting] (DSC-TX100V), following the instructions on the screen, then touch [OK]. • The battery pack will run out quickly if you set [GPS setting] to [On...
Instruction Manual
Page 16
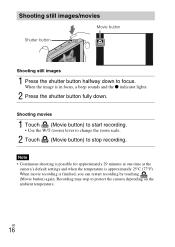
Shooting still images/movies Movie button Shutter button Shooting still images 1 Press the shutter button halfway down . Shooting movies 1 Touch (Movie button) to start recording. • Use the W/T (zoom) lever to change the zoom scale. 2 Touch (Movie button) to focus. GB 16 When movie recording is in focus, a beep sounds and the z indicator lights. 2 Press the shutter button fully down to stop to protect the camera depending on the ambient temperature. When the image is finished, you can restart recording by touching (Movie button) again. Recording may stop recording. ...
Shooting still images/movies Movie button Shutter button Shooting still images 1 Press the shutter button halfway down . Shooting movies 1 Touch (Movie button) to start recording. • Use the W/T (zoom) lever to change the zoom scale. 2 Touch (Movie button) to focus. GB 16 When movie recording is in focus, a beep sounds and the z indicator lights. 2 Press the shutter button fully down to stop to protect the camera depending on the ambient temperature. When the image is finished, you can restart recording by touching (Movie button) again. Recording may stop recording. ...

Instruction Manual
Page 17
Viewing images GB (Playback) 1 Press the (Playback) button. • When images on a memory card recorded with other cameras are played back on the screen. • To play back movies, touch (Playback) in the center of the screen. • To zoom in, touch the image being played back. x Deleting an image 1 Touch (Delete) t [This Image]. GB 17 x Selecting next/previous image Touch (Next)/ (Previous) on this camera, the registration screen for the data file appears. x Returning to shooting images Touch . • You can also return to shooting mode by pressing the shutter button halfway ...
Viewing images GB (Playback) 1 Press the (Playback) button. • When images on a memory card recorded with other cameras are played back on the screen. • To play back movies, touch (Playback) in the center of the screen. • To zoom in, touch the image being played back. x Deleting an image 1 Touch (Delete) t [This Image]. GB 17 x Selecting next/previous image Touch (Next)/ (Previous) on this camera, the registration screen for the data file appears. x Returning to shooting images Touch . • You can also return to shooting mode by pressing the shutter button halfway ...

Instruction Manual
Page 18
Icon guide: Search the function and meaning of the screen while viewing. 2 Select a search method from [In-Camera Guide]. GB 18 This allows you to search the camera's functions according to your needs. 1 Touch (In-Camera Guide). • The mark will appear on the bottom right of displayed icons. Troubleshooting: Search common problems and their solution. Keyword: Search functions by key words. In-Camera Guide This camera contains an internal function guide. History: Display the last 10 items displayed in shooting/viewing mode. Objective guide: Search functions according ...
Icon guide: Search the function and meaning of the screen while viewing. 2 Select a search method from [In-Camera Guide]. GB 18 This allows you to search the camera's functions according to your needs. 1 Touch (In-Camera Guide). • The mark will appear on the bottom right of displayed icons. Troubleshooting: Search common problems and their solution. Keyword: Search functions by key words. In-Camera Guide This camera contains an internal function guide. History: Display the last 10 items displayed in shooting/viewing mode. Objective guide: Search functions according ...
Instruction Manual
Page 19
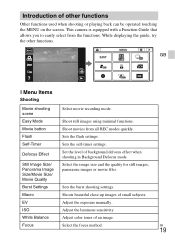
Easy Mode Shoot still images using minimal functions. Movie button Shoot movies from the functions. Focus Select the focus method. Burst Settings Sets the burst shooting settings. Introduction of other functions. Self-Timer Sets the self-timer settings. Flash Sets the flash settings. GB 19 This camera is equipped with a Function Guide that allows you to easily select from all REC modes quickly. EV Adjust the exposure manually. While displaying the guide, try the other functions Other functions used when shooting or playing back can be operated ...
Easy Mode Shoot still images using minimal functions. Movie button Shoot movies from the functions. Focus Select the focus method. Burst Settings Sets the burst shooting settings. Introduction of other functions. Self-Timer Sets the self-timer settings. Flash Sets the flash settings. GB 19 This camera is equipped with a Function Guide that allows you to easily select from all REC modes quickly. EV Adjust the exposure manually. While displaying the guide, try the other functions Other functions used when shooting or playing back can be operated ...
Instruction Manual
Page 20
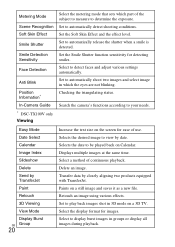
... products equipped with TransferJet. Metering Mode Scene Recognition Soft Skin Effect Smile Shutter Smile Detection Sensitivity Face Detection Anti Blink Position Information* In-Camera Guide * DSC-TX100V only Viewing Select the metering mode that sets which the eyes are not blinking. Set the Smile Shutter function sensitivity for images. Selects the desired...
... products equipped with TransferJet. Metering Mode Scene Recognition Soft Skin Effect Smile Shutter Smile Detection Sensitivity Face Detection Anti Blink Position Information* In-Camera Guide * DSC-TX100V only Viewing Select the metering mode that sets which the eyes are not blinking. Set the Smile Shutter function sensitivity for images. Selects the desired...
Instruction Manual
Page 21
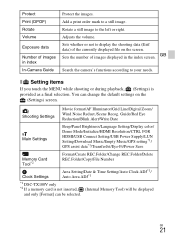
.../Create REC.Folder/Change REC.Folder/Delete REC.Folder/Copy/File Number Clock Settings Area Setting/Date & Time Setting/Auto Clock ADJ*1/ Auto Area ADJ*1 *1 DSC-TX100V only *2 If a memory card is provided as a final selection. Protect Print (DPOF) Rotate Volume Exposure data Number of images displayed in index In-Camera Guide...
.../Create REC.Folder/Change REC.Folder/Delete REC.Folder/Copy/File Number Clock Settings Area Setting/Date & Time Setting/Auto Clock ADJ*1/ Auto Area ADJ*1 *1 DSC-TX100V only *2 If a memory card is provided as a final selection. Protect Print (DPOF) Rotate Volume Exposure data Number of images displayed in index In-Camera Guide...
